Section Summary
🔐 What Are Azure Locks?
Azure Locks help prevent accidental changes to important resources. Whether it’s a virtual machine, storage account, or even an entire resource group, you can apply a lock to avoid unintentional deletion or modification.
🚫 Types of Locks
Azure provides two types of locks:
- CanNotDelete
- Users can read and modify the resource
- But cannot delete it
- Useful when you still need to update the resource, but want to prevent accidental removal
- ReadOnly
- Users can only view the resource
- They cannot make any changes or perform operations
- This acts like a stricter version of setting a resource to “view-only” regardless of user permissions
👤 Who Can Create or Remove Locks?
Only users with specific roles can add or remove locks:
- Owner
- User Access Administrator
These roles ensure that only high-level admins have control over protecting critical infrastructure.
⚙️ How to Apply a Lock
Every Azure resource, resource group, and subscription has a “Locks” blade under its Settings section in the Azure portal.
From here, you can:
- Create a new lock
- Select its type (CanNotDelete or ReadOnly)
- Optionally add a note describing its purpose
✅ Why Use Azure Locks?
Azure Locks are essential for:
- Protecting production resources from being accidentally removed
- Enforcing operational discipline in shared environments
- Adding an extra layer of control that overrides role-based access permissions
Even if a user has Contributor access, a lock will override their ability to modify or delete the resource.
Azure Locks Demo
Admins can lock a resource, or resource group or subscription to prevent users from accidentally deleting or modifying a resource.
Lock overrides user permissions.
We can set lock to :
1 – CannotDelete
2 – ReadOnly
Who can deploy/delete locks?
1 – Owner
2 – User Access Administrator
How to deploy lock
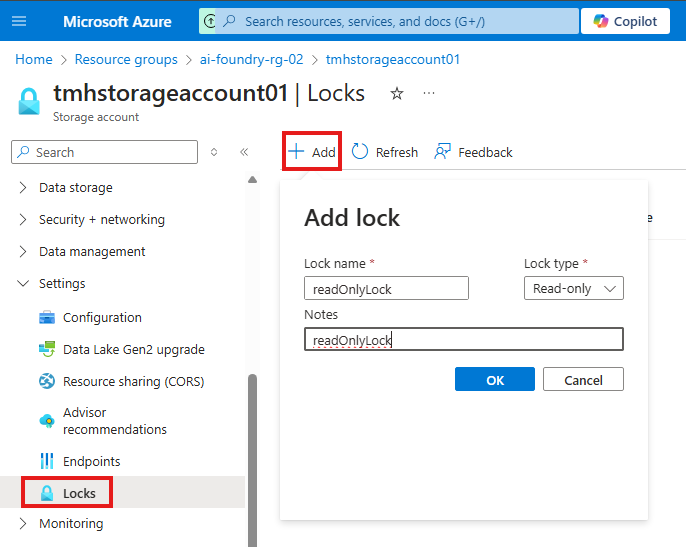
All resource has Lock blade under settings menu, where we create lock.
Once the read-only lock is applied, users cannot make any modification to property or state of the resource.
If delete lock is applied, we can modify buy we cannot delete the resource.
Section Summary
🔒 What is Azure Network Security Group (NSG)?
Azure Network Security Group (NSG) is a simple but powerful tool used to control the flow of network traffic to and from Azure resources, such as virtual machines (VMs), within a virtual network.
NSGs help ensure only approved traffic can reach your resources — much like a firewall for your Azure environment.
📦 How NSG Works
NSGs use a set of rules to allow or deny traffic. These rules are based on a concept called a 5-tuple hash, which considers:
- Source IP address
- Source port
- Destination IP address
- Destination port
- Protocol (TCP/UDP)
Based on these factors, Azure decides whether to permit or block traffic. The evaluation happens at Layer 3 and Layer 4 of the OSI model.
🔁 NSG vs Azure Firewall
While NSGs are great for basic traffic filtering, they are not full-featured firewalls. In contrast:
- NSG: Lightweight, basic filtering (Layer 3 & 4), applied at VM NIC or subnet level.
- Azure Firewall: Fully managed, supports Layer 3, 4, and 7 filtering, with more advanced features like FQDN filtering, logging, and threat intelligence.
Use NSGs for simple filtering needs and Azure Firewall when you require deep packet inspection and policy enforcement.
⚙️ How to Set Up NSG
- Create an NSG from the Azure portal.
- Create a Virtual Network where you want to apply the NSG.
- Create a VM, selecting the NSG and VNet during setup.
🔁 NSG Rules: Defaults and Custom
Every NSG comes with a set of default rules:
- These cannot be modified or deleted.
- They typically allow internal communication and deny all inbound traffic by default.
You can add your own inbound and outbound rules to control access more precisely.
👉 Lower priority numbers mean higher priority. For example, a rule with priority 100 will override one with priority 200.
Example: You can add a rule to allow RDP (port 3389) so you can connect to your VM from your local machine.
✅ Why NSG Matters
NSGs are essential for:
- Enforcing network segmentation
- Protecting resources from unwanted traffic
- Giving you precise control over who can access what in your virtual network
They are lightweight, cost-effective, and easy to manage — making them a first line of defense for your Azure workloads.
Azure Network Security Group
Azure Network Security Group (NSG) is used to filter traffic to and from Azure resources in a Azure virtual network.
Contain rules, that allow or deny traffic from in and out of Azure resources.
Evaluation of these rule are done using a 5-tuple hash.
5-tuple hash takes values from IP address and port number of source and destination and then it associates NSG to a virtual network or NIC of a VM, and it works on layer 3 or layer 4 of OSI model.
NSG is a simple firewall, Azure Firewall has more capabilities.
Azure Firewall unlike NSG is fully managed and can do Layer 3, 4, 7 filtering.
Create NSG
Now create a virtual network that will be protected by this NSG.
Now create a VM and select the created NSG and VNet.
In the created NSG there will be some default rules:
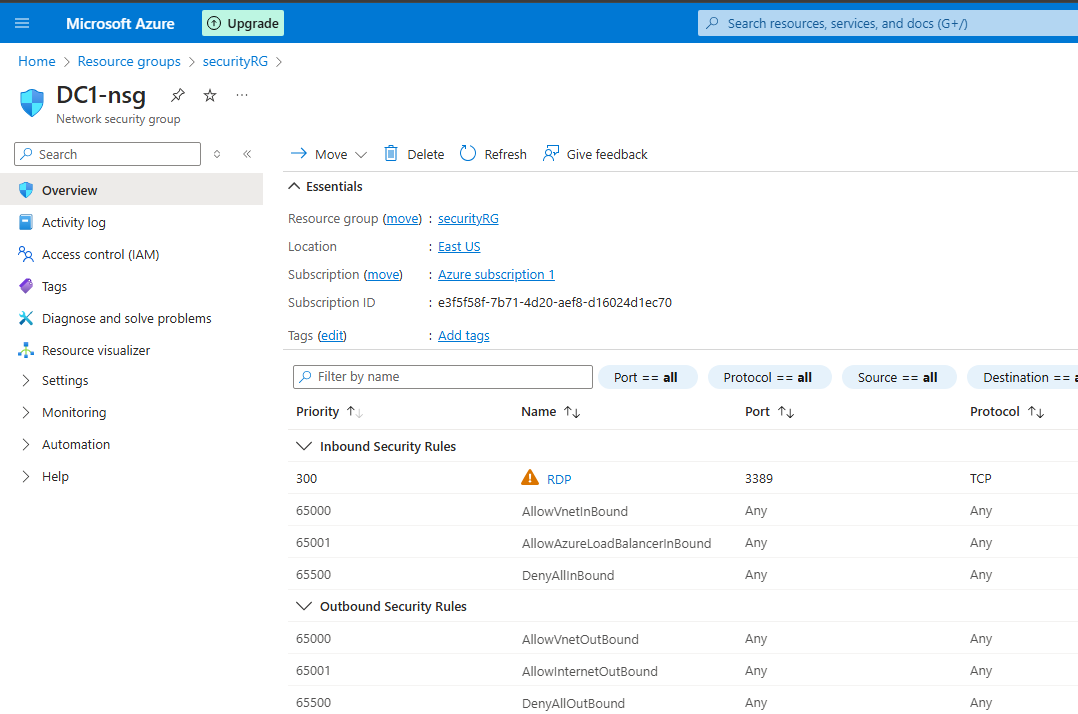
These rules cannot be modified or deleted.
From settings we can add inbound and outbound rules for that NSG, that will allow or deny connection
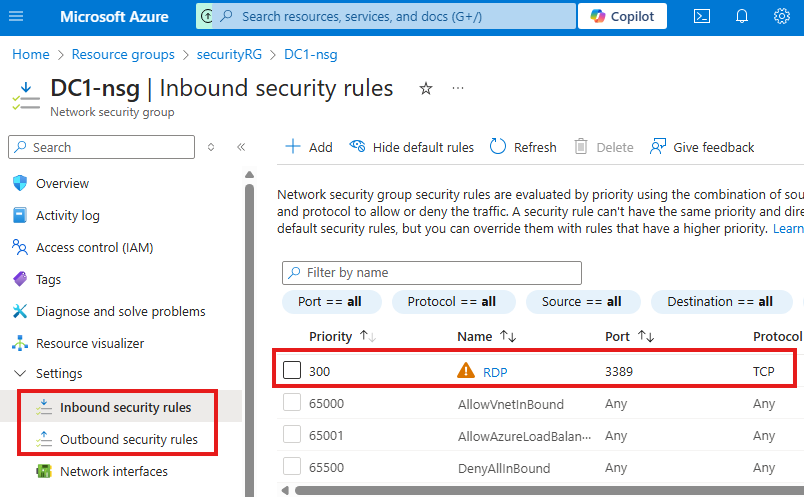
Lowest number means highest priority
Here we have added a rule to allow RDP connection to the VM.
Section Summary
🔐 What Is Azure Disk Encryption?
Azure Disk Encryption is a feature that helps secure your virtual machines (VMs) by encrypting their operating system and data disks. This means even if someone gains access to the physical disk, they won’t be able to read the data without the right keys.
- For Windows VMs, Azure uses BitLocker.
- For Linux VMs, it uses DM-Crypt.
🔑 Why Use Disk Encryption?
- Protects sensitive data stored in VMs.
- Ensures compliance with security and privacy standards.
- Adds an extra layer of protection in case of unauthorized access.
🧰 How It Works
To encrypt a VM:
- Create a Key Vault – A secure place to store encryption keys.
- Enable encryption on the VM using the Key Vault.
- Verify that encryption is active (you’ll see a lock icon on the drive inside the VM).
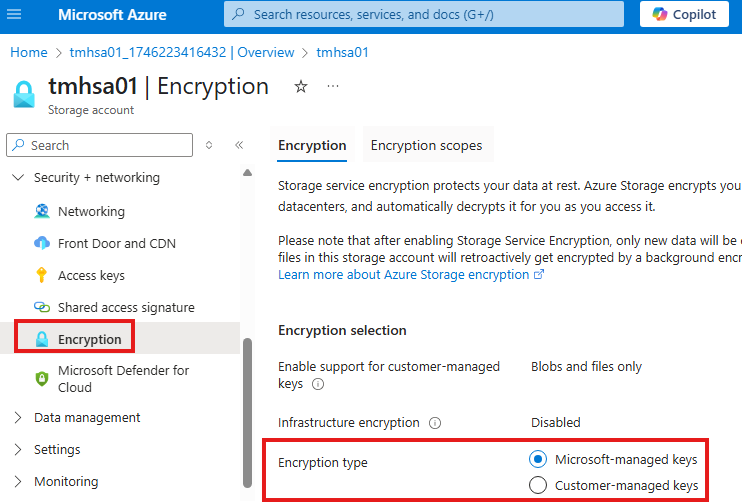
🗄️ Encryption in Storage Accounts
Azure automatically encrypts any data stored in storage accounts (like files, blobs, etc.).
- By default, it uses Microsoft-managed keys.
- You can also choose to use your own encryption keys, known as customer-managed keys.
To make this work:
- You store your key in Azure Key Vault.
- You give permission to the storage account to use this key.
🧱 Infrastructure-Level Encryption
Besides encrypting your data, Azure can also encrypt the underlying infrastructure—this means there’s an extra, deeper layer of encryption to safeguard against rare attacks.
🔄 Key Auto-Rotation
Azure Key Vault supports auto-rotation of keys.
This means your encryption keys can automatically update on a regular schedule, helping to keep your environment secure without manual effort.
📝 Important Notes
- Encryption is often enabled during VM or storage account setup, but you can configure it later too.
- When encryption is active, the VM might restart briefly.
- Permissions are important – you need to allow the right resources (like storage accounts or apps) to access the keys.
✅ In Short
Azure Disk Encryption helps keep your data safe and secure by encrypting virtual machine disks and storage. It uses powerful tools like Key Vault and BitLocker, and it supports automated key management, making it easy for organizations to protect critical information in the cloud.
This is a must-have feature for anyone serious about cloud security.
Azure Disk Encryption
Azure Disk Encryption encrypts OS and data disks of Azure VM using CPU of the VM using features:
1 – Bit locker for windows
2 – DM-Crypt for Linux
Types of encryption
1 – Encryption at rest
2 – Server side encryption
Steps
1 – Create a key vault
az keyvault create \
  --name "Encrypted-VM-KeyVault" \
  --resource-group "Encrypted-VMs" \
  --location eastus \
  --enabled-for-disk-encryption
az keyvault create | Command to create a new Key Vault |
--name "Encrypted-VM-KeyVault" | Name of the Key Vault |
--resource-group "Encrypted-VMs" | Resource group in which the Key Vault will be created |
--location eastus | Azure region (must match or be compatible with resources using the Key Vault) |
--enabled-for-disk-encryption | Important flag that enables this Key Vault to be used with Azure Disk Encryption (ADE) for encrypting VM disks |
2 – Enable encryption
az vm encryption enable \
--resource-group Encrypted-VMs \
--name WinVM \
--disk-encryption-keyvault Encrypted-VM-KeyVault
--resource-group Encrypted-VMs | The resource group containing the VM |
--name WinVM | The name of the virtual machine to encrypt |
--disk-encryption-keyvault Encrypted-VM-KeyVault | The name of the Key Vault where the encryption secrets will be stored |
3 – Verify encryption
az vm encryption show --name WinVM -g Encrypted-VMsThis shows the current disk encryption status of the VM WinVM in the resource group Encrypted-VMs.
It will return JSON with details like:
osDisk→ Whether it’s encrypted, and the encryption settingsdataDisk→ Same as above for any data disksencryptionSettings→ Includes encryption type, key vault URL, volume type, etc.progressMessage→ Status message (e.g., Encryption succeeded, Encryption in progress, etc.)
{
"osDisk": {
"encryptionSettings": [
{
"enabled": true,
"diskEncryptionKey": {
"sourceVault": {
"id": "/subscriptions/xxx/resourceGroups/Encrypted-VMs/providers/Microsoft.KeyVault/vaults/Encrypted-VM-KeyVault"
},
"secretUrl": "https://Encrypted-VM-KeyVault.vault.azure.net/secrets/…"
}
}
]
},
"dataDisk": {
"encryptionSettings": []
},
"progressMessage": "Encryption succeeded for all volumes"
}
If you’re scripting or automating, you can filter output like this:
az vm encryption show --name WinVM -g Encrypted-VMs --query "osDisk.encryptionSettings[0].enabled"4 – To verify physically
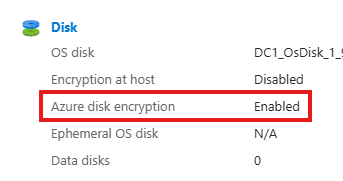
RDP into VM and go to file explorer:

the lock symbol indicate that disk has been encrypted.
We can also check key vault for configuration and secret used for encryption
Encryption At Rest : Storage Account
While creating storage account we can see that encryption is enabled using Microsoft managed keys, we can also use customer managed keys.
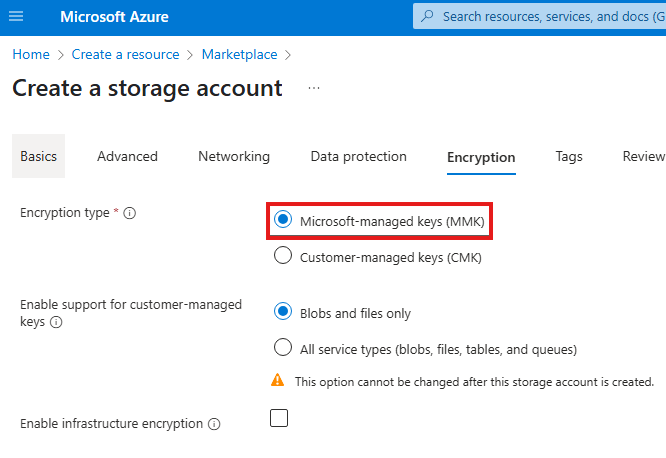
When we upload anything to storage account Microsoft will encrypt it using their keys, by default.
We can switch to customer managed keys from encryption blade of storage account.
We can generate and use our own keys for encryption
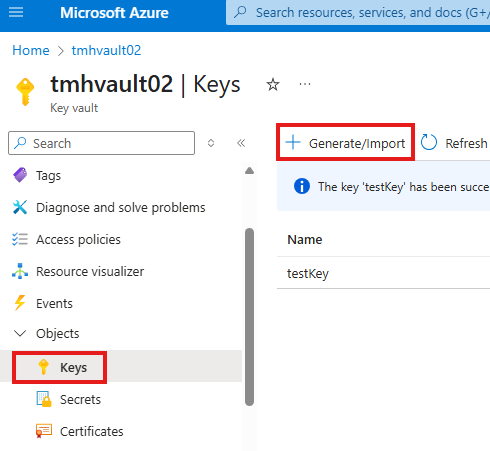
Now, we can go to storage account and select this key for encryption
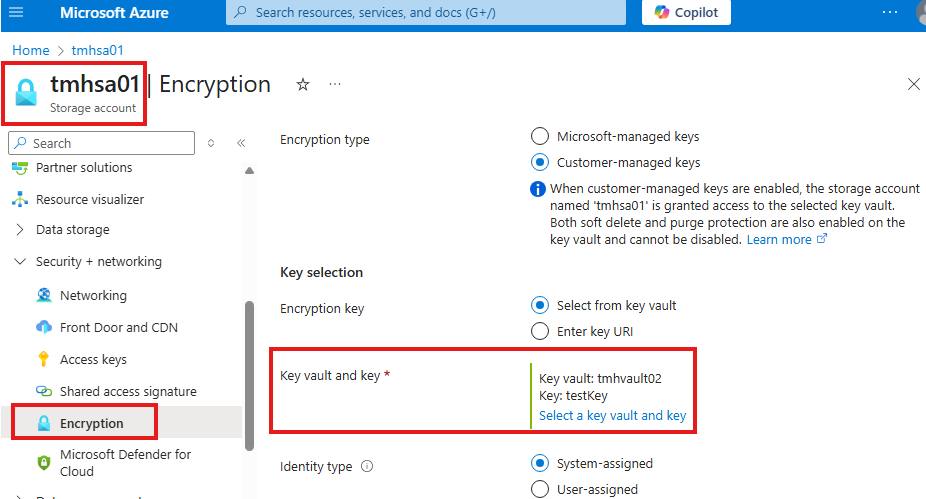
but we may get an error:
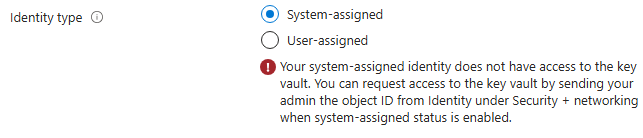
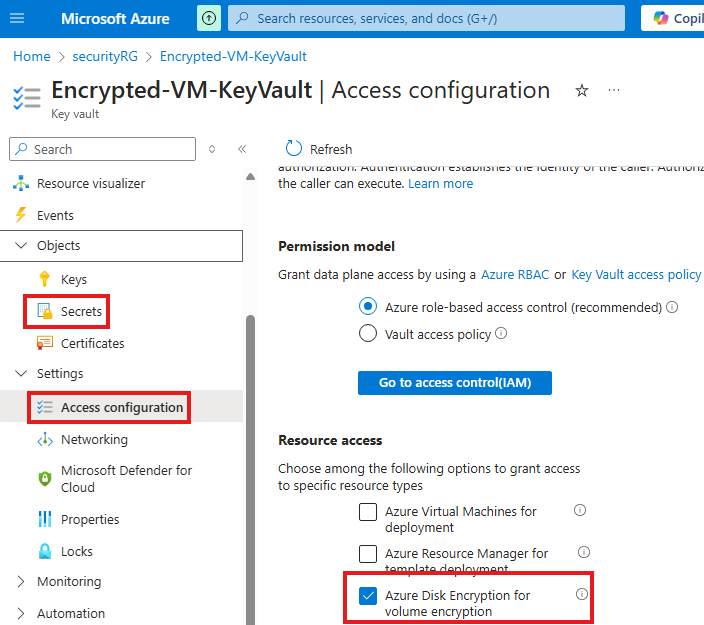
That is because, storage account do not have permission to use this key in key vault.
Like we assigned RBAC roles to users and applications to use the secret from key vault, we need to provide a RBAC role of Key vault crypto service encryption user to storage account.
Service in Azure like storage account has identity called managed identity.
To do that we have to go to Access control (IAM) blade of key vault
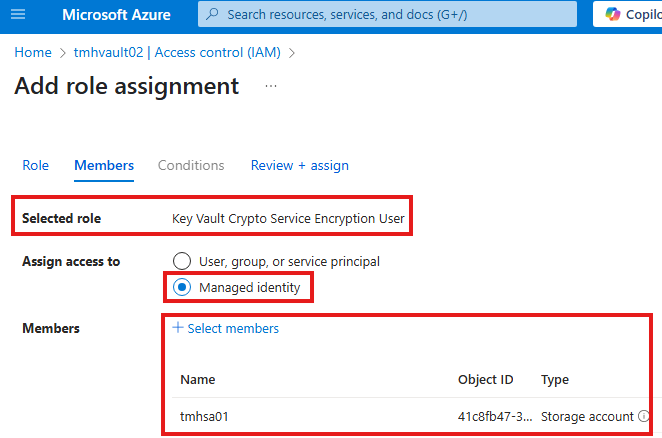
Assign the RBAC role of Key vault crypto service encryption user to managed identity of storage account.
Encryption At Infrastructure level
Beside encrypting data, we can encrypt infrastructure as well.
This is like a double layer of encryption, in case 1 encryption key got compromised.
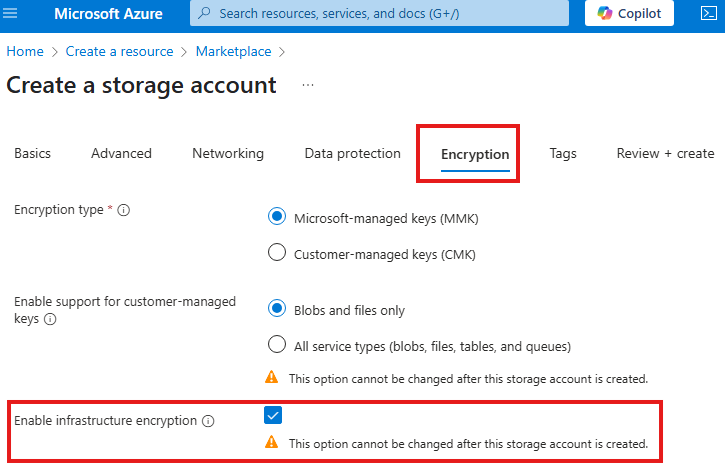
We do this while creating the storage account.
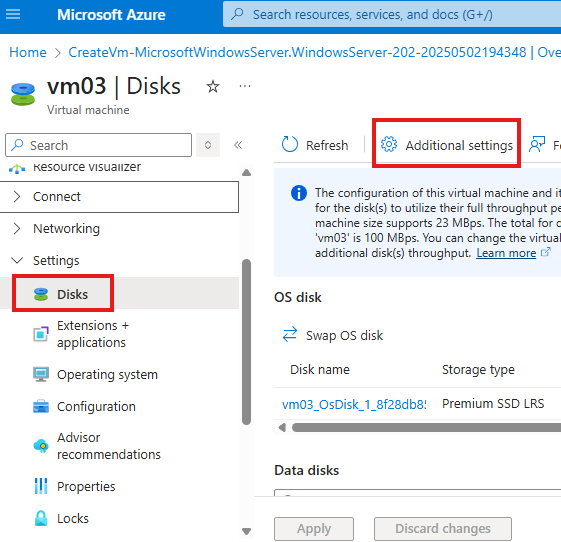
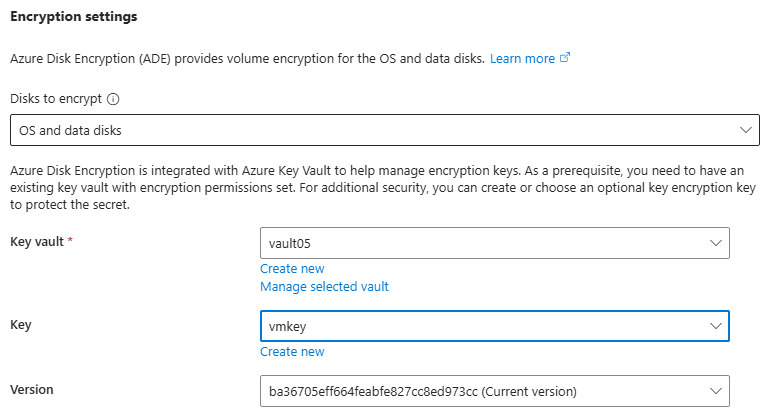
Azure Disk Encryption using portal UI
Create a VM, in Azure portal with additional disk attached.
RDP to VM and initialize disk and create new volume if needed.
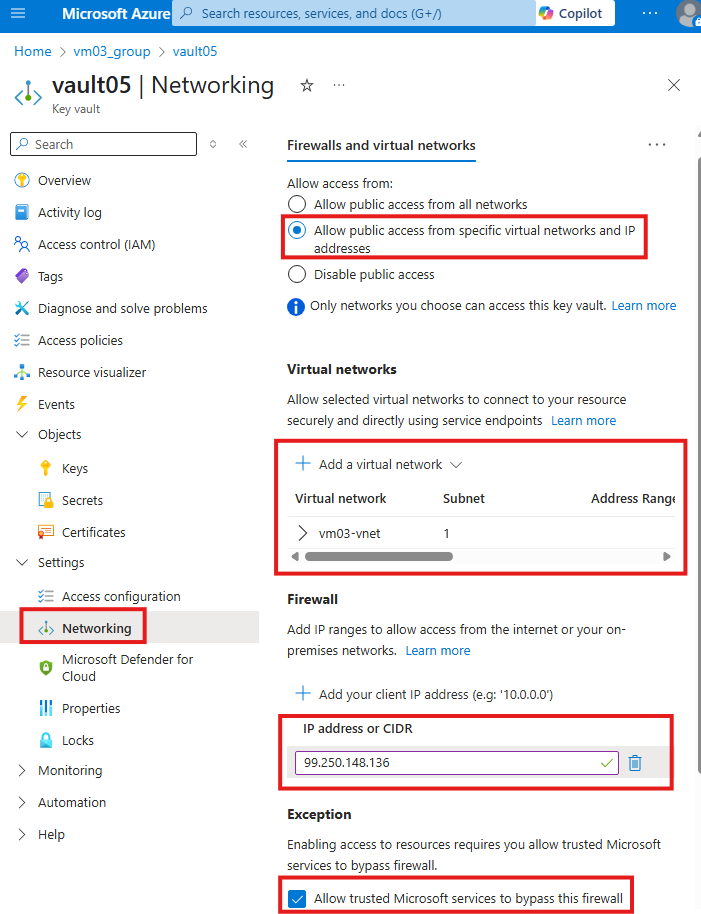
In the key vault give permissions for VM and client computer to access.
After encryption is complete, VM may reboot.
NOTE: Windows server uses bit-locker to encrypt using the key, so it may need higher RSA bits.
Key Auto-rotation in Azure key vault
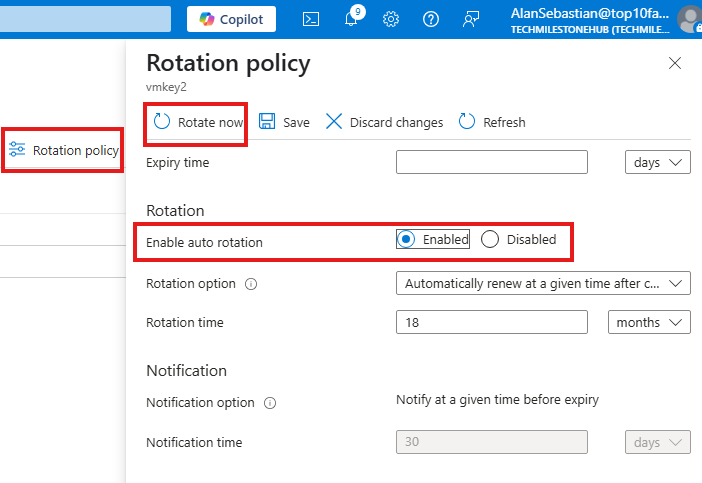
We can go into keys to enable auto-rotation for security.
Section Summary
🔒 What is Azure Policy?
Azure Policy is a governance tool that allows organizations to enforce rules and ensure compliance across Azure resources. These rules help maintain security, cost control, and standardization.
Examples of rules:
- VMs should only be deployed in a specific region.
- Only certain VM SKUs are allowed.
- All VMs must have disk encryption enabled.
🧩 Built-in vs Custom Policies
- Built-in Policies: Predefined by Microsoft for common governance needs.
- Custom Policies: Defined using JSON to meet specific organizational requirements.
📦 Policy Initiatives
An initiative is a collection of policies grouped together to achieve a broader compliance objective. Instead of assigning individual policies, you can assign an initiative for streamlined management.
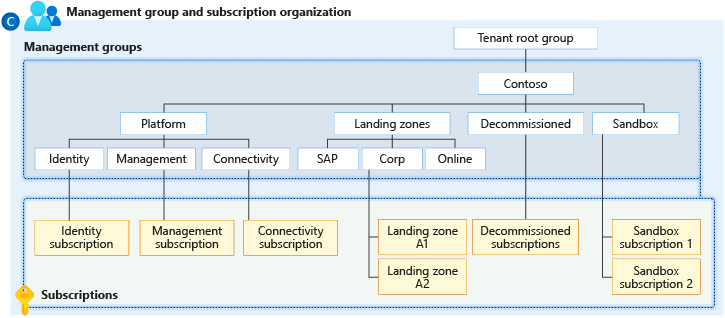
🧭 Management Groups (MGs)
Management Groups are containers that allow you to group multiple subscriptions. This is useful in large organizations where different departments may have separate subscriptions.
Key Benefits:
- Apply RBAC roles at the management group level.
- Apply Azure Policies that automatically affect all nested subscriptions.
- Nestable: MGs can be grouped under other MGs for a hierarchy.
Default Hierarchy:
- All subscriptions fall under the Tenant Root Group by default.
- Even Global Admins must elevate access to manage the root group.
👮 Policy Enforcement Levels
Azure Policy can be applied at different scopes:
- Management Group
- Subscription
- Resource Group
- Resource
🧪 Policy Effects
Azure policies can take different actions depending on the effect defined:
- Audit: Detects non-compliant resources but doesn’t block them.
- Deny: Prevents creation of resources that don’t meet the policy.
- DeployIfNotExists: Adds missing configurations automatically (e.g., enables encryption).
- Disabled: The policy is inactive.
⚙️ Assigning and Managing Policies
- Use the Policy blade in the Azure Portal to browse, assign, or create policies.
- You can filter by category (e.g., Compute, Storage, Security) to find relevant built-in policies.
- Assign policy at the desired scope, and monitor compliance results.
Azure Policy
To govern your resources; We can define rule that resource should comply.
Like, have VMs on a particular region only. VMs should have only form a certain SKU.
We can have : built-in or custom polices.
Initiative is a list of policies.
Management Groups
We can apply policies at different levels, one such level is management groups.
MGs are used to manage different subscriptions
In organizations, we can create different subscription for different departments.
Different subscriptions can be grouped under management group. Multiple management groups can be grouped under 1 management group.
Benefits of MGs
We can assign RBAC roles at MG level.
We can assign policies at MG level.
Working with Management groups
By default all subscriptions fall under Tenant root group.
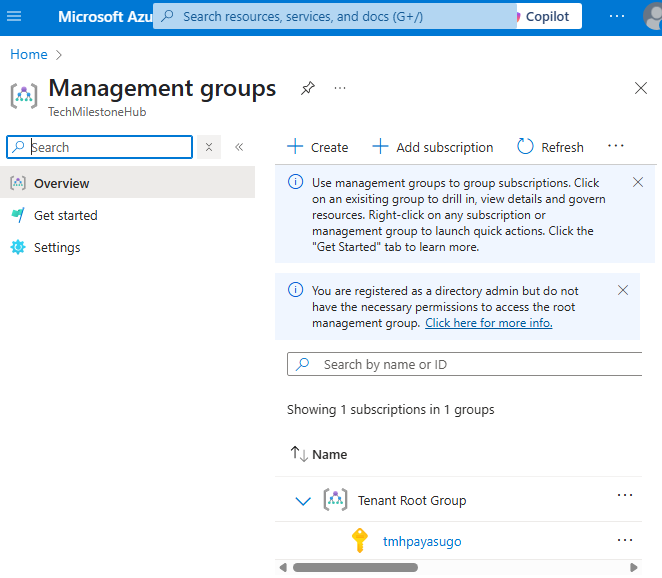
We can create management group under tenant root group.
No one has has default access to default root group; even global admin have to elevate access.
Microsoft Entra Global Admins can only elevate themselves.
Go to Entra admin center > Tenant properties
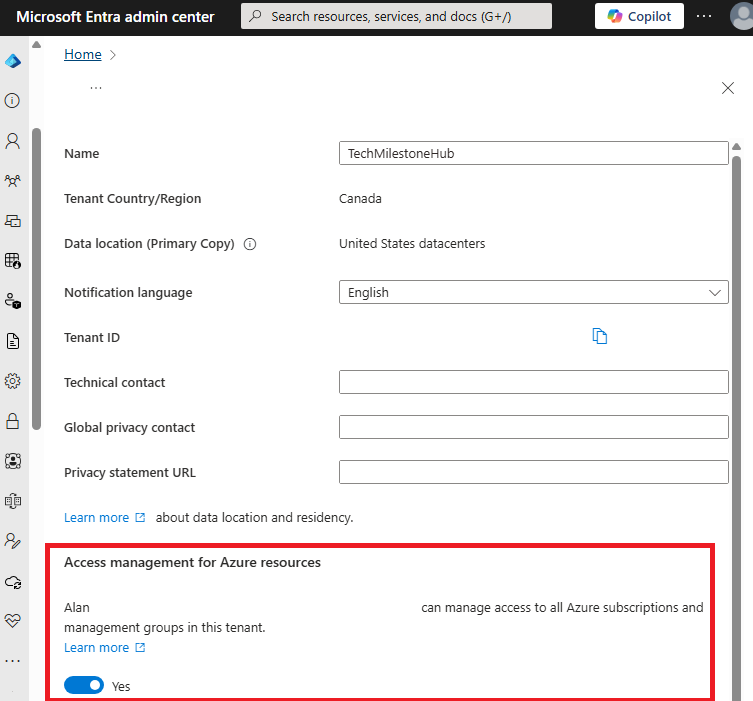
Enable access management for Azure resources.
Now, we can go to root group and add another MG or subscription if we want.

Also, from Access control (IAM) blade, we can assign roles to different security principals.
We can also apply policy on this root MG from policy blade
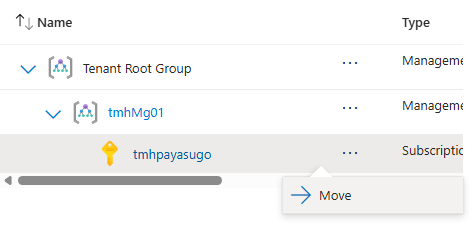
We can move subscription to a different management group:
Applying Policy
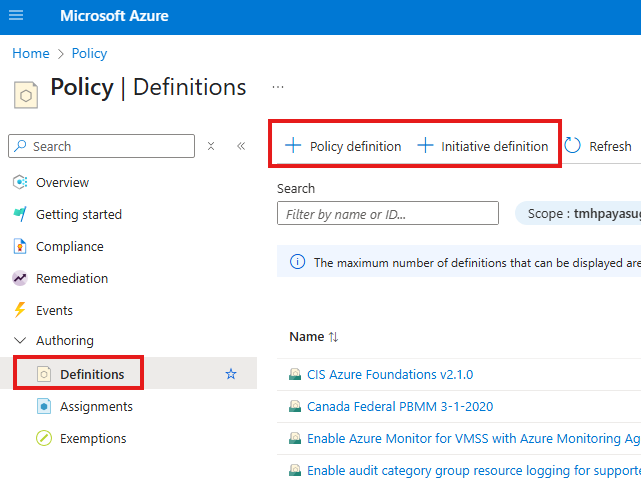
Go to Definitions blade in policy, to create a new policy.
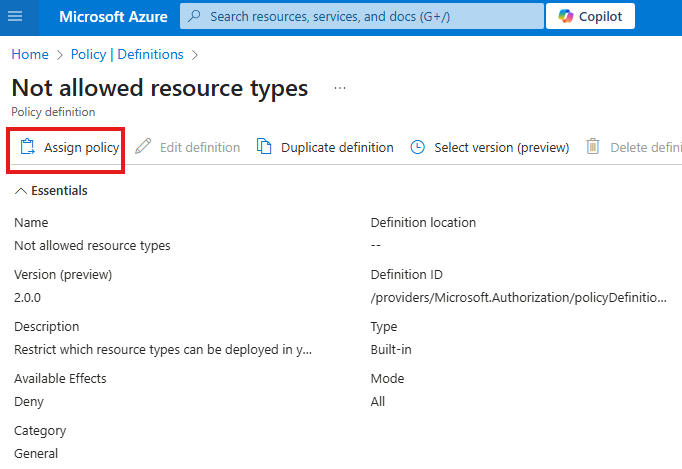
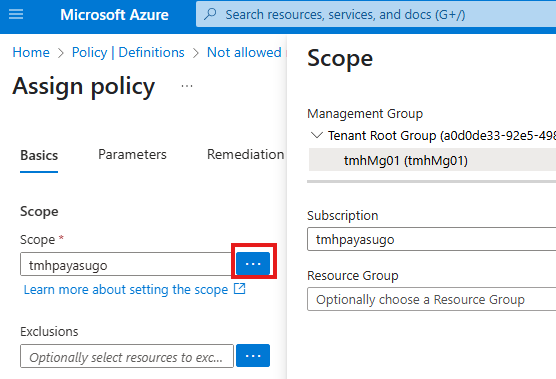
We can assign an in-built policy: Not allowed resource type:
We can select a scope for the policy:
Azure Policy to enforce disk encryption for VMs
We have a built-in policy for that:
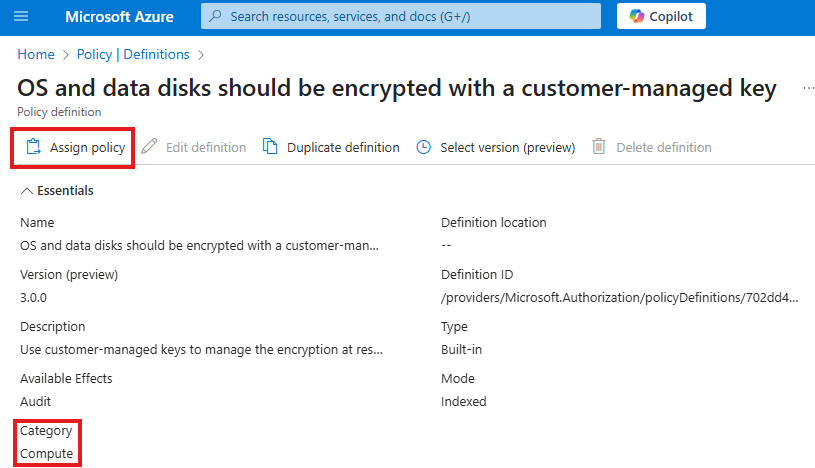
Filter by category, to find a related policy.
Policy Effect : Audit
After policy is applied, we can see the non-compliant VMs if any. Default effect is audit, it will not enforce policy, but will let us know if policy is not met.
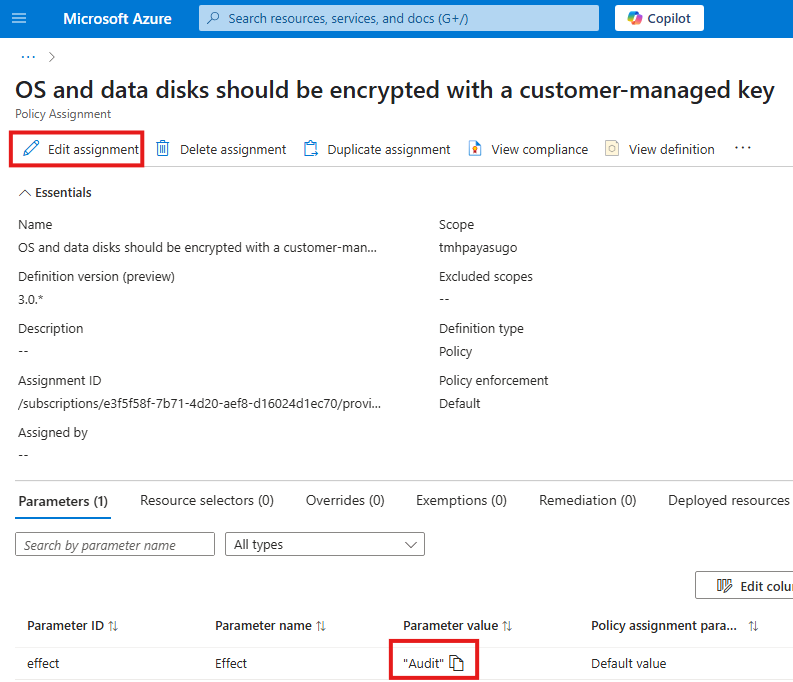
We can edit the assignment to change the effect of policy.
Policy Effect: Deny
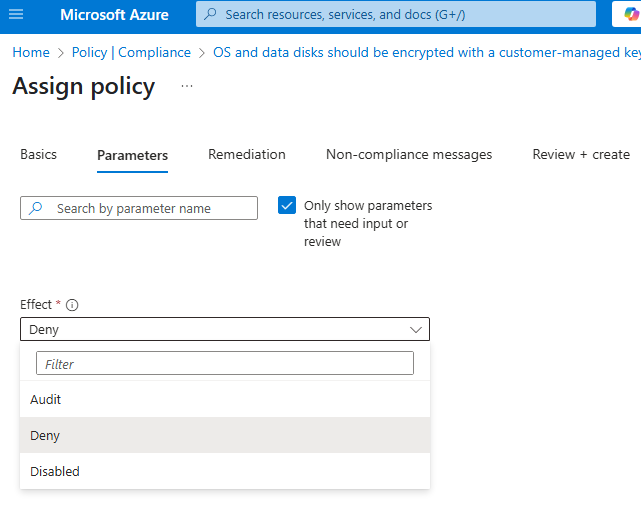
We can change policy effect to deny from parameters tab.
Deny effect will ensure that no one can deploy a VM without encrypting VM disk.
Deny effect, will not affect existing resources; will check policy and deny creation of new resources that does not comply the policy.
Policy Effect: Remediation
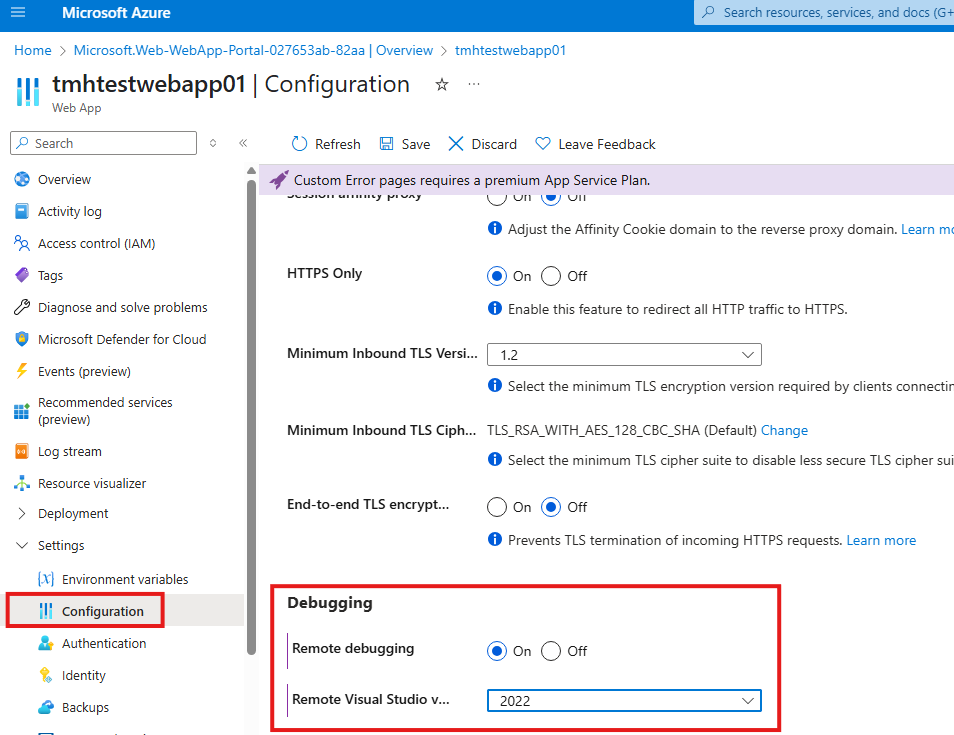
If we have web apps with debugging enabled;
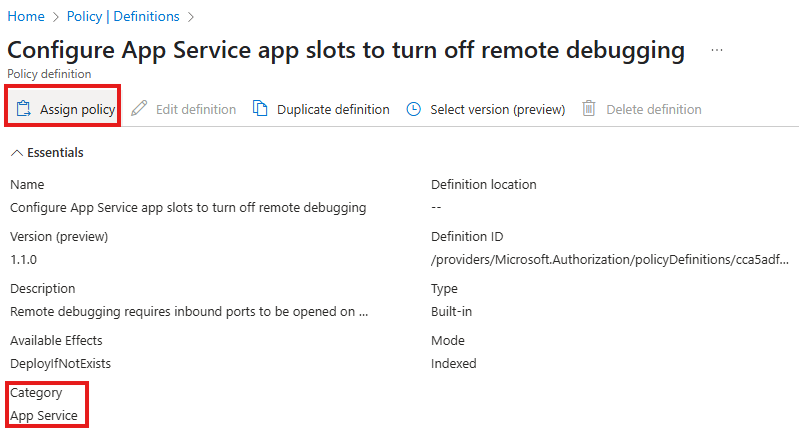
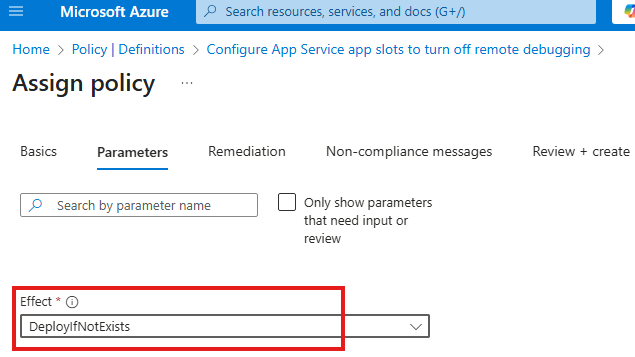
Select deploy if not exists in parameter tab
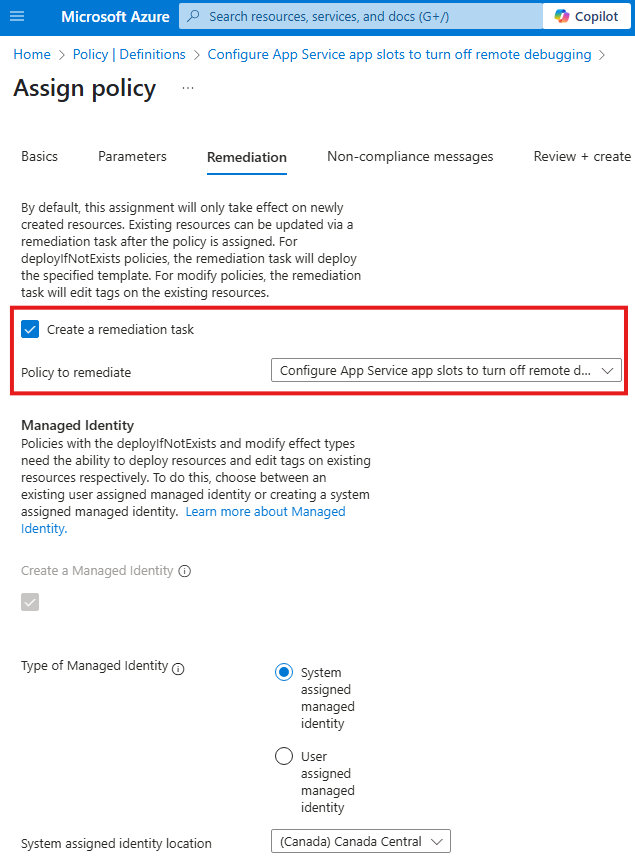
In the remediation tab:
Custom Policy
Custom Policy to Deny creation of VMs
{
  "mode": "All",
  "policyRule": {
    "if": {
      "allOf": [
        {
          "field": "type",
          "equals": "Microsoft.Compute/virtualMachines"
        }
      ]
    },
    "then": {
      "effect": "deny"
    }
  }
}
Policies are defined as JSON.
We can create policies with variables that get value from parameters.
Section Summary
What is Azure Blueprint?
Azure Blueprints is a service that allows organizations to define a repeatable set of Azure resources and configurations. It helps ensure that newly created subscriptions automatically follow organizational standards and compliance requirements.
What Can Be Included in a Blueprint?
When creating a blueprint, you can define multiple components called artifacts. These can include:
- Resource Groups – Predefined resource groups to organize resources.
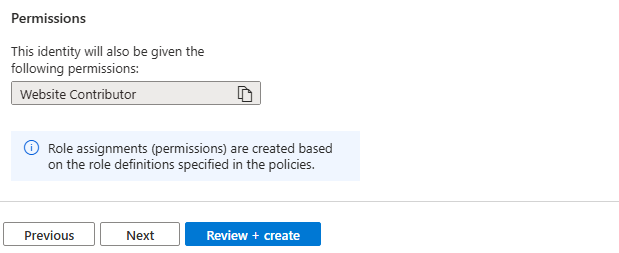
- RBAC Assignments – Role-based access control for users and teams.
- Azure Policies – Rules that enforce organizational policies, like allowed regions or VM SKUs.
- ARM Templates – Infrastructure as code for deploying specific resources like VMs, storage accounts, etc.
Creating and Publishing a Blueprint
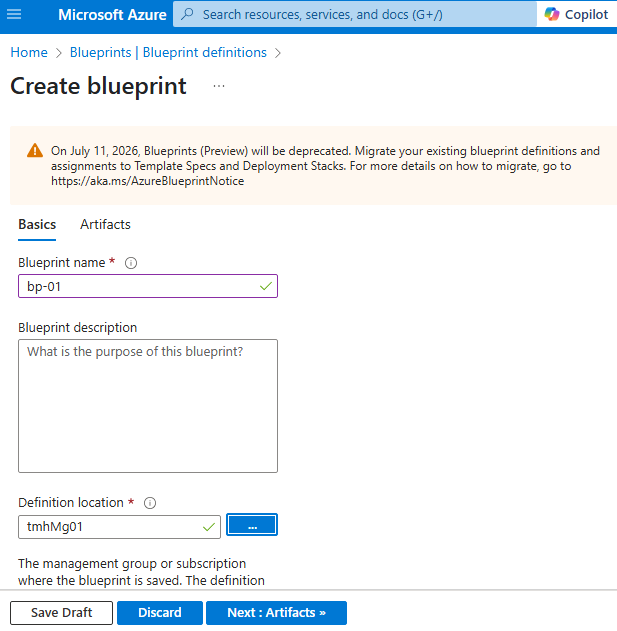
Blueprints are created at the Management Group level so they can be reused across multiple subscriptions. After defining all required artifacts:
- Save the blueprint as a draft.
- Publish it with a version name.
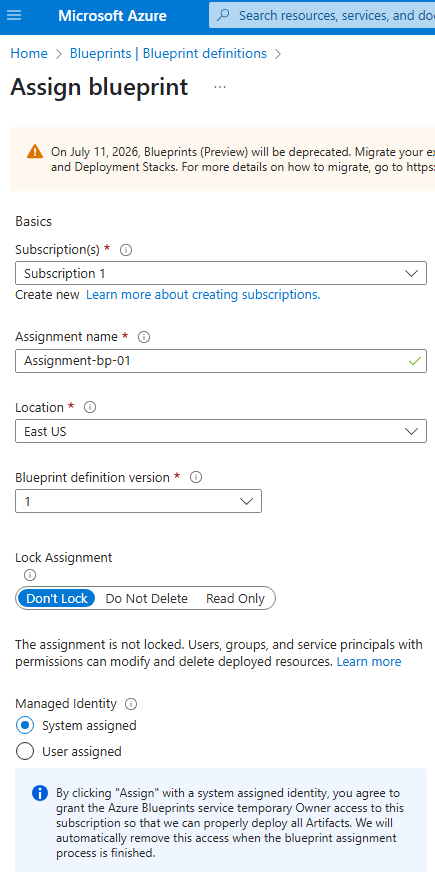
- Assign it to a subscription.
During assignment, you can provide specific parameters like resource group names or regions.
Locking Resources
Blueprints offer a Lock Assignment option to protect deployed resources:
- Don’t Delete: Prevents deletion of resources even by owners.
- Read-Only: Prevents modification of resources.
These locks ensure that critical configurations stay intact unless the blueprint is unassigned first.
Unassigning a Blueprint
Unassigning a blueprint does not delete the resources it created. It simply removes the governance and control applied by the blueprint. The resources remain in place and can be managed manually afterward.
Why Use Azure Blueprints?
Azure Blueprints make it easy to standardize deployments, enforce compliance, and automate infrastructure setup across many Azure subscriptions. It is especially useful for large organizations with multiple departments or environments that need consistent governance.
Azure Blueprints
Using blueprints, a company can define what all :
1 – Resources groups
2 – RBAC
3 – Policy
4 – ARM templates
We can assign blueprint to a newly created subscription, so that it will be prepopulated with all these details.
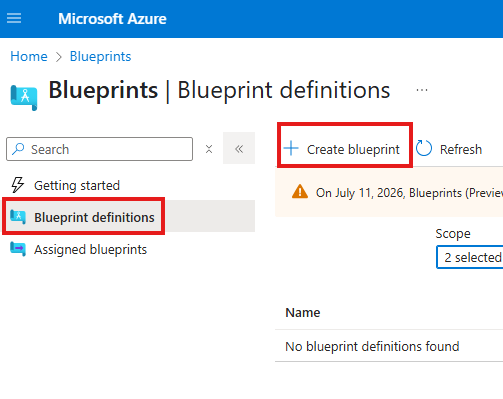
We can create blueprint at MG level
With in artifact we can define:
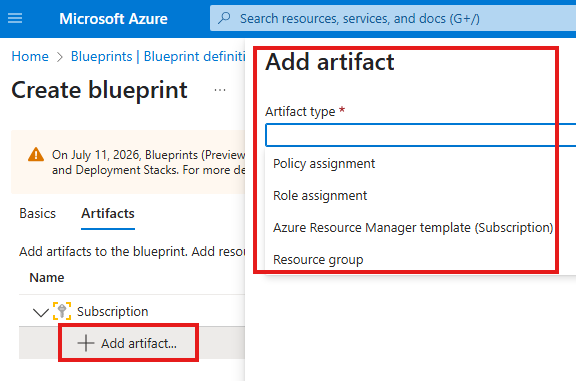
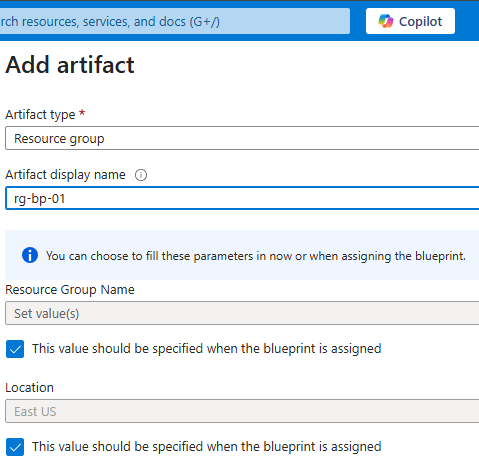
If we add a resource group artifact, that means, when we apply this blue print to a subscription, it will have that resource group in that subscription.
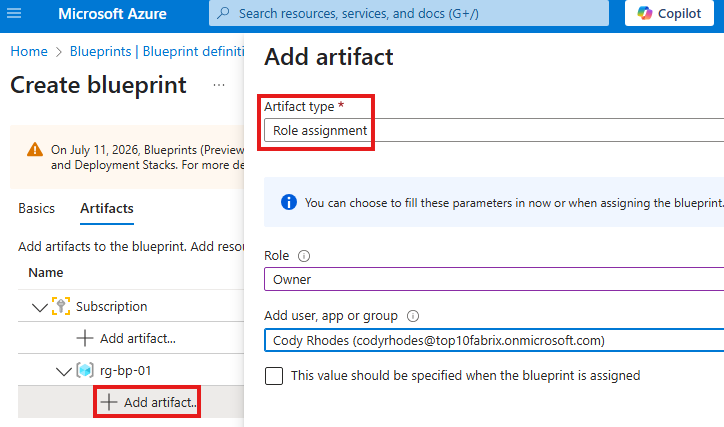
After adding resource group, we can define a role assignment, as another artifact to that resource group.
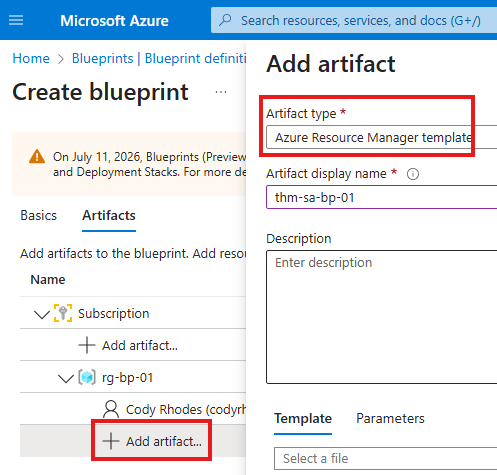
We can also add artifact to have any resource, using ARM template
Save blueprint as draft, and publish.
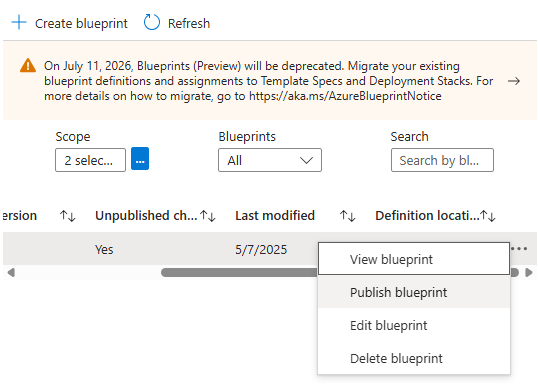
After publish, we can assign blueprint to any new subscription.
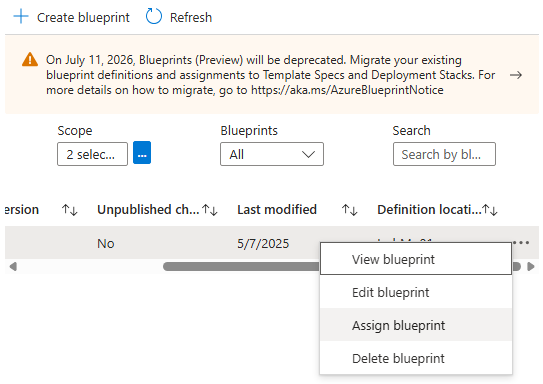
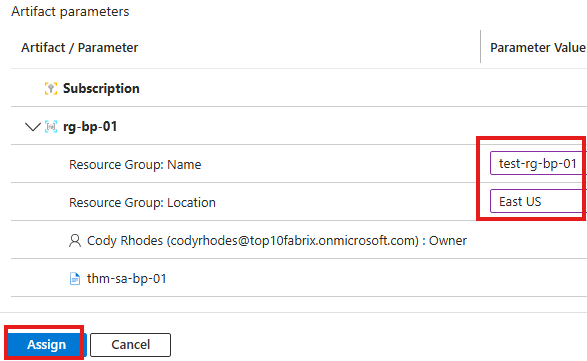
We can provide name and region for resource group, while assigning.
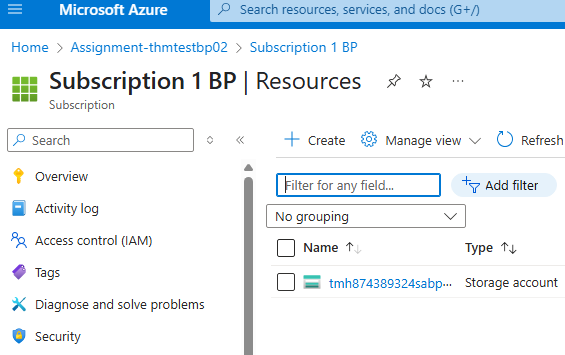
Once assignment is complete we can see the subscription with assigned resources and Access control roles.
If we unassign the blueprint, it will not remove the resources.
Lock Assignment
1 – don’t delete
2 – read only
If we select don’t delete lock, resources created by this assignment cannot be deleted even by resource owners.
To delete resource, we have to unassign blueprint.
Section Summary
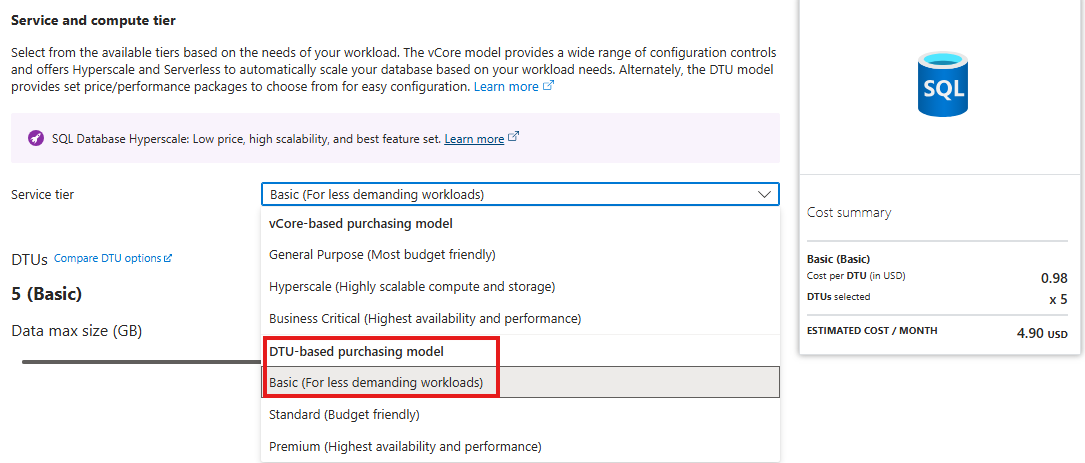
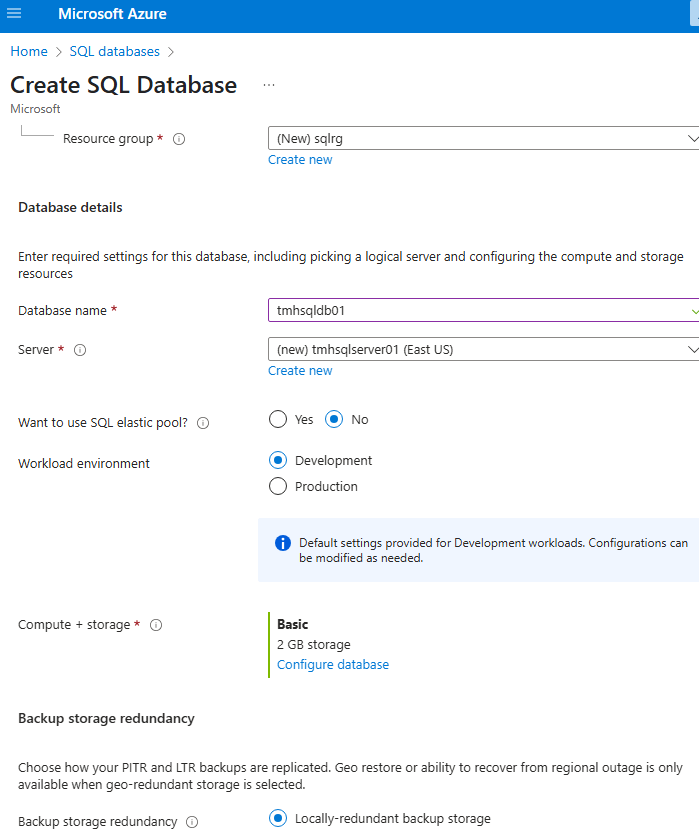
Getting Started with Azure SQL Database
When you create a SQL database through the Azure portal, Azure also provisions a SQL Server to host it. For lower-cost testing, you can choose the DTU-based Basic tier.
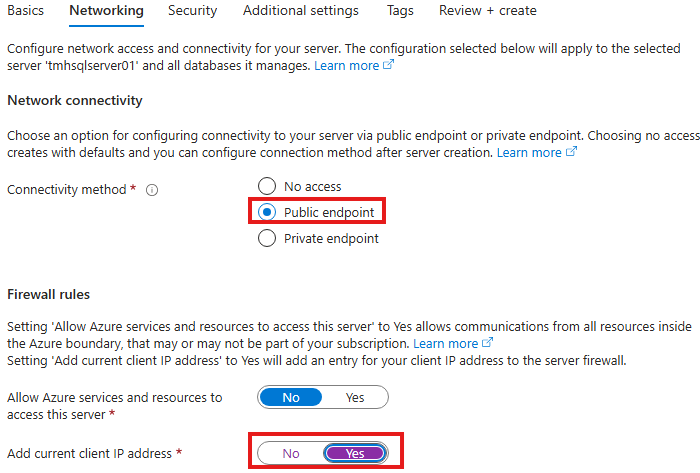
During setup, it’s recommended to allow public access and add your client IP under the Networking tab to be able to connect.
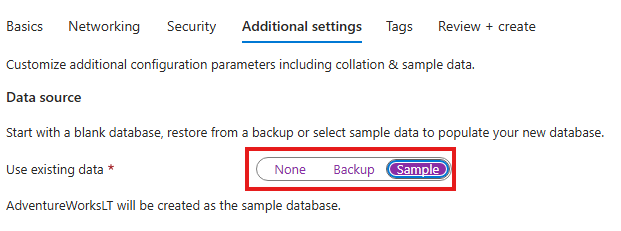
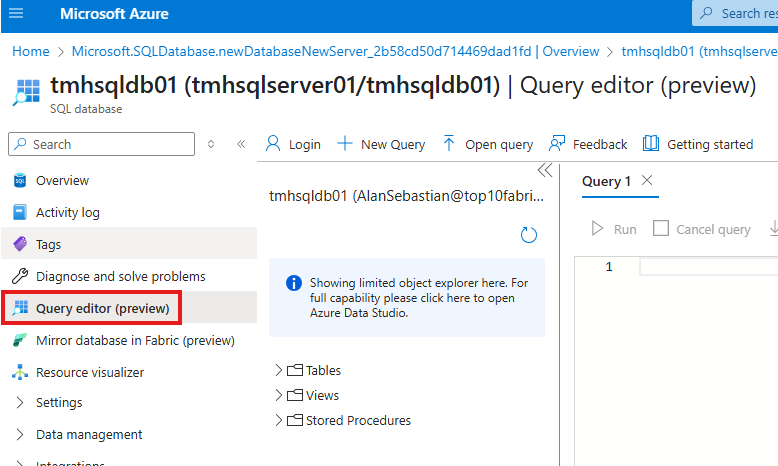
You can also choose to load sample data, and use the built-in Query Editor directly in the portal to interact with the database.
Entra ID (Azure AD) Authentication
Traditionally, SQL users were created and managed within the database. Azure now allows you to use Entra ID (formerly Azure AD) for authentication, avoiding the need to manage SQL users manually.
You can set an Entra ID user as SQL Admin either from the SQL Server’s settings or from the Microsoft Entra Admin Center.
Using Azure Data Studio
You can connect to the SQL database using Azure Data Studio, choosing either:
- SQL Authentication (username/password), or
- Entra ID Authentication (uses your Microsoft identity).
To add additional users, the SQL Admin can run SQL commands to grant access. For example:
sqlCopyEditCREATE USER [user@domain.com] FROM EXTERNAL PROVIDER;
EXEC sp_addrolemember 'db_datareader', 'user@domain.com';
Enabling SQL Auditing
SQL Auditing helps track activity and is useful for security and compliance. Logs can be sent to:
- A Storage Account
- A Log Analytics Workspace
- An Event Hub
Auditing can be turned on from the SQL Server’s Auditing blade and can apply at the server or database level. Logs are stored in a table called AzureDiagnostics.
Dynamic Data Masking
Dynamic Data Masking protects sensitive fields like emails or credit card numbers from non-privileged users. You can configure masking rules from the Dynamic Data Masking blade in the portal.
For example, an email column can be masked to display something like xxxx@contoso.com.
Transparent Data Encryption (TDE)
TDE helps secure data at rest by encrypting the database automatically. Azure SQL enables this by default using Microsoft-managed keys, though you can switch to customer-managed keys if needed.
Always Encrypted
Always Encrypted protects sensitive data during transmission and limits access even to DBAs. It uses two types of keys:
- Column Encryption Key: Encrypts data in a column.
- Column Master Key: Protects the column encryption key.
This feature is configured using SQL Server Management Studio (SSMS) and supports:
- Deterministic encryption (same input = same encrypted value; supports indexing and filtering).
- Randomized encryption (stronger, but no filtering or indexing support).
You’ll use a wizard in SSMS to enable Always Encrypted and store keys securely (e.g., in Azure Key Vault).
Getting Started
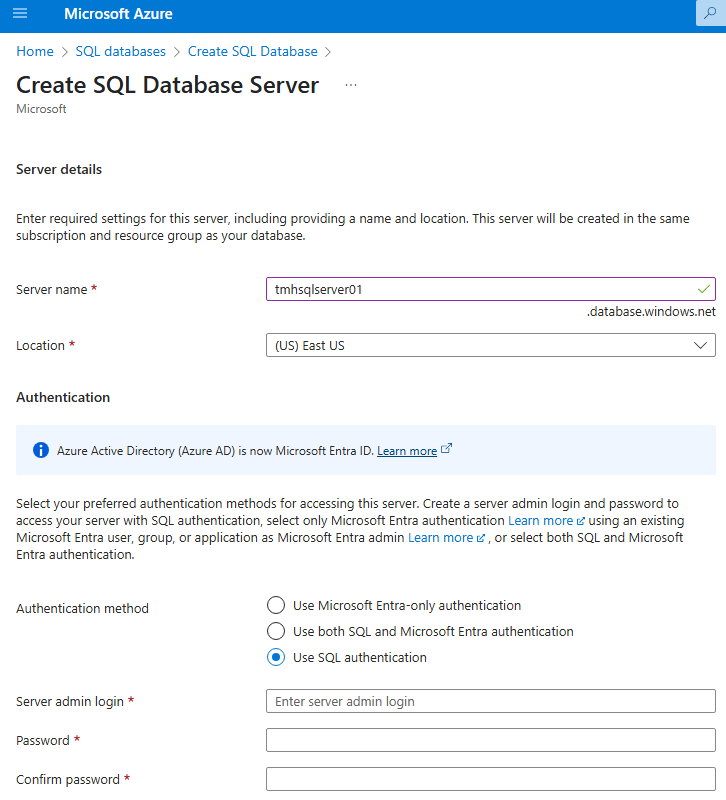
Portal will create an SQL server and a SQL database.
If we choose a DTU(Data transfer units) based basic tier, cost will be less
We should allow public access, and add or IP, in networking tab:
We can have some sample data in the database:
We can use query editor to work with SQL database directly from portal.
Entra ID Authentication for Azure SQL
Legacy approach is to have SQL users within the database.
Since we already have users in Entra ID, we don’t have to recreate users in database.

Go to SQL server resource to configure Entra ID access.
Or, we can go to Entra Id blade in settings:
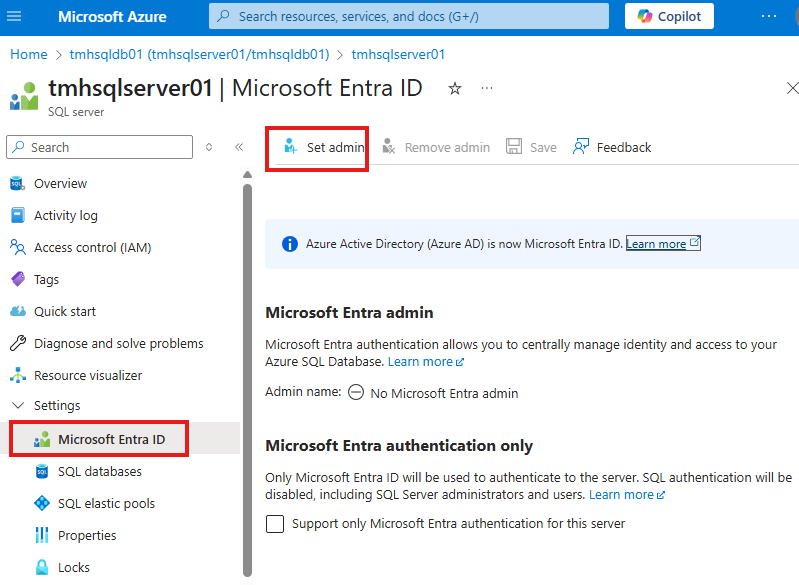
And here we can set any Entra ID user as SQL admin.
Using Azure Data Studio
Create a new connection.
We can use SQL or Entra authentication.
SQL Admin adding another user
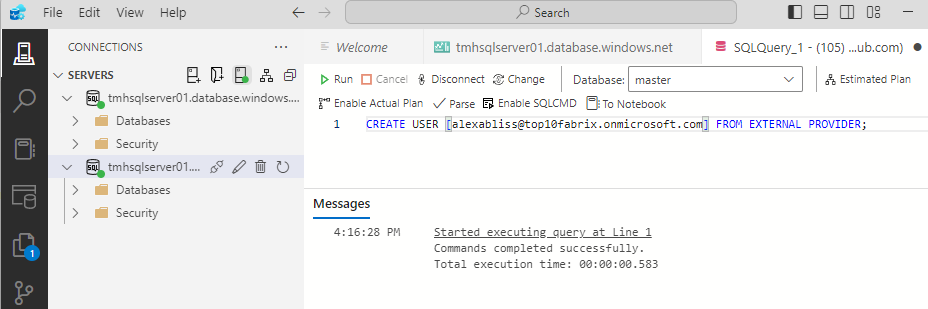
Execute SQL:
CREATE USER [alexabliss@top10fabrix.onmicrosoft.com] FROM EXTERNAL PROVIDER;
exec sp_addrolemember ‘db_datareader’,’alexabliss@top10fabrix.onmicrosoft.com’
Enable SQL Database Auditing
We need to do this for compliance and view database activity.
Audit logs are sent to storage account or Log Analytics workspace or Azure Event hub. So Azure SQL server and storage account should be in same region. Log Analytics workspace can be in another region.
We can enable auditing at server level or database level.
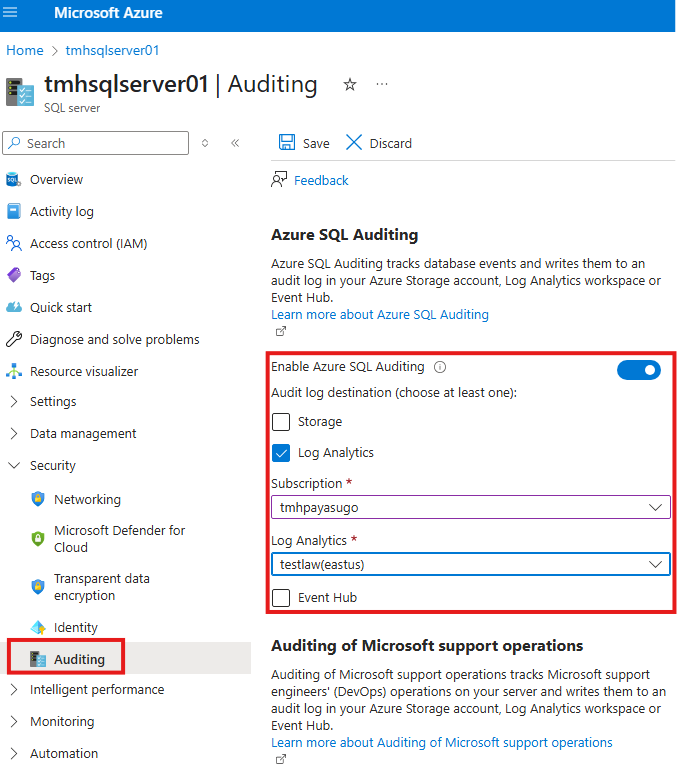
Go to Auditing blade in SQL server.
This will create a table called Azure Diagnostics in Log Analytics workspace
Dynamic Data Masking
This feature in Azure SQL will mask sensitive data to non-privileged users.
For example, we can mask a column for credit card number in a table.
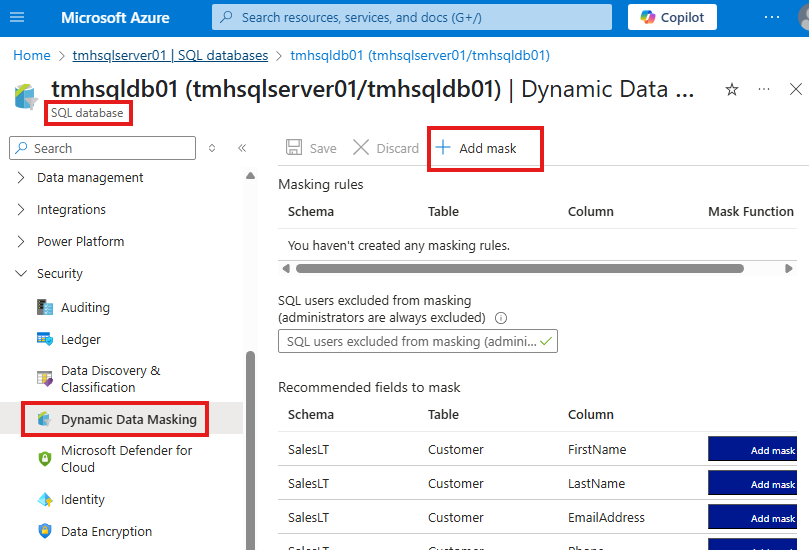
Go to Dynamic Data Masking blade to add a mask.
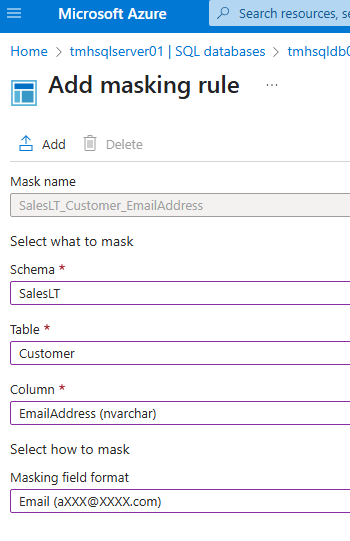
We can add a masking rule to mask a column like email.
Test masking using regular non-privileged user
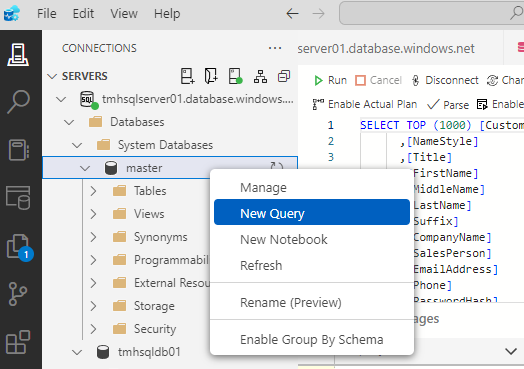
Execute SQL in master DB :
CREATE LOGIN newusr
WITH PASSWORD = ‘Azure123’
GO
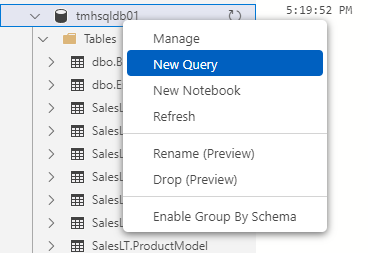
Execute SQL in our DB :
CREATE USER newusr
FOR LOGIN newusr
WITH DEFAULT_SCHEMA = SalesLT
Execute stored procedure to give permission to user:
exec sp_addrolemember ‘db_datareader’,’newusr’;
Transparent Data Encryption
This is to ensure father safety for your SQL data stored in Azure data centers.
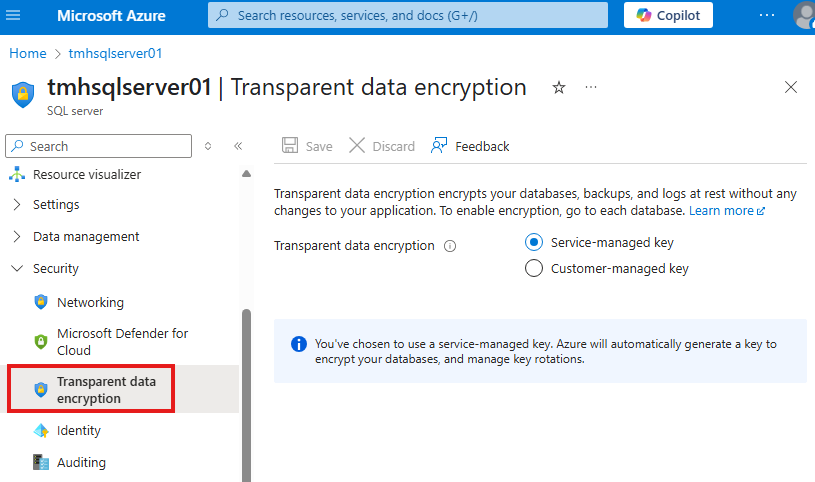
Go to Transparent Data Encryption blade in SQL server settings, we see that is is already enabled; using keys managed my Microsoft.
Always Encrypted
When a non-privileged user try to run query to access data, like masking, we can encrypt the data. This is encryption in transit.
For this we need 2 encryption keys:
1 – Column encryption key
Used to encrypt data in column
2 – Column master key
Key protecting Column encryption key. This can be stored in Azure key vault or windows certificate store.
We need to use SSMS to enable this.
2 Types of Encryption
1 – Deterministic encryption
Same encrypted value is generated for same plain text.
2 – Randomized encryption
Different encrypted value is generated for same plain text. Do not support searching, grouping, indexing, joining on encrypted columns.
In SSMS, right click on table and click > Encrypt Columns:
This will open a wizard.
Sign in to Azure
Select column to encrypt and choose encryption type.
We will also need to select an Azure key vault to store the key.
Section Summary
Creating a Storage Account and Using Blob Service
Once your Azure Storage Account is created, you can start by uploading files in the Blob service. Containers are top-level directories where blobs (files) are stored. Each uploaded blob gets a unique URL, but by default, public access is blocked.
To allow public access, you can change the configuration to allow anonymous blob access and update container access level to make blobs readable over the internet.
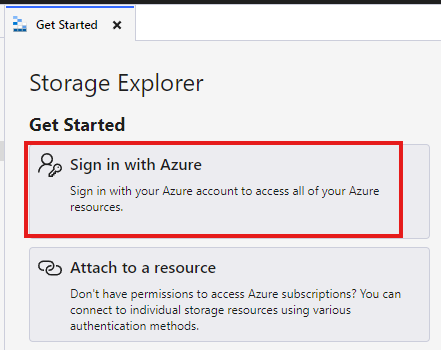
Azure Storage Explorer
Azure Storage Explorer is a desktop tool to access storage accounts without signing into the Azure portal. You can connect using the storage account name and key, which grants full access to data and services.
To connect, retrieve the access key from the portal under Access Keys, and use it to log in through the tool.
Secure Access Using Shared Access Signatures (SAS)
SAS Tokens offer fine-grained, temporary access to blobs or containers. You can generate a SAS token for a blob, controlling permissions, expiration, and allowed IPs.
There are SAS options at:
- Blob level
- Container level
- Storage Account level
You can use these SAS URLs in Storage Explorer or in apps to access files securely.
Stored Access Policy
For enhanced security, SAS tokens can be tied to a Stored Access Policy. If a SAS token is ever compromised, you can revoke access by editing the policy—no need to rotate access keys.
Stored Access Policies are configured under the Access Policy section of a container and are linked when generating SAS tokens.
Azure File Share
Azure File Share provides a traditional file-sharing experience. Files can be uploaded and downloaded like a normal drive, and it can even be mapped as a network drive on your local machine using PowerShell.
Unlike blobs, files in a File Share can be accessed by systems using SMB protocol (e.g., Windows Explorer). Just ensure port 445 is open.
Role-Based Access Control (RBAC) for Storage
Azure allows you to assign roles to users with different levels of access:
- Storage Account Contributor: Full control of the storage account.
- Storage Blob Data Contributor: Read, write, delete blobs and containers.
- Storage Blob Data Reader: Only read/list blob data (not edit).
You can manage RBAC under the Access Control (IAM) tab in your storage account and test access via Storage Explorer after signing in as the assigned user.
Azure Queue Service
Azure Queue is a simple message service included in the storage account. You can add and manage messages via the portal or programmatically. Different RBAC roles can be assigned to control queue operations:
- Queue Data Contributor: Full access
- Queue Data Message Sender: Only send messages
- Queue Data Reader: Only view messages
This is useful for decoupling components of an application.
Azure Table Service
The Table service lets you store structured NoSQL data. You can add data via the portal under the Storage browser tab. Each item is an entity identified by a Partition Key and a Row Key. This is ideal for storing lightweight structured data like logs or user profiles.
Access can be granted securely using SAS tokens, just like blobs and file shares.
Azure Storage Accounts
Create a storage account
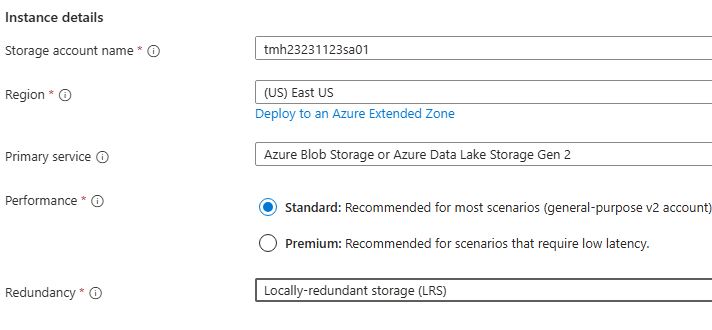
Blob Service
Go to Container blade (Data storage).
This is a top level blade where can store data.

We can go into the container to upload files:
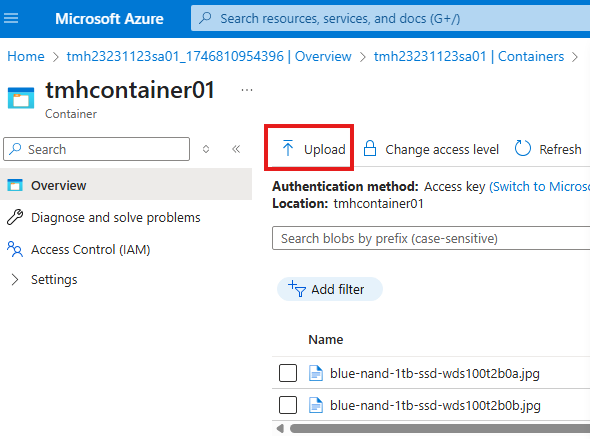
Files will be stored as blobs.
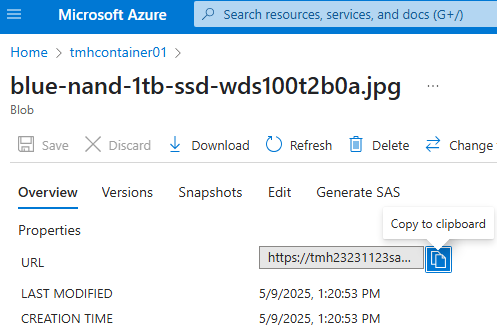
We will get a URL for each uploaded blob, but by default public access is denied.
Easiest and least secure way to allow public access is:
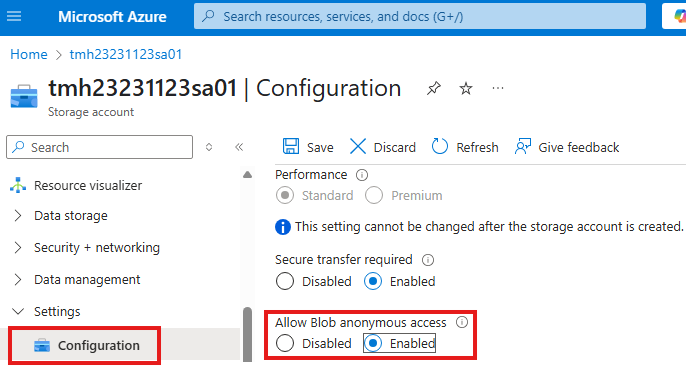
From Configuration blade, Allow blob anonymous access
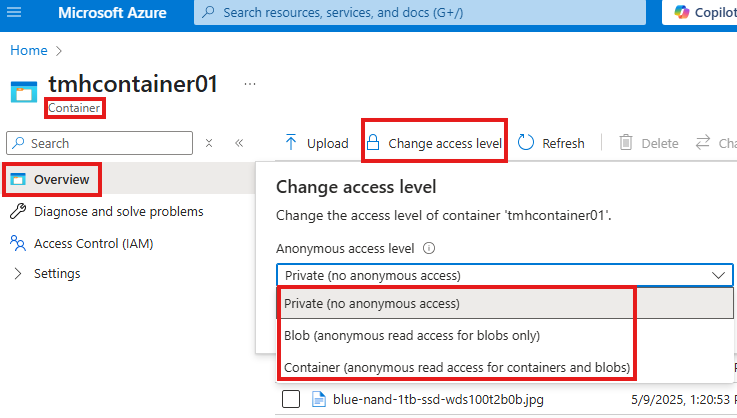
Now, we can go into container and change access level to read the blobs.
Now we can use the blob URL to view or download the files.
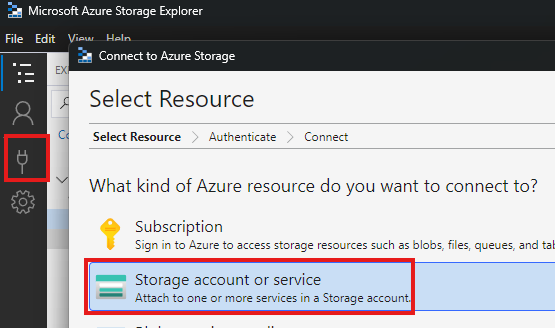
Azure Storage Explorer
This is a toll we can download an install.
To use this we don’t have to sign in to Azure;

So that if we have to work with storage account alone, we don’t have to sign-in to Azure.
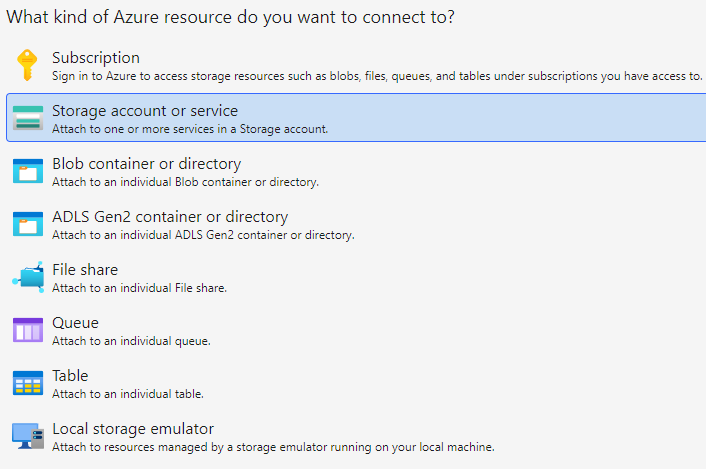
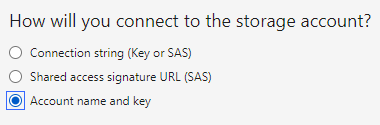
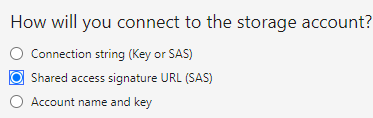
Account name and key
This method will give access to all services and all data in storage account.
Choose account name and key method to connect.

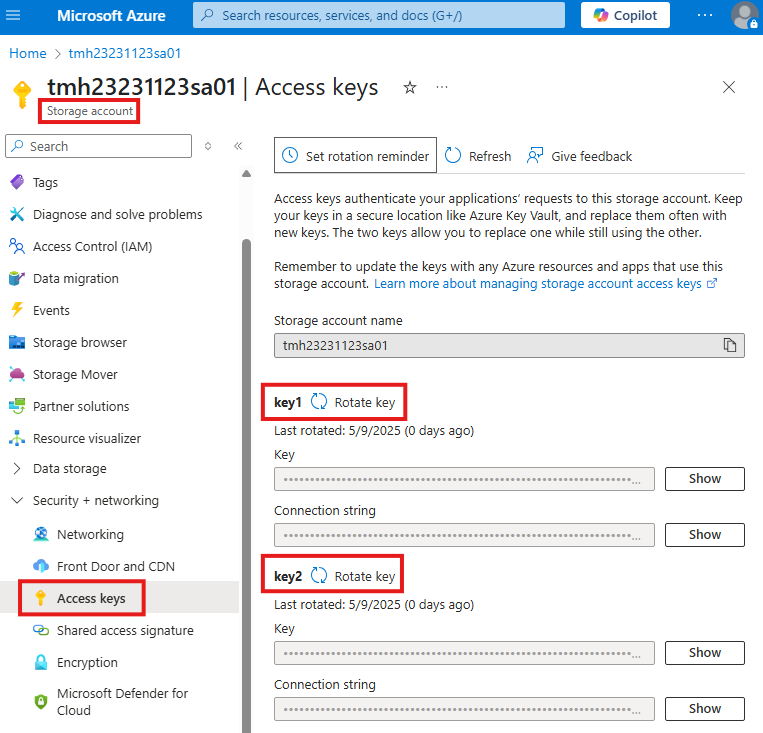
We can get account name and key from Access keys blade in security + networking section

Now, we will be able to access the container through Azure storage explorer.
Shared Access Signatures (SAS)
We can control access to each file in the container using this method. This is more secure way.
Go into blob and :
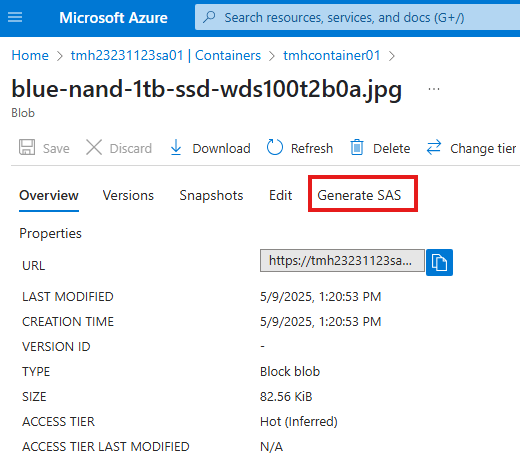
Click on Generate SAS
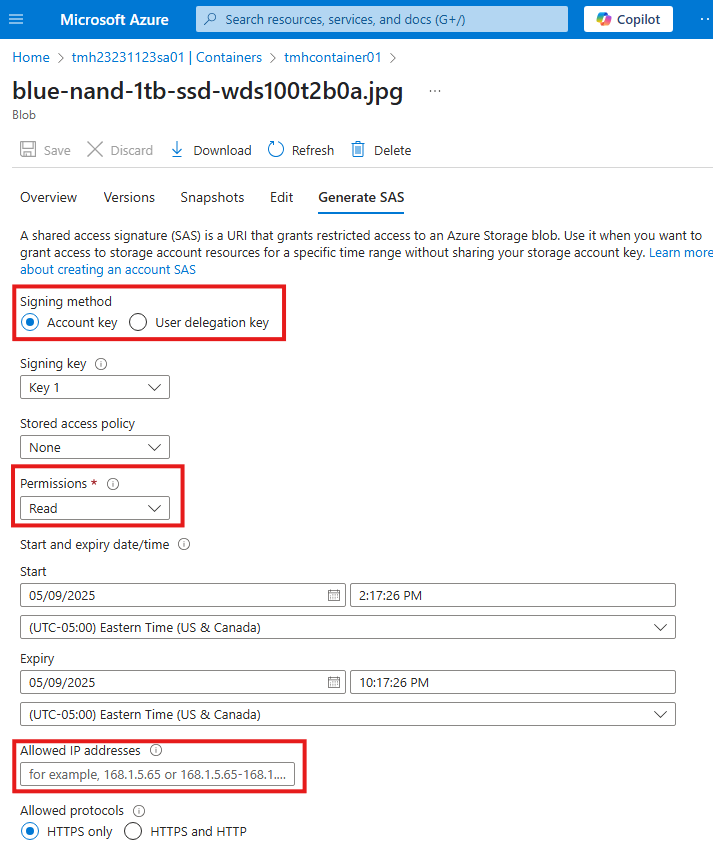
Here we generate a SAS token and URL.
While creating we can control permissions, allowed IP addresses, expiry etc.
We use this URL to access the blob, token will be appended to URL.
As we can see SAS is created using 1 of access keys.
Shared Access Tokens at Container Level (similar to SAS)
Go to container, Shared access tokens blade
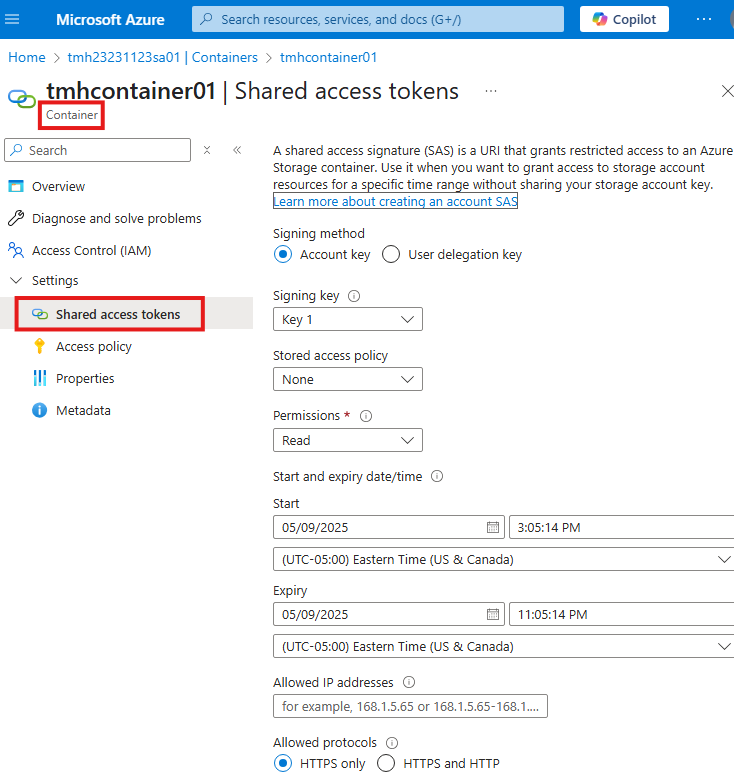
We see similar configurations as that of SAS.
Using Shared Access Tokens
We can connect storage explorer to container.
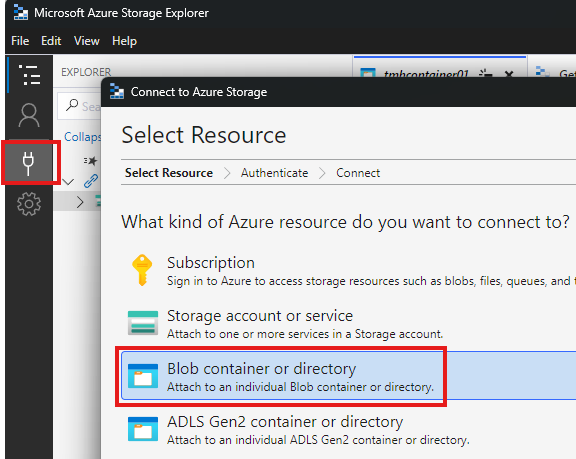
Add a new connection and choose to connect to container.
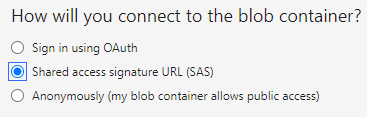
Select SAS method.
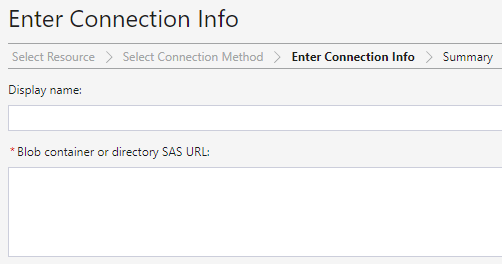
Paste the connection URL.
SAS should have at least Read and List permissions.
Shared Access Signatures (SAS) at Storage Account level
At storage account level, go to Share access signature blade, to create a SAS.

Here, while generating SAS URL, we can choose services and permissions.
In the allowed resource type, if we don’t select the object, we will not be able to download the files, we can only view the lists.
Copy the SAS URL generated
Add a new connection in storage explorer, selecting storage account.
Use SAS URL method.
Stored Access Policy
Stored Access Policy v/s SAS
Stored Access Policy is used to associated with SAS.
SAS with Stored Access Policy is more secure that default SAS. If SAS token falls into wrong hands, attacker can access storage account, even if we generate a new SAS.
Ways to over come this are:
1 – Rotate access key
SAS is based on access key, so if we change it, already generated SAS based on that key will not work.
2 – Stored Access Policy
Go to Access policy blade and add a stored access policy.
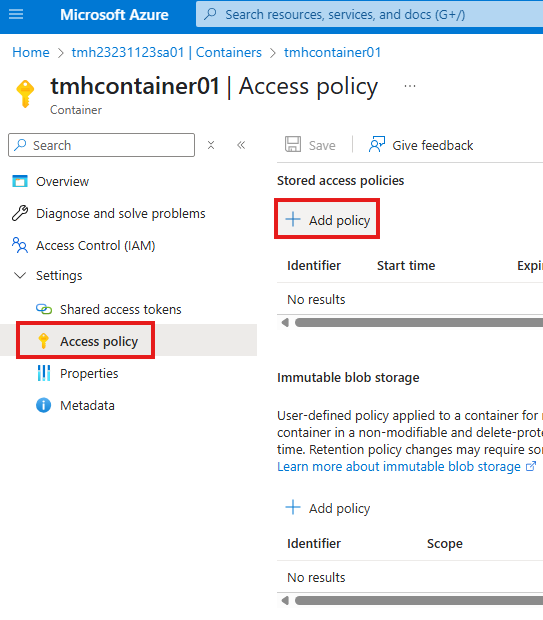
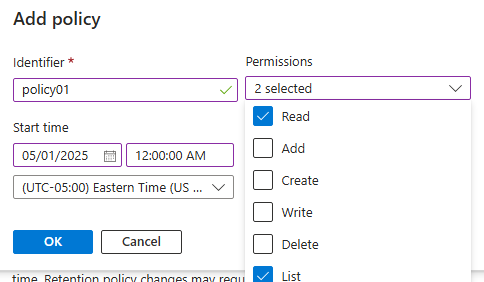
Give Read and list permissions for policy.
Click Save.
Generate SAS using Stored access policy
Now, we can attach the stored access policy to any SAS we create.

As we see here, all other configuration options for SAS are disabled, as it will be taken from stored access policy.
If this SAS falls into wrong hands, we can edit stored access policy and remove permissions.
Azure File Share
Go to Storage account, File shares blade to create a file share.
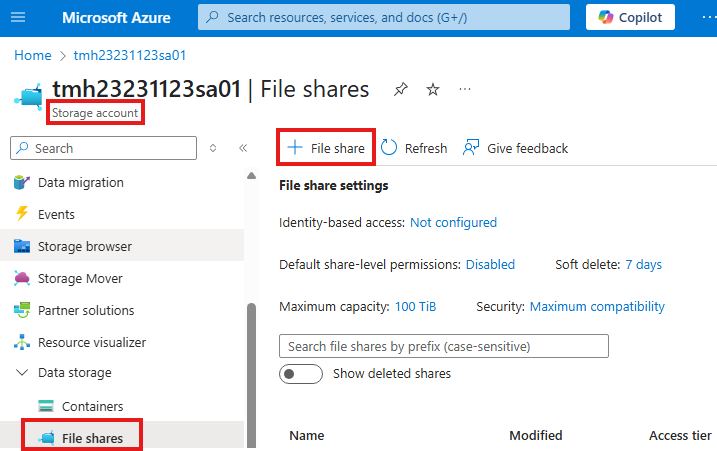
By default back is enabled into Recovery services vault.
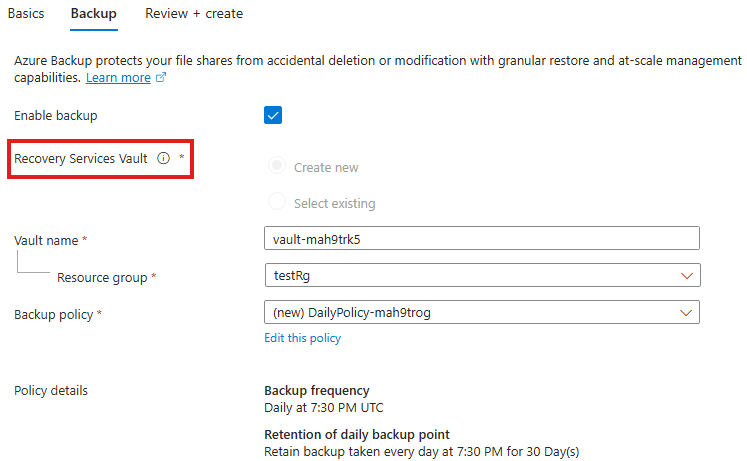
Disable backup for now.
Once file share is created, we can upload files.
Files share v/s Blob storage
In blob, uploaded files are stored as binary based object.
File share can be mapped as drive to various operating systems.
Map File share as drive
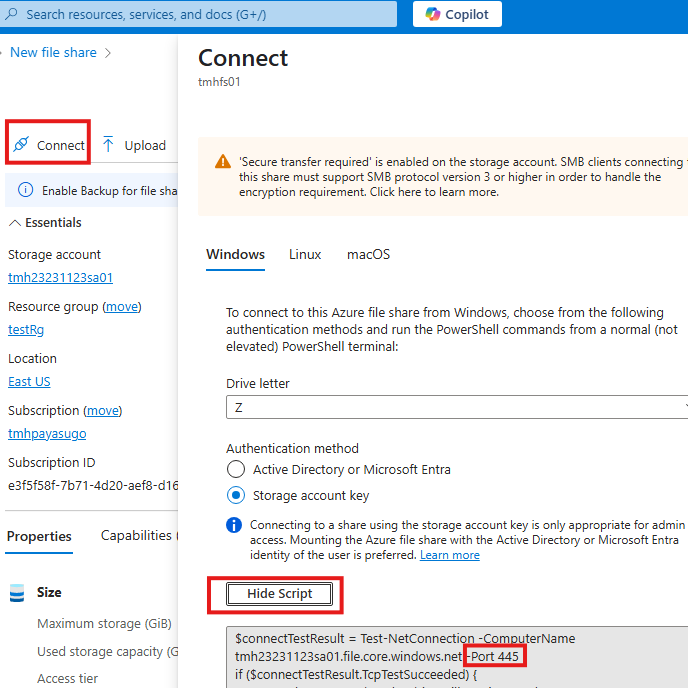
Port 445 of the host machine need to be allowed.
Now, just run the script in PowerShell.
To un map execute command:
net use Z: /deleteRBAC for Azure Storage Account
Some common RBAC roles are:
1 – Storage account contributor
Allows create and manage a storage account.
2 – Storage blob data contributor
Allows to read, write, delete containers and blobs.
3 – Storage blob data reader
Allows to read and list containers and blobs.
User with a regular reader role cannot see the list data, as they can only read the properties.
RBAC Login
Go to Access Control (IAM) blade on Storage account.
Add a RBAC role and assign to a user.

Now sign-in as the user in Azure storage explorer.
Azure Queue Service
Simple messaging service included in Storage account service.
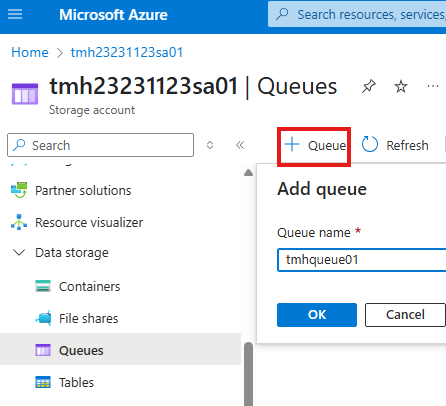
In the queue, we can add messages;
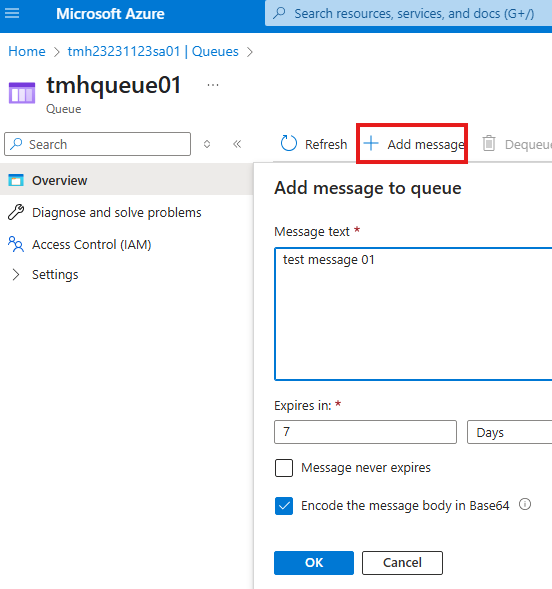
Apps can send and receive messages from queue.
From Access control (IAM) blade we can assign roles that are related to queue.
| Name | Description |
|---|---|
| Storage Queue Data Contributor | Allows for read, write, and delete access to Azure Storage queues and queue messages |
| Storage Queue Data Message Processor | Allows for peek, receive, and delete access to Azure Storage queue messages |
| Storage Queue Data Message Sender | Allows for sending of Azure Storage queue messages |
| Storage Queue Data Reader | Allows for read access to Azure Storage queues and queue messages |
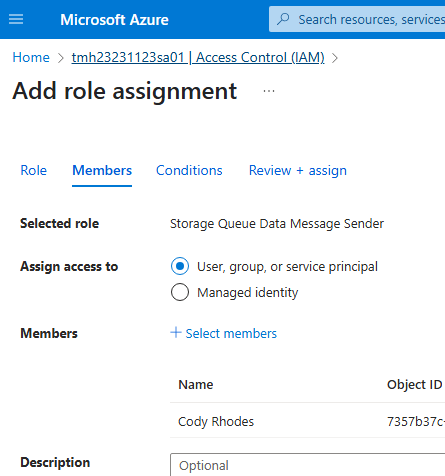
Storage Queue Data Message Sender role will only let you add message to queue, but not view them.
Azure Table Service
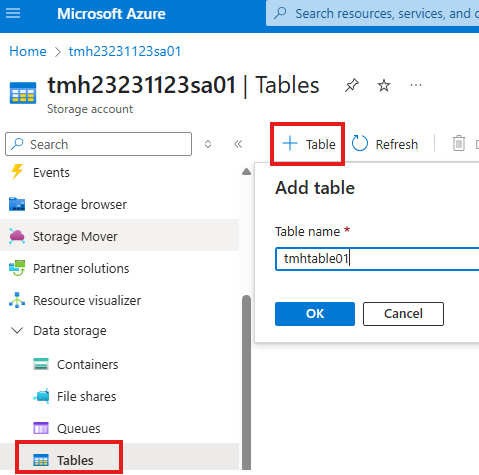
To add data to table, we can do it from portal itself from Storage browser blade.
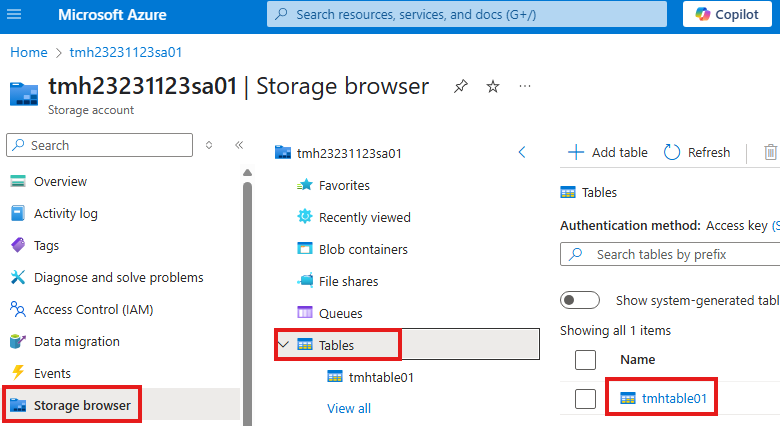
Select the table we want to add data.
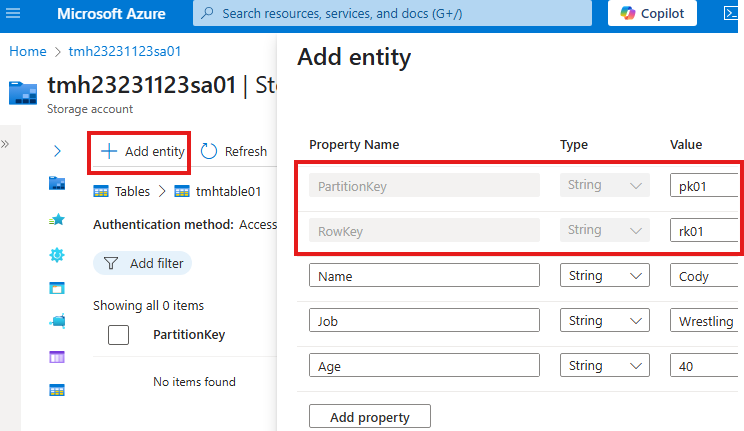
We can add new entity to the table; Each entity will belong to a partition and a row; so there will be partition key and a row key.
Access table using SAS
Section Summary
What Are Containers?
Containers are lightweight, standalone units that package code and its dependencies so an application can run reliably across environments. Docker is one of the most popular tools used to work with containers.
Running Docker on a VM in Azure
You can start by creating an Ubuntu virtual machine (VM) in Azure and install Docker on it. Open port 80 so the VM can receive HTTP requests.
Once Docker is installed, you can run a container using a simple command like:
bashCopyEditsudo docker run -p 80:80 -d nginx
This command runs an NGINX web server container in the background and maps it to port 80 of the VM.
Azure Container Registry (ACR)
While Docker Hub is a public registry for container images, Azure Container Registry (ACR) lets you host your images privately within Azure. It provides better security and integration with other Azure services.
Containerizing an Application
To containerize your own app:
- Create a Dockerfile that defines how the image should be built.
- Copy your app files (e.g., PHP app) to the Ubuntu VM using a tool like FileZilla.
- Build the image using Docker: bashCopyEdit
sudo docker build -t myphpapp .
Now the application is packaged as a Docker image.
Pushing Image to Azure Container Registry
- Enable Admin User in ACR and get credentials.
- Login to ACR from the VM using Docker.
- Tag and Push your image to ACR: bashCopyEdit
sudo docker tag myphpapp <registry-url>/myphpapp sudo docker push <registry-url>/myphpapp
Your image is now hosted on Azure.
Deploying from ACR with Azure Container Instance (ACI)
You can use Azure Container Instances (ACI) to quickly deploy containers without managing VMs. Just select your ACR image and configure the instance to use port 80 for web apps.
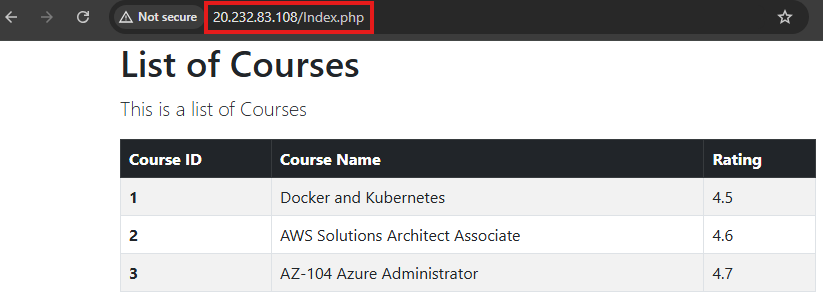
Once deployed, the containerized app is accessible via a public IP.
Deploying to Azure Kubernetes Service (AKS)
For more complex scenarios with multiple containers, use AKS:
- It orchestrates container deployment, scaling, and networking.
- Pull images directly from ACR.
- Use YAML files to define workloads and services.
- Expose the app with a LoadBalancer to get a public IP.
AKS automatically handles traffic distribution, restarts failed containers, and supports persistent storage and scaling.
Managing Access to ACR
Use RBAC (Role-Based Access Control) in the Access Control (IAM) blade of ACR:
- AcrPull role lets AKS pull images from the registry.
- You can assign roles to users, VMs, or services as needed.
Containers
Containers are units of software that packs up all code and dependencies for an application to run.
Deploy Docker on a VM
1 – Deploy VM and connect to it
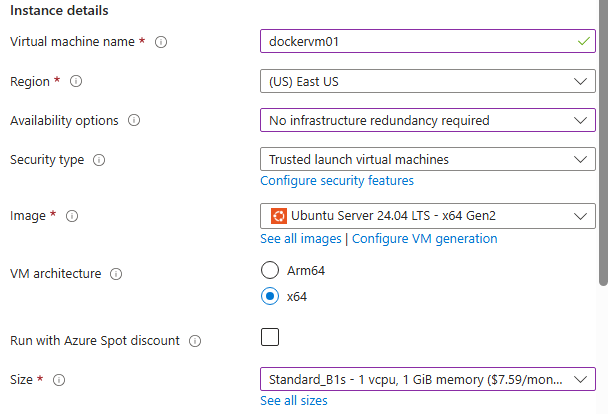
Create an Ubuntu VM in Azure portal.
Open inbound port 80 of the VM, so that we can host a webserver and it will get inbound HTTP request over port 80.
Click here for official documentation to install docker on Ubuntu: Ubuntu | Docker Docs
To connect to VM:
ssh user@public-ip2 – Install docker in Ubuntu VM
Now execute commands to install docker using apt repository:
Add Docker’s official GPG key:
sudo apt-get update
sudo apt-get install ca-certificates curl
sudo install -m 0755 -d /etc/apt/keyrings
sudo curl -fsSL https://download.docker.com/linux/ubuntu/gpg -o /etc/apt/keyrings/docker.asc
sudo chmod a+r /etc/apt/keyrings/docker.asc
Add the repository to Apt sources:
echo \
"deb [arch=$(dpkg --print-architecture) signed-by=/etc/apt/keyrings/docker.asc] https://download.docker.com/linux/ubuntu \
$(. /etc/os-release && echo "${UBUNTU_CODENAME:-$VERSION_CODENAME}") stable" | \
sudo tee /etc/apt/sources.list.d/docker.list > /dev/null
sudo apt-get update
Install the Docker packages.
sudo apt-get install docker-ce docker-ce-cli containerd.io docker-buildx-plugin docker-compose-plugin3 – Run a docker container in Ubuntu VM
Container is created from a docker image.
From docker hub fin the name of image.
To run a nginx container based on nginx image:
sudo docker run -p 80:80 -d nginx-d flad will run it in background
-p will map port 80 of docker to the host VM.
This command will download the image from docker hub, if it is not already present locally.
To view all running containers, run the command:
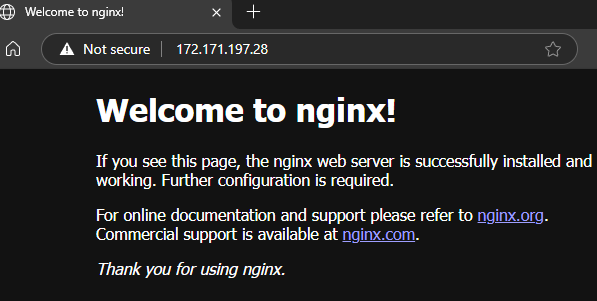
sudo docker psOnce nginx container is running and it is port mapped; we can browse the nginx default web page; now the docker continuer has made the host VM a web server.
Azure Container Registry
The nginx image we used was a ready made image available on Docker hub. We can create our own docker images.
Docker hub is a public registry for docker images. We can upload our images to a private registry in Azure container registry.
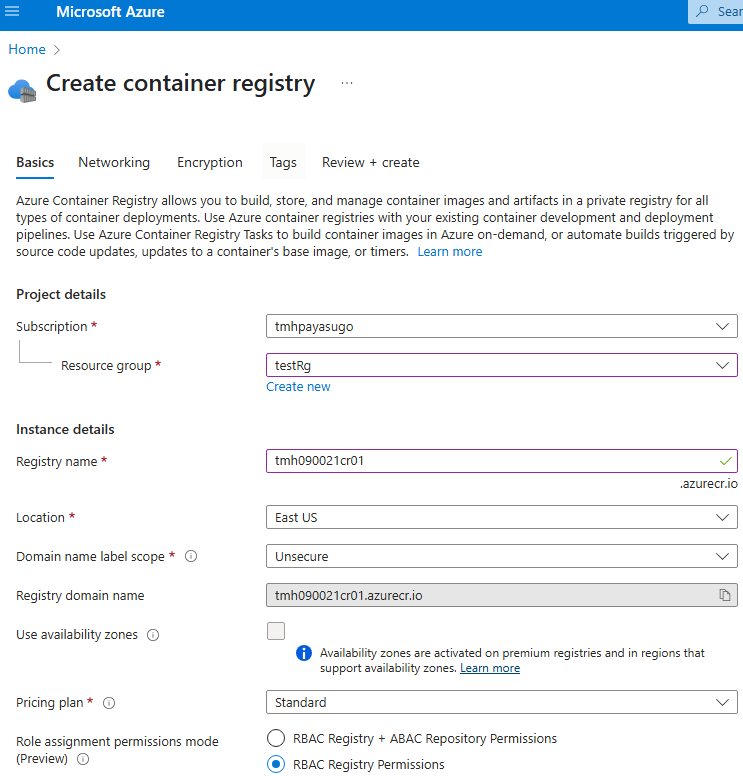
Once deployment is complete we can upload our own images to this container registry.
Containerize an application : Pushing Image To Azure Container Registry
To containerize an application, we need to have a Docker file in the application folder.
Docker file is a set of instructions.
A simple Docker file we will be using is:
FROM php:8.2-apacheCOPY . /var/www/htmlEvery docker files start with FROM. This is the base image on which this image will be built.
php:8.2-apache is a ready made image in Docker hub, with a light-weight Linux OS, Apache web server and all required dependencies for our application. We have to choose this image based on our requirements.
COPY command will copy application files from host computer to docker image.
1 – File Transfer to Ubuntu VM
We need to have docker installed locally to create docker images. We already have an ubuntu VM with docker installed. We will be using that to create our docker image.
Download and install FileZilla client.
Connect to Ubuntu VM:
Go to File > Site Manager

Provide IP, username and password for the VM.
Click on OK to save connection.
Go to site manager again and Connect.
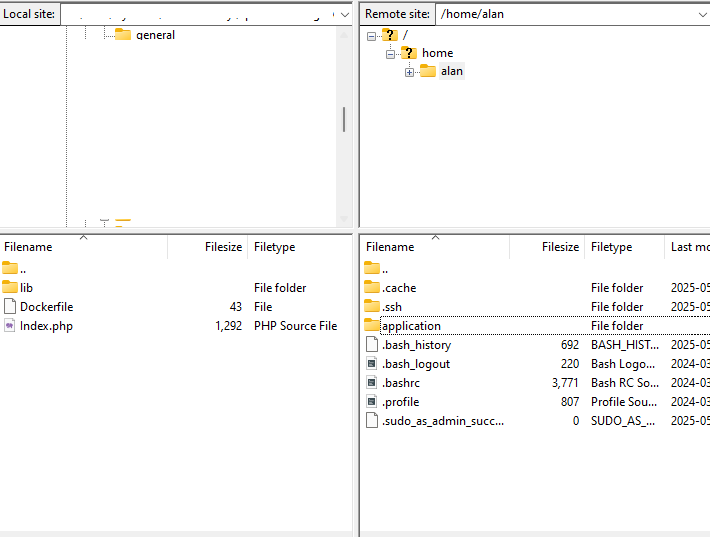
FileZilla will show local and remote file system side by side.
We can create a new directory called application and copy our application files with drag and drop.
2 – Build docker image
Once file transfer is complete, using CLI, go to the folder to which we copied the application files:
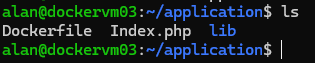
Execute command to build an image using the application files and Docker file:
sudo docker build -t myphpapp .myphpapp is the name of image;
“.” indicates that docker file is in current directory.
Once image is built, we can list all available images using command:
sudo docker images
This will list all the available images in the host machine.
3 – Publish image to Azure container registry
First we need to activate the Admin user.
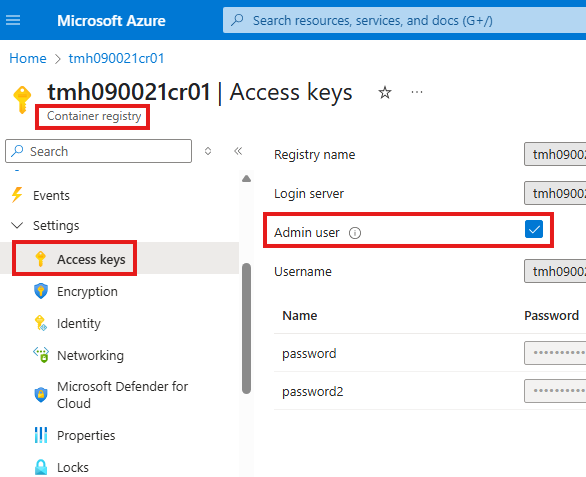
We can get admin user credentials from access keys blade in container registry.
Use these admin credentials to connect to Azure container registry from Ubuntu VM.
sudo docker login <login server URL> -u <admin username> -p <password>Tag the local image
sudo docker tag <local image name> <login server URL>/<local image name>Push the Image
sudo docker push <login server URL>/<local image name>Containerize An Application : Using Image from ACR to Run Containers
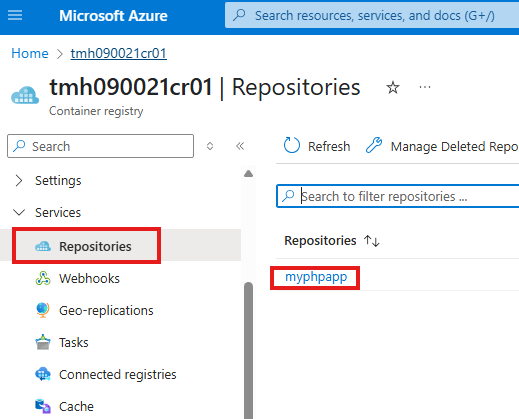
Now, we will be able to see the pushed image, under Repositories blade in ACR.
Azure Container Instance
We can use pull image from ACR to run a container from in any machine with docker installed, but Azure has a service for it called Azure container Instance.
While creating the instance we configure, which image to use, which image source to use etc.
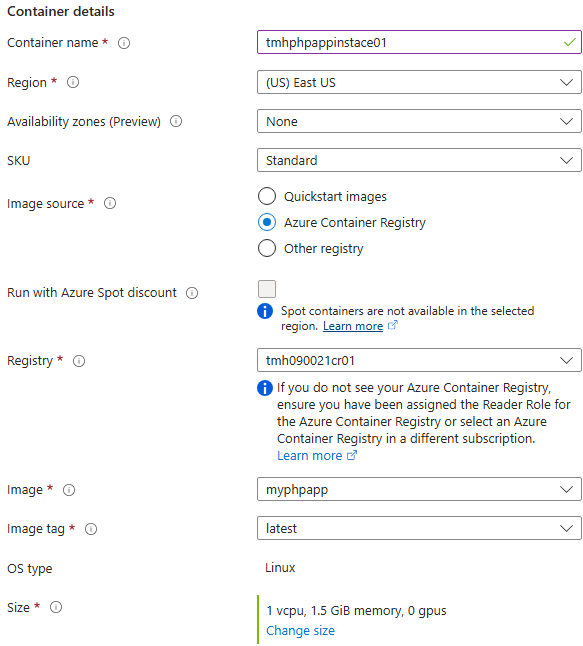
Azure container Instance, is a compute instance with docker installed behind the scene.
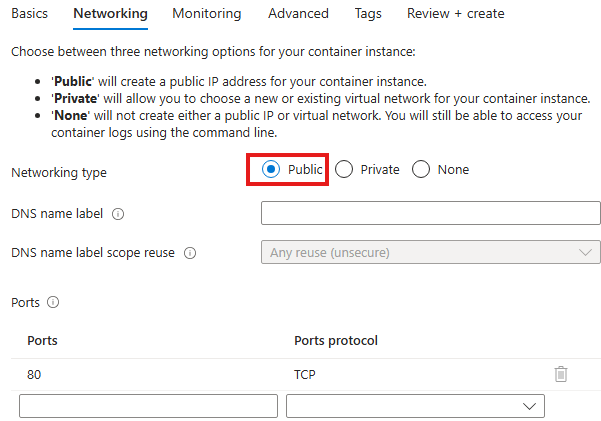
Make it public and expose port 80.
Now once container instance is deployed, we can browse to public IP of the instance to access the containerized application:
Azure Kubernetes Service
Docker Image from ACR can also be deployed on AKS.
Kubernetes is an open-source orchestration tool in case we have multiple containers for various microservices of an application like front end backend database login etc.
Features of Kubernetes:
1 – Restart containers if they fail
2 – Load balance traffic across containers
3 – Dictate state of services that need to run
4 – Mount storage for persistence of data
5- Scale services if needed.
1 – Create AKS resource
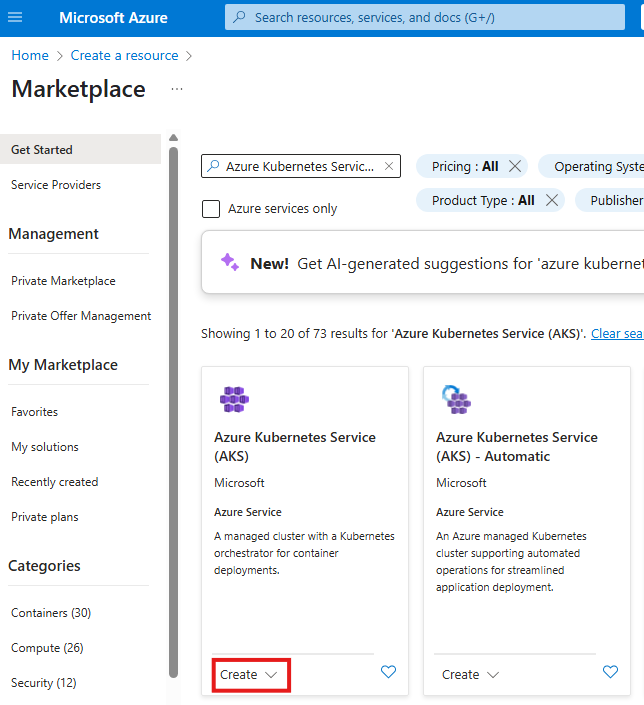
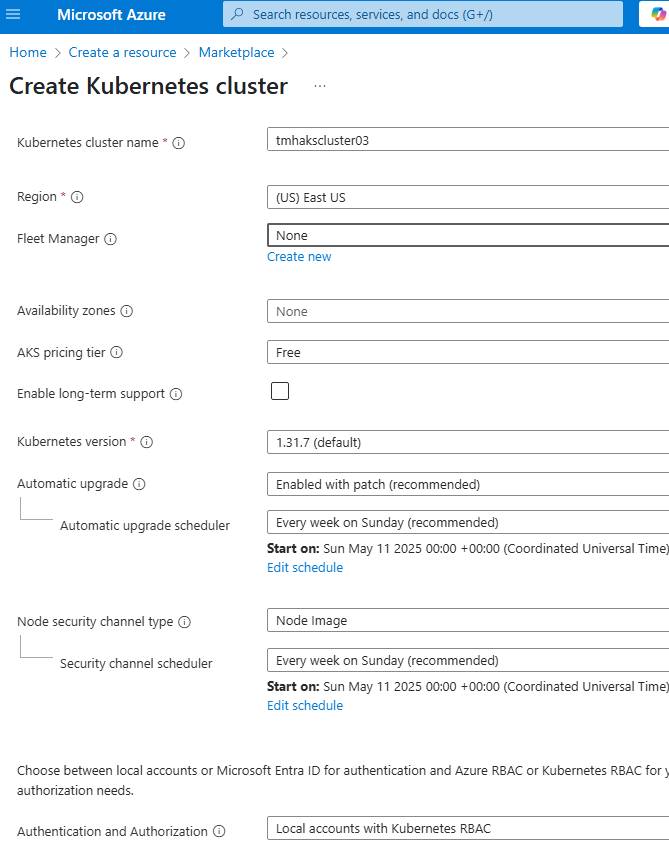
AKS cluster will have node pools, these are compute that will run the containers; We can choose the size of the nodes in Node pools tab:

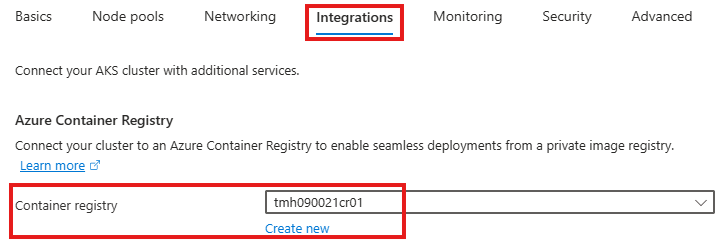
From integrations tab, we choose the ACR.
2 – Deploy
To create a new deployment, create a new workload using YAML.
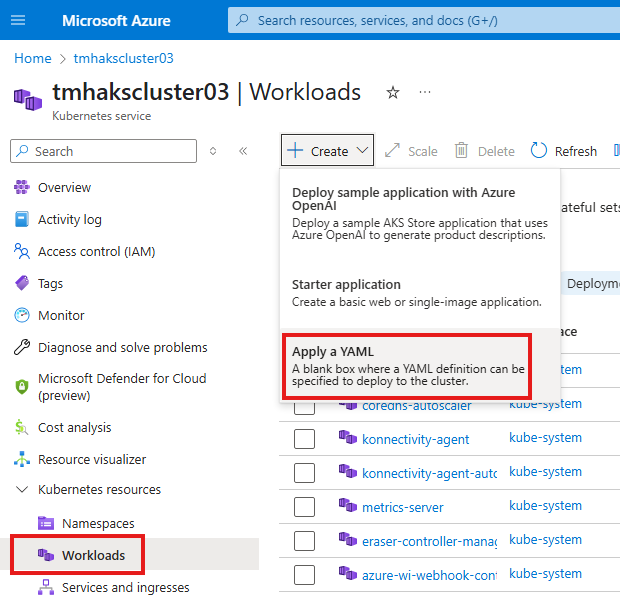
Copy paste the YAML.
Now, we need to deploy service that will allow us to access the application.
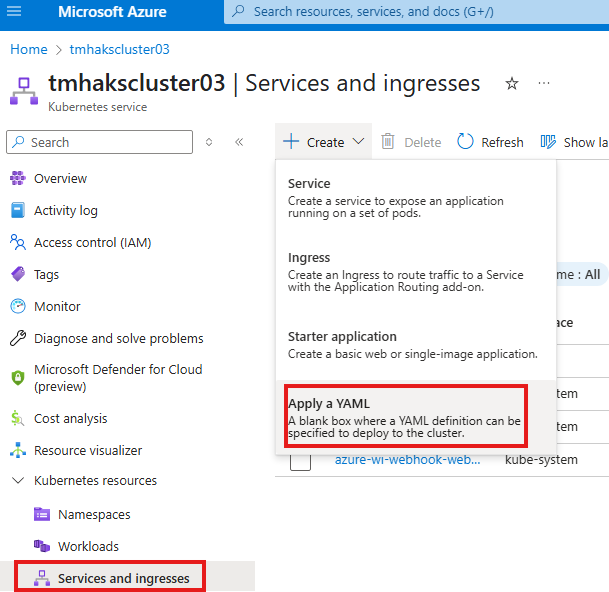
Once service is added we will get public IP to access the PHP app.
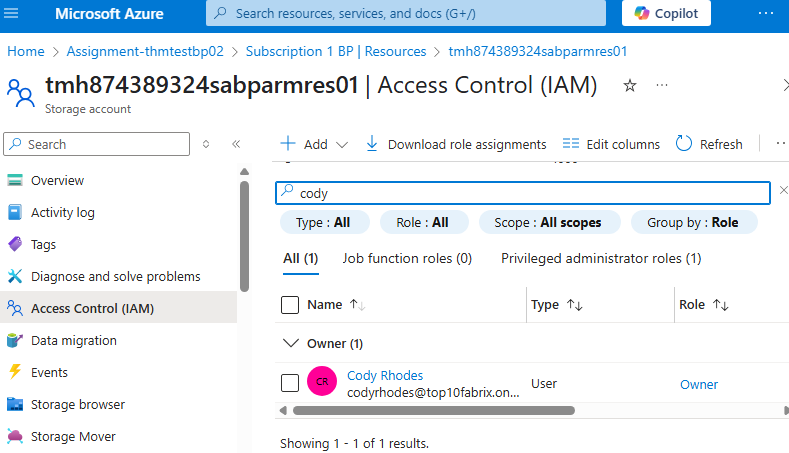
Access Control (IAM) for ACR
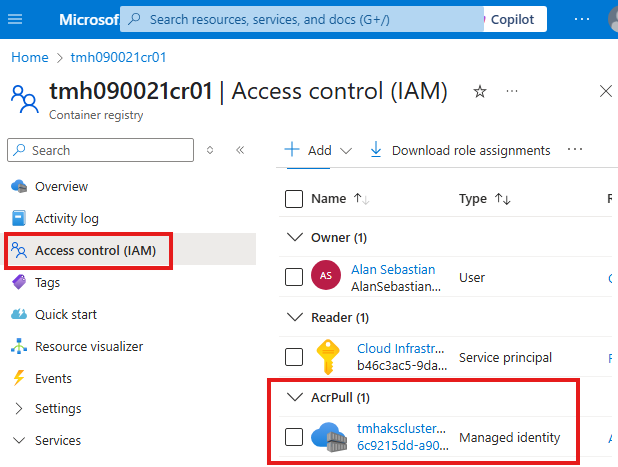
If we check Access control(IAM) blade of ACR, we see that AKS cluster’s managed identity is having a RBAC role of AcrPull.