Author: Alan

  • Accessing SharePoint and Creating a Site

    Microsoft 365 includes powerful tools for collaboration, and SharePoint is one of the most useful among them. It allows teams to share documents, organize information, and create dedicated spaces for projects or departments.

    In this section, you’ll learn how to log in to your Microsoft 365 portal and create a new SharePoint site. Even if you’re completely new, the process is simple and guided.

    Video Explanation


    Logging in to the Office Portal

    Before using SharePoint, you first need to sign in to your Microsoft 365 account. Once logged in, you can access all available apps from one place.

    Steps to log in:

    1. Open your browser and go to office.microsoft.com.
    2. Enter your work or school email and password.
    3. After signing in, you may be redirected to a different Microsoft 365 URL — this is normal.
    4. Use your organization account when prompted.
    5. After login, you’ll see the Microsoft 365 app launcher with apps like Outlook, Word, Teams, and SharePoint.
    6. Click SharePoint to open it.

    Key Point: SharePoint is included with Microsoft 365, so one login gives you access to all apps.


    Creating a SharePoint Site

    A SharePoint site acts as a central hub where your team can store files, share updates, and collaborate.

    Steps to create a site:

    1. On the SharePoint home page, click Create site (top-left corner).
    2. Choose Team site when asked for the site type.
    3. Select the default team template and click Use template.

    Configure your site:

    • Site name → Example: Test Site
    • Site address → Auto-generated (editable)
    • Description → Optional but useful
    • Privacy settings:
      • Public → Anyone in your organization can view
      • Private → Only invited members can access
    • For most team or project work, choose Private
    1. Click Create site.
    2. You can skip adding members for now and add them later.

    Key Point: A Private site keeps access limited to invited members, which is ideal for most teams and projects.


    Familiarizing Yourself with the SharePoint Site Interface

    A SharePoint site in Microsoft 365 is designed to make navigation and collaboration simple. Once you understand the layout, it becomes much easier to find information, manage files, and move between different areas of your site.

    In this section, we’ll walk through the main parts of a SharePoint site interface so you know what each area does and how it helps with daily work.


    Top Bar and Global Navigation

    At the very top of a SharePoint site, you’ll find tools that help you search and navigate across sites.

    Key areas:

    • Search bar (top):
      Lets you search for files, pages, or content across SharePoint.
    • SharePoint toolbar (far left):
      This toolbar is consistent across SharePoint sites. It includes:
      • Home icon → Takes you to the SharePoint home page where you can see your sites.
      • Sites icon → Shows all sites available to you in your organization.
      • News icon → Displays news posts from different sites.
      • Files icon → Lists your files across the organization, including files connected to your work.

    Site Home Page

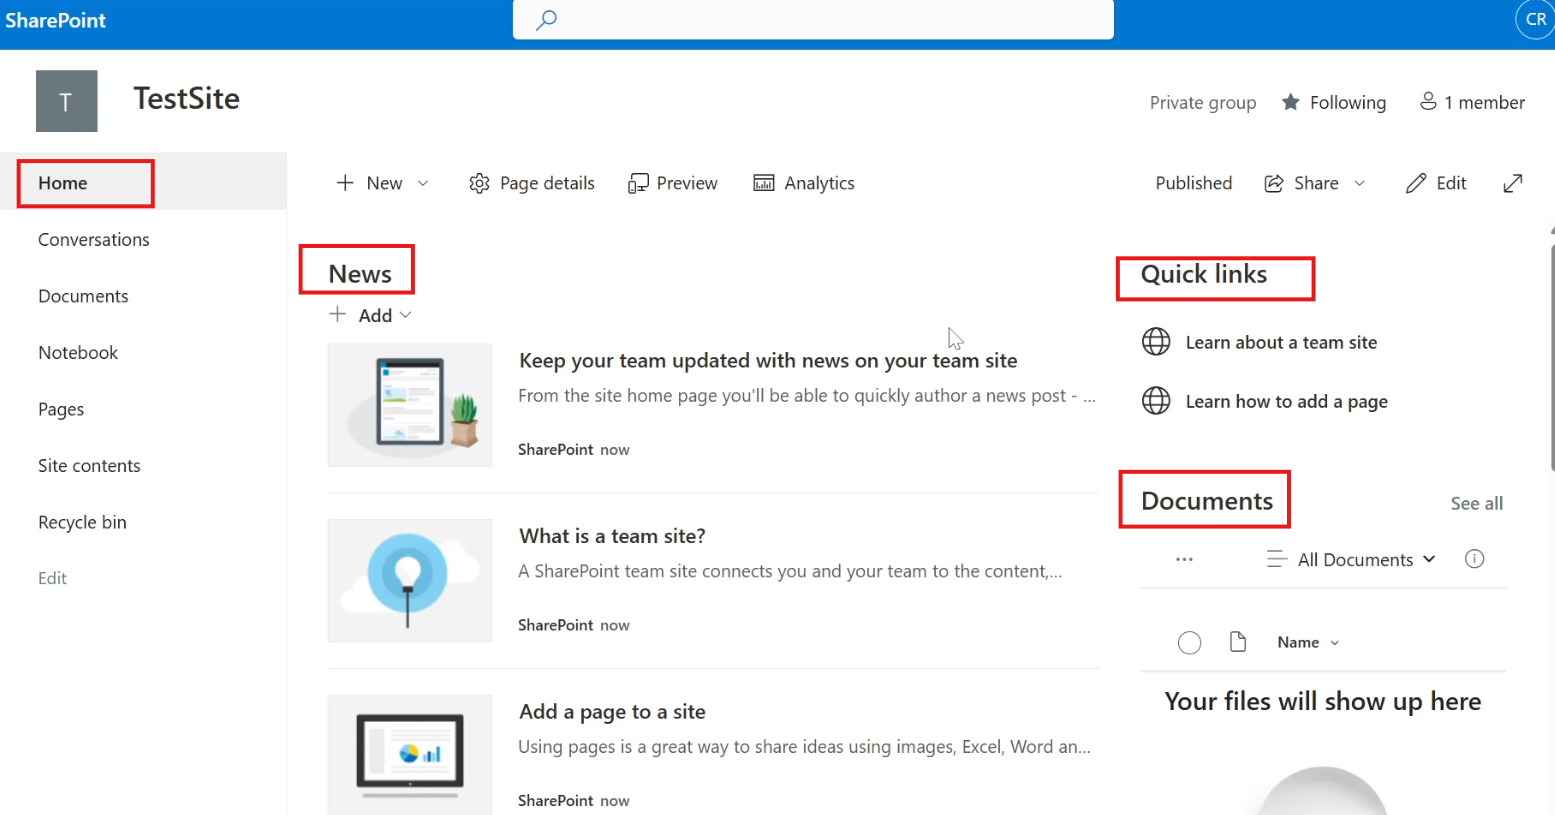
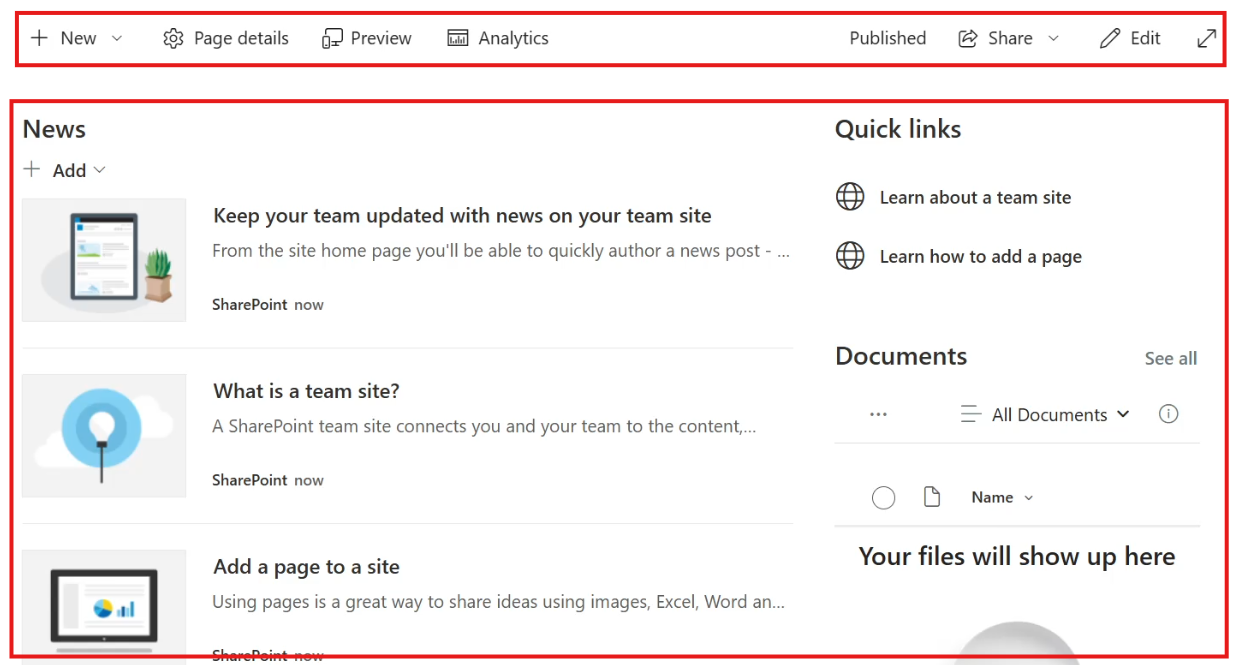
    The site home page is made up of web parts, which you can think of as widgets that display different types of content.

    Common web parts include:

    1. News – Displays announcements and updates
    2. Quick Links – Provides shortcuts to important resources
    3. Documents – Shows recent or pinned documents
    4. Activity – Highlights recent actions on the site

    The home page acts like a dashboard where important information is grouped in one place.


    Site Apps and Left Navigation

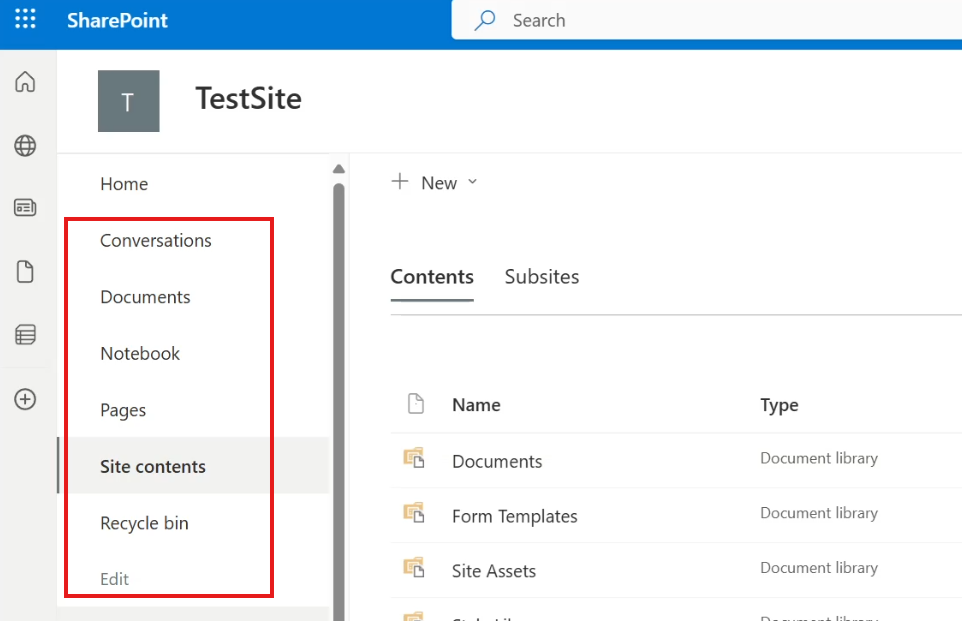
    A SharePoint site is essentially a collection of apps (also called site contents). Each app serves a specific purpose and has its own screen and menu.

    The left-side navigation menu helps you move between these apps.

    Common apps include:

    • Conversations
      Used to track communications related to the site (often connected to group discussions).
    • Documents
      A document library where site-related files are stored and managed.
    • Site Contents
      A central area where you can see everything in the site. This includes:
      • Document libraries
      • Page libraries
      • Lists and other content types
      You can think of Site Contents like a “program files” directory on a computer—it shows all available components in one place.

    To explore available content types, you can click New inside Site Contents and see what can be created.


    How Apps Work

    Each app in SharePoint has:

    • Its own menu
    • Its own display screen

    For example, the Home page itself is an app with a layout and menu options.

    Understanding that a SharePoint site is built from apps makes it easier to manage and customize your site as your needs grow.


    Once you’re familiar with these areas, navigating SharePoint becomes much more intuitive, helping you find information faster and work more efficiently.

  • 7 – 🚀 Azure App Service with Terraform — Blue-Green Deployment Step-by-Step

    Blue-green deployment is a release strategy that lets you ship new versions of your app with near-zero downtime and low risk. Instead of updating your live app directly, you run two environments side-by-side and switch traffic between them.

    In this guide, I’ll walk you through how I implemented blue-green deployment on Azure using Terraform and simple HTML apps. This is written for beginners and focuses on understanding why we do each step — not just what to type.

    Table of Contents


    🧠 What Is Blue-Green Deployment (Simple Explanation)

    Imagine:

    • Blue = current live version
    • Green = new version

    Users only see one version at a time.

    You:

    1. Deploy the new version to Green
    2. Test it safely
    3. Swap Green → Production
    4. Instantly roll back if needed

    No downtime. No risky in-place updates.

    Azure App Service deployment slots make this easy.


    🎯 What We Will Build

    We will:

    ✅ Create Azure infrastructure with Terraform
    ✅ Create a staging slot
    ✅ Deploy two app versions (Blue & Green)
    ✅ Swap them using Terraform
    ✅ Understand how real companies do this


    📌 Prerequisites

    You should have:

    • Azure subscription
    • Terraform (by HashiCorp) installed
    • Azure CLI installed
    • Logged in using az login
    • Basic Terraform knowledge

    🏗️ Step 1 — Create Resource Group, App Service Plan & App Service

    Why these resources?

    Resource Group
    Container that holds everything.

    App Service Plan
    Defines pricing tier, performance, and features.
    Deployment slots require Standard tier or higher.

    App Service
    Your actual web app.


    rg.tf

    resource "azurerm_resource_group" "rg" {
      name = "rgminipro87897"
      location = "Central US"
    }
    

    asplan.tf

    resource "azurerm_app_service_plan" "asp" {
      name = "aspminipro8972"
      location = azurerm_resource_group.rg.location
      resource_group_name = azurerm_resource_group.rg.name
    
      sku {
        tier = "Standard"
        size = "S1"
      }
    }
    

    👉 Why S1?
    Slots are unavailable in Free/Basic tiers.


    appservice.tf

    resource "azurerm_app_service" "as" {
      name = "appserviceminipro87897987233"
      location = azurerm_resource_group.rg.location
      resource_group_name = azurerm_resource_group.rg.name
      app_service_plan_id = azurerm_app_service_plan.asp.id
    }
    

    ▶ Run Terraform

    terraform init
    terraform apply
    

    ✅ Verify

    Open the app URL in a browser.
    You’ll see a default Azure page — that means infrastructure works.


    🔁 Step 2 — Create a Staging Slot

    A deployment slot is a second live version of your app with its own URL.

    Think of it as a testing environment running inside the same App Service.


    slot.tf

    resource "azurerm_app_service_slot" "slot" {
      name = "slotstagingminipro78623"
      location = azurerm_resource_group.rg.location
      resource_group_name = azurerm_resource_group.rg.name
      app_service_plan_id = azurerm_app_service_plan.asp.id
      app_service_name = azurerm_app_service.as.name
    }
    

    ▶ Apply

    terraform apply
    

    ✅ Verify in Azure

    You will see:

    • Production slot
    • Staging slot
    • Traffic: 100% production, 0% staging

    👉 This is normal — staging is for testing.


    🌈 Step 3 — Deploy Blue & Green Apps

    Terraform builds infrastructure.
    We use Azure CLI to deploy app code.

    (That’s also how real companies separate infra and app deployments.)


    Blue Version (Production)

    Create:

    <h1 style="background:blue;color:white;">BLUE VERSION</h1>
    

    Zip with index.html at root → blueapp.zip


    Green Version (Staging)

    <h1 style="background:green;color:white;">GREEN VERSION</h1>
    

    Zip → greenapp.zip


    Deploy Using Microsoft Azure CLI

    Blue → Production

    az webapp deploy \
      --resource-group rgminipro87897 \
      --name appserviceminipro87897987233 \
      --src-path blueapp.zip \
      --type zip
    

    Green → Staging

    az webapp deploy \
      --resource-group rgminipro87897 \
      --name appserviceminipro87897987233 \
      --slot slotstagingminipro78623 \
      --src-path greenapp.zip \
      --type zip
    

    ✅ Verify

    Production URL → Blue
    Staging URL → Green

    Perfect setup!


    🔄 Step 4 — Slot Swapping (The Core of Blue-Green)

    Now we swap environments.


    swap.tf

    resource "azurerm_web_app_active_slot" "swap" {
      slot_id = azurerm_app_service_slot.slot.id
    }
    

    ▶ Apply

    terraform apply
    

    🎉 Result

    Now:

    Production → Green
    Staging → Blue

    You just performed a blue-green deployment!


    🔙 How to Swap Back

    Terraform won’t auto-reverse swaps.

    Use Azure CLI:

    az webapp deployment slot swap \
      --resource-group rgminipro87897 \
      --name appserviceminipro87897987233 \
      --slot slotstagingminipro78623 \
      --target-slot production
    

    🏢 How Companies Do This in Real Life

    In real projects:

    Terraform
    → Creates infrastructure

    CI/CD pipelines
    → Deploy apps & swap slots

    Why?

    Because swapping affects real users and needs:

    • Testing
    • Approval
    • Monitoring
    • Rollback strategy

    Common tools:

    • GitHub Actions
    • Azure DevOps
    • Jenkins

    📌 Key Lessons

    You learned:

    ✔ App Service basics
    ✔ Deployment slots
    ✔ Blue-green strategy
    ✔ Terraform infrastructure setup
    ✔ CLI deployment
    ✔ Slot swapping logic
    ✔ Real-world DevOps workflow


    🧹 Cleanup

    Avoid charges:

    terraform destroy
    

    🚀 Final Thoughts

    Blue-green deployment is a core DevOps skill.
    Mastering it early gives you a big advantage.

    This small demo mirrors how production systems reduce risk during releases.

  • 6 – Terraform + Azure Entra ID Mini Project: Step-by-Step Beginner Guide (Users & Groups from CSV)

    Table of Contents

    1. Terraform + Azure Entra ID Mini Project: Step-by-Step Beginner Guide (Users & Groups from CSV)
    2. 🎯 What We’re Building
    3. 🟢 Step 1 — Configure Provider & Fetch Domain
    4. 🟢 Step 2 — Test CSV Reading
    5. 🟢 Step 3 — Create ONE Test User
    6. 🟢 Step 4 — Create Users from CSV
    7. 🟢 Step 5 — Create Group & Add Members
    8. 🧠 Key Beginner Lessons
    9. 🚀 What You Can Try Next
    10. 🎉 Final Thoughts

    Terraform + Azure Entra ID Mini Project: Step-by-Step Beginner Guide (Users & Groups from CSV)

    In this mini project, I automated user and group management in Microsoft Entra ID using Terraform.

    Instead of creating infrastructure like VMs or VNets, we manage:

    • 👤 Users
    • 👥 Groups
    • 🔗 Group memberships

    I followed my instructor’s tutorial but implemented it in my own small, testable steps. This blog shows exactly how you can do the same and debug easily as a beginner.


    🎯 What We’re Building

    We will:

    ✅ Fetch our tenant domain
    ✅ Read users from a CSV file
    ✅ Create Entra ID users from CSV
    ✅ Detect duplicate usernames
    ✅ Create a group
    ✅ Add users to the group based on department


    🟢 Step 1 — Configure Provider & Fetch Domain

    azadprovider.tf

    terraform {
      required_providers {
        azuread = {
          source  = "hashicorp/azuread"
          version = "2.41.0"
        }
      }
    }
    

    👉 This tells Terraform to use the Azure AD provider.


    domainfetch.tf

    data "azuread_domains" "tenant" {
      only_initial = true
    }
    
    output "domain" {
      value = data.azuread_domains.tenant.domains.0.domain_name
    }
    

    Run

    terraform init
    terraform apply
    

    Verify

    You should see:

    domain = "yourtenant.onmicrosoft.com"
    

    ✅ Now Terraform can build valid usernames.


    🟢 Step 2 — Test CSV Reading

    locals {
      users = csvdecode(file("users.csv"))
    }
    
    output "users_debug" {
      value = local.users
    }
    

    Why?

    Before creating users, confirm Terraform reads the CSV correctly.

    Run

    terraform plan
    

    You should see structured user data printed.

    ✅ If this fails → your CSV format is wrong.


    🟢 Step 3 — Create ONE Test User

    Always test with one user first.

    resource "azuread_user" "testuserminipro867" {
      user_principal_name = "testuserminipro867@yourdomain.onmicrosoft.com"
      display_name = "Test User"
      password = "Password123!"
    }
    

    Verify in Portal

    Entra ID → Users → Confirm creation.

    ✅ Works? Good.
    Then comment it out.


    🟢 Step 4 — Create Users from CSV

    Now we automate.


    Generate UPNs

    locals {
      upns = [
        for u in local.users :
        lower("${u.first_name}.${u.last_name}@${data.azuread_domains.tenant.domains[0].domain_name}")
      ]
    }
    

    👉 Creates usernames like:

    michael.scott@tenant.onmicrosoft.com
    

    Detect Duplicates

    output "duplicate_check" {
      value = length(local.upns) != length(distinct(local.upns))
        ? "❌ DUPLICATES FOUND"
        : "✅ No duplicates"
    }
    

    💡 Beginner Tip:
    Duplicate usernames will break Terraform — always check first!


    Preview Planned Users

    output "planned_users" {
      value = local.upns
    }
    

    Create Users

    resource "azuread_user" "users" {
    
      for_each = {
        for idx, user in local.users :
        local.upns[idx] => user
      }
    
      user_principal_name = each.key
      display_name = "${each.value.first_name} ${each.value.last_name}"
      mail_nickname = lower("${each.value.first_name}${each.value.last_name}")
    
      department = each.value.department
      password = "Password123!"
    }
    

    Apply

    terraform apply
    

    Verify

    Check Entra ID → Users.

    ✅ Users created automatically!


    🔥 Important Learning

    If you change the CSV later:

    Terraform will
    ✔ create new users
    ✔ update existing users
    ✔ remove deleted users

    👉 This is Terraform’s desired state model in action.


    🟢 Step 5 — Create Group & Add Members


    Create Group

    resource "azuread_group" "test_group" {
      display_name = "Test Group"
      security_enabled = true
    }
    

    Add Members by Department

    resource "azuread_group_member" "education" {
    
      for_each = {
        for u in azuread_user.users :
        u.mail_nickname => u
        if u.department == "Education"
      }
    
      group_object_id = azuread_group.test_group.id
      member_object_id = each.value.id
    }
    

    Apply

    terraform apply
    

    Verify

    Portal → Groups → Members tab

    ✅ Only Education department users added.


    🧠 Key Beginner Lessons

    ✅ Work in Small Steps

    Don’t deploy everything at once.


    ✅ Always Check Data First

    Validate CSV before creating resources.


    ✅ Use Outputs for Debugging

    Outputs save hours of troubleshooting.


    ✅ Terraform is Declarative

    It maintains the desired state automatically.


    🚀 What You Can Try Next

    👉 Add more users to CSV
    👉 Create groups by job title
    👉 Use Service Principal authentication
    👉 Generate random passwords
    👉 Assign roles to groups


    🎉 Final Thoughts

    This project shows how powerful Terraform is beyond infrastructure — it can manage identity too.

    If you’re learning cloud or DevOps, this skill is extremely valuable because real organizations manage thousands of users and groups.

    Start small, test often, and build confidence step-by-step — exactly like you did here.

  • 5 – Azure VNet Peering: A Real-World Terraform Mini Project to Build a Secure Cloud Network

    In this mini project, I implemented Azure VNet peering using Terraform, but instead of applying everything at once, I deliberately broke the setup into small, testable steps.
    This approach makes it much easier to understand what’s happening, catch mistakes early, and build real confidence with Terraform and Azure networking.

    Below is the exact flow I followed — and you can follow the same steps as a beginner.

    Table of Contents

    1. Step 1: Create the Resource Group, Virtual Networks, and Subnets
    2. Step 2: Create VM1 in Subnet 1 (via a NIC)
    3. Step 3: Create VM2 in Subnet 2
    4. Step 4: Test Connectivity Before Peering (Expected to Fail)
    5. Step 5: Add VNet Peering (Both Directions)
    6. Step 6: Test Connectivity After Peering (Expected to Work)
    7. Key Takeaways for Beginners
    8. Why This Step-by-Step Approach Matters

    Step 1: Create the Resource Group, Virtual Networks, and Subnets

    We start by creating the network foundation:

    • One resource group
    • Two separate virtual networks
    • One subnet inside each virtual network

    At this stage, there is no connectivity between the networks.

    What we created

    • vnet1 → address space 10.0.0.0/16
    • vnet2 → address space 10.1.0.0/16
    • One /24 subnet in each VNet
    resource "azurerm_resource_group" "rg" {
      name     = "rgminipro76876"
      location = "Central US"
    }
    
    resource "azurerm_virtual_network" "vnet1" {
      name                = "vnet1minipro8768"
      location            = azurerm_resource_group.rg.location
      address_space       = ["10.0.0.0/16"]
      resource_group_name = azurerm_resource_group.rg.name
    }
    
    resource "azurerm_subnet" "sn1" {
      name                 = "subnet1minipro878"
      resource_group_name  = azurerm_resource_group.rg.name
      virtual_network_name = azurerm_virtual_network.vnet1.name
      address_prefixes     = ["10.0.0.0/24"]
    }
    
    resource "azurerm_virtual_network" "vnet2" {
      name                = "vnet2minipro8768"
      location            = azurerm_resource_group.rg.location
      address_space       = ["10.1.0.0/16"]
      resource_group_name = azurerm_resource_group.rg.name
    }
    
    resource "azurerm_subnet" "sn2" {
      name                 = "subnet2minipro878"
      resource_group_name  = azurerm_resource_group.rg.name
      virtual_network_name = azurerm_virtual_network.vnet2.name
      address_prefixes     = ["10.1.0.0/24"]
    }
    

    How to verify

    • Run terraform apply
    • Open Azure Portal
    • Confirm:
      • Both VNets exist
      • Each VNet has its own subnet
      • Address spaces do not overlap

    At this point, nothing can talk to anything else yet — and that’s expected.


    Step 2: Create VM1 in Subnet 1 (via a NIC)

    In Azure, VMs don’t live directly inside subnets.
    Instead, a Network Interface (NIC) is placed inside a subnet, and the VM attaches to that NIC.

    Here, we:

    • Create a NIC attached to subnet1
    • Create a VM that uses that NIC

    VM1 and NIC1

    resource "azurerm_network_interface" "nic1" {
      name                = "nic1minipro8789"
      location            = azurerm_resource_group.rg.location
      resource_group_name = azurerm_resource_group.rg.name
    
      ip_configuration {
        name                          = "ipconfignic1minipro989"
        subnet_id                     = azurerm_subnet.sn1.id
        private_ip_address_allocation = "Dynamic"
      }
    }
    
    resource "azurerm_virtual_machine" "vm1" {
      name                = "vm1minipro98908"
      location            = azurerm_resource_group.rg.location
      resource_group_name = azurerm_resource_group.rg.name
      network_interface_ids = [
        azurerm_network_interface.nic1.id
      ]
      vm_size = "Standard_D2s_v3"
    
      delete_os_disk_on_termination = true
    
      storage_image_reference {
        publisher = "Canonical"
        offer     = "0001-com-ubuntu-server-jammy"
        sku       = "22_04-lts"
        version   = "latest"
      }
    
      storage_os_disk {
        name              = "storageosdisk1"
        caching           = "ReadWrite"
        create_option     = "FromImage"
        managed_disk_type = "Standard_LRS"
      }
    
      os_profile {
        computer_name  = "peer1vm"
        admin_username = "testadmin"
        admin_password = "Password1234!"
      }
    
      os_profile_linux_config {
        disable_password_authentication = false
      }
    }
    

    How to verify

    • Run terraform apply
    • In Azure Portal:
      • VM1 exists
      • NIC is attached
      • NIC is in subnet1
      • VM has no public IP

    Step 3: Create VM2 in Subnet 2

    Now we repeat the same pattern for the second network:

    • NIC attached to subnet2
    • VM attached to that NIC
    resource "azurerm_network_interface" "nic2" {
      name                = "nic2minipro8789"
      location            = azurerm_resource_group.rg.location
      resource_group_name = azurerm_resource_group.rg.name
    
      ip_configuration {
        name                          = "ipconfignic2minipro989"
        subnet_id                     = azurerm_subnet.sn2.id
        private_ip_address_allocation = "Dynamic"
      }
    }
    
    resource "azurerm_virtual_machine" "vm2" {
      name                = "vm2minipro98908"
      location            = azurerm_resource_group.rg.location
      resource_group_name = azurerm_resource_group.rg.name
      network_interface_ids = [
        azurerm_network_interface.nic2.id
      ]
      vm_size = "Standard_D2s_v3"
    
      delete_os_disk_on_termination = true
    
      storage_image_reference {
        publisher = "Canonical"
        offer     = "0001-com-ubuntu-server-jammy"
        sku       = "22_04-lts"
        version   = "latest"
      }
    
      storage_os_disk {
        name              = "storageosdisk2"
        caching           = "ReadWrite"
        create_option     = "FromImage"
        managed_disk_type = "Standard_LRS"
      }
    
      os_profile {
        computer_name  = "peer2vm"
        admin_username = "testadmin"
        admin_password = "Password1234!"
      }
    
      os_profile_linux_config {
        disable_password_authentication = false
      }
    }
    

    How to verify

    • Run terraform apply
    • Confirm:
      • VM2 exists
      • NIC2 is attached
      • NIC2 belongs to subnet2
      • VM2 also has no public IP

    Step 4: Test Connectivity Before Peering (Expected to Fail)

    Now we test whether the two VMs can communicate without peering.

    Because:

    • They are in different VNets
    • There is no peering
    • No public IPs

    They should not be able to communicate.

    How I tested

    Using Azure Run Command (no SSH or Bastion needed):

    • VM1 → Operations → Run command → RunShellScript
    • Command:
    ping -c 4 10.1.0.x
    

    Result

    4 packets transmitted, 0 received, 100% packet loss
    

    ✅ This is the correct and expected behavior


    Step 5: Add VNet Peering (Both Directions)

    VNet peering in Azure is not automatic.
    You must create two peering connections:

    • VNet1 → VNet2
    • VNet2 → VNet1
    resource "azurerm_virtual_network_peering" "peer1to2" {
      name                      = "peer1to2minipro455"
      resource_group_name       = azurerm_resource_group.rg.name
      virtual_network_name      = azurerm_virtual_network.vnet1.name
      remote_virtual_network_id = azurerm_virtual_network.vnet2.id
    }
    
    resource "azurerm_virtual_network_peering" "peer2to1" {
      name                      = "peer2to1minipro455"
      resource_group_name       = azurerm_resource_group.rg.name
      virtual_network_name      = azurerm_virtual_network.vnet2.name
      remote_virtual_network_id = azurerm_virtual_network.vnet1.id
    }
    

    How to verify

    • Run terraform apply
    • Azure Portal → Virtual Networks → Peering
    • Status should show Connected

    Step 6: Test Connectivity After Peering (Expected to Work)

    Now we repeat the same test as before.

    ping -c 4 10.1.0.x
    

    Result

    4 packets transmitted, 4 received, 0% packet loss
    

    🎉 Success!

    This proves:

    • VNet peering is working
    • Traffic stays on Azure’s private backbone
    • No public IPs are required

    Key Takeaways for Beginners

    • VMs communicate via NICs, not directly via subnets
    • VNets are isolated by default
    • Peering must be created in both directions
    • Always test:
      • ❌ Before peering
      • ✅ After peering
    • Applying Terraform in small steps makes debugging much easier

    Why This Step-by-Step Approach Matters

    Instead of running one giant terraform apply and hoping for the best, this method:

    • Builds real understanding
    • Makes Azure networking concepts visual
    • Helps you debug like a real DevOps engineer

    If you can do this project, you already understand:

    • VNets
    • Subnets
    • NICs
    • VM placement
    • VNet peering
    • Real-world network isolation

    That’s solid progress 👏

  • 🔐 SSH, Keys, .pem, .ppk, PuTTY, and Windows vs Linux VMs — Explained Clearly

    When working with cloud virtual machines, authentication is often the most confusing topic for beginners:

    • Why do we need SSH keys before a VM exists?
    • What exactly is a .pem file in AWS?
    • Why does Windows EC2 require password decryption?
    • What is PuTTY, and why does it use .ppk files?
    • Why can’t we just use PowerShell or a normal terminal?

    This blog explains all of it from first principles, without assuming prior knowledge.


    1. Does my laptop really support SSH?

    Yes — your laptop already has SSH support.

    Modern operating systems ship with OpenSSH, a standard cryptographic and networking tool:

    • Windows 10 / 11 → OpenSSH included
    • Linux → OpenSSH included
    • macOS → OpenSSH included

    That’s why commands like these work out of the box:

    ssh
    ssh-keygen
    

    👉 SSH is not provided by AWS or Azure.
    It’s an operating system feature.


    2. What is an SSH key pair?

    When you generate an SSH key, your OS creates two mathematically linked files:

    FileExample nameLives wherePurpose
    Private keykey, id_rsa, .pemYour laptop onlyProves your identity
    Public keykey.pubGiven to the VMVerifies your identity

    ⚠️ The private key must never be shared.
    The public key is safe to distribute.


    3. Why must SSH keys exist before the VM is created?

    Cloud VMs do not generate their own SSH keys.

    Instead, the flow is:

    1. You create an SSH key pair locally
    2. You give the public key to the cloud provider
    3. The provider injects it into the VM during creation

    On Linux VMs, the public key is stored in:

    ~/.ssh/authorized_keys
    

    This file defines who is allowed to log in.


    4. Where is the private key actually used?

    This is a common misunderstanding.

    The private key is never sent to the cloud.

    It is used only on your laptop, later, when you connect:

    ssh -i private_key user@vm-ip
    

    At login time:

    1. SSH client uses your private key
    2. VM checks the stored public key
    3. Cryptographic proof succeeds
    4. Access is granted

    The cloud platform is not involved in this step.


    5. AWS EC2 .pem files — what are they really?

    In AWS, when you create a key pair:

    • AWS generates an SSH key pair
    • AWS keeps the public key
    • You download the private key as a .pem file

    So a .pem file is simply:

    An SSH private key

    Nothing more.


    6. Why Linux EC2 uses .pem directly

    Linux EC2 instances:

    • Use SSH
    • Use key-based authentication
    • Do not allow passwords by default

    That’s why this works:

    ssh -i mykey.pem ec2-user@<public-ip>
    

    The private key is used directly for authentication.


    7. Why Windows EC2 is different

    Windows EC2 instances:

    • Do not use SSH for login
    • Use RDP (Remote Desktop Protocol)
    • RDP requires a username and password

    But AWS does not want to send passwords insecurely.

    So AWS does this instead:

    1. Generates a random Administrator password
    2. Encrypts it using your public key
    3. Stores the encrypted password
    4. You download the .pem (private key)
    5. You decrypt the password locally
    6. You log in via RDP using that password

    Important distinction

    Linux EC2Windows EC2
    SSHRDP
    Key-based loginPassword-based login
    .pem used directly.pem used to decrypt password

    So the .pem file is not used to log in directly to Windows.


    8. What exactly is PuTTY?

    PuTTY is not just a terminal.

    PuTTY is:

    A Windows-native SSH client

    Before Windows 10:

    • Windows had no built-in SSH
    • PuTTY was the standard way to:
      • SSH into Linux servers
      • Manage SSH keys
      • Save sessions

    That’s why PuTTY became popular.


    9. Is PuTTY the same as PowerShell or CMD?

    No.

    ToolWhat it is
    CMDShell
    PowerShellShell
    Windows TerminalTerminal UI
    PuTTYSSH client

    PuTTY:

    • Opens a terminal window
    • Handles network authentication
    • Manages SSH sessions

    10. Can PuTTY log into Linux VMs?

    ✔ Yes — very commonly.

    PuTTY is widely used to:

    • SSH into Linux EC2
    • SSH into Azure Linux VMs
    • SSH into on-prem Linux servers

    11. Can PuTTY log into Windows VMs?

    ❌ No.

    Windows login uses RDP, not SSH.

    For Windows VMs you use:

    • Remote Desktop Connection (mstsc)

    PuTTY does not support RDP.


    12. Why does PuTTY use .ppk files?

    PuTTY does not use OpenSSH key formats.

    ToolPrivate key format
    OpenSSH.pem, .key
    PuTTY.ppk

    A .ppk file is simply:

    PuTTY’s private key format

    Same cryptographic key, different encoding.


    13. Why do we convert .pem.ppk?

    Because PuTTY cannot read OpenSSH private keys.

    Conversion is done using PuTTYgen:

    .pem / .key  ──▶ puttygen ──▶ .ppk
    

    This conversion:

    • Does not change the key
    • Only changes the file format

    14. Why not just use PowerShell today?

    You absolutely can.

    Modern Windows supports:

    ssh user@ip
    

    So PuTTY is no longer required for most users.

    Why PuTTY still exists

    • Legacy environments
    • Saved SSH sessions
    • Serial console access
    • Enterprise standardization
    • Habit and familiarity

    15. One unified mental model

            YOUR LAPTOP
     ┌─────────────────────┐
     │ Private Key         │  ◀── Never shared
     └─────────────────────┘
                │
                │ proves identity
                ▼
          SSH Authentication
                ▲
                │ matches
     ┌─────────────────────┐
     │ Public Key          │  ◀── Stored on VM
     └─────────────────────┘
    

    16. Final key takeaways

    • SSH comes from your operating system
    • Keys are created before VM creation
    • Public key goes to the VM
    • Private key stays on your machine
    • .pem is always a private key
    • Linux uses SSH directly
    • Windows uses RDP and passwords
    • PuTTY is an SSH client, not a Windows login tool
    • .ppk is just a different key format

    Closing thought

    Once you understand that identity is proven locally and verified remotely, SSH authentication stops being confusing and starts feeling elegant.

    This single concept unlocks:

    • Secure cloud access
    • Passwordless infrastructure
    • Bastion hosts
    • Zero-trust architectures
    • Safer operations at scale
  • 4 – 🚀 Terraform Mini Project: Building a Scalable Web App with VMSS, Load Balancer, NSG, and NAT Gateway(in Azure)

    Table of Contents

    1. What We Are Building (End Architecture Overview)
    2. Step 1: Resource Group, Virtual Network, and Subnet
    3. Step 2: Network Security Group (NSG)
    4. Step 3: Public IP (Inbound Traffic)
    5. Step 4: Load Balancer and Backend Pool
    6. Step 5: Health Probe and Load Balancing Rule
    7. Step 6: NAT Gateway (Outbound Traffic)
    8. Step 7: Virtual Machine Scale Set (VMSS)
    9. Step 8: Add Autoscaling (Last Step)
    10. Step 8.1: Add a Scale-Out Rule (CPU > 80%)
    11. Step 8.2: Add a Scale-In Rule (CPU < 10%)
    12. Step 8.3: Apply and Verify
    13. How to Test Autoscaling (Optional but Powerful)
    14. Final Result
    15. Why This Project Is Important for Beginners

    This mini project demonstrates how to build a real-world Azure infrastructure step by step using Terraform.
    The goal is not just to deploy resources, but to understand why each Azure service exists, how it fits into the architecture, and what each Terraform block actually does.

    Instead of creating everything in one go, we intentionally build the infrastructure incrementally. This makes it easier for beginners to:

    • Verify resources in the Azure Portal
    • Understand dependencies between services
    • Debug errors without feeling overwhelmed
    • Build a strong mental model of Azure networking and compute

    What We Are Building (End Architecture Overview)

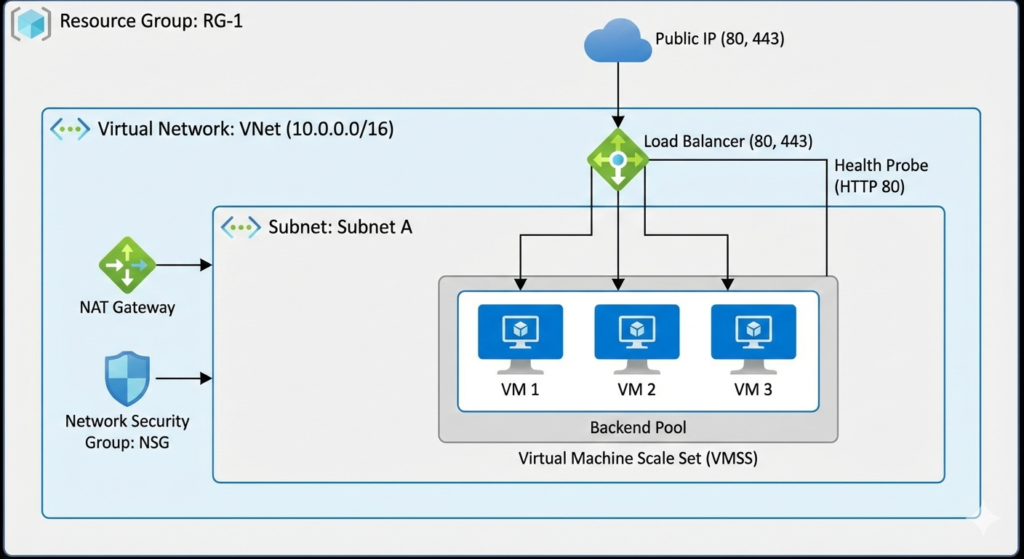
    By the end of this project, we will have:

    • A Resource Group to logically contain all resources
    • A Virtual Network (VNet) with a defined private IP space
    • A Subnet to host compute resources
    • A Network Security Group (NSG) acting as a firewall
    • A Public IP for inbound internet access
    • A Standard Load Balancer to distribute traffic
    • A NAT Gateway to manage outbound internet traffic
    • A Virtual Machine Scale Set (VMSS) running a web application

    This architecture closely resembles how production web applications are deployed on Azure.


    Step 1: Resource Group, Virtual Network, and Subnet

    Why this step is required

    In Azure, nothing can exist without a Resource Group.
    Similarly, no virtual machine can exist outside a Virtual Network.

    This step lays the networking foundation for everything that follows.


    Resource Group (rg.tf)

    resource "azurerm_resource_group" "rg" {
      name     = "rgminipro345"
      location = "Central US"
    }
    

    Explanation:

    • azurerm_resource_group
      Creates a logical container for Azure resources.
    • name
      Used for management, billing, and cleanup.
    • location
      Determines the Azure region where resources are deployed.

    After applying, this can be verified in:
    Azure Portal → Resource Groups


    Virtual Network (vnet.tf)

    resource "azurerm_virtual_network" "vnet" {
      name                = "vnetminipro8979879"
      address_space       = ["10.0.0.0/16"]
      location            = azurerm_resource_group.rg.location
      resource_group_name = azurerm_resource_group.rg.name
    }
    

    Explanation:

    • address_space defines the private IP range for the entire VNet.
    • 10.0.0.0/16 provides ~65,536 private IPs.
    • VNets are isolated by default and cannot access the internet without configuration.

    Subnet

    resource "azurerm_subnet" "subnet" {
      name                 = "subnetminipro89"
      resource_group_name  = azurerm_resource_group.rg.name
      virtual_network_name = azurerm_virtual_network.vnet.name
      address_prefixes     = ["10.0.0.0/20"]
    }
    

    Explanation:

    • Subnets divide a VNet into smaller IP ranges.
    • /20 provides ~4,096 IPs.
    • This subnet will host:
      • VM Scale Set instances
      • NAT Gateway association
      • Network interfaces

    At this point, the subnet has no security rules applied.


    Step 2: Network Security Group (NSG)

    Why NSGs are needed

    A Network Security Group (NSG) is Azure’s primary network firewall.
    It controls what traffic is allowed or denied at the subnet or NIC level.


    NSG Definition (nsg.tf)

    resource "azurerm_network_security_group" "nsg" {
      name                = "nsgminipro76786"
      location            = azurerm_resource_group.rg.location
      resource_group_name = azurerm_resource_group.rg.name
    

    This creates an empty firewall that we populate with rules.


    Security Rules

    security_rule {
      name                       = "allow-http"
      priority                   = 100
      direction                  = "Inbound"
      access                     = "Allow"
      protocol                   = "Tcp"
      destination_port_range     = "80"
    }
    

    What this rule means:

    • Allows inbound HTTP traffic
    • Uses TCP protocol
    • Priority determines evaluation order (lower number = higher priority)

    Similar rules are added for HTTPS (443) and SSH (22).

    ⚠️ SSH is allowed here for learning purposes only.


    Associating NSG with Subnet

    resource "azurerm_subnet_network_security_group_association" "myNSG" {
      subnet_id                 = azurerm_subnet.subnet.id
      network_security_group_id = azurerm_network_security_group.nsg.id
    }
    

    Why this matters:

    • NSGs do nothing unless attached.
    • Subnet-level attachment applies rules to all resources inside the subnet.

    Verify in:
    Azure Portal → VNet → Subnets


    Step 3: Public IP (Inbound Traffic)

    Why a Public IP is required

    To expose an application to the internet, Azure requires a Public IP resource.


    resource "azurerm_public_ip" "pubip" {
      allocation_method = "Static"
      sku               = "Standard"
      zones             = ["1", "2", "3"]
    }
    

    Key points:

    • Static IP does not change
    • Standard SKU is required for Standard Load Balancer
    • Zone-redundant for high availability
    • Used only for inbound traffic

    Step 4: Load Balancer and Backend Pool

    Why a Load Balancer is needed

    The Load Balancer distributes incoming traffic across multiple VMs, enabling:

    • High availability
    • Fault tolerance
    • Horizontal scaling

    Load Balancer

    resource "azurerm_lb" "lb" {
      sku = "Standard"
    

    Frontend IP Configuration

    frontend_ip_configuration {
      public_ip_address_id = azurerm_public_ip.pubip.id
    }
    

    This connects the public IP to the Load Balancer frontend.


    Backend Pool

    resource "azurerm_lb_backend_address_pool" "bpool" {
      loadbalancer_id = azurerm_lb.lb.id
    }
    

    VMSS instances will later register here automatically.


    Step 5: Health Probe and Load Balancing Rule

    Health Probe

    resource "azurerm_lb_probe" "lbprobe" {
      protocol = "Http"
      port     = 80
    }
    

    Azure uses this probe to determine VM health.


    Load Balancing Rule

    resource "azurerm_lb_rule" "lbrule" {
      frontend_port = 80
      backend_port  = 80
      probe_id      = azurerm_lb_probe.lbprobe.id
    }
    

    Defines how traffic flows from the frontend to backend VMs.


    Step 6: NAT Gateway (Outbound Traffic)

    Why NAT Gateway is needed

    Inbound and outbound traffic should be separated.

    • Load Balancer → inbound
    • NAT Gateway → outbound

    resource "azurerm_nat_gateway" "natgw" {}
    

    Associated with:

    resource "azurerm_subnet_nat_gateway_association" "example" {
      subnet_id = azurerm_subnet.subnet.id
    }
    

    All outbound traffic from the subnet now uses a fixed public IP.


    Step 7: Virtual Machine Scale Set (VMSS)

    Why VMSS is used

    VMSS allows:

    • Running multiple identical VMs
    • Automatic scaling
    • Seamless Load Balancer integration

    SSH Authentication

    disable_password_authentication = true
    admin_ssh_key {
      public_key = file(".ssh/key.pub")
    }
    
    • Passwords are disabled
    • SSH key authentication is enforced
    • Keys are injected at creation time

    Network Integration

    load_balancer_backend_address_pool_ids = [
      azurerm_lb_backend_address_pool.bpool.id
    ]
    

    Automatically registers VM instances with the Load Balancer.


    user-data.sh (Cloud Init)

    The startup script:

    • Installs Apache and PHP
    • Deploys a test application
    • Displays instance metadata

    Every VM runs this script on first boot.


    Step 8: Add Autoscaling (Last Step)

    Finally, add autoscale.tf.

    Apply.

    What is happening here?

    • Autoscale profile is created
    • VMSS can scale between 1 and 10 instances

    Verify

    • Open VMSS
    • Go to Scaling
    • Confirm autoscale rules exist

    Step 8.1: Add a Scale-Out Rule (CPU > 80%)

    Add this inside the same profile {} block:

    rule {
      metric_trigger {
        metric_name        = "Percentage CPU"
        metric_resource_id = azurerm_orchestrated_virtual_machine_scale_set.vmss.id
        time_grain         = "PT1M"
        statistic          = "Average"
        time_window        = "PT5M"
        time_aggregation   = "Average"
        operator           = "GreaterThan"
        threshold          = 80
      }
    
      scale_action {
        direction = "Increase"
        type      = "ChangeCount"
        value     = "1"
        cooldown  = "PT5M"
      }
    }
    

    Line-by-line explanation (beginner friendly)

    • Percentage CPU → Azure’s built-in VMSS CPU metric
    • PT1M → Check CPU every 1 minute
    • PT5M → Evaluate average over 5 minutes
    • GreaterThan 80 → Trigger when CPU > 80%
    • Increase by 1 → Add one VM
    • Cooldown 5 min → Prevent rapid scaling

    Step 8.2: Add a Scale-In Rule (CPU < 10%)

    Add this below the scale-out rule:

    rule {
      metric_trigger {
        metric_name        = "Percentage CPU"
        metric_resource_id = azurerm_orchestrated_virtual_machine_scale_set.vmss.id
        time_grain         = "PT1M"
        statistic          = "Average"
        time_window        = "PT5M"
        time_aggregation   = "Average"
        operator           = "LessThan"
        threshold          = 10
      }
    
      scale_action {
        direction = "Decrease"
        type      = "ChangeCount"
        value     = "1"
        cooldown  = "PT5M"
      }
    }
    

    What this does

    • If CPU stays below 10% for 5 minutes
    • Azure removes one VM
    • But never below your minimum = 1

    Step 8.3: Apply and Verify

    Run:

    terraform plan
    terraform apply
    

    Then go to:

    Azure Portal → VM Scale Set → Scaling → JSON

    You should now see:

    • rules array populated
    • minimum = 1, maximum = 10
    • ✅ Autoscale logic visible in UI

    How to Test Autoscaling (Optional but Powerful)

    To actually see autoscaling happen:

    1. SSH into one VM using NAT rule
    2. Generate CPU load: sudo apt install stress -y stress --cpu 2 --timeout 600
    3. Wait ~5–10 minutes
    4. Watch VMSS instance count increase

    Final Result

    Access the application using:

    http://<load-balancer-public-ip>/index.php
    

    Traffic is:

    • Load balanced
    • Secured by NSG
    • Scaled via VMSS
    • Outbound traffic controlled by NAT Gateway

    Why This Project Is Important for Beginners

    This project teaches:

    • Core Azure networking concepts
    • Secure traffic flow design
    • Stateless compute patterns
    • Infrastructure-as-Code fundamentals

    If you understand this setup, you understand how most Azure web platforms are built.

  • 3 – Terraform Advanced

    Terraform Built-in Functions (Part 1): Learning Functions Through Hands-on Assignments

    In this section, we begin exploring Terraform built-in functions through practical, hands-on assignments.
    Instead of only reading documentation, the focus here is on:

    • Practicing functions directly in terraform console
    • Applying them in real Terraform files
    • Solving common problems such as:
      • Formatting names
      • Enforcing naming rules
      • Merging maps
      • Validating resource constraints
      • Generating dynamic values

    This approach helps beginners understand why functions exist and how to use them correctly.


    Practicing Functions Using terraform console

    Before writing full Terraform files, we can experiment with functions interactively.

    terraform console
    

    Inside the console, you can directly test functions.

    Example:

    max(2, 4, 1)
    

    Result:

    4
    

    This shows:

    • You do not need to write a full Terraform file
    • You can quickly test function behavior
    • This is the fastest way to learn functions safely

    Terraform only supports built-in functions.
    You cannot create custom functions in Terraform.


    Assignment 1: Formatting Resource Names with lower and replace

    Requirement:

    • Resource names must:
      • Be lowercase
      • Replace spaces with hyphens

    Input example:

    Project Alpha Resource
    

    Expected output:

    project-alpha-resource
    

    Step 1: Define the Variable

    variable "project_name" {
      type        = string
      description = "Name of the project"
      default     = "Project Alpha Resource"
    }
    

    Step 2: Format the Name Using Functions

    locals {
      formatted_name = lower(replace(var.project_name, " ", "-"))
    }
    

    Explanation:

    • replace(var.project_name, " ", "-")
      Replaces all spaces with hyphens
    • lower(...)
      Converts the entire string to lowercase

    Step 3: Use It in a Resource

    resource "azurerm_resource_group" "rg" {
      name     = "${local.formatted_name}-rg"
      location = "West US 2"
    }
    

    Now:

    • "Project Alpha Resource"
      Becomes:
      project-alpha-resource-rg

    This ensures consistent, policy-compliant naming.


    Assignment 2: Merging Tags Using merge

    Scenario:

    You have:

    • Default tags
    • Environment-specific tags

    You want to combine both maps into one.

    Step 1: Define the Tag Maps

    variable "default_tags" {
      type = map(string)
      default = {
        owner   = "team-a"
        project = "demo"
      }
    }
    
    variable "environment_tags" {
      type = map(string)
      default = {
        environment = "dev"
        costcenter  = "1001"
      }
    }
    

    Step 2: Merge Them Using merge

    locals {
      merged_tags = merge(var.default_tags, var.environment_tags)
    }
    

    Explanation:

    • merge(map1, map2)
      Combines both maps
    • If the same key exists in both, the last one wins

    Step 3: Apply to a Resource

    resource "azurerm_resource_group" "rg" {
      name     = "${local.formatted_name}-rg"
      location = "West US 2"
      tags     = local.merged_tags
    }
    

    This avoids repeating the same merge logic in multiple places.


    Assignment 3: Formatting Storage Account Names with Multiple Functions

    Azure Storage Account Rules:

    • Only lowercase letters and numbers
    • Length between 3 and 24 characters
    • No spaces
    • No special characters

    Step 1: Define an Invalid Input

    variable "storage_account_name" {
      type    = string
      default = "Tech Tutorials @ Demo 2024!!!"
    }
    

    This input:

    • Has spaces
    • Has uppercase
    • Has special characters
    • Is longer than allowed

    Step 2: Format the Name Using Nested Functions

    locals {
      formatted_storage_name = lower(
        replace(
          substr(var.storage_account_name, 0, 23),
          " ",
          ""
        )
      )
    }
    

    Explanation:

    • substr(var.storage_account_name, 0, 23)
      Limits length to 23 characters
    • replace(..., " ", "")
      Removes spaces
    • lower(...)
      Converts to lowercase

    This produces a valid Azure storage account name.


    Step 3: Use It in the Resource

    resource "azurerm_storage_account" "example" {
      name                     = local.formatted_storage_name
      resource_group_name      = azurerm_resource_group.rg.name
      location                 = azurerm_resource_group.rg.location
      account_tier             = "Standard"
      account_replication_type = "LRS"
    }
    

    This shows how multiple functions can be nested to enforce strict provider rules.


    Assignment 4: Generating NSG Rule Names Using split, for, and String Interpolation

    Scenario:

    You start with a comma-separated list of ports:

    "80,443,3306"
    

    You want to generate rule names like:

    • Port-80
    • Port-443
    • Port-3306

    Step 1: Define the Variable

    variable "allowed_ports" {
      type    = string
      default = "80,443,3306"
    }
    

    Step 2: Split the String into a List

    locals {
      formatted_ports = split(",", var.allowed_ports)
    }
    

    Explanation:

    • split(",", var.allowed_ports)
      Converts "80,443,3306" into:
    ["80", "443", "3306"]
    

    Step 3: Build a Map of NSG Rules Using a for Expression

    locals {
      nsg_rules = {
        for port in local.formatted_ports :
        "Port-${port}" => {
          name        = "Port-${port}"
          port        = port
          description = "Allow traffic on port ${port}"
        }
      }
    }
    

    Explanation:

    • for port in local.formatted_ports
      Loops through each port
    • "Port-${port}"
      Dynamically builds the rule name
    • Each iteration creates a map entry for one rule

    Step 4: Use the Map in a Dynamic Block

    resource "azurerm_network_security_group" "example" {
      name                = "${local.formatted_name}-nsg"
      location            = azurerm_resource_group.rg.location
      resource_group_name = azurerm_resource_group.rg.name
    
      dynamic "security_rule" {
        for_each = local.nsg_rules
    
        content {
          name                       = security_rule.value.name
          priority                   = 100
          direction                  = "Inbound"
          access                     = "Allow"
          protocol                   = "Tcp"
          source_port_range          = "*"
          destination_port_range     = security_rule.value.port
          source_address_prefix      = "*"
          destination_address_prefix = "*"
          description                = security_rule.value.description
        }
      }
    }
    

    Now Terraform automatically creates:

    • One rule per port
    • With correct names and descriptions
    • Without manually writing each rule

    Summary

    In this first part of Terraform functions, you learned how to:

    • Practice functions using terraform console
    • Format names using:
      • lower
      • replace
      • substr
    • Merge maps using:
      • merge
    • Enforce provider naming rules using nested functions
    • Convert strings to lists using:
      • split
    • Generate multiple blocks using:
      • for expressions
      • Dynamic maps

    These assignments show how Terraform functions help you write:

    • Cleaner code
    • Fewer hardcoded values
    • More reusable configurations
    • Provider-compliant resource definitions

    This forms the foundation for writing dynamic, production-ready Terraform code.

    Terraform Built-in Functions (Part 2): Practical Demos with Lookup, Validation, Sets, Math, Time, and Files

    In this section, we continue learning Terraform built-in functions through a set of hands-on assignments.
    The focus here is on how functions are used in real Terraform code to solve practical problems such as:

    • Selecting values dynamically
    • Validating user input
    • Enforcing naming rules
    • Removing duplicates
    • Performing math on lists
    • Working with timestamps
    • Handling sensitive data and files

    All examples below are written in a beginner-friendly, step-by-step way.


    Using lookup to Select Values from an Environment Map

    Instead of writing long conditional expressions, we use a map + lookup function to select the correct VM size based on the environment.

    Defining the Environment Variable with Validation

    variable "environment" {
      type        = string
      description = "Environment name"
    
      validation {
        condition     = contains(["dev", "staging", "prod"], var.environment)
        error_message = "Enter a valid value for environment: dev, staging, or prod"
      }
    }
    

    Explanation:

    • contains(["dev", "staging", "prod"], var.environment)
      Ensures the value is only one of the allowed environments
    • If the value is invalid, Terraform stops with the custom error message

    This prevents accidental typos like prods or testing.


    Mapping Environments to VM Sizes

    variable "vm_sizes" {
      type = map(string)
      default = {
        dev     = "Standard_D2s_v3"
        staging = "Standard_D4s_v3"
        prod    = "Standard_D8s_v3"
      }
    }
    

    This map defines which VM size should be used in each environment.


    Using lookup with a Fallback Value

    locals {
      selected_vm_size = lookup(var.vm_sizes, var.environment, "Standard_D2s_v3")
    }
    

    Explanation:

    • First argument → the input map
    • Second argument → the key to search (var.environment)
    • Third argument → fallback value if the key does not exist

    This means:

    • devStandard_D2s_v3
    • prodStandard_D8s_v3
    • Missing key → default VM size

    Printing the Result with an Output

    output "vm_size" {
      value = local.selected_vm_size
    }
    

    Running:

    terraform plan
    

    Shows the VM size selected based on the environment.


    Validating VM Size Using length and strcontains

    Now we add validation rules to a VM size string.

    Rules:

    • Length must be between 2 and 20 characters
    • It must contain the word “standard”
    variable "vm_size" {
      type    = string
      default = "Standard_D2s_v3"
    
      validation {
        condition = length(var.vm_size) >= 2 && length(var.vm_size) <= 20
        error_message = "VM size should be between 2 and 20 characters"
      }
    
      validation {
        condition = strcontains(lower(var.vm_size), "standard")
        error_message = "VM size should contain the word 'standard'"
      }
    }
    

    Explanation:

    • length(var.vm_size) checks the string length
    • lower(...) converts to lowercase
    • strcontains(...) checks if "standard" exists in the string

    Terraform throws a validation error if either rule fails.


    Marking Sensitive Variables with sensitive

    To protect secrets:

    variable "credential" {
      type      = string
      default   = "XYZ123"
      sensitive = true
    }
    

    And in the output:

    output "credential" {
      value     = var.credential
      sensitive = true
    }
    

    Terraform will display:

    credential = <sensitive>
    

    This prevents secrets from being printed in logs.


    Enforcing Naming Rules with endswith

    We ensure backup names end with _backup.

    variable "backup_name" {
      type    = string
      default = "test_backup"
    
      validation {
        condition     = endswith(var.backup_name, "_backup")
        error_message = "Backup name must end with _backup"
      }
    }
    

    If the name does not end with _backup, Terraform stops with an error.


    Combining Lists and Removing Duplicates with concat and toset

    locals {
      user_locations    = ["East US", "West US", "East US"]
      default_locations = ["Central US"]
    
      unique_locations = toset(concat(local.user_locations, local.default_locations))
    }
    

    Explanation:

    • concat(...) joins both lists
    • toset(...) removes duplicate values

    Result:

    ["East US", "West US", "Central US"]
    

    Working with Numbers Using abs and max

    locals {
      monthly_costs = [-50, 75, -200, 100]
    
      positive_costs = [for c in local.monthly_costs : abs(c)]
      max_cost       = max(local.positive_costs...)
    }
    

    Explanation:

    • abs(c) converts negative numbers to positive
    • for expression applies it to every element
    • max(... ) finds the largest number
    • ... expands the list into arguments

    Result:

    • positive_costs[50, 75, 200, 100]
    • max_cost200

    Working with Time Using timestamp and formatdate

    locals {
      current_time  = timestamp()
      resource_name = formatdate("YYYYMMDD", local.current_time)
      tag_date      = formatdate("DD-MM-YYYY", local.current_time)
    }
    

    Explanation:

    • timestamp() returns the current UTC time
    • formatdate() converts it into readable formats

    These values are commonly used in:

    • Resource names
    • Tags
    • Audit metadata

    Handling File Content with file, jsondecode, and sensitive

    locals {
      config_content = sensitive(file("config.json"))
      decoded_config = jsondecode(file("config.json"))
    }
    

    Explanation:

    • file("config.json") reads file content as a string
    • sensitive(...) hides it from output
    • jsondecode(...) converts JSON into a Terraform object

    This allows you to safely load structured configuration from files.


    Summary

    In this section, you learned how to use Terraform built-in functions to:

    • Select values dynamically with lookup
    • Validate inputs using:
      • contains
      • length
      • strcontains
      • endswith
    • Protect secrets with sensitive
    • Combine and deduplicate lists with:
      • concat
      • toset
    • Process numbers using:
      • abs
      • max
    • Work with time using:
      • timestamp
      • formatdate
    • Safely read and decode files using:
      • file
      • jsondecode

    These examples show how Terraform functions transform static configuration into intelligent, validated, and production-ready Infrastructure as Code.

    Terraform Data Sources: Using Existing Infrastructure in Your Terraform Code

    In this section, we learn about Terraform Data Sources — what they are, why we need them, and how to use them in a real Azure example.

    This is a very important concept for real-world projects, because in most organizations:

    • You do not create everything yourself
    • Many core resources (networks, subnets, security) are already managed by other teams
    • Your Terraform code must reuse existing infrastructure, not recreate it

    Let’s understand this step by step.


    Why Do We Need Terraform Data Sources?

    Imagine this common enterprise setup:

    • A central network team manages:
      • A shared Virtual Network (VNet)
      • Multiple subnets for different teams and environments
    • Each team is not allowed to create their own VNet or subnet
    • You only get permission to:
      • Create your own Resource Group
      • Create your own Virtual Machine
      • But you must place it inside an existing subnet

    Without data sources:

    • Terraform would try to create a new VNet and subnet
    • This would:
      • Break governance rules
      • Duplicate infrastructure
      • Cause conflicts

    With data sources:

    • Terraform can read existing resources
    • And attach new resources to them

    This is exactly what data sources are for:

    Data sources allow Terraform to read information about resources that already exist, without creating or modifying them.


    What Is a Terraform Data Source?

    A data source:

    • Starts with the data keyword
    • Reads an existing resource from the provider
    • Makes its attributes available in your configuration

    It does not create anything.
    It only fetches information.

    Basic pattern:

    data "provider_resource_type" "local_name" {
      name                = "existing-resource-name"
      resource_group_name = "existing-rg-name"
    }
    

    You then use it like:

    data.provider_resource_type.local_name.attribute
    

    Scenario Used in This Demo

    Already existing in Azure:

    • Resource Group: shared-network-rg
    • Virtual Network: shared-network-vnet
    • Subnet: shared-primary-sn

    Our goal:

    • Create a new Resource Group
    • Create a new Virtual Machine
    • Attach it to:
      • The existing VNet
      • The existing Subnet

    Without creating any new network resources.


    Step 1: Create a Data Source for the Existing Resource Group

    data "azurerm_resource_group" "rg_shared" {
      name = "shared-network-rg"
    }
    

    Line-by-line explanation:

    • data "azurerm_resource_group"
      Tells Terraform this is a data source, not a resource
    • "rg_shared"
      Local name to reference this data source
    • name = "shared-network-rg"
      The exact name of the existing Resource Group in Azure

    This lets us read:

    • Location
    • ID
    • Name
      From the existing resource group.

    Step 2: Create a Data Source for the Existing Virtual Network

    data "azurerm_virtual_network" "vnet_shared" {
      name                = "shared-network-vnet"
      resource_group_name = data.azurerm_resource_group.rg_shared.name
    }
    

    Explanation:

    • name
      Name of the existing VNet
    • resource_group_name
      We do not hardcode it
      We reuse it from the previous data source:
    data.azurerm_resource_group.rg_shared.name
    

    This creates a dependency chain:

    • First read Resource Group
    • Then read VNet from that Resource Group

    Step 3: Create a Data Source for the Existing Subnet

    data "azurerm_subnet" "subnet_shared" {
      name                 = "shared-primary-sn"
      resource_group_name  = data.azurerm_resource_group.rg_shared.name
      virtual_network_name = data.azurerm_virtual_network.vnet_shared.name
    }
    

    Explanation:

    • name
      Name of the existing subnet
    • resource_group_name
      Taken from the Resource Group data source
    • virtual_network_name
      Taken from the VNet data source

    Now Terraform knows exactly:

    • Which subnet
    • In which VNet
    • In which Resource Group

    Step 4: Use Data Sources in Your Own Resources

    Now we create our own Resource Group, but we align its location with the shared network.

    resource "azurerm_resource_group" "example" {
      name     = "day13-rg"
      location = data.azurerm_resource_group.rg_shared.location
    }
    

    Why this matters:

    • We are not hardcoding "East US" or "Canada Central"
    • We are reusing the same location as the shared network
    • This avoids region mismatch errors

    Step 5: Attach the VM to the Existing Subnet

    Inside the network interface configuration:

    subnet_id = data.azurerm_subnet.subnet_shared.id
    

    Explanation:

    • data.azurerm_subnet.subnet_shared.id
      Fetches the ID of the existing subnet

    This ensures:

    • Terraform does not create a new subnet
    • The VM is placed inside the shared subnet

    What Happens When We Run terraform plan?

    Terraform shows:

    • It will create:
      • Resource Group
      • Network Interface
      • Virtual Machine
    • It will not create:
      • Virtual Network
      • Subnet

    This confirms:

    • Data sources are being used correctly
    • Existing infrastructure is reused

    Verifying in Azure Portal

    After terraform apply:

    • The new VM appears in your new Resource Group
    • In Networking settings, you can see:
      • Virtual Network: shared-network-vnet
      • Subnet: shared-primary-sn

    This proves:

    The VM was created in your Resource Group,
    but connected to shared infrastructure managed by another team.


    Key Takeaways

    • Use data sources when:
      • A resource already exists
      • You are not allowed to recreate it
      • You need to reference it safely
    • Data sources:
      • Read existing resources
      • Do not create or modify them
      • Help enforce enterprise governance
    • Common use cases:
      • Shared VNets and subnets
      • Existing Resource Groups
      • Existing images
      • Existing Key Vaults
      • Existing Load Balancers

    This pattern is essential for working in real enterprise Terraform environments.

  • 2 – Terraform Intermediate

    Table of Contents

    1. Terraform File and Directory Structure Best Practices
    2. Terraform Type Constraints Explained (Through an Azure VM Example)
    3. Terraform Resource Meta-Arguments: count and for_each
    4. Terraform Lifecycle Rules: create_before_destroy
    5. Terraform Lifecycle ignore_changes
    6. Terraform Lifecycle prevent_destroy: What It Is and How to Demo It
    7. Terraform Lifecycle replace_triggered_by: What It Is and How to Demo It
    8. Terraform Custom Conditions: What They Are and How to Demo Them
    9. Terraform Dynamic Expressions: Why We Need Dynamic Blocks and How They Work with Azure NSG
    10. Terraform Conditional Expressions: Dynamically Naming an NSG Based on Environment
    11. Terraform Splat Expression: Collecting Values from Multiple Resources
    12. Terraform Built-in Functions: Useful String, List & Map Helpers
  • Terraform File and Directory Structure Best Practices

    As your Terraform projects grow, keeping everything in a single file becomes messy and hard to maintain.
    In this section, we’ll learn how to structure Terraform files properly and how Terraform decides the order in which resources are created using dependencies.

    This will help you write clean, scalable, and error-free Terraform code.


    Splitting Terraform Code into Multiple Files

    Terraform allows you to split your configuration into multiple .tf files.

    ✔ You can move each block (provider, resources, variables, outputs, etc.) into different files
    ✔ Terraform automatically loads all .tf files in a directory
    ✔ File names can be anything meaningful

    Example of a Clean File Structure

    You might organize your project like this:

    ⚠️ Important: File names don’t control execution order — dependencies do.


    Some Blocks Must Be Inside Parent Blocks

    Certain Terraform configurations must be nested inside parent blocks, such as the backend.

    Terraform Backend Block Example

    terraform {
      backend "azurerm" {
        resource_group_name  = ""  
        storage_account_name = ""                      
        container_name       = ""                      
        key                  = ""        
      }
    }
    

    Line-by-line Explanation

    👉 This ensures Terraform stores its state remotely instead of locally, which is crucial for team projects.


    Understanding Terraform Load Sequence

    Terraform does not execute resources based on file order.

    Instead, it determines the order using dependencies.

    Some resources must exist before others, for example:

    To handle this, Terraform supports:


    Implicit Dependency (Automatic)

    Terraform automatically understands dependencies when a resource uses values from another resource.

    Example: Implicit Dependency

    resource "azurerm_storage_account" "example" {
      name                     = "mytmhstorageaccount10021"
      resource_group_name      = azurerm_resource_group.example.name
      location                 = azurerm_resource_group.example.location
      account_tier             = "Standard"
      account_replication_type = "GRS"
    
      tags = {
        environment = local.common_tags.environment
      }
    }
    

    Line-by-line Explanation

    ✅ Terraform automatically knows that the resource group must be created first.


    Explicit Dependency (Manual)

    Sometimes Terraform cannot automatically detect a dependency, especially when:

    In those cases, we use depends_on.

    Example: Explicit Dependency

    resource "azurerm_storage_account" "example" {
      name                     = "mytmhstorageaccount10021"
      resource_group_name      = azurerm_resource_group.example.name
      location                 = azurerm_resource_group.example.location
      account_tier             = "Standard"
      account_replication_type = "GRS"
    
      tags = {
        environment = local.common_tags.environment
      }
    
      depends_on = [ azurerm_resource_group.example ]
    }
    

    Line-by-line Explanation

    Everything above is the same as before, plus:

    ⚠️ Use explicit dependency only when necessary — implicit is preferred.


    Best Practices Summary

    To keep your Terraform projects clean and reliable:

    ✔ Split code into meaningful files
    ✔ Don’t rely on file name order for execution
    ✔ Always use resource references to create implicit dependencies
    ✔ Use depends_on only when required
    ✔ Keep backend configuration inside the terraform block
    ✔ Organize directories logically as projects grow

    Terraform Type Constraints Explained (Through an Azure VM Example)

    In this section, we’ll understand Terraform Type Constraints by actually creating an Azure Virtual Machine step by step.
    Instead of theory alone, we’ll see how each data type is used in real Terraform code.

    We’ll cover:


    Starting Point: Azure VM Terraform Documentation

    To understand which fields expect which types, we first look at the official Azure VM resource documentation:

    https://registry.terraform.io/providers/hashicorp/azurerm/latest/docs/resources/virtual_machine

    From here, we copy the sample VM code and then replace hardcoded values with typed variables.


    Primitive Types

    Primitive types hold only one value.

    String Variable Example

    variable "prefix" {
      default = "tfvmex"
    }
    

    Line-by-line Explanation

    This variable is commonly used to build resource names.


    Number Variable Example

    From the Azure VM documentation, inside storage_os_disk, we see:

    We define a number variable:

    variable "storage_disk_size" {
      type        = number
      description = "size of storage disk"
      default     = 80
    }
    

    Line-by-line Explanation

    Now we use it in the VM resource:

    storage_os_disk {
      name              = "myosdisk1"
      caching           = "ReadWrite"
      create_option     = "FromImage"
      managed_disk_type = "Standard_LRS"
      disk_size_gb      = var.storage_disk_size
    }
    

    Explanation


    Boolean Variable Example

    Azure VM has this property:

    delete_os_disk_on_termination = true
    

    This controls whether the OS disk is deleted when the VM is deleted.

    We replace this with a boolean variable.

    variable "is_disk_delete" {
      type        = bool
      description = "delete the OS disk automatically when deleting the VM"
      default     = true
    }
    

    Line-by-line Explanation

    Now use it:

    delete_os_disk_on_termination = var.is_disk_delete
    

    Important Note

    If you want to preserve data, set this to:

    default = false
    

    Verifying with Terraform Plan

    Run:

    terraform init
    terraform plan
    

    To see only the resources that will be created:

    terraform plan | Select-String "will be created"
    

    Example output:

    # azurerm_network_interface.main will be created
    # azurerm_resource_group.example will be created
    # azurerm_subnet.internal will be created
    # azurerm_virtual_machine.main will be created
    # azurerm_virtual_network.main will be created
    

    This confirms Terraform is reading your types correctly.


    List Type (Collection Type)

    A list holds multiple values of the same type, in a fixed order.

    Original Hardcoded Resource Group

    resource "azurerm_resource_group" "example" {
      name     = "${var.prefix}-resources"
      location = "West Europe"
    }
    

    We replace the hardcoded location with a list variable.

    Defining a List Variable

    variable "allowed_locations" {
      type        = list(string)
      description = "allowed locations for the creation of resources"
      default     = ["West Europe", "East Europe", "East US"]
    }
    

    Line-by-line Explanation

    Now use it:

    resource "azurerm_resource_group" "example" {
      name     = "${var.prefix}-resources"
      location = var.allowed_locations[0]
    }
    

    Explanation


    Map Type

    A map is a set of key-value pairs.

    We’ll use a map to define resource tags.

    Defining a Map Variable

    variable "allowed_tags" {
      type        = map(string)
      description = "allowed tags for resources"
      default = {
        "environment" = "staging"
        "department"  = "devops"
      }
    }
    

    Line-by-line Explanation

    Now use the map:

    tags = {
      environment = var.allowed_tags["environment"]
      department  = var.allowed_tags["department"]
    }
    

    Explanation


    Tuple Type

    A tuple can hold multiple values of different types in a fixed order.

    We define network configuration as a tuple.

    Defining a Tuple Variable

    variable "my_network_config" {
      type        = tuple([string, string, number, bool])
      description = "VNet address, subnet address, subnet mask, a test flag"
      default     = ["10.0.0.0/16", "10.0.2.0/24", 24, true]
    }
    

    Line-by-line Explanation

    Original Virtual Network Code

    address_space = ["10.0.0.0/16"]
    

    We replace it with tuple value:

    address_space = [element(var.my_network_config, 0)]
    

    Explanation

    ⚠️ Important:
    Even though the tuple gives a string, address_space requires a list, so we must use [].


    Set Type

    A set is like a list, but:

    We define allowed VM sizes as a set.

    Defining a Set Variable

    variable "allowed_vm_sizes" {
      type        = set(string)
      description = "allowed VM sizes"
      default     = ["Standard_DS1_v2", "Standard_DS2_v2"]
    }
    

    Line-by-line Explanation

    Accessing a Set Value

    We cannot do:

    var.allowed_vm_sizes[1]   # ❌ Invalid
    

    We must convert it to a list first:

    vm_size = tolist(var.allowed_vm_sizes)[1]
    

    Explanation

    ⚠️ Note: Order is not guaranteed when converting a set.


    Object Type

    An object groups multiple named fields of any type, like a configuration object.

    We define a VM configuration object.

    Defining an Object Variable

    variable "vm_config" {
      type = object({
        size      = string
        publisher = string
        offer     = string
        sku       = string
        version   = string
      })
      description = "VM Configuration"
      default = {
        size      = "Standard_DS1_v2"
        publisher = "Canonical"
        offer     = "0001-com-ubuntu-server-jammy"
        sku       = "22_04-lts"
        version   = "latest"
      }
    }
    

    Line-by-line Explanation

    Using the Object in VM Resource

    storage_image_reference {
      publisher = var.vm_config.publisher
      offer     = var.vm_config.offer
      sku       = var.vm_config.sku
      version   = var.vm_config.version
    }
    

    Explanation

    This keeps VM image configuration clean and centralized.


    Summary

    In this section, you learned how Terraform type constraints work by using:

    Understanding these types is essential to avoid type mismatch errors and to write robust, reusable Terraform code.

    Terraform Resource Meta-Arguments: count and for_each

    In this section, we’ll learn about Terraform Resource Meta-Arguments, specifically:

    These meta-arguments allow you to create multiple resources in a loop using collections like lists, sets, and maps.

    We’ll use a practical example: creating multiple Azure Storage Accounts, and we’ll also see how to output the names of created resources, which is a very common real-world requirement.


    Why Meta-Arguments Are Needed

    Without count or for_each, you would have to:

    With meta-arguments, you can:

    This makes your Terraform code:


    Using count to Create Multiple Resources

    count is best suited when:


    Defining a List of Storage Account Names

    variable "storage_account_names" {
      type        = list(string)
      description = "storage account names for creation"
      default     = ["myteststorageacc222j22", "myteststorageacc444l44"]
    }
    

    Line-by-line Explanation


    Creating Resources Using count

    resource "azurerm_storage_account" "example" {
      count = length(var.storage_account_names)
    
      name                     = var.storage_account_names[count.index]
      resource_group_name      = azurerm_resource_group.example.name
      location                 = azurerm_resource_group.example.location
      account_tier             = "Standard"
      account_replication_type = "GRS"
    
      tags = {
        environment = "staging"
      }
    }
    

    Line-by-line Explanation

    This ensures:


    Output with count

    Because count creates a list of resources, we can use the splat expression ([*]) to collect attributes from all instances.

    output "created_storage_account_names" {
      value = azurerm_storage_account.example[*].name
    }
    

    Line-by-line Explanation

    If two storage accounts are created, the output will be:

    [
      "myteststorageacc222j22",
      "myteststorageacc444l44"
    ]
    

    ⚠️ This syntax works only because count creates a list.


    Using for_each to Create Multiple Resources

    for_each is best suited when:


    Why for_each Does Not Work with Lists

    Lists:

    for_each requires:


    Defining a Set of Storage Account Names

    variable "storage_account_names" {
      type        = set(string)
      description = "storage account names for creation"
      default     = ["myteststorageacc222j22", "myteststorageacc444l44"]
    }
    

    Line-by-line Explanation


    Creating Resources Using for_each

    resource "azurerm_storage_account" "example" {
      for_each = var.storage_account_names
    
      name                     = each.key
      resource_group_name      = azurerm_resource_group.example.name
      location                 = azurerm_resource_group.example.location
      account_tier             = "Standard"
      account_replication_type = "GRS"
    
      tags = {
        environment = "staging"
      }
    }
    

    Line-by-line Explanation

    If this were a map:


    Output with for_each (Important Difference)

    With for_each, this will not work:

    azurerm_storage_account.example[*].name   # ❌ Invalid
    

    Why?

    So we must use a for expression.


    Correct Output with for_each

    output "created_storage_account_names" {
      value = [for sa in azurerm_storage_account.example : sa.name]
    }
    

    Line-by-line Explanation

    This produces:

    [
      "myteststorageacc222j22",
      "myteststorageacc444l44"
    ]
    

    Key Differences: count vs for_each

    Featurecountfor_each
    Input typeNumber / ListSet / Map
    Resource collectionList of resourcesMap of resources
    Access patterncount.indexeach.key, each.value
    Output with [*]✅ Works❌ Does not work
    Stable identity❌ Index-based✅ Key-based
    Handles duplicates❌ Yes✅ No (unique only)

    Summary

    In this section, you learned:

    This section gives you a strong foundation for writing dynamic, scalable Terraform configurations.

    Terraform Lifecycle Rules: create_before_destroy

    In this section, we’ll focus only on the Terraform lifecycle rule create_before_destroy:

    This lifecycle rule is essential for building safe, zero-downtime infrastructure changes.


    What Is create_before_destroy?

    By default, when a Terraform change requires a resource replacement, Terraform follows this order:

    1. Destroy the old resource
    2. Create the new resource

    This is called destroy-before-create.

    For many critical resources, this can cause:

    The lifecycle rule:

    lifecycle {
      create_before_destroy = true
    }
    

    Changes the behavior to:

    1. Create the new resource first
    2. Then destroy the old resource

    This is called create-before-destroy.


    Why create_before_destroy Is Important

    You should use create_before_destroy when:

    Common scenarios:


    When Does Terraform Replace a Resource?

    Terraform replaces a resource when:

    Examples:

    In such cases, Terraform shows:

    -/+ resource_name (replace)
    

    This means:


    Demo create_before_destroy

    A very important learning point:

    You cannot see the difference in terraform plan.
    The difference appears only during terraform apply, in the execution order.

    We demo this by:


    Step 1: Create a Simple Azure Storage Account

    resource "azurerm_resource_group" "example" {
      name     = "rg-lifecycle-demo"
      location = "West Europe"
    }
    
    resource "azurerm_storage_account" "example" {
      name                     = "lifecycledemoacc01abc"
      resource_group_name      = azurerm_resource_group.example.name
      location                 = azurerm_resource_group.example.location
      account_tier             = "Standard"
      account_replication_type = "LRS"
    }
    

    Apply once:

    terraform apply
    

    This creates the initial infrastructure.


    Step 2: Force a Replacement (Without Lifecycle Rule)

    Now change the storage account name:

    name = "lifecycledemoacc02abc"
    

    Run:

    terraform apply
    

    You will see logs like:

    Destroying azurerm_storage_account.example
    Destruction complete
    Creating azurerm_storage_account.example
    Creation complete
    

    What This Shows

    Order is:

    1. Destroy old resource
    2. Create new resource

    This is the default Terraform behavior.


    Step 3: Add create_before_destroy

    Now add the lifecycle rule:

    resource "azurerm_storage_account" "example" {
      name                     = "lifecycledemoacc02abc"
      resource_group_name      = azurerm_resource_group.example.name
      location                 = azurerm_resource_group.example.location
      account_tier             = "Standard"
      account_replication_type = "LRS"
    
      lifecycle {
        create_before_destroy = true
      }
    }
    

    Change the name again:

    name = "lifecycledemoacc03abc"
    

    Run:

    terraform apply
    

    Now you will see:

    Creating azurerm_storage_account.example
    Creation complete
    Destroying azurerm_storage_account.example
    Destruction complete
    

    What This Shows

    Order is now:

    1. Create new resource
    2. Destroy old resource

    This proves that create_before_destroy changes the execution order.


    Making the Demo Clearer with Sequential Execution

    Terraform may run operations in parallel, which can hide the order.

    To make the demo very clear, run:

    terraform apply -parallelism=1
    

    This forces Terraform to:

    This is ideal for:


    Important Azure Limitation

    Azure storage account names must be:

    So for this demo:

    Example sequence:

    If you try to reuse the same name, Azure will block creation and the demo will fail.


    Key Points to Remember


    Summary

    In this section, you learned:

    This lifecycle rule is a core building block for writing safe, production-ready Terraform configurations.

    Terraform Lifecycle ignore_changes

    In this section, we’ll learn about another very important Terraform lifecycle rule: ignore_changes.

    We’ll cover:

    This rule is essential when you want Terraform to stop managing certain attributes of a resource.


    What Is ignore_changes?

    By default, Terraform continuously tries to make the real infrastructure match exactly what is written in your configuration.

    If someone changes a resource manually in the Azure Portal, Terraform will:

    The lifecycle rule:

    lifecycle {
      ignore_changes = [ ... ]
    }
    

    Tells Terraform:

    “If this specific attribute changes outside Terraform,
    do not treat it as drift and do not try to fix it.”

    In simple words:


    Why ignore_changes Is Useful

    You should use ignore_changes when:

    Common real-world examples:


    How to Demo ignore_changes

    We will demo this using:

    We will:

    1. Create the resource
    2. Change the tag manually in Azure
    3. Run terraform plan
    4. Observe the difference:

    Step 1: Create a Storage Account with a Tag

    resource "azurerm_resource_group" "example" {
      name     = "rg-ignore-demo"
      location = "West Europe"
    }
    
    resource "azurerm_storage_account" "example" {
      name                     = "ignoredemostore01abc"
      resource_group_name      = azurerm_resource_group.example.name
      location                 = azurerm_resource_group.example.location
      account_tier             = "Standard"
      account_replication_type = "LRS"
    
      tags = {
        environment = "staging"
      }
    }
    

    Apply it:

    terraform apply
    

    This creates a storage account with:

    environment = "staging"
    

    Step 2: Change the Tag Manually in Azure

    Go to:

    Change:

    environment = "staging"
    

    To:

    environment = "production"
    

    Save the change.

    Now Terraform state and real infrastructure are out of sync.


    Step 3: Run terraform plan (Without ignore_changes)

    Run:

    terraform plan
    

    You will see something like:

    ~ azurerm_storage_account.example
      tags.environment: "production" => "staging"
    

    What This Shows

    Terraform is saying:

    This is normal default behavior.


    Step 4: Add ignore_changes

    Now update the resource with a lifecycle block:

    resource "azurerm_storage_account" "example" {
      name                     = "ignoredemostore01abc"
      resource_group_name      = azurerm_resource_group.example.name
      location                 = azurerm_resource_group.example.location
      account_tier             = "Standard"
      account_replication_type = "LRS"
    
      tags = {
        environment = "staging"
      }
    
      lifecycle {
        ignore_changes = [
          tags.environment
        ]
      }
    }
    

    Line-by-line Explanation

    Terraform will still manage:

    But it will stop managing this one field.


    Step 5: Run terraform plan Again

    Run:

    terraform plan
    

    Now you will see:

    Even though:

    Terraform stays silent.


    Ignoring Multiple Attributes

    You can ignore multiple fields:

    lifecycle {
      ignore_changes = [
        tags,
        access_tier,
        account_replication_type
      ]
    }
    

    This tells Terraform to ignore changes to:


    Important Rules About ignore_changes


    When Not to Use ignore_changes

    Avoid using it when:

    ignore_changes should be:


    Key Takeaway

    You can summarize this clearly in your blog:

    This is how you allow controlled manual changes without fighting Terraform.


    Summary

    In this section, you learned:

    This lifecycle rule is essential for handling partial ownership and real-world drift scenarios in Terraform.

    Terraform Lifecycle prevent_destroy: What It Is and How to Demo It

    In this section, we’ll learn about the Terraform lifecycle rule prevent_destroy:

    This rule is designed to protect important resources from accidental deletion.


    What Is prevent_destroy?

    By default, Terraform allows you to:

    The lifecycle rule:

    lifecycle {
      prevent_destroy = true
    }
    

    Tells Terraform:

    “This resource must never be destroyed by Terraform.”

    If any plan or apply would destroy this resource, Terraform will:

    This acts as a safety lock on critical infrastructure.


    Why prevent_destroy Is Important

    You should use prevent_destroy when:

    Common real-world examples:

    In short:

    It protects you from human mistakes.


    How to Demo prevent_destroy

    We will demo this using:

    We will:

    1. Create the resource
    2. Enable prevent_destroy
    3. Try to destroy it
    4. Observe how Terraform blocks the operation

    Step 1: Create a Basic Storage Account

    resource "azurerm_resource_group" "example" {
      name     = "rg-prevent-destroy-demo"
      location = "West Europe"
    }
    
    resource "azurerm_storage_account" "example" {
      name                     = "preventdestroydemo01abc"
      resource_group_name      = azurerm_resource_group.example.name
      location                 = azurerm_resource_group.example.location
      account_tier             = "Standard"
      account_replication_type = "LRS"
    }
    

    Apply it:

    terraform apply
    

    This creates the resource normally.


    Step 2: Add prevent_destroy

    Now protect the storage account with a lifecycle block:

    resource "azurerm_storage_account" "example" {
      name                     = "preventdestroydemo01abc"
      resource_group_name      = azurerm_resource_group.example.name
      location                 = azurerm_resource_group.example.location
      account_tier             = "Standard"
      account_replication_type = "LRS"
    
      lifecycle {
        prevent_destroy = true
      }
    }
    

    Apply again:

    terraform apply
    

    No changes occur, but the resource is now protected.


    Step 3: Try to Destroy the Resource

    Now attempt to destroy the infrastructure:

    terraform destroy
    

    Terraform will fail with an error similar to:

    Error: Instance cannot be destroyed
    
    Resource azurerm_storage_account.example has lifecycle.prevent_destroy set,
    but the plan calls for this resource to be destroyed.
    

    What This Shows

    Terraform is telling you:

    This proves that prevent_destroy is working.


    Step 4: How to Intentionally Destroy a Protected Resource

    To destroy a resource with prevent_destroy, you must explicitly remove the protection first.

    1. Remove the lifecycle block:
    lifecycle {
      prevent_destroy = true
    }
    
    1. Run:
    terraform apply
    
    1. Then run:
    terraform destroy
    

    Only now will Terraform allow the resource to be deleted.

    This ensures:


    Important Rules About prevent_destroy


    When Not to Use prevent_destroy

    Avoid using it when:

    Overusing prevent_destroy can:

    Use it only for truly critical resources.


    Summary

    In this section, you learned:

    This lifecycle rule is Terraform’s strongest safety mechanism for preventing catastrophic accidental deletions in production environments.

    Terraform Lifecycle replace_triggered_by: What It Is and How to Demo It

    In this section, we’ll learn about the Terraform lifecycle rule replace_triggered_by:

    This rule is used when you want Terraform to force replacement of a resource when some other resource or attribute changes.


    What Is replace_triggered_by?

    By default, Terraform replaces a resource only when:

    The lifecycle rule:

    lifecycle {
      replace_triggered_by = [ ... ]
    }
    

    Tells Terraform:

    “If this other resource or attribute changes,
    then recreate this resource as well,
    even if this resource itself did not change.”

    In simple words:


    Why replace_triggered_by Is Important

    You should use replace_triggered_by when:

    Common real-world examples:

    In short:

    It gives you explicit control over replacement behavior.


    How to Demo replace_triggered_by

    We will demo this using:

    We will:

    1. Create the resources
    2. Link them using replace_triggered_by
    3. Change only the trigger
    4. Observe that Terraform replaces the storage account

    Step 1: Create a Basic Resource Group

    resource "azurerm_resource_group" "example" {
      name     = "rg-replace-trigger-demo"
      location = "West Europe"
    }
    

    Apply once:

    terraform apply
    

    This creates the resource group.


    Step 2: Create a Trigger Resource

    We use a null_resource as a simple trigger.

    resource "null_resource" "trigger" {
      triggers = {
        version = "v1"
      }
    }
    
    Explanation

    This will act as our replacement trigger.

    Apply:

    terraform apply
    

    Step 3: Create a Storage Account Without Any Direct Dependency

    resource "azurerm_storage_account" "example" {
      name                     = "replacetriggerdemo01abc"
      resource_group_name      = azurerm_resource_group.example.name
      location                 = azurerm_resource_group.example.location
      account_tier             = "Standard"
      account_replication_type = "LRS"
    }
    

    Apply again:

    terraform apply
    

    At this point:


    Step 4: Add replace_triggered_by

    Now link the storage account lifecycle to the trigger.

    resource "azurerm_storage_account" "example" {
      name                     = "replacetriggerdemo01abc"
      resource_group_name      = azurerm_resource_group.example.name
      location                 = azurerm_resource_group.example.location
      account_tier             = "Standard"
      account_replication_type = "LRS"
    
      lifecycle {
        replace_triggered_by = [
          null_resource.trigger
        ]
      }
    }
    

    Apply:

    terraform apply
    

    No changes occur, but the dependency is now registered.


    Step 5: Change Only the Trigger

    Now change only the trigger value:

    resource "null_resource" "trigger" {
      triggers = {
        version = "v2"
      }
    }
    

    Note:

    Run:

    terraform plan
    

    You will see:

    -/+ azurerm_storage_account.example (replace)
    

    What This Shows

    This proves that:

    This is exactly what replace_triggered_by is designed for.


    Using Real Resources as Triggers

    Instead of null_resource, in real projects you often use:

    Example:

    lifecycle {
      replace_triggered_by = [
        azurerm_subnet.example.id
      ]
    }
    

    This means:

    If the subnet changes, recreate this resource.


    Important Rules About replace_triggered_by

    Use it carefully and only when replacement is truly required.


    Summary

    In this section, you learned:

    This lifecycle rule is a powerful tool for handling intentional, dependency-driven replacements in production Terraform configurations.

    Terraform Custom Conditions: What They Are and How to Demo Them

    In this section, we’ll learn about Terraform Custom Conditions, also called:

    These allow you to validate assumptions about your infrastructure and fail early if something is wrong.

    We’ll cover:

    This feature is extremely useful for building safe, self-validating Terraform code.


    What Are Custom Conditions?

    Terraform custom conditions let you attach logical checks to:

    There are two types:

    precondition  # Checked before creating or updating a resource
    postcondition # Checked after the resource is created or read
    

    If the condition is false, Terraform will:

    In simple words:

    Custom conditions let you say:
    “This must be true, otherwise Terraform should fail.”


    Why Custom Conditions Are Important

    You should use custom conditions when:

    Common real-world examples:

    In short:

    They turn Terraform into a self-validating system.


    Difference Between precondition and postcondition

    Most beginner demos start with precondition, because it is easier to understand.


    How to Demo Custom Conditions

    We will demo this using:

    We will:

    1. Create a resource with a valid name
    2. Add a precondition
    3. Change the name to an invalid value
    4. Observe Terraform failing with a custom error

    Step 1: Create a Basic Storage Account

    resource "azurerm_resource_group" "example" {
      name     = "rg-condition-demo"
      location = "West Europe"
    }
    
    resource "azurerm_storage_account" "example" {
      name                     = "democonditionacc01"
      resource_group_name      = azurerm_resource_group.example.name
      location                 = azurerm_resource_group.example.location
      account_tier             = "Standard"
      account_replication_type = "LRS"
    }
    

    Apply once:

    terraform apply
    

    This works normally.


    Step 2: Add a precondition

    Now add a custom condition to the storage account.

    resource "azurerm_storage_account" "example" {
      name                     = "democonditionacc01"
      resource_group_name      = azurerm_resource_group.example.name
      location                 = azurerm_resource_group.example.location
      account_tier             = "Standard"
      account_replication_type = "LRS"
    
      lifecycle {
        precondition {
          condition     = startswith(self.name, "demo")
          error_message = "Storage account name must start with 'demo'."
        }
      }
    }
    
    Line-by-line Explanation

    Apply again:

    terraform apply
    

    No change occurs, because the condition is satisfied.


    Step 3: Break the Condition Intentionally

    Now change the name to an invalid value:

    name = "invalidacc01"
    

    Run:

    terraform plan
    

    You will see an error like:

    Error: Resource precondition failed
    
    Storage account name must start with 'demo'.
    

    What This Shows

    This proves that:

    This is the core power of custom conditions.


    Demo Using postcondition

    Now let’s see a simple postcondition.

    We will check that the storage account location is really "West Europe".

    resource "azurerm_storage_account" "example" {
      name                     = "democonditionacc01"
      resource_group_name      = azurerm_resource_group.example.name
      location                 = azurerm_resource_group.example.location
      account_tier             = "Standard"
      account_replication_type = "LRS"
    
      lifecycle {
        postcondition {
          condition     = self.location == "West Europe"
          error_message = "Storage account was not created in West Europe."
        }
      }
    }
    

    What This Does

    This validates the real result, not just the input.


    Where Else Can You Use Custom Conditions?

    You can use custom conditions in:

    Example on output:

    output "storage_account_name" {
      value = azurerm_storage_account.example.name
    
      precondition {
        condition     = length(self) > 3
        error_message = "Storage account name is too short."
      }
    }
    

    This validates outputs before showing them.


    Important Rules About Custom Conditions


    When Not to Use Custom Conditions

    Avoid using them when:

    Use them mainly for:


    Summary

    In this section, you learned:

    Custom conditions turn Terraform from a simple provisioning tool into a rule-enforcing, self-validating infrastructure platform.

    Terraform Dynamic Expressions: Why We Need Dynamic Blocks and How They Work with Azure NSG

    In this section, we’ll understand why Terraform dynamic blocks are needed, how NSG rules look without dynamic blocks, and why in this demo we store rule values in locals and use them inside a dynamic block instead of looping through a simple list.

    This explanation is based on your exact Azure Network Security Group demo code.

    Official documentation for Azure NSG using terraform:

    https://registry.terraform.io/providers/hashicorp/azurerm/latest/docs/resources/network_security_group


    The Core Problem: Repeated Nested Blocks

    In Azure, an NSG can contain many security_rule blocks.

    Without dynamic blocks, Terraform code looks like this:

    resource "azurerm_network_security_group" "example" {
    
      security_rule {
        name                   = "Allow-SSH"
        priority               = 100
        destination_port_range = "22"
        description            = "Allow SSH"
      }
    
      security_rule {
        name                   = "Allow-HTTP"
        priority               = 200
        destination_port_range = "80"
        description            = "Allow HTTP"
      }
    
      security_rule {
        name                   = "Allow-HTTPS"
        priority               = 300
        destination_port_range = "443"
        description            = "Allow HTTPS"
      }
    }
    

    Problems with This Approach

    In simple words:

    This is manual configuration, not scalable Infrastructure as Code.


    Why We Need Dynamic Blocks

    A dynamic block allows Terraform to:

    In simple words:

    Instead of writing rules as code,
    we write rules as data,
    and let Terraform generate the code.

    This is the main reason dynamic blocks exist.


    Why Store Values in locals Instead of Hardcoding?

    In your demo, you defined NSG rules in locals:

    locals {
      nsg_rules = {
        "allow_http" = {
          priority = 100
          destination_port_range = "80"
          description = "Allow HTTP"
        },
    
        "allow_https" = {
          priority = 110
          destination_port_range = "443"
          description = "Allow HTTPS"
        }
      }
    }
    

    This design is intentional and very important.


    Why Not Hardcode Rules in the Resource?

    If rules are hardcoded:

    By moving rules to locals:


    Why Not Use a Simple List?

    A simple list might look like this:

    [
      {
        name = "allow_http"
        priority = 100
        port = "80"
      },
      {
        name = "allow_https"
        priority = 110
        port = "443"
      }
    ]
    

    This works, but it has drawbacks:


    Why Use a Map in locals?

    Your nsg_rules is a map, not a list:

    nsg_rules = {
      "allow_http"  = { ... }
      "allow_https" = { ... }
    }
    

    This gives important advantages:

    In short:

    Maps give stable, predictable behavior
    Lists give fragile, index-based behavior

    This is why maps are preferred for dynamic blocks.


    How the Dynamic Block Uses the Local Map

    From your main.tf:

    dynamic "security_rule" {
      for_each = local.nsg_rules
    
      content {
        name                   = security_rule.key
        priority               = security_rule.value.priority
        destination_port_range = security_rule.value.destination_port_range
        description            = security_rule.value.description
      }
    }
    

    How the Loop Works

    For each iteration:


    Why Use security_rule.key for the Name?

    name = security_rule.key
    

    This ensures:

    This is much safer than using list indexes.


    What Terraform Generates Internally

    From your two rules in locals, Terraform generates:

    security_rule {
      name                   = "allow_http"
      priority               = 100
      destination_port_range = "80"
      description            = "Allow HTTP"
    }
    
    security_rule {
      name                   = "allow_https"
      priority               = 110
      destination_port_range = "443"
      description            = "Allow HTTPS"
    }
    

    But:


    Why This Design Is Better Than Without Dynamic Blocks

    With locals + dynamic blocks:

    Without dynamic blocks:


    Summary

    In this section, you learned:

    This pattern — maps in locals + dynamic blocks in resources — is a key step from basic Terraform to clean, scalable, production-grade Infrastructure as Code.

    Terraform Conditional Expressions: Dynamically Naming an NSG Based on Environment

    In this section, we’ll learn how to use a Terraform conditional expression to dynamically set the name of an Azure Network Security Group (NSG) based on the value of an environment variable.

    This is a practical beginner example that shows how:

    We’ll explain this using the exact code and CLI output from your demo.


    The Problem We Are Solving

    In real projects, you rarely deploy only one environment.

    You usually have:

    Each environment must have:

    Without conditional logic, you would need:

    Terraform conditional expressions solve this cleanly.


    The Conditional Expression in Your Code

    From your NSG resource:

    resource "azurerm_network_security_group" "example" {
      name = var.environment == "dev" ? "mytestnsg10001dev" : "mytestnsg10001test"
      location            = azurerm_resource_group.example.location
      resource_group_name = azurerm_resource_group.example.name
    

    This single line controls the NSG name:

    name = var.environment == "dev" ? "mytestnsg10001dev" : "mytestnsg10001test"
    

    Understanding the Syntax

    Terraform conditional expressions follow this format:

    condition ? value_if_true : value_if_false
    

    In your case:

    var.environment == "dev" ? "mytestnsg10001dev" : "mytestnsg10001test"
    

    This reads as:

    This decision is made during terraform plan, before any resource is created.


    The Environment Variable That Drives the Logic

    From your code:

    variable "environment" {
      type        = string
      default     = "staging"
      description = "Environmnet"
    }
    

    This means:

    This variable is the input that controls the conditional expression.


    Case 1: Running Without Passing Any Variable

    You ran:

    terraform plan
    

    Since no -var was provided, Terraform used the default:

    environment = "staging"
    

    Now evaluate the condition:

    var.environment == "dev" ? "mytestnsg10001dev" : "mytestnsg10001test"
    

    So Terraform selected the false branch:

    mytestnsg10001test
    

    This is exactly what your plan output showed:

    + name = "mytestnsg10001test"
    

    This proves:

    The default value "staging" caused Terraform to use
    the test-style NSG name.


    Case 2: Running with -var=environment=dev

    Next, you ran:

    terraform plan -var=environment=dev
    

    Now Terraform used:

    environment = "dev"
    

    Evaluate the condition again:

    var.environment == "dev" ? "mytestnsg10001dev" : "mytestnsg10001test"
    

    So Terraform selected the true branch:

    mytestnsg10001dev
    

    And your plan output showed:

    + name = "mytestnsg10001dev"
    

    This clearly demonstrates that:

    Changing only the variable value
    Changed only the resource name,
    Without changing any Terraform code.


    Why This Pattern Is Important

    With this one conditional expression, you achieved:

    This pattern is widely used for:


    A More Scalable Naming Pattern

    Your current logic handles two cases: dev and “not dev”.

    In real projects, a more scalable pattern is:

    name = "mytestnsg10001-${var.environment}"
    

    This automatically produces:

    This avoids long conditional chains and scales naturally to many environments.


    Summary

    In this section, you learned:

    var.environment == "dev" ? "mytestnsg10001dev" : "mytestnsg10001test"
    

    This is a simple but very powerful example of how Terraform conditional expressions make your infrastructure flexible, automated, and production-ready.

    Terraform Splat Expression: Collecting Values from Multiple Resources

    In this section, we’ll learn about the Terraform splat expression and how it is used to collect values from multiple instances of a resource into a single list.

    We’ll cover:

    Splat expressions are a key concept when you start working with multiple resource instances in Terraform.


    What Is a Splat Expression?

    A splat expression is a shortcut syntax used to:

    Extract the same attribute
    From all instances of a resource
    And return them as a list.

    Basic syntax:

    resource_type.resource_name[*].attribute
    

    Example:

    azurerm_storage_account.example[*].name
    

    This means:


    Why We Need Splat Expressions

    Splat expressions are useful when:

    Without splat:

    With splat:

    One expression
    Collects everything automatically.


    Splat Expression with count

    Consider this resource created using count:

    resource "azurerm_storage_account" "example" {
      count = 2
    
      name                     = "mystorage${count.index}"
      resource_group_name      = azurerm_resource_group.example.name
      location                 = azurerm_resource_group.example.location
      account_tier             = "Standard"
      account_replication_type = "LRS"
    }
    

    This creates:

    Now, to collect all storage account names:

    output "storage_account_names" {
      value = azurerm_storage_account.example[*].name
    }
    

    Line-by-line Explanation

    azurerm_storage_account.example[*].name
    

    The result is a list like:

    [
      "mystorage0",
      "mystorage1"
    ]
    

    Splat Expression with for_each

    Now consider a resource created using for_each:

    variable "storage_names" {
      type    = set(string)
      default = ["stor1", "stor2"]
    }
    
    resource "azurerm_storage_account" "example" {
      for_each = var.storage_names
    
      name                     = each.key
      resource_group_name      = azurerm_resource_group.example.name
      location                 = azurerm_resource_group.example.location
      account_tier             = "Standard"
      account_replication_type = "LRS"
    }
    

    Here:

    To collect all names, splat still works:

    output "storage_account_names" {
      value = [for sa in azurerm_storage_account.example : sa.name]
    }
    

    In this case, we often prefer a for expression because:

    But conceptually, this is still the same idea as splat:

    Collect one attribute from all instances.


    When Splat Expressions Are Most Commonly Used

    Splat expressions are frequently used for:

    Example:

    backend_address_pool_ids = azurerm_network_interface.example[*].id
    

    This passes all NIC IDs into another resource.


    Full vs Legacy Splat Syntax

    Modern Terraform uses the full splat syntax:

    resource[*].attribute
    

    Older Terraform versions used:

    resource.*.attribute
    

    Example:

    azurerm_storage_account.example.*.name   # Legacy
    azurerm_storage_account.example[*].name  # Modern (recommended)
    

    You should always use the modern [*] syntax.


    Important Rules About Splat Expressions


    A Simple Real-World Example

    Create two NSGs:

    resource "azurerm_network_security_group" "example" {
      count = 2
      name  = "nsg-${count.index}"
      ...
    }
    

    Collect all NSG IDs:

    output "nsg_ids" {
      value = azurerm_network_security_group.example[*].id
    }
    

    Terraform returns:

    [
      "/subscriptions/.../nsg-0",
      "/subscriptions/.../nsg-1"
    ]
    

    This list can now be passed to another resource.


    Summary

    In this section, you learned:

    Splat expressions are one of the most important tools for working with multiple resource instances and building data flows between Terraform resources.

    Terraform Built-in Functions: Useful String, List & Map Helpers

    Terraform comes with a set of built-in functions you can use inside expressions to transform values, manipulate strings, work with lists or maps, and more. These functions are extremely helpful when you want to process values dynamically in a module, variable, local, or resource attribute.

    Below are some commonly used functions with simple explanations and examples so you can start using them in your code confidently. For full reference, see the official docs: https://developer.hashicorp.com/terraform/language/functions


    trim

    What it does:
    Removes whitespace from the start and end of a string.

    Example:

    locals {
      messy = "  hello world  "
      clean = trim(local.messy)
    }
    

    Result:

    "hello world"
    

    Use this when your values might have extra spaces you don’t want.


    chomp

    What it does:
    Removes a trailing newline (end-of-line) from a string.

    Example:

    locals {
      text_with_newline = "hello\n"
      fixed_text        = chomp(local.text_with_newline)
    }
    

    Result:

    "hello"
    

    This is useful when reading output that may include newline characters.


    max

    What it does:
    Returns the largest numeric or alphabetic value from a list.

    Example (numbers):

    locals {
      numbers = [10, 32, 5, 18]
      largest = max(local.numbers...)
    }
    

    Result:

    32
    

    Example (strings):

    locals {
      words = ["apple", "banana", "grape"]
      highest = max(local.words...)
    }
    

    Result:

    "grape"
    

    Note: You need ... to expand list into separate arguments.


    lower

    What it does:
    Converts a string to all lowercase.

    Example:

    locals {
      mixed = "HELLoTerraform"
      lowercased = lower(local.mixed)
    }
    

    Result:

    "helloterraform"
    

    Great for normalizing strings when case doesn’t matter.


    reverse

    What it does:
    Reverses a list (flips order).

    Example:

    locals {
      numbers = [1, 2, 3, 4]
      backwards = reverse(local.numbers)
    }
    

    Result:

    [4, 3, 2, 1]
    

    Works only on lists, not on maps or strings.


    merge

    What it does:
    Combines two or more maps into one.

    Example:

    locals {
      tags1 = { env = "dev" }
      tags2 = { project = "blog" }
      merged_tags = merge(local.tags1, local.tags2)
    }
    

    Result:

    { env = "dev", project = "blog" }
    

    If maps have the same key, the last one wins.


    substr

    What it does:
    Returns a part of a string given a start index and length.

    Syntax:

    substr(string, start, length)
    

    Example:

    locals {
      full = "terraform"
      part = substr(local.full, 0, 4)
    }
    

    Result:

    "terr"
    

    Indices start at 0 (first character).


    replace

    What it does:
    Replaces all occurrences of a substring with another string.

    Example:

    locals {
      original = "prod-environment"
      fixed = replace(local.original, "prod", "production")
    }
    

    Result:

    "production-environment"
    

    Useful for transforming naming conventions.


    split

    What it does:
    Splits a single string into a list based on a separator.

    Syntax:

    split(separator, string)
    

    Example:

    locals {
      raw = "80,443,22"
      ports = split(",", local.raw)
    }
    

    Result:

    ["80", "443", "22"]
    

    You can then loop over this list in a dynamic block or for expression.


    When To Use These in Real Terraform

    These functions are most commonly used in:

    By combining conditions and functions, you can make your Terraform configurations more flexible, less repetitive, and more maintainable.


    Summary

    FunctionWhat It Does
    trimRemoves leading/trailing spaces
    chompRemoves trailing newline
    maxReturns the largest numeric/string value
    lowerConverts string to lowercase
    reverseReverses a list
    mergeCombines maps
    substrExtracts part of a string
    replaceReplaces substrings
    splitSplits a string into a list

  • 1 – Terraform Basics

    Table of Contents

    1. Terraform Fundamentals: Infrastructure as Code (IaC) for Beginners
    2. Terraform Providers Explained (Beginner-Friendly)
    3. Install Terraform in Windows Using PowerShell and Chocolatey(Windows package manager)
    4. First Terraform Code: Create an Azure Storage Account (Beginner Friendly)
    5. Terraform State File Management with Azure Storage (Beginner Friendly)
    6. Terraform Variables Explained
  • Terraform Fundamentals: Infrastructure as Code (IaC) for Beginners

    In this section, we’ll cover the core fundamentals of Terraform and Infrastructure as Code (IaC). If you are completely new to Terraform or cloud automation, this will give you a strong conceptual foundation before we move into hands-on labs in later sections.


    What Is Infrastructure as Code (IaC)?

    Infrastructure as Code means provisioning and managing infrastructure using code instead of manual steps.

    Traditionally, an engineer would log in to a cloud portal (Azure, AWS, or GCP), click through screens, fill forms, and create resources like virtual machines, load balancers, and databases. With IaC, you write code that defines what infrastructure you want, and a tool provisions it for you automatically.

    In simple terms:

    This is exactly what tools like Terraform help us achieve.


    There are multiple IaC tools available today:

    In this series, the focus is Terraform, because it works across multiple cloud providers and is widely used in the industry.


    Why Do We Need Infrastructure as Code?

    You might wonder:

    “If I can easily create resources using the cloud portal, why should I write code?”

    Let’s understand this with a simple example.


    Example: A Basic Three-Tier Architecture

    Imagine a simple application setup:

    In a real cloud environment, this includes:

    Creating this manually using a cloud portal might take 2 hours for just one environment.


    The Real Enterprise Challenge

    In real organizations, you don’t have just one environment.

    Typically, you have multiple environments like:

    That’s 6 environments.

    If one environment takes 2 hours, manually creating all of them takes 12+ hours — and that’s just for provisioning.


    Problems With Manual Infrastructure Provisioning

    Manual infrastructure creation introduces several serious challenges:

    Time-Consuming

    Engineers spend hours just setting up infrastructure instead of developing or testing applications.

    High Cost

    Resources often remain running even when not in use, increasing cloud bills.

    Repetitive Work

    The same steps are repeated daily across environments.

    Human Errors

    Manual clicks and form entries can easily lead to misconfigurations.

    Security Issues

    Inconsistent role-based access and permissions can expose security risks.

    “It Works on My Machine” Problem

    Each environment may differ slightly:

    This leads to bugs appearing in production even when code works in development.


    How Terraform Solves These Problems

    Terraform addresses all these challenges effectively.

    Automation

    Consistency

    Cost Optimization

    Faster Delivery

    Version Control

    Reusability


    How Terraform Works (High-Level)

    Terraform follows a simple workflow:

    Terraform Configuration Files

    Key Terraform Commands

    These commands can be run manually or automated using CI/CD pipelines.


    Installing Terraform

    Terraform installation is straightforward and supports all major operating systems.

    Installation Options

    Summary

    By the end of this section, you should understand:

    Terraform Providers Explained (Beginner-Friendly)

    In this section, we’ll focus entirely on Terraform Providers. Providers are a core building block of Terraform, and understanding them early will make everything else much easier as we move forward.


    What Is a Terraform Provider?

    A Terraform provider is a plugin that allows Terraform to talk to external systems such as:

    Terraform itself does not know how to create a virtual machine, database, or load balancer.
    Instead, it relies on providers to translate Terraform code into API calls that cloud platforms understand.


    Terraform Version vs Provider Version

    This is a very important concept for beginners.

    👉 These two versions are separate and serve different purposes.


    Types of Terraform Providers

    Terraform providers are categorized based on who maintains them:

    Official Providers

    Partner Providers

    Community Providers


    How Terraform Providers Work (Behind the Scenes)

    When you run Terraform commands, this is what happens:

    1. You write Terraform configuration files (.tf)
    2. Terraform reads the configuration
    3. The provider plugin:
    4. The platform creates or updates resources
    5. Terraform displays the result

    👉 Providers act as a bridge between Terraform and real infrastructure.


    Why Providers Are Required

    Each platform has:

    Providers standardize this complexity so you can write consistent Terraform code without worrying about API differences.

    That’s why Terraform supports hundreds of providers.


    Provider Configuration Basics

    A Terraform configuration usually includes two key parts:

    Terraform Block

    This defines:

    Provider Block

    This configures how Terraform connects to the platform (credentials, features, regions, etc.)

    Example (conceptual, not full code):


    Why You Must Lock Provider Versions

    If you don’t specify a provider version, Terraform uses the latest version by default.

    This can cause problems because:

    Best Practice

    This process is called version locking.


    Understanding Provider Version Constraints

    Terraform allows you to control which versions are allowed using version operators.

    Here are the most common ones:

    Exact Version (=)

    Exclude Version (!=)

    Greater Than / Less Than (>=, <=)

    Pessimistic Constraint (~>) – Most Important

    This allows safe updates.

    Example behavior:

    If your version is:

    This keeps your infrastructure stable while still receiving fixes.


    When Should You Upgrade a Provider?

    Follow this workflow:

    1. Upgrade the provider locally
    2. Test all Terraform changes
    3. Validate nothing breaks
    4. Promote changes to higher environments

    Never upgrade providers directly in production.


    Key Takeaways

    By the end of this section, you should understand:

    Install Terraform in Windows Using PowerShell and Chocolatey(Windows package manager)

    Using Chocolatey, a Windows package manager, is one of the easiest ways to install Terraform. It handles downloading, installation, and updates automatically.


    Step 1: Install Chocolatey

    Chocolatey must be installed first before we can use it to install Terraform.

    1. Open PowerShell as Administrator
    2. Run the following command:
    Set-ExecutionPolicy Bypass -Scope Process -Force; `
    [System.Net.ServicePointManager]::SecurityProtocol = `
    [System.Net.ServicePointManager]::SecurityProtocol -bor 3072; `
    iex ((New-Object System.Net.WebClient).DownloadString('https://community.chocolatey.org/install.ps1'))
    

    This command temporarily bypasses the execution policy and installs Chocolatey securely.

    Note: Close and reopen PowerShell after installation to ensure Chocolatey is available.


    Step 2: Install Terraform

    Once Chocolatey is installed, run the command below to install Terraform:

    choco install terraform -y
    

    The -y flag automatically confirms prompts and installs the latest stable version.


    Step 3: Verify the Installation

    To confirm that Terraform has been installed successfully, run:

    terraform -version
    

    If Terraform displays its version number, the installation is complete ✅


    Summary

    Using Chocolatey simplifies the installation process by:

    You’re now ready to start working with Terraform 🚀

    First Terraform Code: Create an Azure Storage Account (Beginner Friendly)

    In this section, we’ll write and run our first Terraform Infrastructure as Code (IaC) to create an Azure Storage Account.
    This is written for absolute beginners—no prior Terraform knowledge assumed.

    We will:


    Finding the Right Terraform Resource

    When working with Terraform, the official documentation is your best friend.

    Search in Google:

    Create Azure Storage Account using Terraform

    You’ll land on the Terraform Registry page for the Azure Storage Account resource.

    https://registry.terraform.io/providers/hashicorp/azurerm/latest/docs/resources/storage_account

    This page tells us:

    You’ll also notice a tag called Official.
    This means the provider is maintained by HashiCorp and is safe to use.


    Writing Terraform Code in VS Code

    Terraform code is written in HCL (HashiCorp Configuration Language).

    To make life easier:

    This extension provides:


    Terraform Configuration Block

    terraform {
      required_version = ">= 1.9.0"
    
      required_providers {
        azurerm = {
          source  = "hashicorp/azurerm"
          version = "~> 4.8.0"
        }
      }
    }
    

    Explanation (line by line):


    Azure Provider Configuration

    provider "azurerm" {
      features {}
    }
    

    Explanation:


    Creating an Azure Resource Group

    resource "azurerm_resource_group" "example" {
      name     = "example-resources"
      location = "West Europe"
    }
    

    Explanation:


    Creating an Azure Storage Account

    resource "azurerm_storage_account" "example" {
      name                     = "mytmhstorageaccount10021"
      resource_group_name      = azurerm_resource_group.example.name
      location                 = azurerm_resource_group.example.location
      account_tier             = "Standard"
      account_replication_type = "GRS"
    
      tags = {
        environment = "staging"
      }
    }
    

    Explanation:

    Terraform automatically understands dependencies from these references.


    Authenticating Terraform with Azure

    Terraform must authenticate before creating resources.

    First, log in using Azure CLI:

    az login
    

    This opens a browser and authenticates you.


    Using a Service Principal (Best Practice)

    Instead of deploying using your personal account, we create a Service Principal.

    az ad sp create-for-rbac -n az-demo --role="Contributor" --scopes="/subscriptions/$SUBSCRIPTION_ID"
    

    Explanation:

    Azure returns credentials like:

    {
      "appId": "...",
      "password": "...",
      "tenant": "..."
    }
    

    These values are required by Terraform.


    Setting the Azure Subscription (If needed)

    Ensure Terraform uses the correct subscription, the Azure CLI is using (or else set to desired subscription):

    az account set --subscription <subscription-id>
    

    Storing Credentials in PowerShell (Windows)

    On Windows, we store credentials as environment variables.

    Create a file called env.ps1:

    $env:ARM_CLIENT_ID=""
    $env:ARM_CLIENT_SECRET=""
    $env:ARM_SUBSCRIPTION_ID=""
    $env:ARM_TENANT_ID=""
    

    Run it:

    .\env.ps1
    

    Important concepts:


    Initializing Terraform

    terraform init
    

    1. Downloads the Azure Provider

    Terraform reads the required_providers block and downloads the AzureRM provider specified in your configuration.

    This provider is responsible for:


    2. Creates the .terraform Directory

    Terraform creates a hidden directory named:

    .terraform/
    

    This directory contains:

    These binaries are platform-specific, which is why this folder should never be committed to GitHub.


    3. Generates terraform.lock.hcl

    Terraform creates a file called:

    terraform.lock.hcl


    ✅ This file locks provider versions

    What this file actually does:

    This guarantees consistent and repeatable builds across machines and environments.


    Validating Configuration

    terraform validate
    

    This checks:

    No resources are created at this stage.


    How Terraform Reads .tf Files

    When Terraform runs:


    Planning the Infrastructure Changes

    terraform plan
    

    This command:

    Example output summary:

    Plan: 2 to add, 0 to change, 0 to destroy.
    

    Filtering Plan Output (PowerShell)

    To see only created resources:

    terraform plan | Select-String "will be created"
    

    This is the PowerShell equivalent of grep.


    Applying the Configuration

    terraform apply
    

    Terraform:


    Making Changes Later

    Terraform follows desired state:

    Some changes require resource recreation, which Terraform clearly shows.


    Instead of manually deleting resources:

    terraform destroy
    

    To skip confirmation:

    terraform destroy --auto-approve
    

    This ensures:


    Key Takeaways

    This completes your first real Terraform IaC workflow 🎉

    Terraform State File Management with Azure Storage (Beginner Friendly)

    In this section, we will understand what the Terraform state file is, why it is critical, and how to manage it safely using Azure Storage as a remote backend.

    This is a core concept in Terraform, and understanding it early will save you from many production issues later.


    What Is the Terraform State File?

    When you run Terraform for the first time, it automatically generates a file called:

    terraform.tfstate
    

    This file contains the actual current state of your infrastructure.

    Terraform uses this file to:


    Why Terraform Needs a State File

    In your Terraform code (.tf files), you only describe the desired state, for example:

    “I want one resource group and one storage account.”

    But Terraform also needs to know:

    This information comes entirely from the state file.

    Without the state file:


    Important Rules About the State File

    The Terraform state file is extremely sensitive.
    Follow these rules strictly:


    Best Practices for Managing Terraform State

    Do Not Store State Locally

    By default, Terraform stores terraform.tfstate in your local folder.
    This is fine for learning, but not for real projects.

    Instead, store it in a remote backend, such as:

    This allows:


    Use State Locking

    State locking ensures:

    Only one Terraform process can modify infrastructure at a time.

    This prevents:

    Azure Storage supports native state locking, which Terraform uses automatically.


    Isolate State Files for Each Environment

    Never use one state file for all environments.

    Best practice:

    Example:

    This ensures:


    Keep Regular Backups

    Even with remote backends:

    Always ensure your backend supports:

    Azure Blob Storage supports all of these.


    Why We Use Azure Storage for Terraform State

    Azure Blob Storage is commonly used because:

    Importantly:

    This storage account is NOT managed by Terraform
    It is created and maintained separately.

    This avoids circular dependency issues.


    Creating the Remote Backend Infrastructure

    We do NOT use Terraform to create the backend storage.

    Instead, we use:

    This ensures Terraform can safely access the backend from the start.

    What we create:

    This container will hold the Terraform state file remotely.


    Configuring Terraform to Use Azure Backend

    Google search: Azure backend terraform, to find a page about how to configure remote backend in terraform

    https://developer.hashicorp.com/terraform/language/backend/azurerm

    Once the storage account and blob container exist, we must tell Terraform:

    “Use this location for storing state instead of local files.”

    To do this, we add a backend block inside the terraform block.

    Example:

    terraform {
      backend "azurerm" {
        resource_group_name  = "tfstate-rg"
        storage_account_name = "tfstateaccount123"
        container_name       = "tfstate"
        key                  = "prod.terraform.tfstate"
      }
    }
    

    Explanation (Line by Line)


    How Terraform Authenticates to Azure Storage

    Terraform uses:

    The same authentication you use for Azure resources is reused for backend access.


    What Happens After Backend Is Configured

    After adding the backend block, run:

    terraform init
    

    Terraform will:

    You will now see:


    Why Remote State Is Critical

    Without remote state:

    With remote state:


    Key Takeaways

    Terraform Variables Explained

    In this section, we’ll learn about Terraform Variables, one of the most important concepts for writing reusable and flexible Infrastructure as Code.
    Variables help you avoid hardcoding values and make your Terraform configurations adaptable to different environments like dev, staging, and production.


    Types of Variables in Terraform

    Terraform supports three main kinds of variables:

    Input Variables

    These allow you to pass values into Terraform from outside (CLI, files, etc.).

    Output Variables

    These allow Terraform to return values after execution, such as resource names, IP addresses, or IDs.

    Local Variables

    These are used inside Terraform code only for convenience and readability.


    Type Constraints in Terraform

    Terraform supports several data types:

    Primitive Types

    These take only one value.

    Collection Types

    Structural Types

    Special Type


    Input Variables

    Input variables allow your Terraform code to be dynamic and reusable.

    Defining an Input Variable

    variable "environment" {
      type        = string
      description = "env var"
      default     = "staging"
    }
    

    Line-by-line Explanation


    Using a Variable in Terraform Code

    tags = {
      environment = var.environment
    }
    

    Line-by-line Explanation


    Using a default value makes the variable optional, but:

    For real projects, it’s better to explicitly pass values.


    Assigning Input Variables

    Terraform allows multiple ways to assign values to variables.

    Passing Variables via CLI

    terraform plan -var=environment=dev
    

    Explanation

    ⚠️ This overrides the default value and has higher precedence.


    Assigning Variables Using a File (terraform.tfvars)

    Create a file named terraform.tfvars and write:

    environment = "demo"
    

    Explanation

    Terraform automatically reads this file when executing commands.

    ⚠️ Note: CLI assignment still has higher precedence than tfvars files.


    Variable Precedence in Terraform

    Terraform decides which value to use based on a priority order:

    From highest to lowest:

    1. CLI options (-var, -var-file) and variables from Terraform Cloud
    2. *.auto.tfvars or *.auto.tfvars.json files
    3. terraform.tfvars.json
    4. terraform.tfvars
    5. Environment variables
    6. default value in variable block

    This ensures that explicit user input always wins over defaults.

    📚 More details:
    https://developer.hashicorp.com/terraform/language/values/variables


    Output Variables

    Output variables let Terraform display useful values after execution.

    Defining an Output Variable

    output "storage_account_name" {
      value = azurerm_storage_account.example.name
    }
    

    Line-by-line Explanation


    Why Output Variables Are Useful

    They help you:

    You can view outputs using:

    terraform output
    

    Or also after:

    terraform plan
    terraform refresh
    

    Local Variables

    Local variables are used for internal convenience when values do not change frequently.
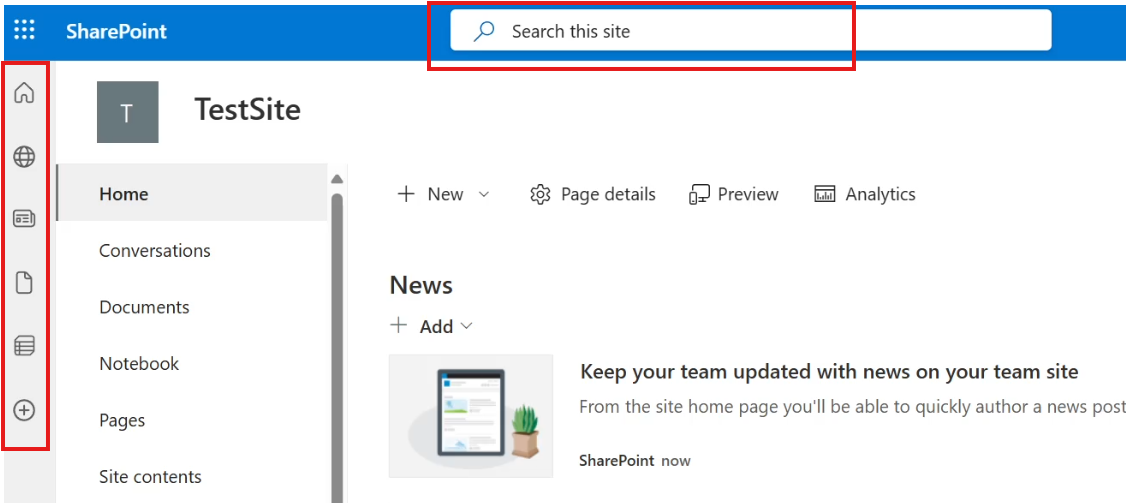
    They improve:

    Defining Local Variables

    locals {
      common_tags = {
        environment = "dev"
        lob         = "banking"
        stage       = "alpha"
      }
    }
    

    Line-by-line Explanation


    Using Local Variables in Code

    environment = local.common_tags.environment
    

    Explanation

    This avoids repeating the same values in multiple places.


    Summary

    In this section, you learned:

  • test quiz