Section Summary
Understanding Azure Virtual Network: Your Gateway to Secure Cloud Architecture
In this section, we explore the importance of Azure Virtual Network (VNet) in building secure and organized cloud environments. Even though Azure hosts virtual resources, they reside on shared physical servers. VNets ensure these resources are logically isolated, so each organization’s data stays protected from others—even if they’re using the same physical infrastructure.
A Simple Analogy: Virtual Network as a Gated Community
To simplify the concept, this section uses a housing community analogy. Think of the VNet as the entire gated community, firewalls as boundary walls, and subnets as individual buildings. Virtual Machines (VMs) live inside these subnets like apartments. Security layers such as Application Gateways or Load Balancers work like security guards—authenticating traffic, checking availability, and rerouting as needed. Network Security Groups (NSGs) add even more granular control, like individual buzzer codes for each building.
Demystifying IP Addresses and CIDR Notation
This part of the section helps you grasp how IP addressing works in Azure. It explains the structure of IPv4 addresses and introduces CIDR notation—like 100.8.0.0/24—to show how IP ranges are allocated within a VNet or subnet. You’ll understand how the number of bits assigned to a network determines how many devices can exist within it.
Creating and Managing VNets in Azure
Here, we look at how VNets and subnets are created within Azure, including practical notes such as Azure reserving the first five IPs in every subnet for internal processes. You’ll also learn that Azure prevents IP conflicts when creating multiple subnets within the same VNet.
The Purpose of Private and Public IPs
This final section discusses when and why to use public versus private IP addresses. Public IPs allow global access, but most secure environments block them to reduce attack risks. Instead, communication stays within the private network using private IPs. Only the Application Gateway usually has a public IP, acting as the sole entry point—helping secure and control all inbound traffic.
Why we need Azure Virtual Network?
In Azure all the virtual resources are hosted on a physical server. A physical server may be shared by different Azure subscription or organizations. So Azure separate out the virtual resources in a physical server using virtual network. So that resources of 1 organization/subscription is isolated from another organization to ensure the security.
Virtual Network as Housing gated community Analogy
Entire housing community is VNet(Virtual network).
The walls of entire housing community is Firewall.
Resources like VMs for webservers or any purpose are located in their own subnets, like units inside each building.
The main security guard that is located at the main entrance of this housing community is Application Gateway(for web based applications) or Load Balancer, it does 3 main things:
1 – Check Id(Autherise/Autheitcate)
2 – Check Availablity
3 – Find alternative if not available
Subnets in a VNet are individual buildings in the housing community.
Security guard at the main gate has his own building for his shift, like wise Application Gateway(for web based applications) or Load Balancer is also located in a subnet within the VNet.
There is also separate security system like a buzzer code for each building or each unit, like NSG on subnet or on NIC of VM. These security system can do further filtering.
IP Address and CIDR Notation
When we create a VNet or subnet we need to provide IP address range.
IPv4 address has 4 parts separated by dot: 97.87.3.1
Each part is composed of 8-bits, for that reason, each part can take any value from 0-255; because 2^8 =256, so 8 bit can have only 256 values and 0 is included.
CIDR notation
How a VNet or subnet IP address range is represented.
It is represented by IPv4 address followed by ‘/’ and a number, like : 100.8.0.0/24
This is used to indicated what all IP address are included in a particular VNet or subnet.
Here /24 means 24 bits in the IPv4 address will be used to represent the network, and rest of the bits will be used to represent the useable ip address in the network that can be assigned to various devices or components in the network like VMs.
In IPv4 address we have 4 X 8 = 32 bits, so if we use 24 bits for network, we only have 8 remaining bits to address various components in network, so using 8 bits we can address 2 ^ 8 network resources, or we have 2 ^ 8 IP addresses.
Larger the number of bits we use for network, lesser will be bits available for addressing network resources.
VNet vs Subnet
Subnet will have an address range with in the address range of VNet.
If a Vnet has address range of 100.8.0.0/24, we can have 2 ^ 8 devices in this Vnet, subnet may be represented by 100.8.0.0/28, that means 2^4 devices can be inside this subnet.
Create VNet in Azure

Here we can see the Vnet and subnet address ranges available. We can rename the default subnet.
With in a subnet Azure always use first 5 IP address for internal management.
We can add more subnets to the virtual network.
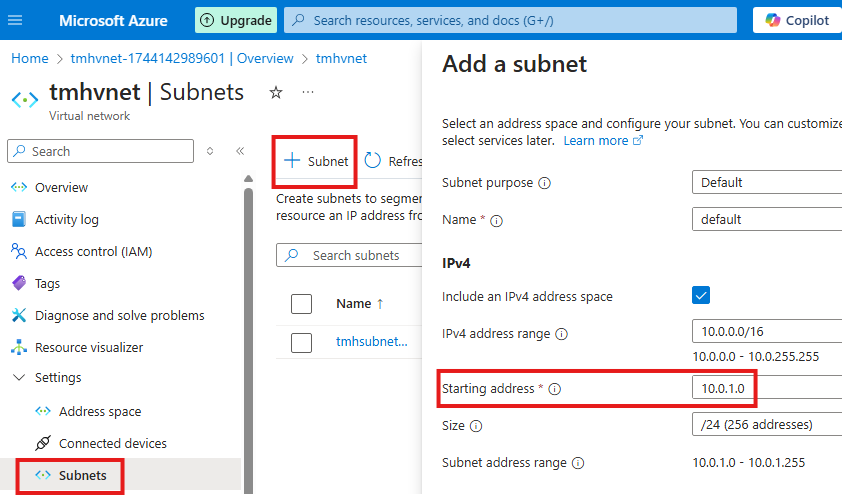
Azure will automatically assign IP address range that will not overlap with other subnets in the same VNet.
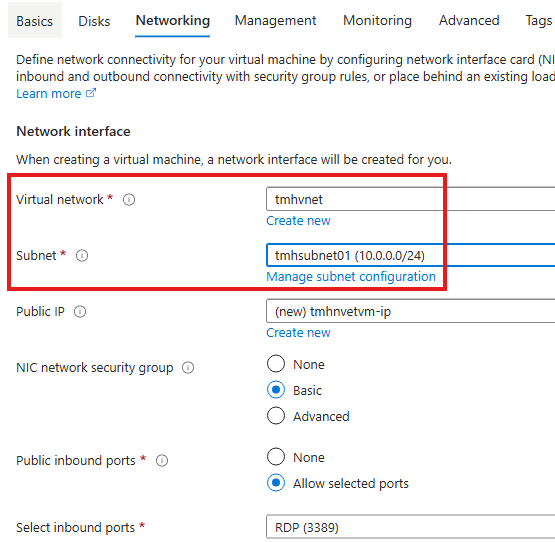
Adding Azure VM to VNet
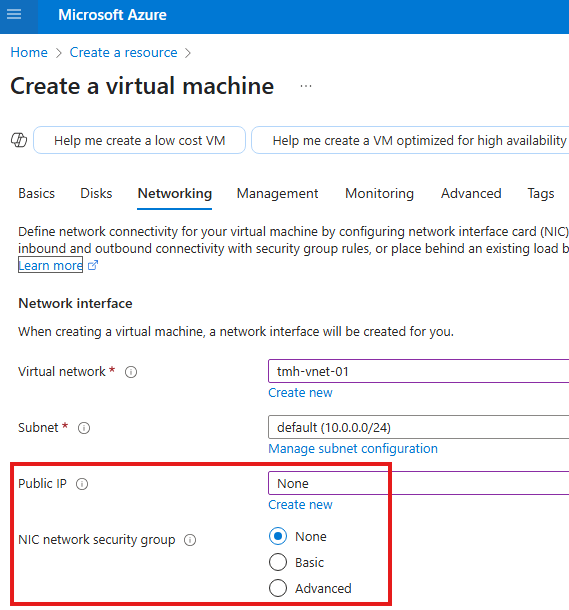
While creating VM in Azure, select the VNet and Subnet that we created earlier.
Public IP v/s Private IP
Public IP is used to connect to VM globally. Private IP is visible only with in the VNet(not necessarly same subnet, subnets will not have overlapping IP, so private IP is unique in a VNet).
Why do we need public and private IP?
To prevent attack on a server, it can block access to outside world by blocking inbound connections to the public IP, in the meantime it can stay connected within the VNet using private IP.
In most of scenarios, we block public IP address of all VMs, and every request should go through Application gateway. Only public IP of application gateway will be open.
Section Summary
Hosting a Web App Inside a Virtual Machine
In this section, we walk through the process of deploying a web application inside a Virtual Machine (VM) on Azure. By installing IIS (Internet Information Services) and the .NET 8 Hosting Bundle, we turn the VM into a functional web server. You’ll learn how to connect to the VM using Remote Desktop (RDP), configure it using Server Manager, and access the default IIS landing page locally.
Building and Publishing Your Web App
We then shift to Visual Studio to create a web application using the ASP.NET Core MVC template. After customizing the interface, the project is published to a local folder using a self-contained deployment mode. This ensures the application runs independently of external framework installations. The published files are then transferred to the VM and linked to IIS by configuring a new website that listens on port 8080.
Local Access vs. Public Access
Once hosted, the web app can be viewed from within the VM using localhost. However, this local availability does not make the application accessible from the internet using the VM’s public IP. While it’s technically possible to open port 8080 to allow external traffic, this introduces significant security risks and is not recommended for production environments.
Securing the Web Application
Security is a critical focus of this section. We highlight the dangers of exposing web apps directly to the internet, including common threats like DDoS attacks, SQL injection, cross-site scripting, and protocol violations. To counter these risks, the recommended solution is to route all external traffic through an Azure Application Gateway. This acts as a secure entry point that filters and validates requests before passing them to the web app.
Hosting a Web App in VM
Install IIS and .NET 8 Hosting bundle in VM
RDP into the VM we created earlier in previous section.
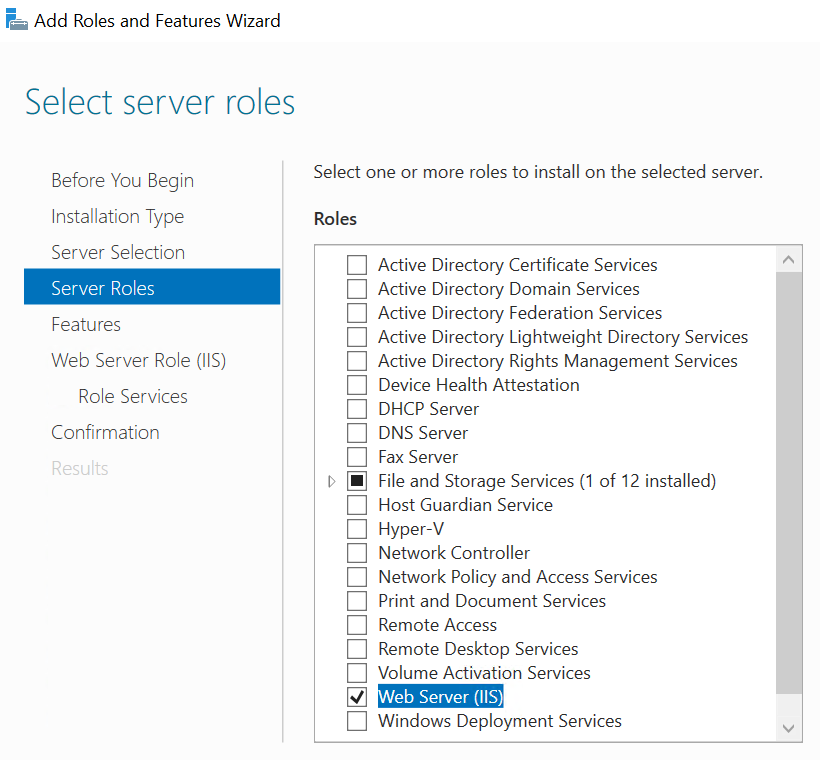
Server Manager > Add Roles and Features
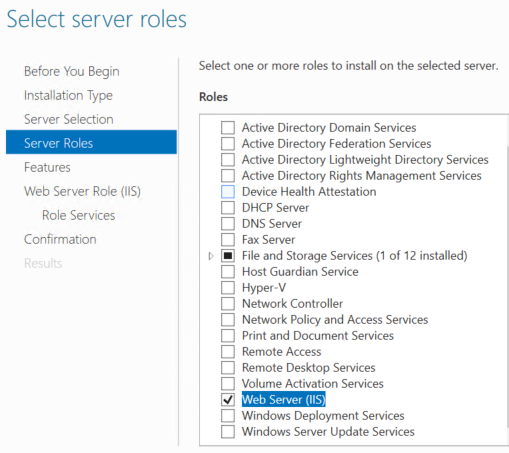
Add Web Server(IIS) role
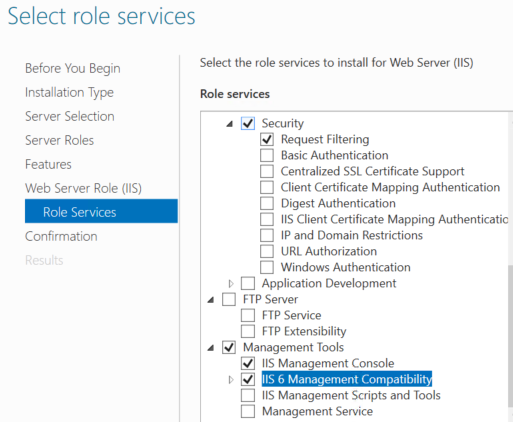
Under Web server roles, select IIS 6 Management Compatibility
Wait for installation to complete.
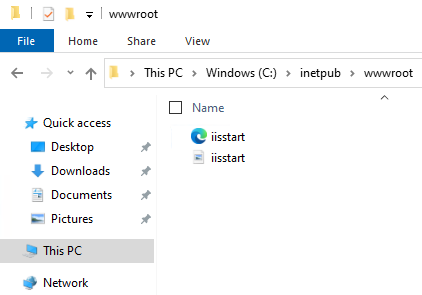
Once installation is completed we will have path: inetpub > wwwroot.
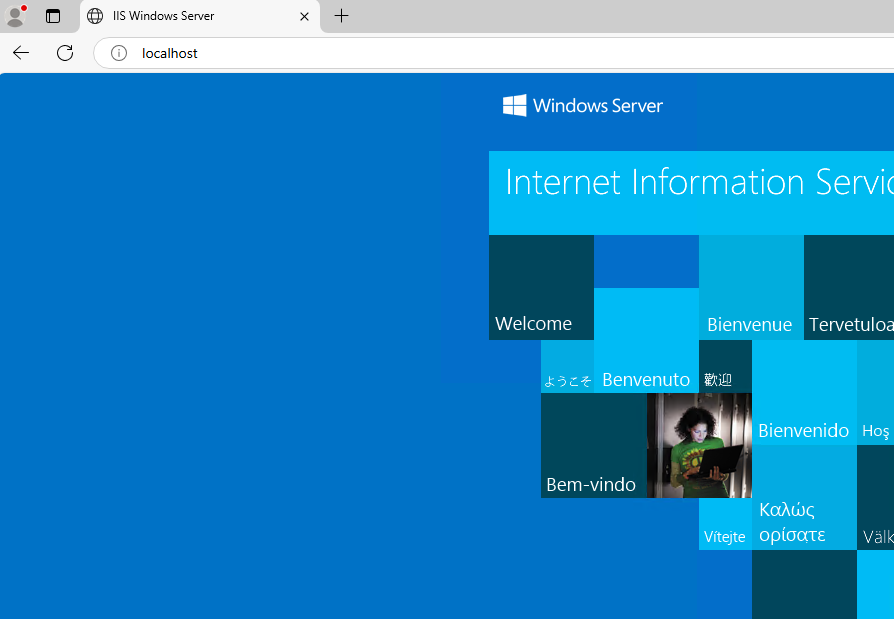
The default landing page will be available in the folder. Which can also we accessed within the server at its loopback address(localhost).
Now, download and install latest .NET 8 Hosting bundle
Create a Web App using .NET in visual studio
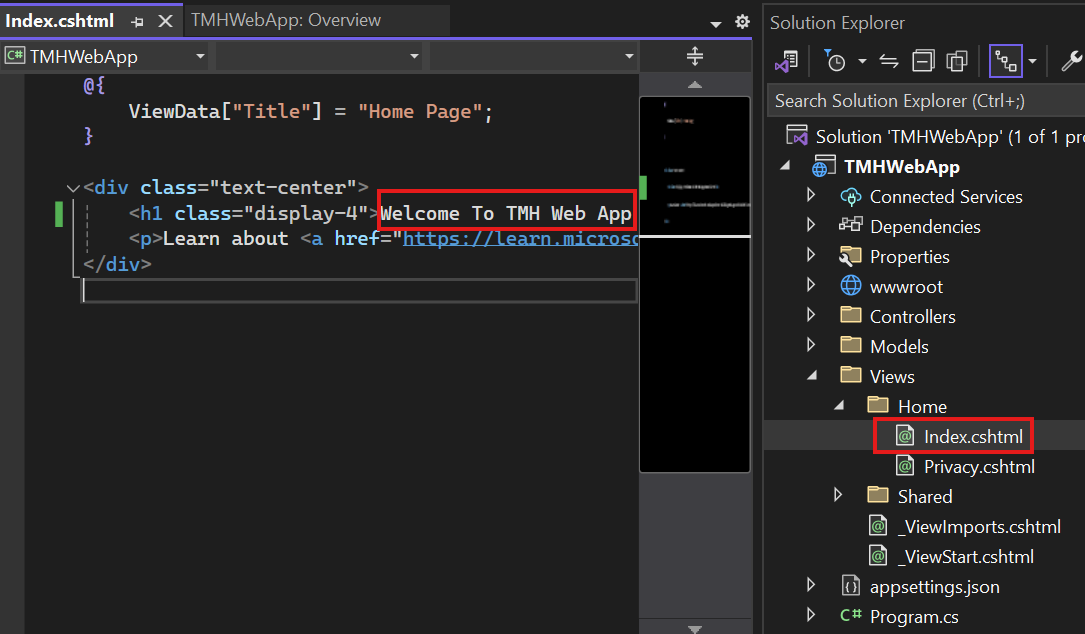
In Visual Studio create a project of type: ASP.NET Core Web App (Model-View-Controller)
Make some noticeable change in UI of the index page at Home > Index.cshtml
Publish the Web App as folder
Right Click on Project > Publish > Publish into a folder
In publish configuration settings, choose self-contained instead of framework dependent to make the webapp run without any dependency.
Copy the published folder into VM on any location.
Open IIS Manager on VM
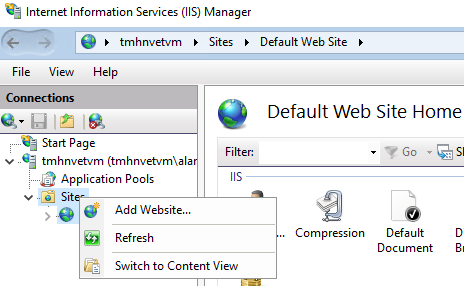
Remove default website and Add new website.
Select physical path of our VM to be the path of the publish folder we copied.
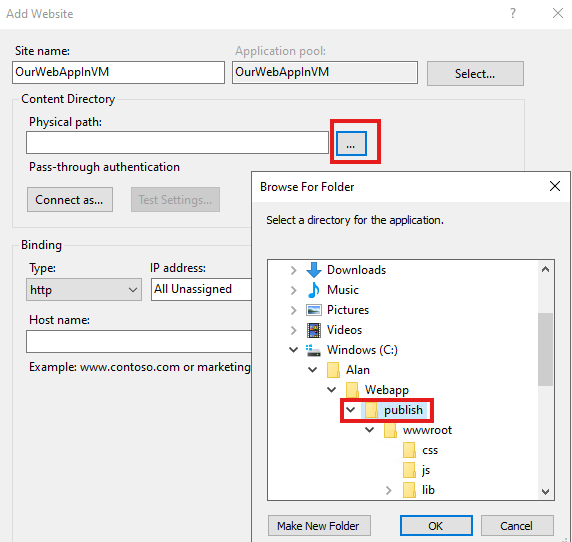
publish folder will be the direct parent of wwwroot folder.
Change port to 8080
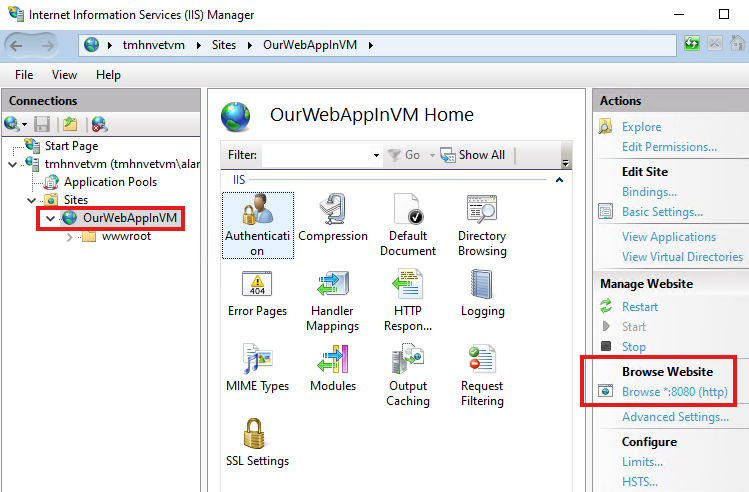
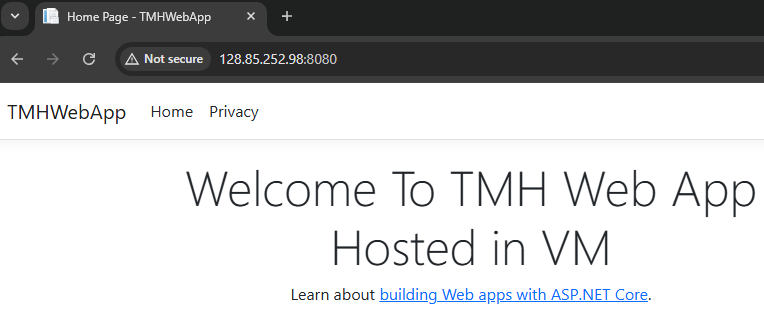
After adding website, we click on browse 8080 to view the webapp locally.
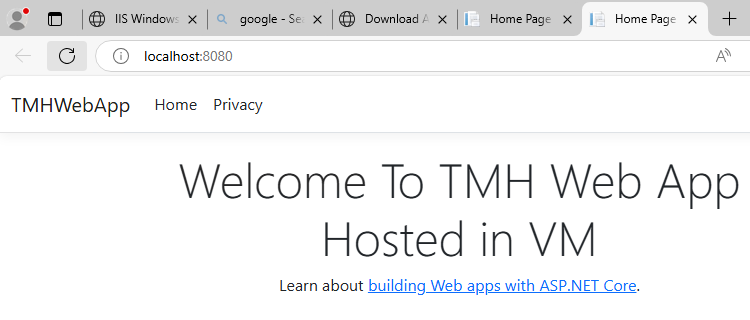
Web app will be available within the server locally.
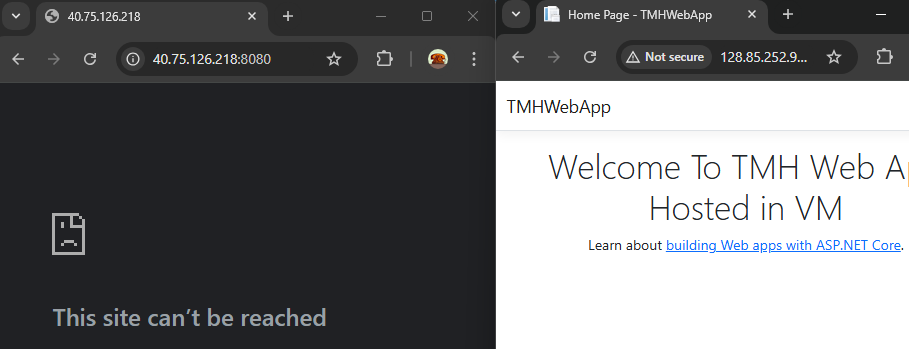
But it will not be available with public IP to the outside world.
Securing Web App in VM
Allowing in-bound connection to public IP at port 8080 is not recommended, as it has security risk.
Currently RDP port is open, but that also need to be closed for security.
Common Security Issues
1 – DDOS attack
Web app will get large number or requests from bots so that regular users cannot access it.
2 – Cross site scripying
3 – SQL Injection
4 – HTTP protocol violation
Solution
We should implement Application gateway to secure web app to filter the requests, and only valid traffic will reach the web app.
Section Summary
Spinning Up an Ubuntu Web Server in Azure
In this section, you’ll learn how to deploy a basic Ubuntu virtual machine (VM) in Azure and host a web server using Nginx. During VM creation, we also configure the virtual network, subnet, and public IP from the networking tab, which are essential for managing connectivity and access control.
Installing and Testing Nginx
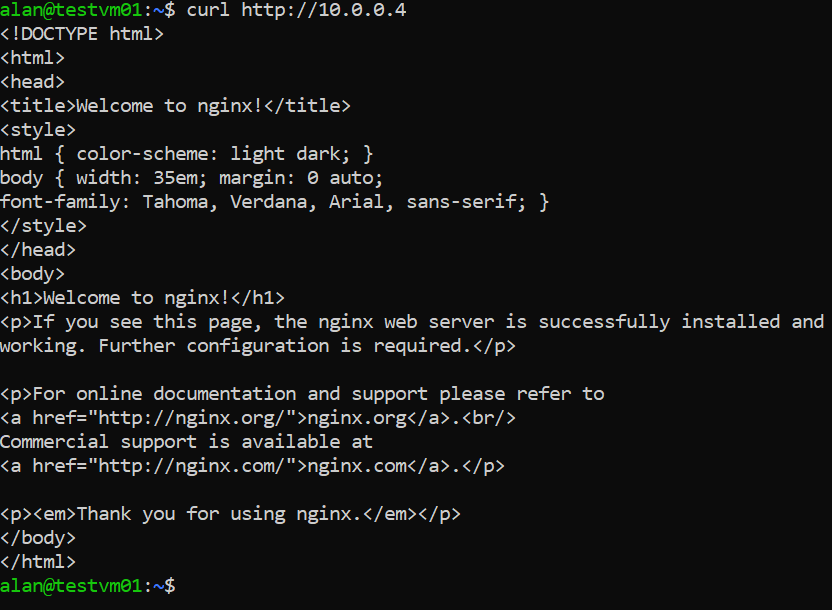
Once the VM is up, we SSH into it from a terminal using the public IP. From there, we update system packages and install the Nginx web server. A simple curl command to the VM’s private IP confirms that the server is working—but it’s still inaccessible from the internet. That’s because public access is blocked by NSG (Network Security Group) rules.
Enabling Web Access with NSG Rules
To make the web page publicly accessible, we modify the NSG associated with the VM. By adding an inbound rule to allow HTTP traffic on port 80, we unlock access to the Nginx home page via the VM’s public IP. NSGs can be associated with the VM’s NIC or even at the subnet level for broader control.
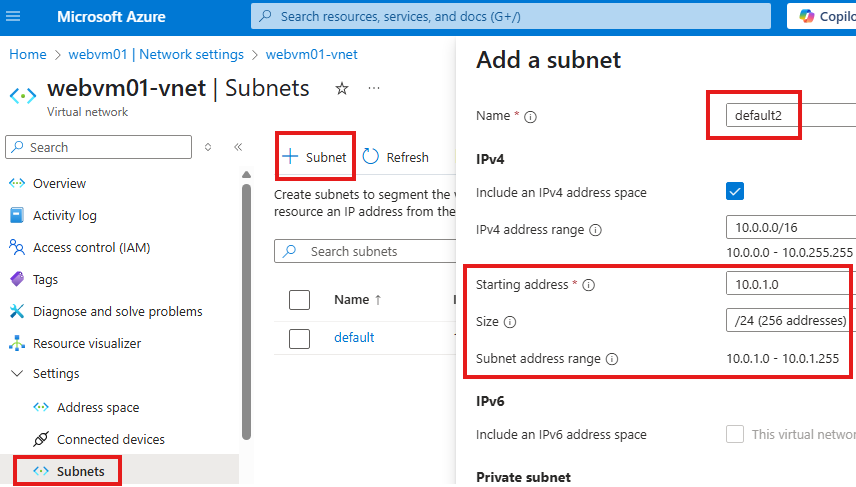
Expanding to Multiple Subnets
You’ll also learn how to scale this setup by creating another VM in a different subnet—but still within the same virtual network. These VMs can communicate using their private IPs thanks to default NSG rules that permit traffic within the VNet. This makes it easy to test inter-VM communication, such as accessing the web server VM from the second VM.
Hosting Web App In Ubuntu VM with Nginx server Steps
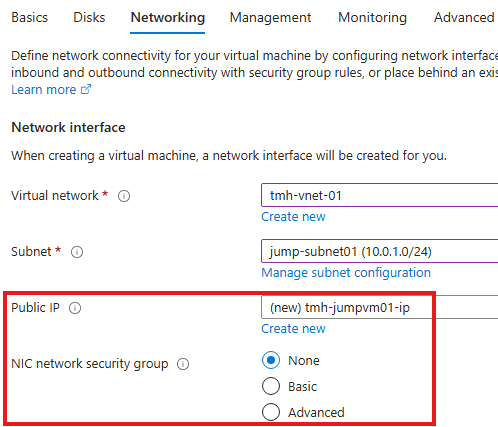
1 – Create Ubuntu VM
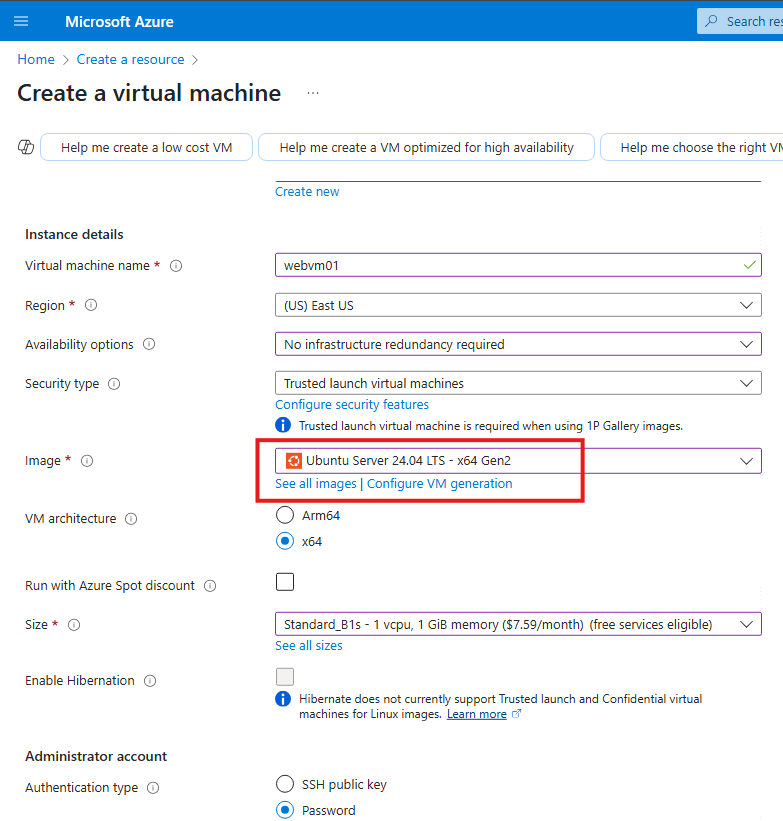
Note the virtual network and subnet that is created; Also public IP resource
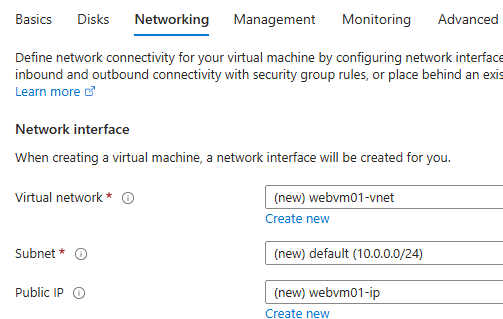
We can set these from Networking tab, while creating VM.
2 – Install Nginx
To connect to Ubuntu VM
From a terminal :
> ssh username@<public ip>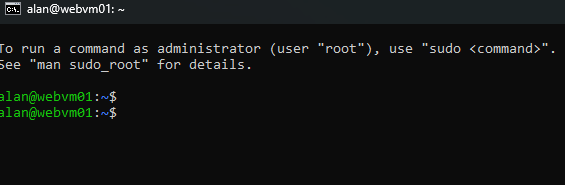
Once logged in we will see the <username@><vm name>
a . Update packages
sudo apt updateb. Install nginx package
sudo apt install nginxc. Test if webserver is working locally
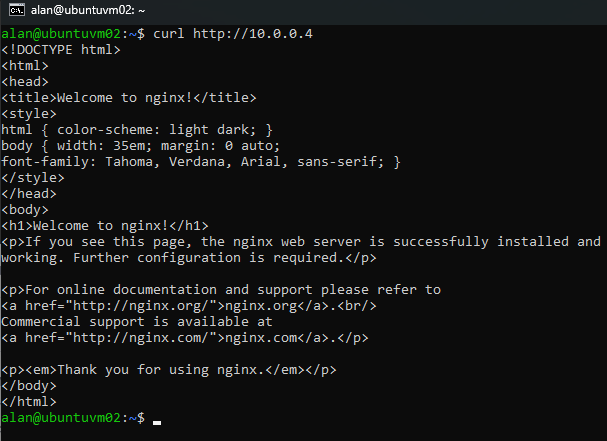
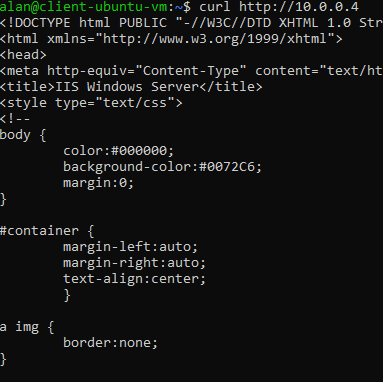
Since we are already connected to the VM, we can send a curl request to the private IP of the VM
curl http://10.0.0.4We will see the HTML of the webpage.
But, this web page will not be available over public internet over VM’s public IP address.
This is because NSG rules are blocking public access to the web server.
3 – NSG: Modify rule
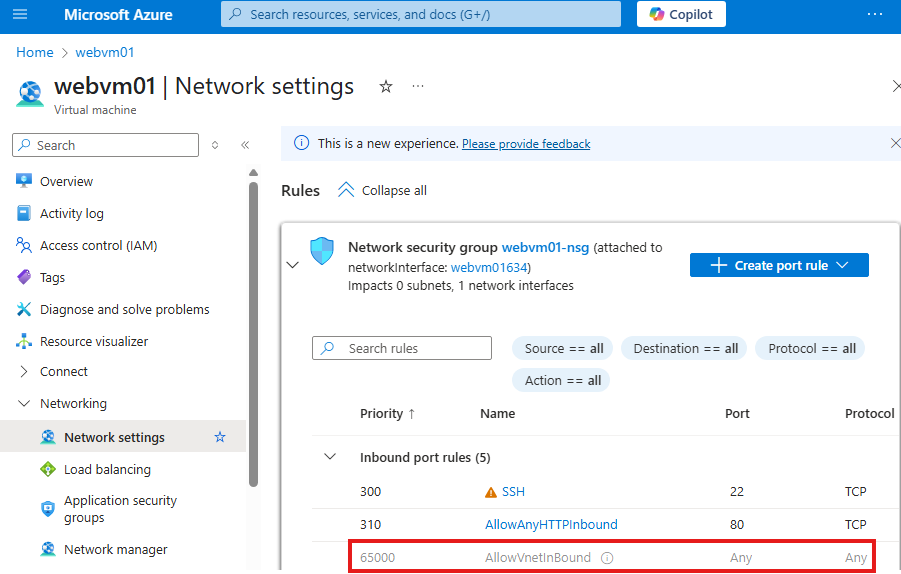
As we saw earlier, NSG by default get attached to NIC of VM, but we can re-attach it to the entire subnet of VM.
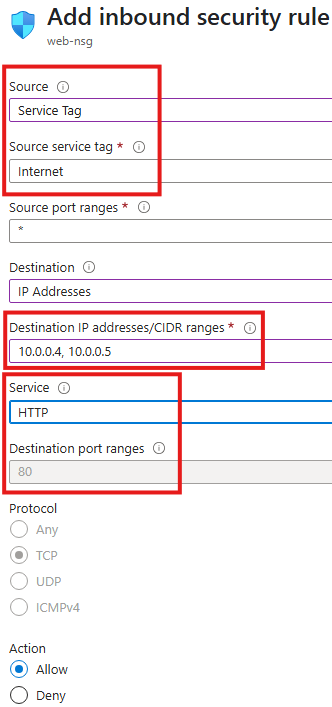
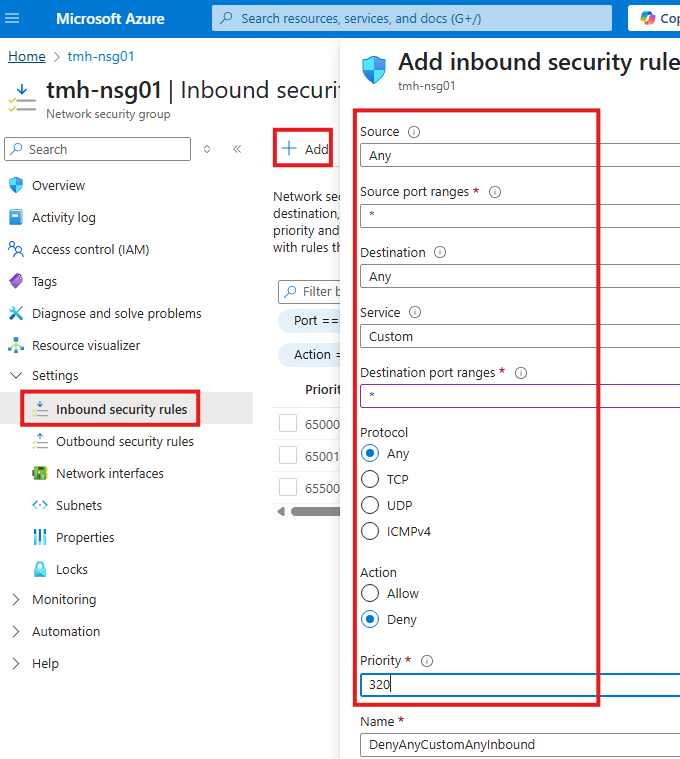
We need to create an inbound port rule, from network settings blade of VM
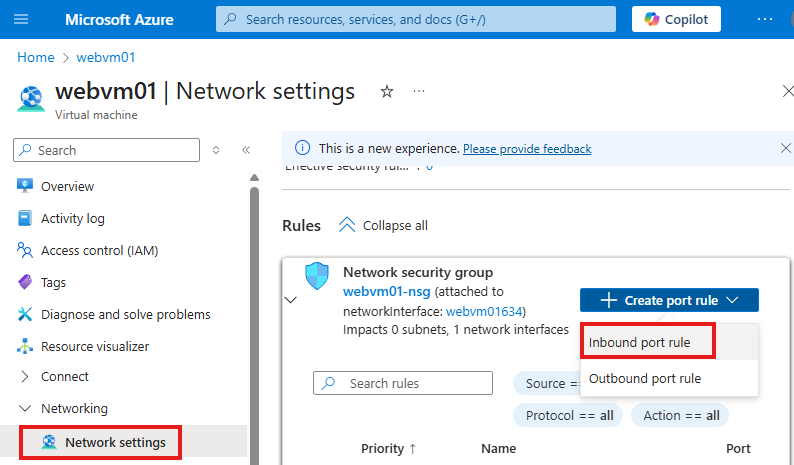
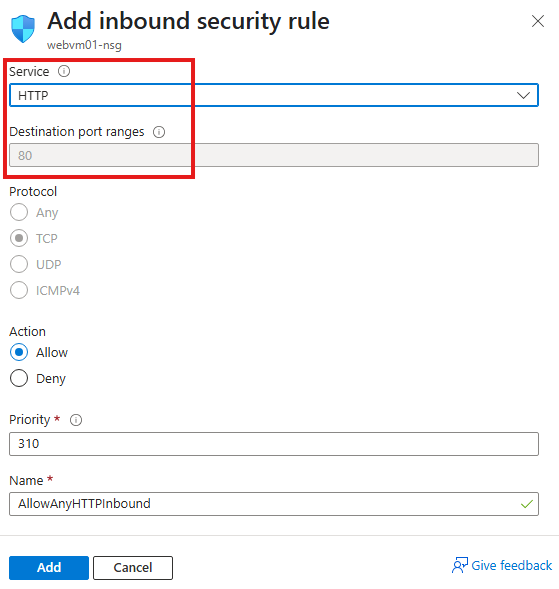
This rule allows HTTP request from anywhere to VM on port 80.
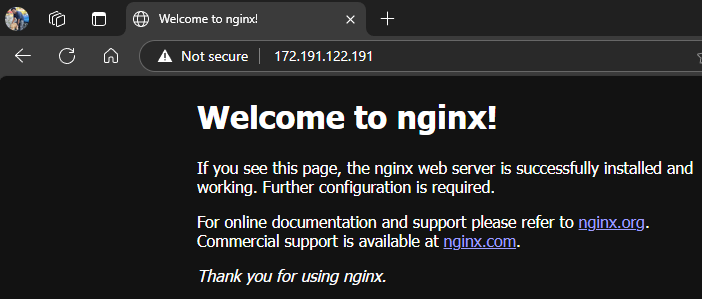
Once the rule is added, we will be able to see the nginx home page hosted in our VM over public IP
VMs In Different Subnets
Add a subnet to the same virtual network in the first VM is hosted
From the Networking tab, choose the new subnet
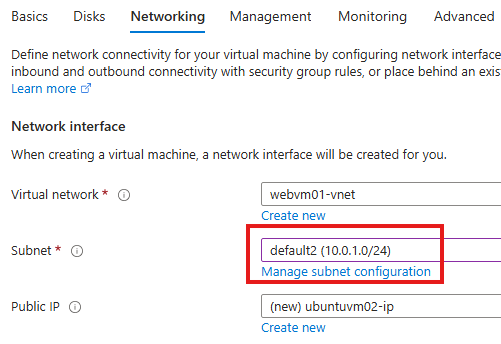
Now we have 2 VMs in 2 different subnets in same virtual network
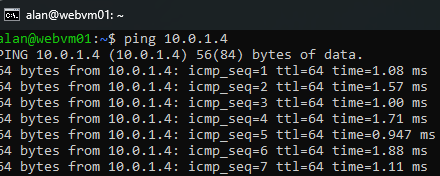
We will be able to ping 1 VM from another.
From the other VM, we will be able to access the webpage hosted in webserver VM
In NSGs, there is a default rule that allow all connections within the subnet.
Because of this rule any VM can access webapp hosted in same subnet, without an explicit rule in web sever.
Section Summary
Understanding Network Security in Azure
In this section, we dive into some key security features in Azure that help protect virtual machines and web applications. One of the fundamental tools is the Network Security Group (NSG). Think of an NSG as a security checkpoint that controls who can and cannot access your resources. It works by filtering traffic based on IP addresses, ports, and protocols. For example, to allow web traffic, you might open port 80 or 443; for remote desktop access, port 3389. NSGs can be applied either to the individual VM’s network interface or to an entire subnet. This flexibility allows administrators to manage security efficiently and scale their configurations.
NSGs, IPs, and Ports Made Simple
Just like devices have physical ports like USB or HDMI, systems on a network have virtual ports identified by numbers. These ports help decide what kind of data is allowed in or out — for example, port 443 for secure websites, or port 22 for secure shell access. NSG rules use this port and protocol system to allow or block traffic. You’ll also learn how NSG rules can be moved from an individual VM to a whole subnet to simplify management and enhance security.
Securing Web Apps in Azure App Service
While hosting apps inside a VM gives full control, Azure App Service offers a simpler, managed way to host web applications without worrying about infrastructure. However, the trade-off is less direct control over networking. App Services are public by default, which raises security concerns. In this section, we explain how to use access restrictions and secure endpoints to protect your apps. You’ll see how to publish an app directly from Visual Studio to Azure App Service and apply rules to limit who can access it.
Protecting App Services with Gated Access
We use a helpful analogy here — imagine your app as a mansion outside a gated community. By default, anyone from the public can access it. But by creating service endpoints or private endpoints, you can ensure that only users from a trusted network (your gated community) are allowed in. This involves adding virtual network rules and disabling public access, forcing all traffic to go through a secure gateway.
Using Application Gateway for Traffic Filtering
To secure both VMs and App Services, Azure provides Application Gateway — a smart traffic controller that not only balances load but also inspects web traffic at the application level. It supports URL-based routing, multi-site hosting, and SSL termination, which helps improve both security and performance. The Application Gateway sits in its own virtual network and subnet and works with the Web Application Firewall (WAF) to block common attacks like SQL injections or cross-site scripting.
Securing App Services Through Gateway Integration
We take a hands-on approach to integrate a web app hosted in App Service with an Application Gateway. You’ll see how to configure routing rules, listeners, and back-end pools so that all traffic to your app goes through the gateway. Then, by setting access restrictions and service endpoints, you ensure that no one can bypass the gateway to reach your app directly.
Going Deeper with Private Endpoints
To take security a step further, we introduce Private Endpoints, which allow Azure resources to communicate privately using the Azure backbone network. This is like creating a private underground tunnel directly to your app, bypassing the public internet entirely. By combining this with Application Gateway and disabling all public access to your app, you can build a highly secure and enterprise-grade web hosting solution.
Some Security Concepts
NSG (Network Security Group)
These are set of rules that will decide who is allowed and denied access to a VM or a subnet.
NSG can be attached to a NIC of VM or a subnet.
NSG for a subnet works with protocol and ports.
To send data from A to B, we need 2 main things:
1 – Address (IP address)
2 – Protocol (TCP/IP)
Protocols, are sets of rules for a data transfer from A to B. Protocol TCP/IP make sure data is sent as and received in order as packets.
Ports, are physical or virtual interfaces on a network device or a system, that allows its to communicate with other systems and devices.
Like physical ports:
- USB port
- HDMI port
- Ethernet port, etc
network device or a system also has virtual ports represented by numbers, that are dedicated for different type of data transfers.
- Port 80 – for HTTP (web traffic)
- Port 443 – for HTTPS (secure web traffic)
- Port 25 – for email (SMTP)
- Port 22 – for SSH (secure remote login)
- Port 3389 – for RDP
To send data over network from 1 system or device to another, these virtual ports are used.
NSG rules that filter traffic are based on :
- Protocols
- Ports
- IP Addresses
So there are 5 components in NSG rule:
- Source IP Address
- Source Port
- Destination IP Address
- Destination Port
- Protocol
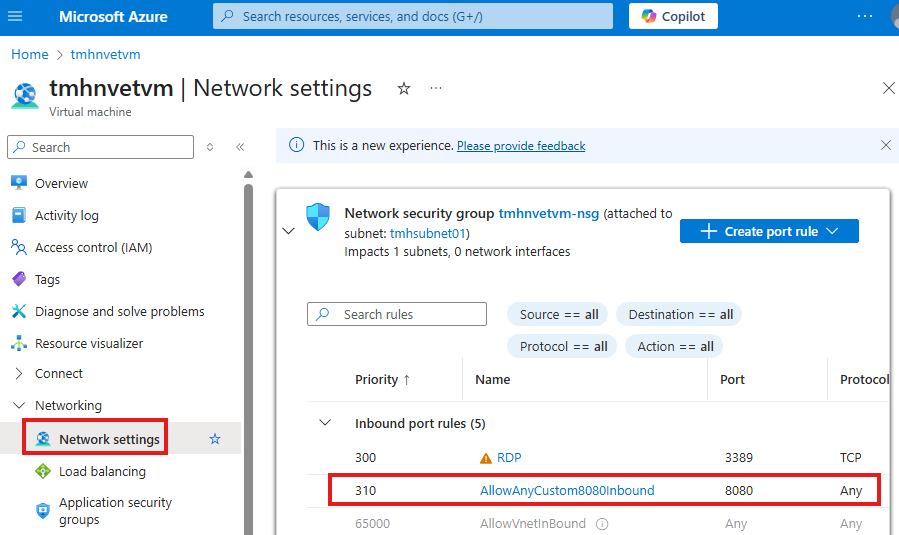
In the Network settings (Networking) blade of the VM, we can see the NSG rules and also we can see the NIC the NSG is attached to.
Here we can create or edit existing rules.
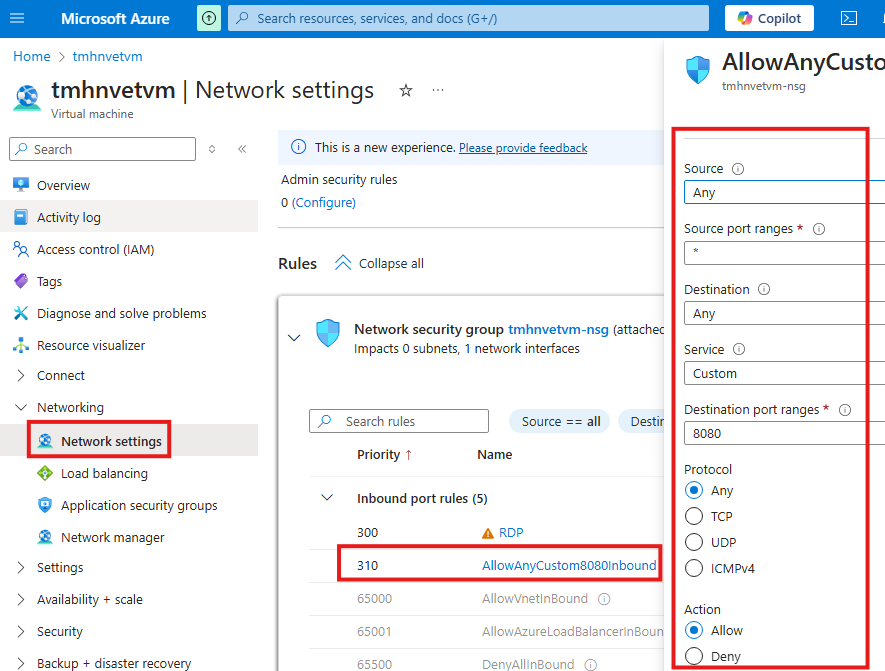
For the Web app to be publicly available over internet, we have to do 2 things:
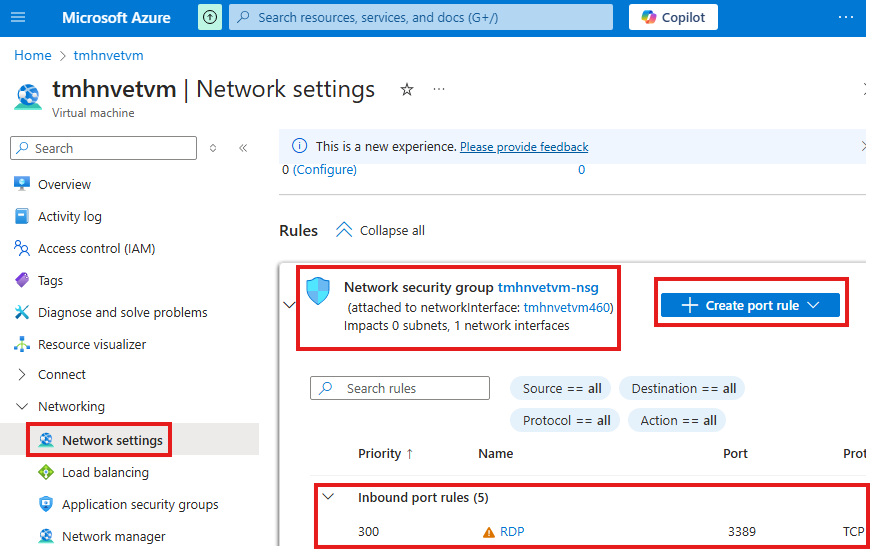
1 – Create a NSG rule Azure portal to allow port 8080
Here we can add a port rule, that will allow traffic to port 8080 of the VM, select service as custom and protocol as Any(since 80 is port of HTTP)
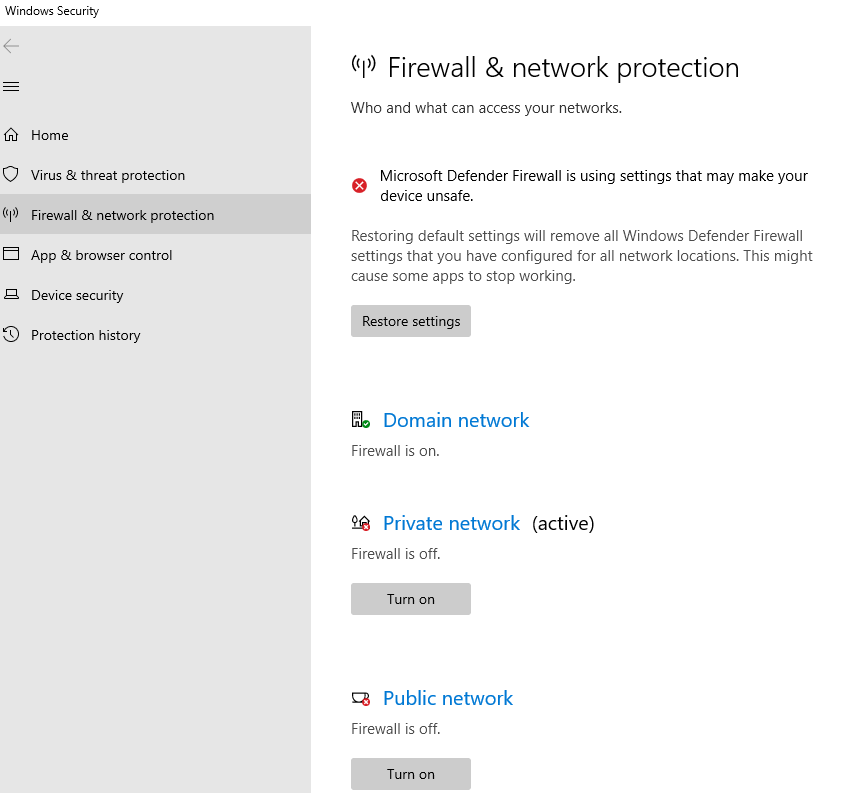
2 – Disable firewall of the VM for both private and public networks.
This is an insecure way of accessing a web application
Attaching NSG to subnet instead of NIC
NSG can be attached to a subnet instead of each individual NICs.
NSG cannot be used for full virtual network, we have to use Firewall for that.
1 – At NIC
We can change the association of NIC to the NSG, by going to NSG blade of NIC
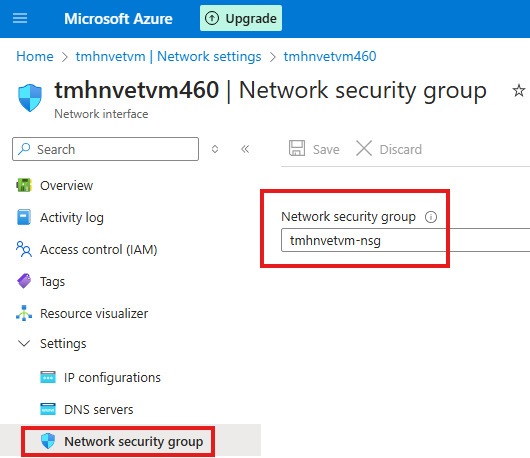
Here we can change the dropdown to none.
Now, the VM will not get rules of this NSG.
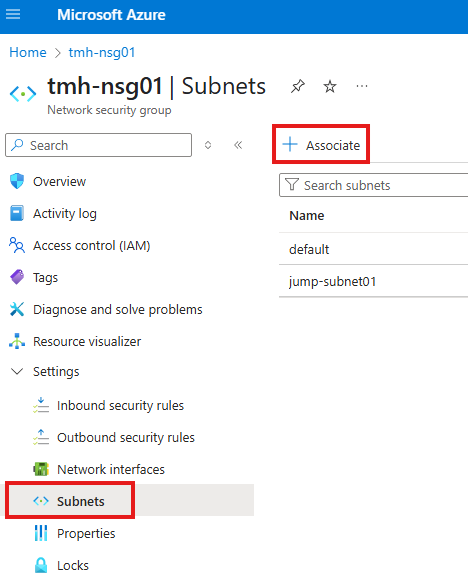
2 – At NSG
The NSG is now NOT attached to any VM.
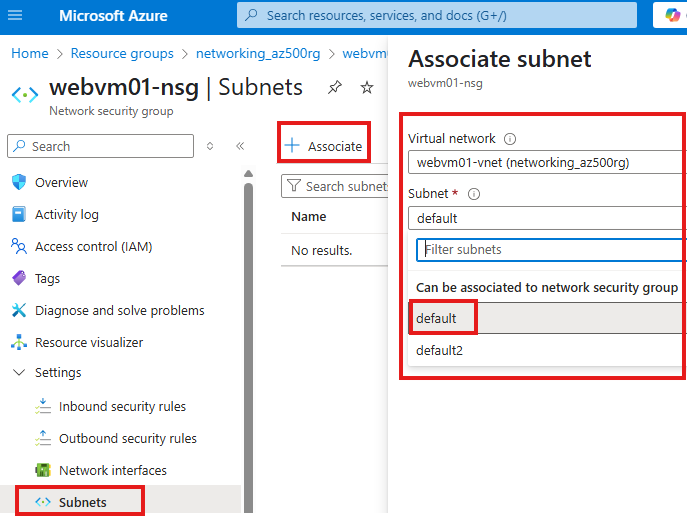
Now, go to Subnets blade and associate NSG to the subnet in which VM is located.
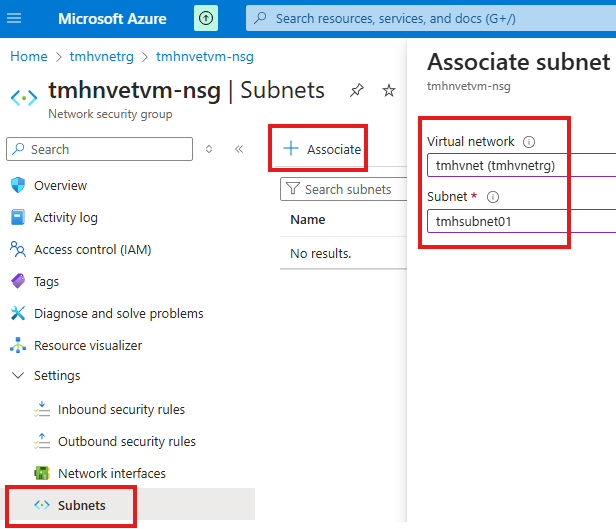
Now the web app will work again
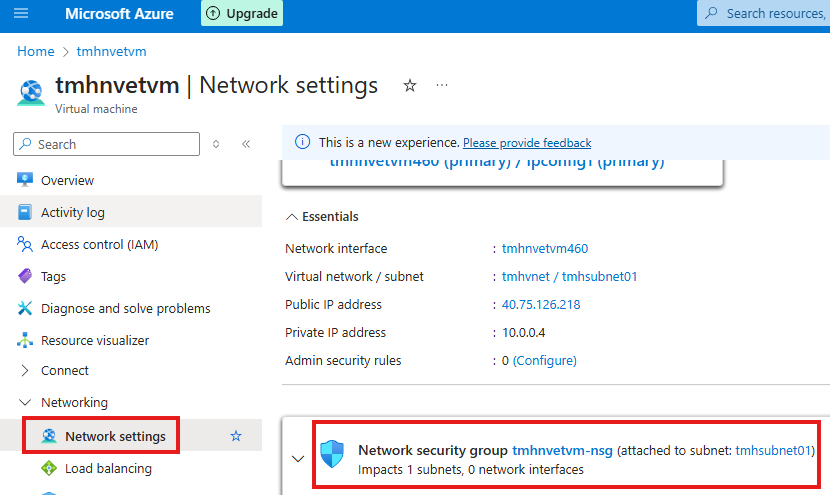
Now in the network settings of VM, it will show NSG is now attached to entire subnet, instead of NIC of the VM
Azure Web App Service
Service in Azure so that we can host web app without managing the underlying VM.
Underlying infrastructure is configured by : App Service plan
We are charged based on the App Service plan we choose.
Once web app is hosted, we can secure it by :
1 – Secure endpoint
2 – Access restriction
Publishing Web App To Azure App Service
Right click web app project in visual studio > Publish
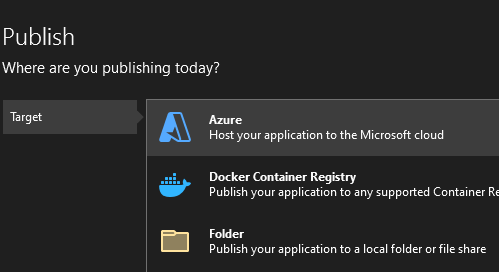
Choose Azure.
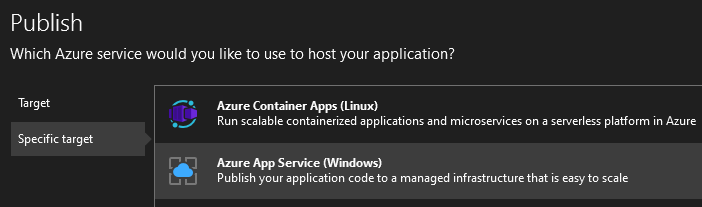
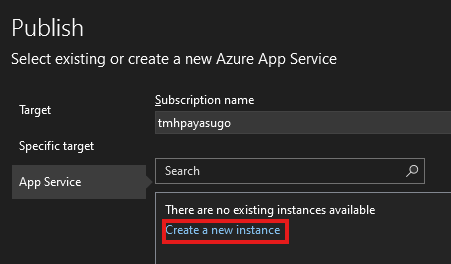
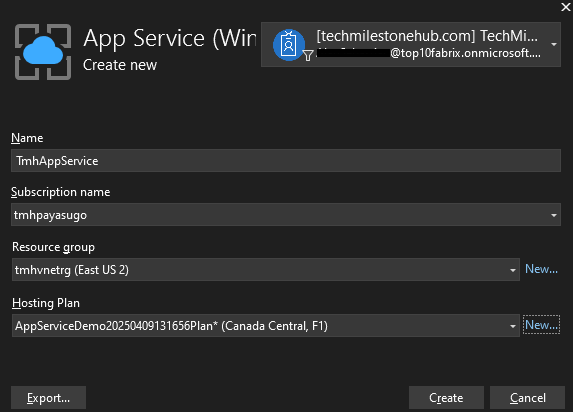
Here we create an App service and also select a hosting plan.
Now, create the App service and publish.
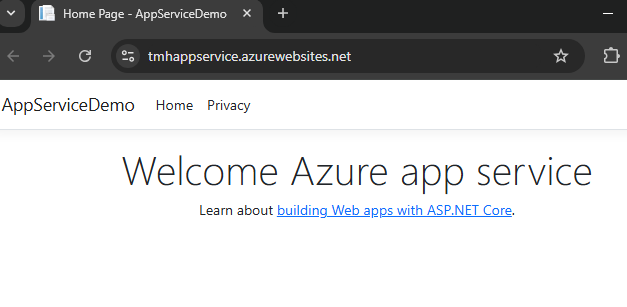
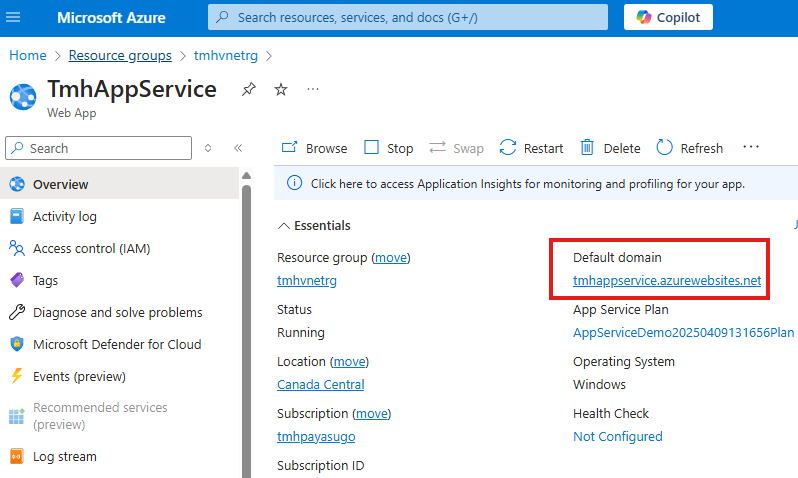
In Azure portal we can see the newly created Web app resources and domain to access the web app.
Web App hosted in VM v/s Web App hosted in App service
We don’t have control over app service’s Vnet or subnet. So we need to look for different options to secure these web apps. NSG is not applicable to app service.
Another difference is that, anyone can access web app in app service from public internet.
So to secure web apps in app service we can use:
1 – Service endpoint + Access restriction
2 – Private endpoint + Access restriction
Access restriction is like NSG for a subnet.
Application gateway can be used for web apps hosted in both VMs and App service to protect from common security attacks
Service Endpoint & Private Endpoint
There as used by PaaS in Azure, like : App service, Azure SQL, Azure cosmos etc.
Because, these services do not reside in a subnet created by us, and we cannot apply NSG on it.
Security issues with web app hosted in App Service
1 – Available on public internet by default
Analogy with Gated housing community
Like VNet is a gated housing community an subnets are building it
App service is like a mansion located out side the gated comminity.
Anyone can access it by default.
To provide security for this app service mansion we can, set up a security system such that, only people who is a member of a gated housing community with a pass can be allowed access to this mansion.
So two important this we did in this scenario was :
1 – restrict access to mansion
2 – check for gate pass of the hosing community
3 – Door of mansion should be closed to public and we need a private underground tunnel to a private door.
Similarly to secure a web app in Azure app service,
1 – Restrict access to public internet
2 – Create a service endpoint in a subnet, so that only devices in the subnet can only access this web app in app service.
3 – Set up private endpoint
Application Gateway For Security
Above security measures are achieved using Application gateway, which is a web application load balancer.
Application gateway will reside in a separate VNet and subnet.
Also, we need to attach WAF(Web Application Firewall) to the application gateway, to implement WAF policy.
Application gateway will receive all public requests to front-end IP, and will block malicious requests.
Application gateway works with layer 7 of OSI model, that is application layer, that is it can read the URL enter by user to request the web app.
Application gateway capabilities:
1 – URL routing:
Based on URL, application gateway can send request to different VMs
2 – Multi-site hosting
3 – SSL termination
Application gateway can receive HTTPS requests from public internet for security, and VMs that sit behind the application gateway is already secure from public internet, so application gateway don’t need to send the HTTPS request to these VMs, it can send HTTP request. HTTP is more efficient as it don’t have to deal with encryption.
Components of Application Gateway
1 – Front-end IP
IP exposed by Application Gateway, so that public can access it.
2 – HTTP listener
To receive HTTP/HTTPS requests
3 – Back-end pool
Resources where web apps are hosted that sits behind application gateway protected.
These can be web apps hosted in VMs or Azure web app service or combination of both.
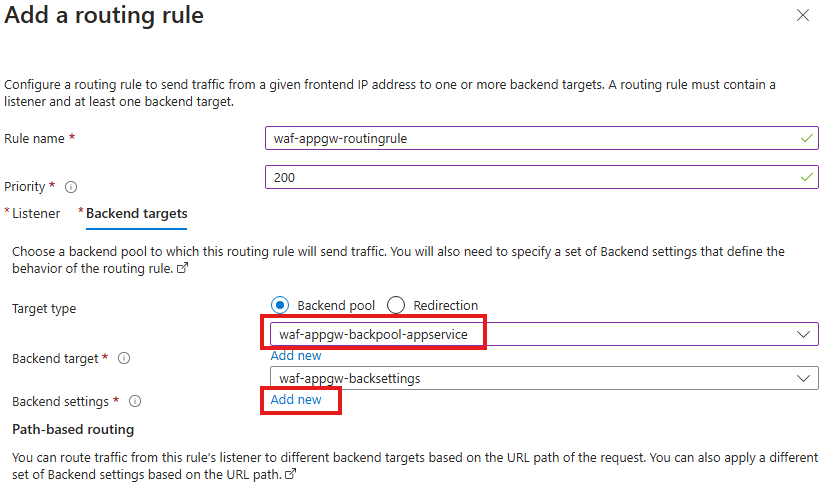
4 – Routing rule
Rule that will decide, to which resource the request should go to.
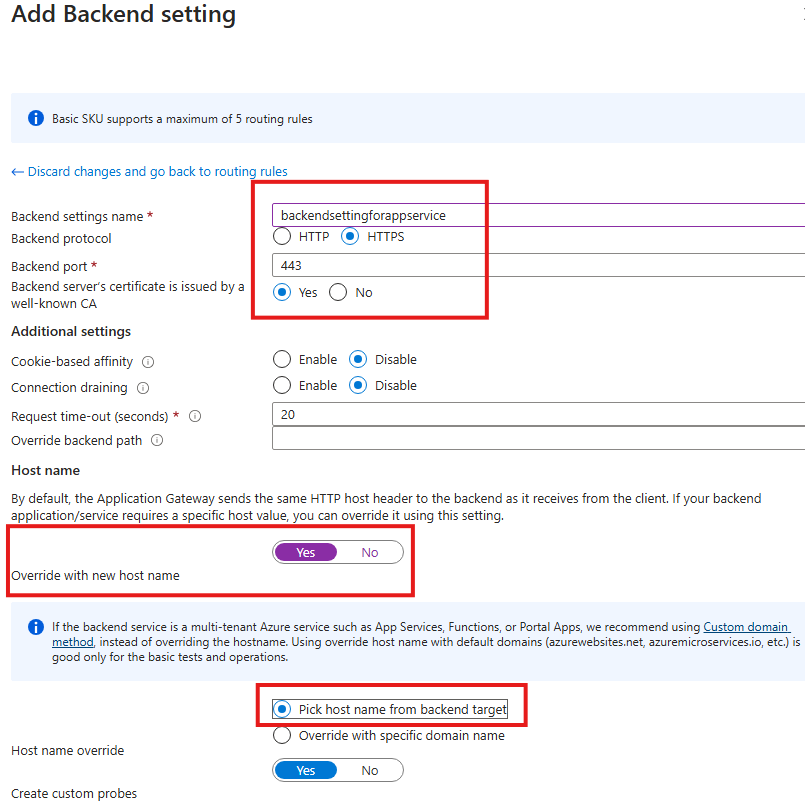
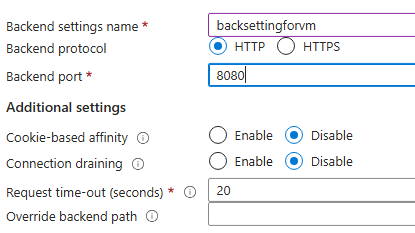
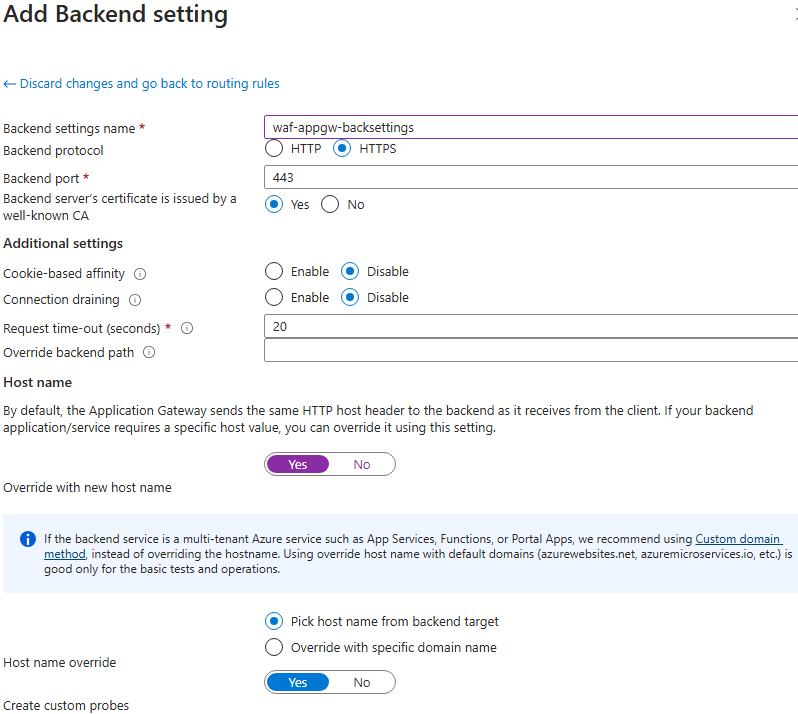
5 – Backend settings
Settings that decide weather HTTP or HTTPS should be forwarded to the backend pool.
Creating Application Gateway in Azure portal
1 – Making web app hosted in app service available using Application Gateway
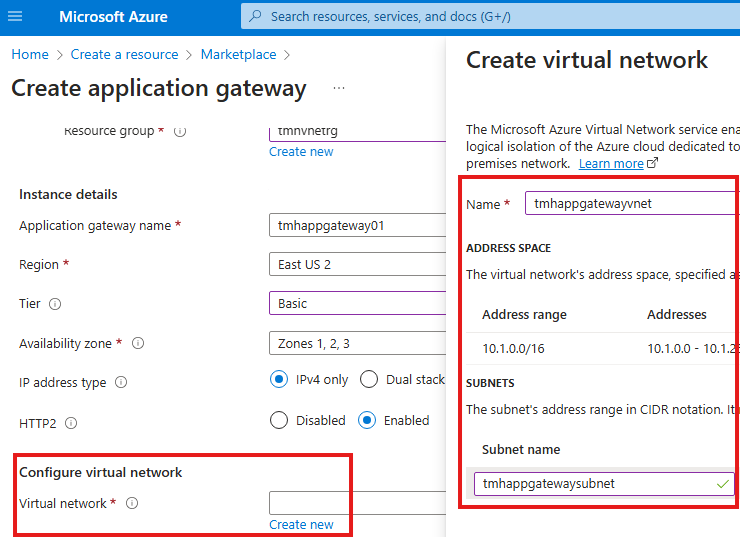
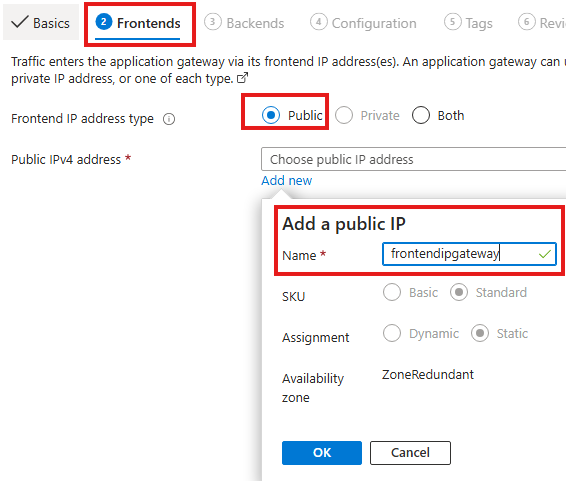
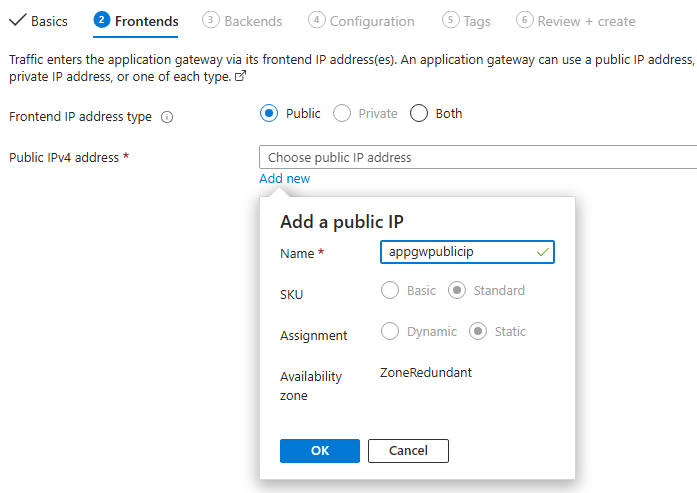
In the front-end tab, create a new public front end ip
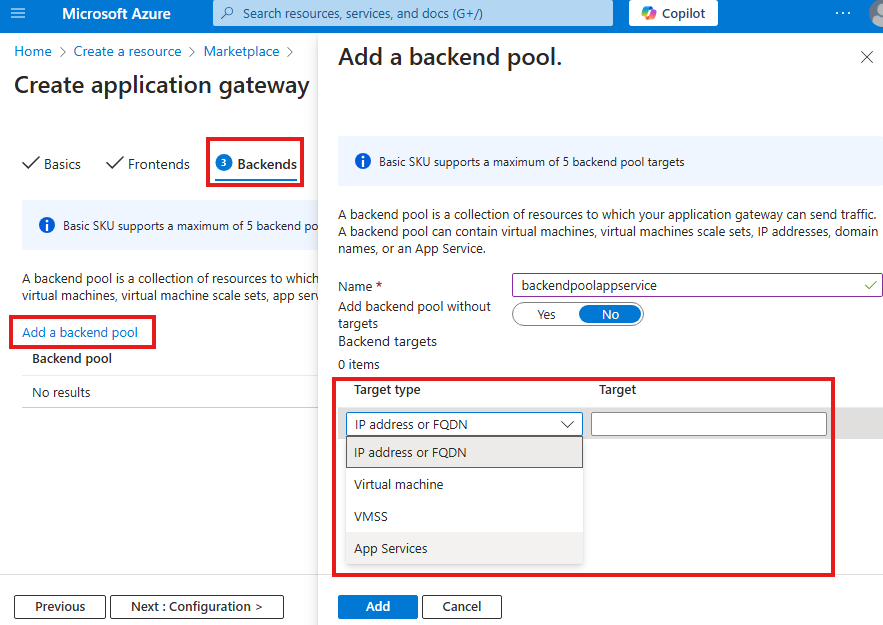
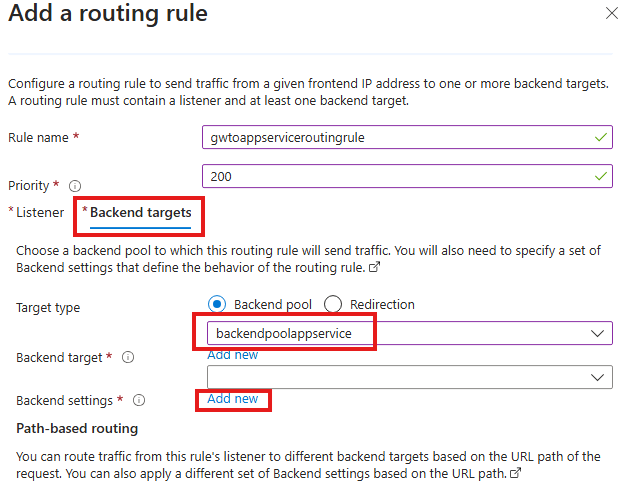
Now add the web app hosted in Azure app service as our back end pool.
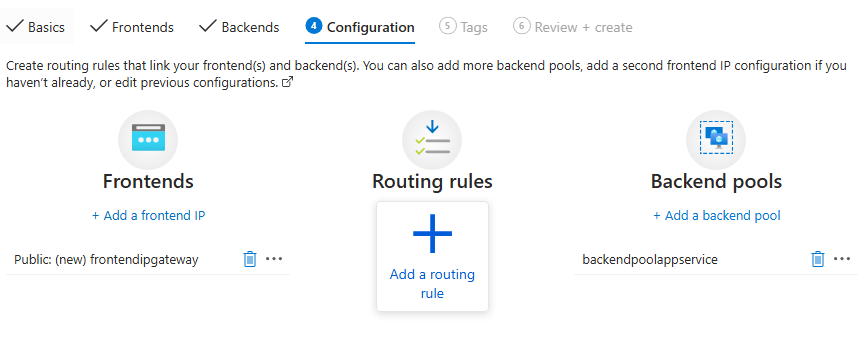
in the configurations tab, we add a routing rule
Add listener settings
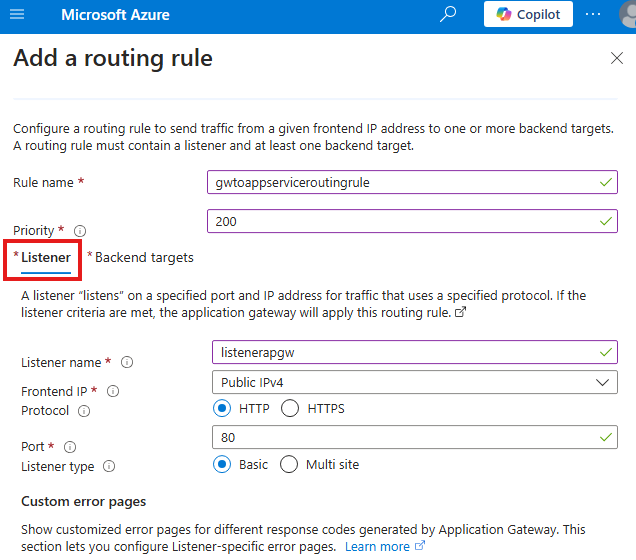
Now add backend settings
Add backend settings for backend pool
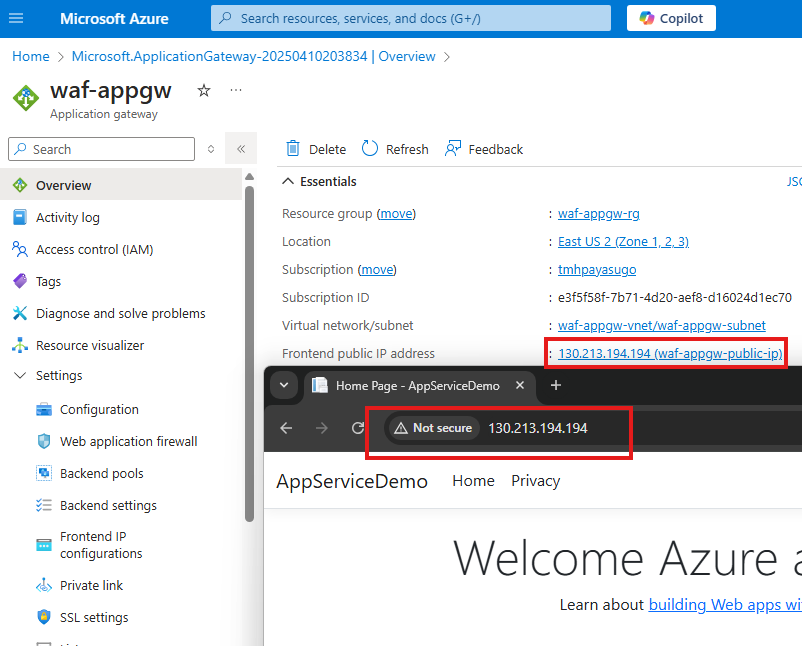
Once application gateway is deployed we will get three resources:
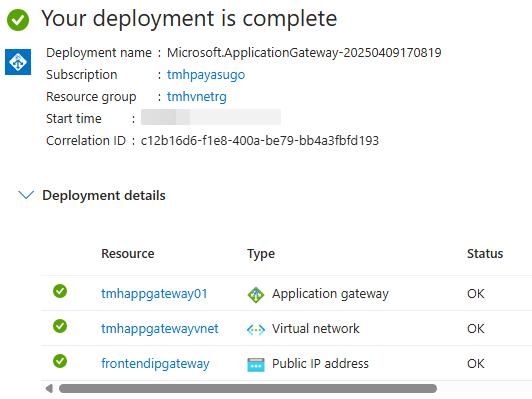
Now go to application gateway resource and copy front-end
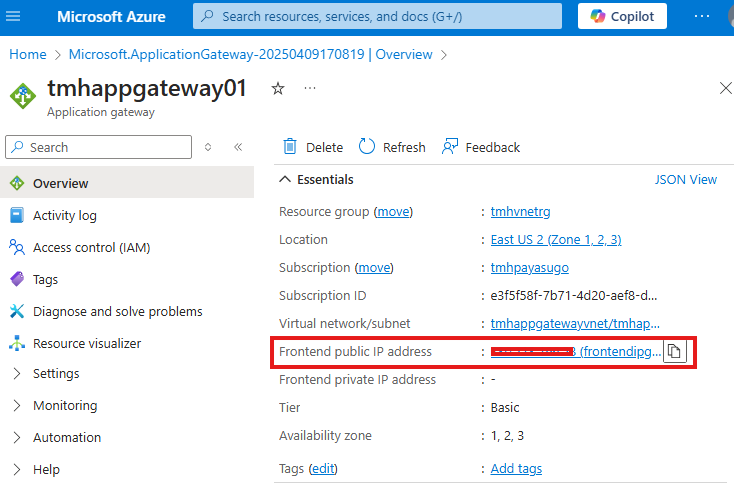
give HTTP request using front-end using any browser, http://22.22.22.22
We will be able to access the web app hosted in Azure app service.
2 – Restricting public access of web app hosted in app service
Now, we need to make sure that web app hosted in app service is available through Application gateway alone.
For that we have to do 3 main steps:
1 – Add access restriction for web app to public internet
2 – Add a service endpoint in subnet of application gateway
3 – Allow traffic only from service end point to app service
1 – Add a service endpoint in subnet of application gateway
We need to do this first, or if we try to add access restriction rule at app service first. then when we try to select the VNet and subnet of our application gateway, we will get a message that no service endpoint is present for this subnet.
Go to the VNet in which application gateway is located:
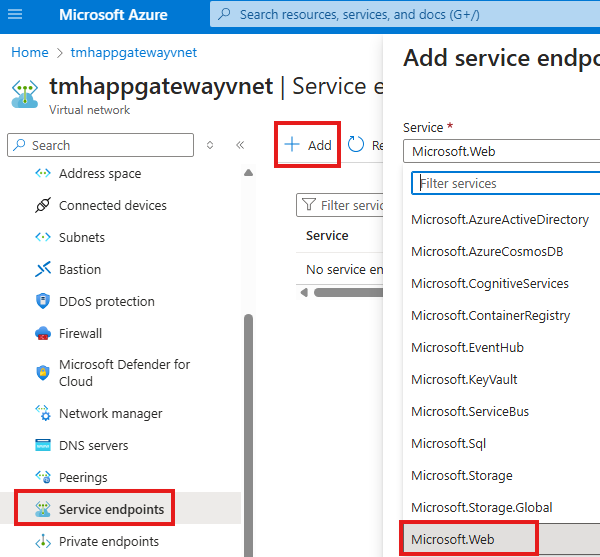
Go to Service endpoints blade
Add a service endpoint, select service as Microsoft.Web, since we want to access a web app.
Select the subnet, in which application gateway is located.
Once we have added the service endpoint in our VNet, we can add access restriction in web app service.
2 – Add access restriction for web app to public internet
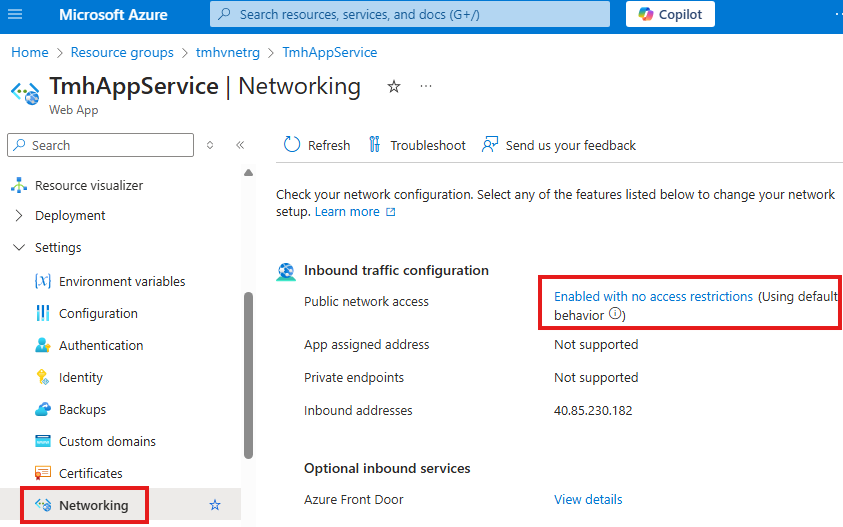
Go to Networking blade of app service
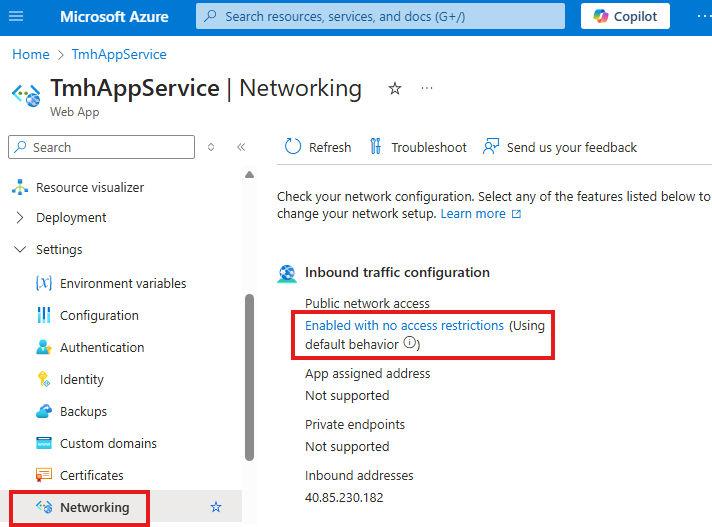
Click on Public Network access (currently : Enabled with no access restrictions)
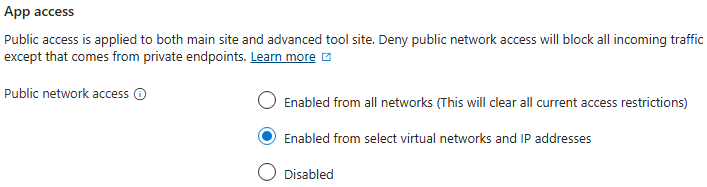
Select App access as : Enabled from select virtual networks and IP addresses
Now, add a new rule for access restriction
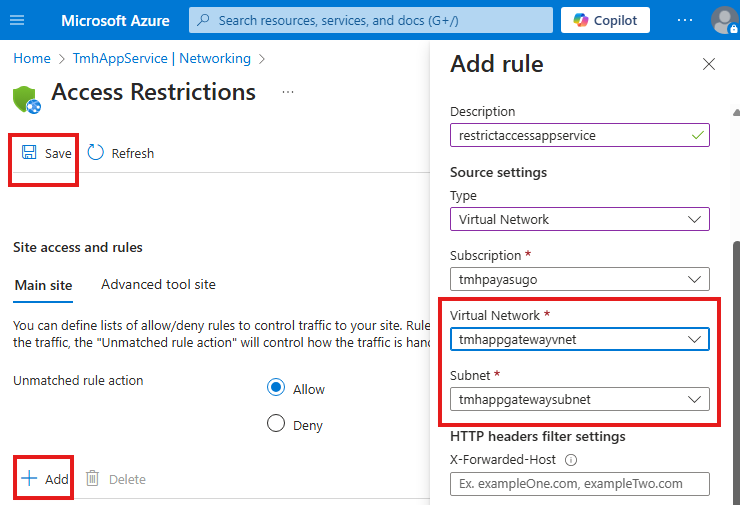
Select the VNet and subnet in which the application gateway resides.
Verify Application Gateway in Action
Now, try to go to the public URL of the app service.
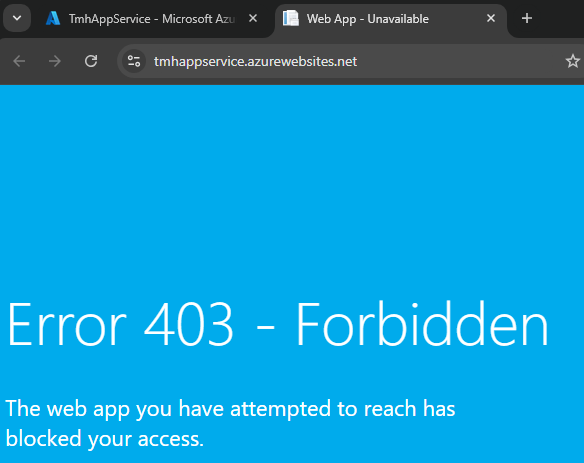
We will not be able to access the site.
Now access public IP of app gateway
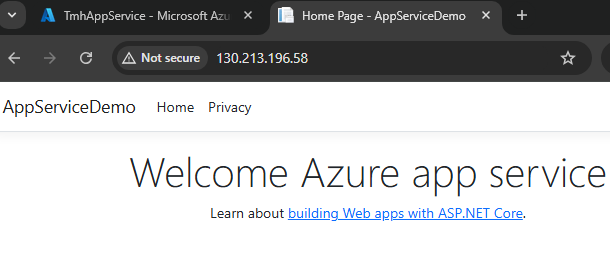
We will be able to see the site.
Alternative, better solution for restricting App service web app: Private Endpoint
Main issue with Service endpoint is that it access the web app using the public IP of the web app.
For mansion analogy, it is like closing the main entrance of mansion to public, but still the people with membership card of a near by gated community can enter the mansion, but through main entrance door.
Instead of service endpoint, we can use private endpoint. It is like an underground tunnel to the mansion.
2 main steps involved in achieving this is:
1 – Completely block public IP of the web app in app service
2 – Create a private end point in VNet of Application gateway
1 – Add private endpoint for web app in app service
NOTE: Basic free tier of app service doesn’t support VNet integration or Private Endpoints.
Now create a private endpoint for the app service.
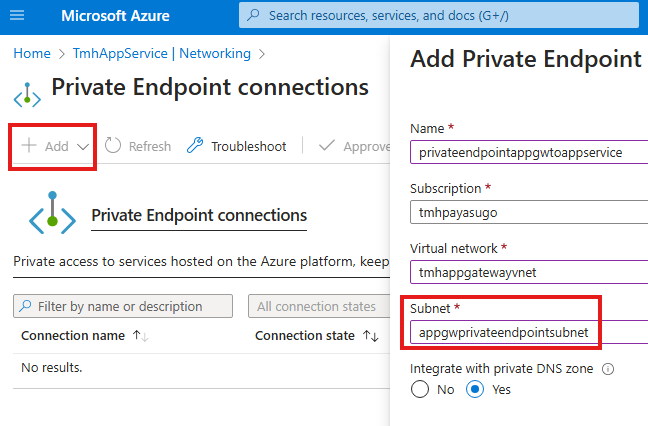
We need to choose a subnet that does not contain service endpoint.
Here we are making a subnet private endpoint. So what is happening is the VNet in which that subnet is included also includes a Application gateway we created earlier.
So this Application gateway can access the web app in app service. We don’t have to explicitly add anything to this subnet like we added a service endpoint.
Service endpoint and private endpoint should be on 2 separate subnets.
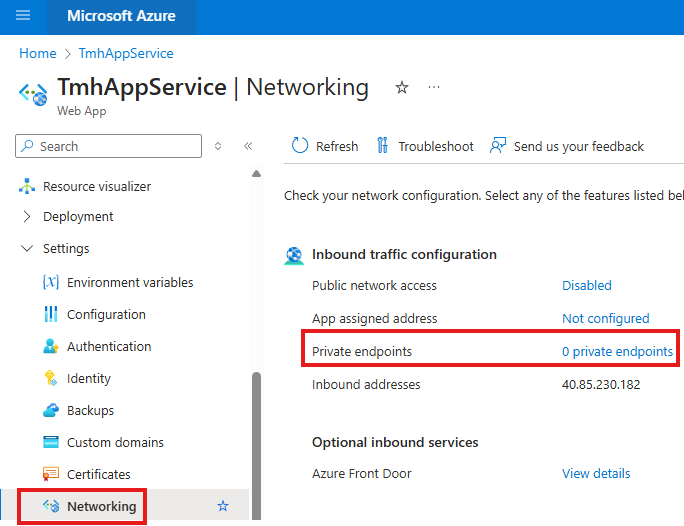
2 – Disable public app access
App service > networking > Public network access
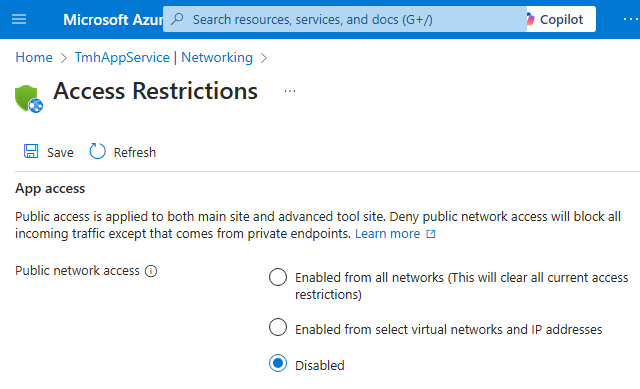
Now, web app can only be accessed through Application gateways public IP address; This happens through Azure backbone network, not public internet.
Section Summary
Directing Traffic Through a Secure Gateway
In this part, we learn how to make sure a web app hosted in a virtual machine is only accessible through a secure route—the Application Gateway. Think of the Application Gateway as the main guarded entrance to your web app, where all incoming visitors are checked before being allowed in.
Setting Up the Gateway
You’ll follow the steps to create an Application Gateway inside the same virtual network as your virtual machine. This includes assigning it a special public IP, defining which system (the VM) it should point to, and setting up rules so it knows how to handle web requests. Once it’s running, users can visit your website through the gateway’s public IP.
Blocking Direct Access
But setting up the gateway isn’t enough—you also need to shut the backdoor. This means removing any existing rule that allows people to visit your VM’s IP directly. Once that’s done, the only way to reach your site is through the secured path of the Application Gateway.
What’s Next?
We hint at an even more flexible setup in the next part, using VNet Peering, which lets you securely connect resources across different networks. This comes in handy when your web app and Application Gateway aren’t in the same network.
Making Web app available only through Application gateway
Method 1 : Creating Application gateway in same VNet as of VM
We need to create a NSG rule so that this app can be only accessed from Application gateway.
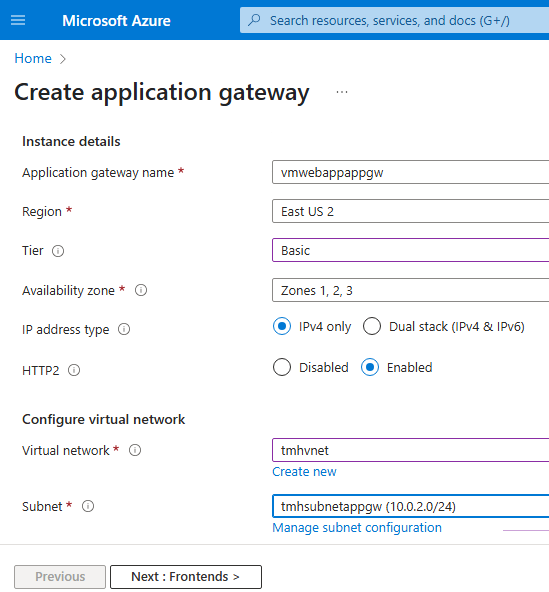
1 – Create a new Application gateway
Create a new application gateway in a new resource group.
But, Application gateway need its own subnet.
Add new public ip
Add backend pool
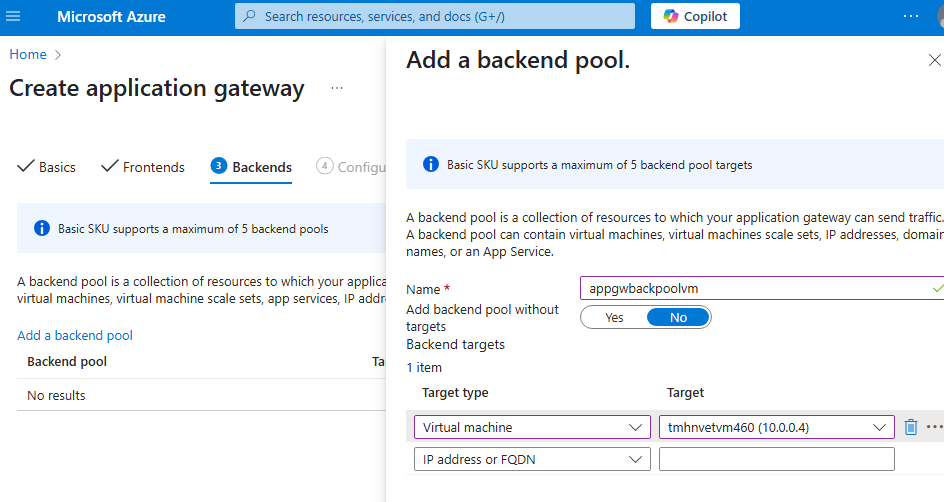
Select VM as backend pool
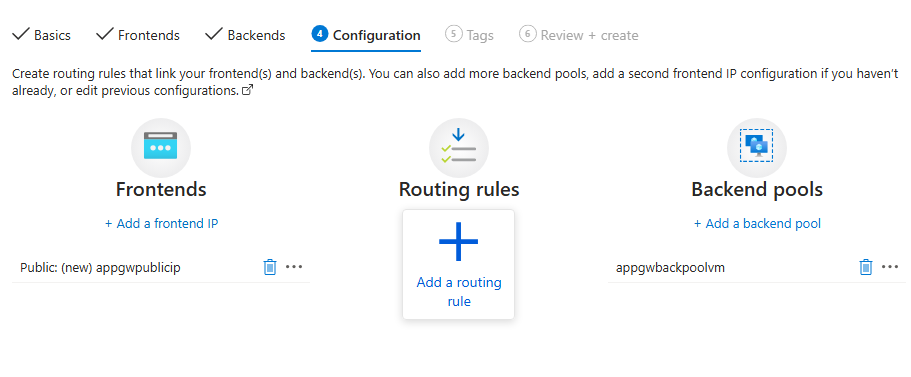
Add a routing rule in configurations tab
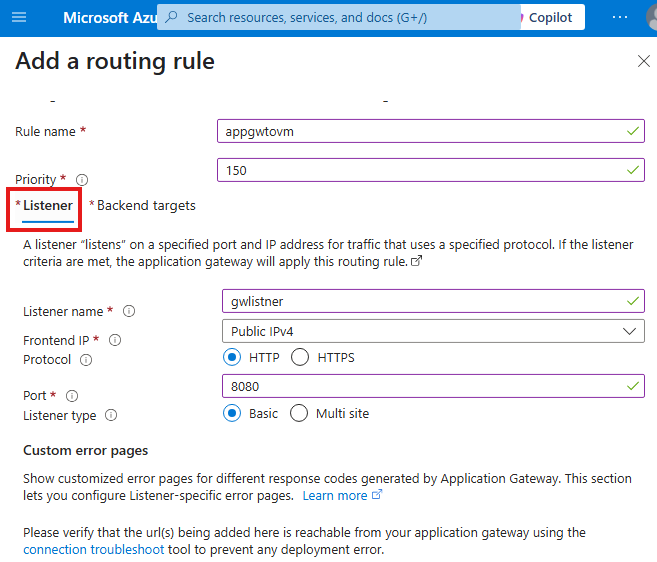
Add listener
Add backend targets
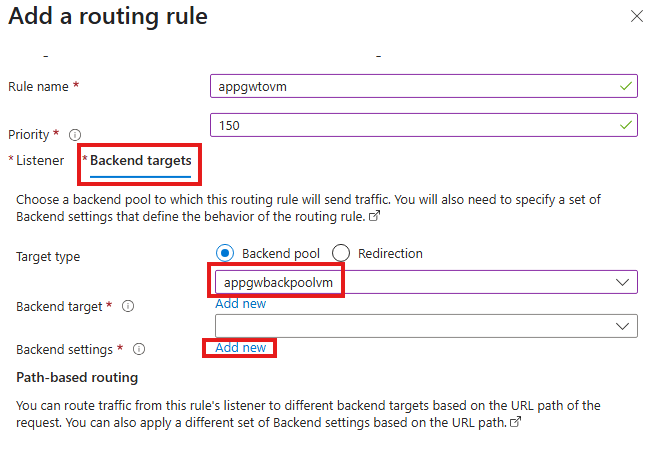
Add a new backend settings
After this if we send a HTTP request to port 8080 of Application gateway’s public IP we will get the website:
But, now we can also access the site through public IP of VM as well. We have to restrict that.
2 – Restrict public access of web app through public IP of VM
In the VM > Network settings, just delete the NSG rule that will allow access of inbound custom HTTP/Custom protocol over port 8080(that we created earlier).
Now, web app will not be available through public IP of VM, but only through frontend IP of application gateway
Method 2 : VNet Peering
In the upcoming section
Section Summary
🚦 Introduction to Azure Application Gateway
Azure Application Gateway is a layer 7 (application layer) load balancer that can inspect incoming web requests and route them to different backend servers based on the URL path. This allows you to host multiple web applications under a single frontend IP and route traffic smartly depending on what the user is trying to access.
🖥️ Setting Up Web Servers
We start by deploying two Ubuntu virtual machines (VMs) on the same subnet. Each VM is configured with Nginx to act as a web server:
- One serves video content
- The other serves image content
Network Security Group (NSG) rules are configured to:
- Allow SSH access for setup and testing
- Allow HTTP traffic for users to access the content
Each server hosts a simple custom HTML page that responds to requests.
🔀 URL-Based Routing with Application Gateway
We then create an Application Gateway in a separate subnet. It acts as the entry point for all incoming traffic. Here’s how it works:
- We configure backend pools, one for each web server
- Create listeners that wait for HTTP traffic
- Set up routing rules that forward traffic to the correct backend pool based on the URL
For example:
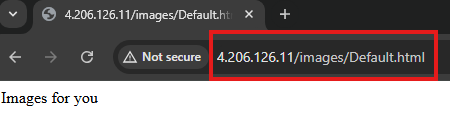
http://<gateway-ip>/videos→ routes to the video serverhttp://<gateway-ip>/images→ routes to the image server
Now, only the Application Gateway needs a public IP; the backend servers can remain private.
🛡️ Securing Applications with WAF
We enable Web Application Firewall (WAF) on the Application Gateway. WAF protects web apps from threats such as:
- SQL Injection
- Cross-Site Scripting (XSS)
- HTTP protocol violations
We can use Managed Rules provided by Microsoft or define Custom Rules to fit our application’s needs. WAF can be set in:
- Detection Mode – Just logs suspicious requests
- Prevention Mode – Actively blocks malicious traffic
Azure Application Gateway
Used for layer 7 load balancing
We can use Application gateway to look at incoming URL and redirect to correct VMs that are hosting web application
1 – Create 2 Ubuntu VMs for web servers ( on same subnet)
Each web server will have different purpose and app gateway will redirect traffic to correct VM based on URL of the request.
No need to attach an NSG while creating each VMs, we will attach NSG to the subnet of the VMs.
But we can have public IP for the VMs, so that we can SSH with ease for testing.
Modify NSG rules
1 – Allow inbound SSH connections to private IPs of VMs
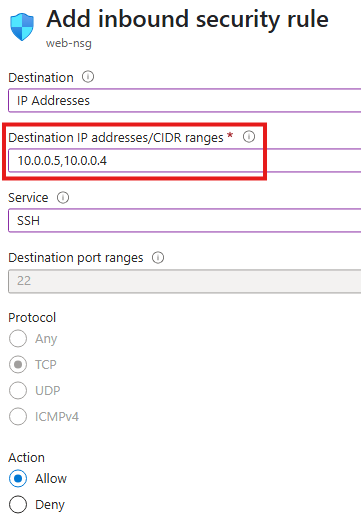
2 – Since our VMs will be acting as web server, users over internet should be able to send HTTP requests to the VMs; add a NSG rule for that
SSH into VMs and install ngnix to make it webserver
sudo apt updatesudo apt install nginx
We have 2 VMs, 1 VM will act as webserver for serving videos; Other will act as webserver for serving images:
In the first VM, create a directory with a customized HTML related to videos
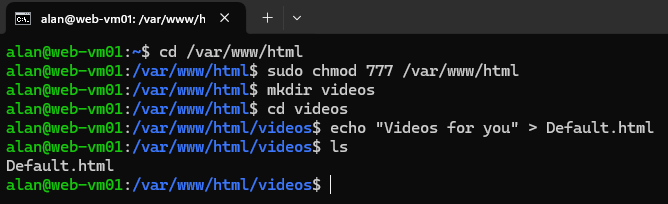
cd /var/www/htmlsudo chmod 777 /var/www/htmlmkdir videoscd videosecho "Videos for you" > Default.html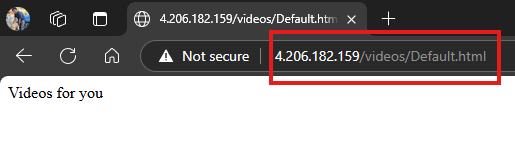
Now, we can access web page from the videos web server.
Do the same for second VM, to make it images web server
2 – Implement URL Routing using application gateway
Create Application gateway resource:
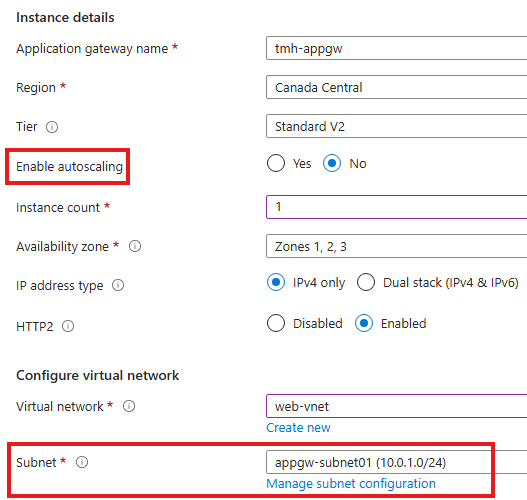
We need to have an empty subnet for application gateway.
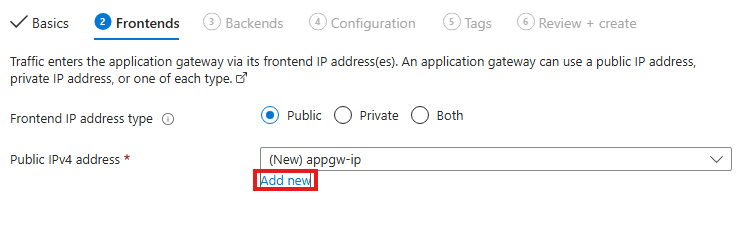
Add new front-end IP, for public to access the web service.
Create backend pools
We need 2 backend pools
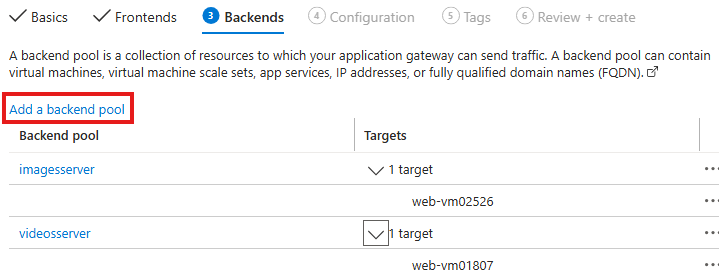
For video server and image server.
Configure routing rules
Now, we need to configure some routing rules to determine how a request will be redirected to the pools.
Create a listener

Listener, will look for a request to a port number for a protocol, the only the routing rules will be applied.
Now, configure backend targets
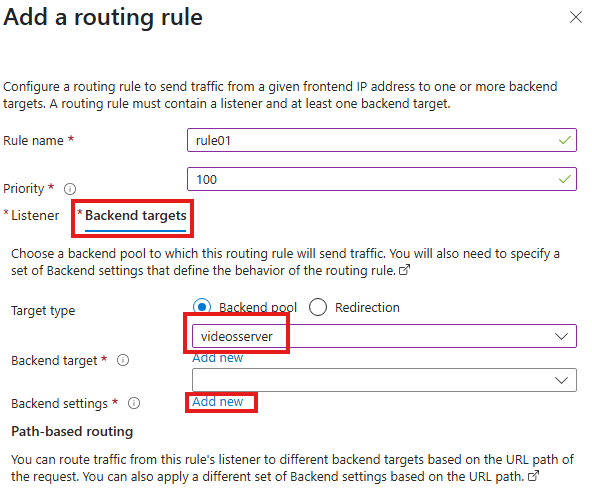
Select the backend pool and add a new backend settings (just give a name for settings)
Add a new path based routing
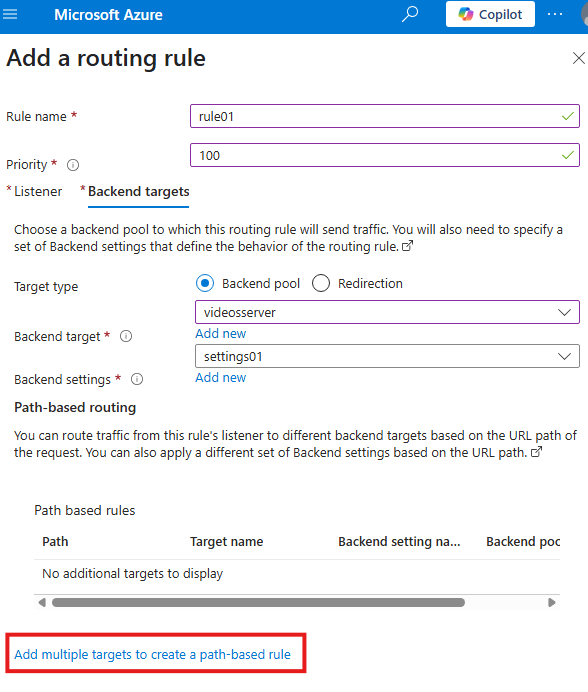
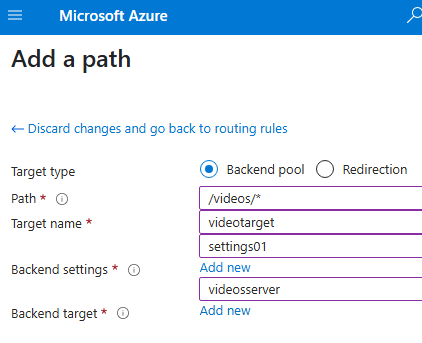
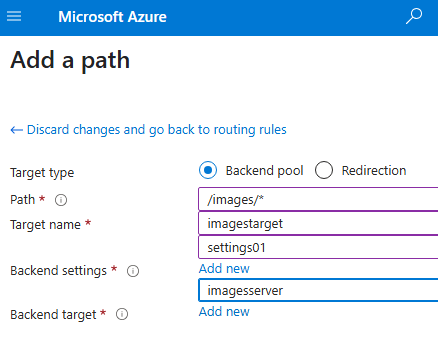
Add 2 path based routing rules for URL containing images and videos
Now if we send request to frontend IP of application gateway, based on the URL, it will be redirected to correct web server.

We only need frontend IP of application gateway, both webserver no longer need public IP.
Web Application Firewall
On, application gateway, we can deploy web application firewall to safe guard applications.
WAF can protect web apps from various attacks like SQL injection, cross-site scripting etc.
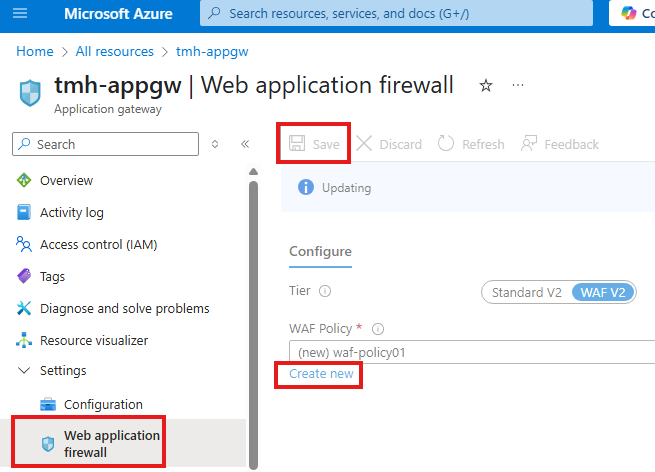
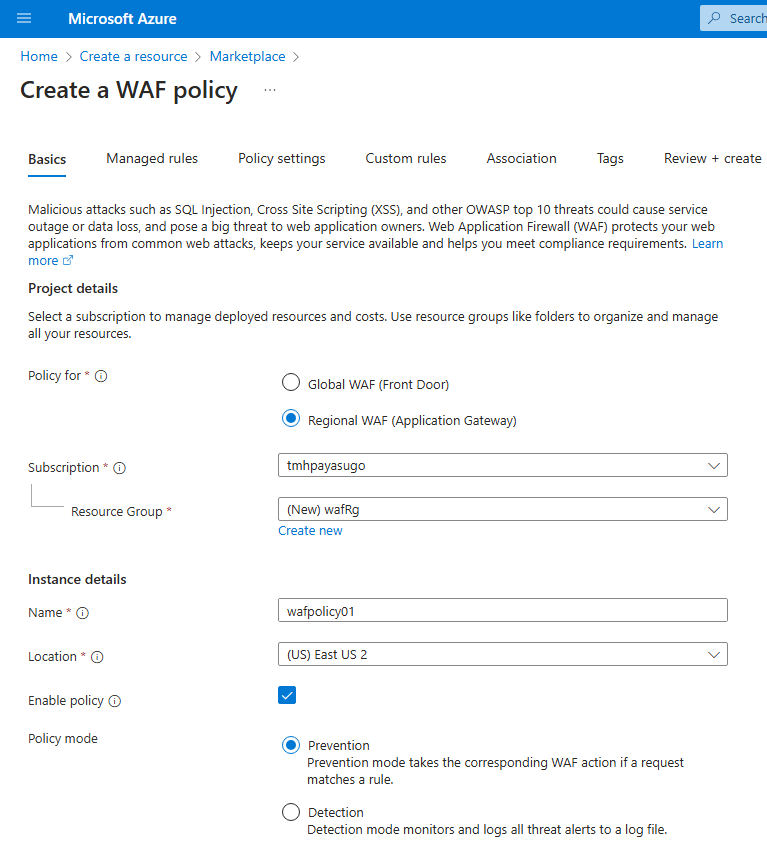
To create a new WAF policy, go to, Web application firewall blade in Application gateway resource.
We can go into the WAF policy and make changes
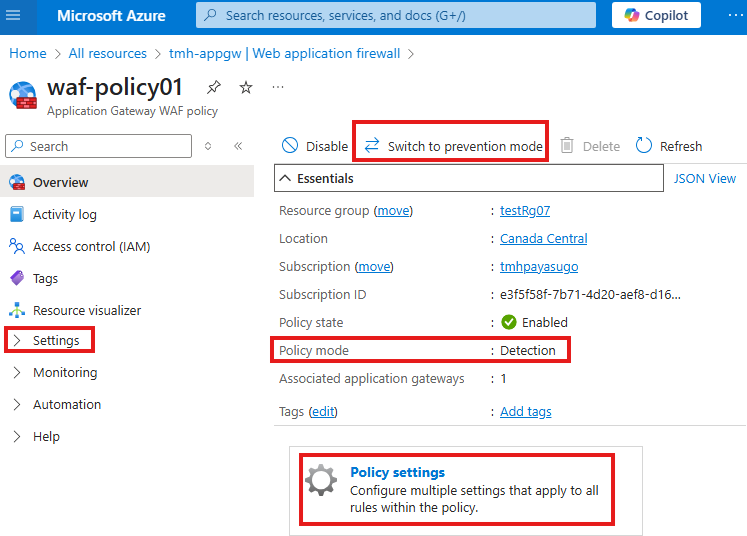
Currently mode will be detection, we can switch to prevention mode.
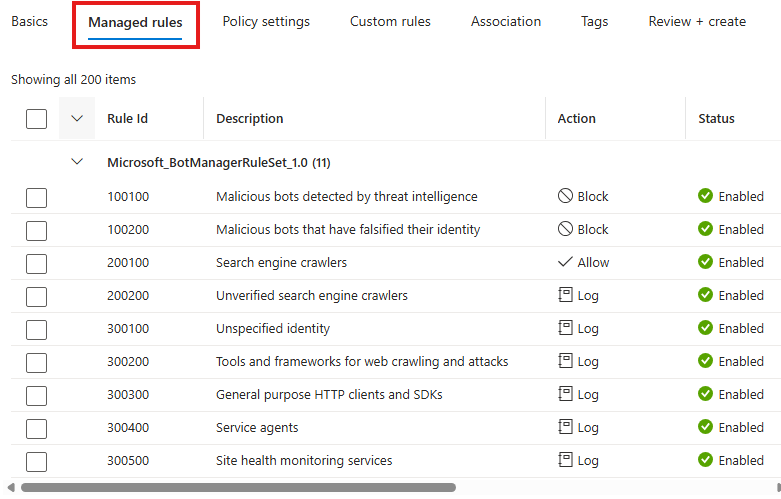
We can go to policy settings > Managed rules:
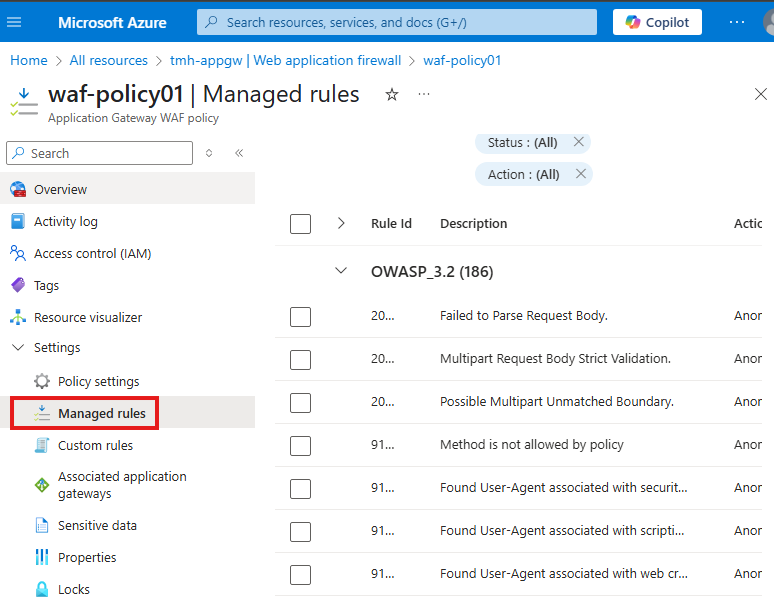
Here we will see some built-in rules.
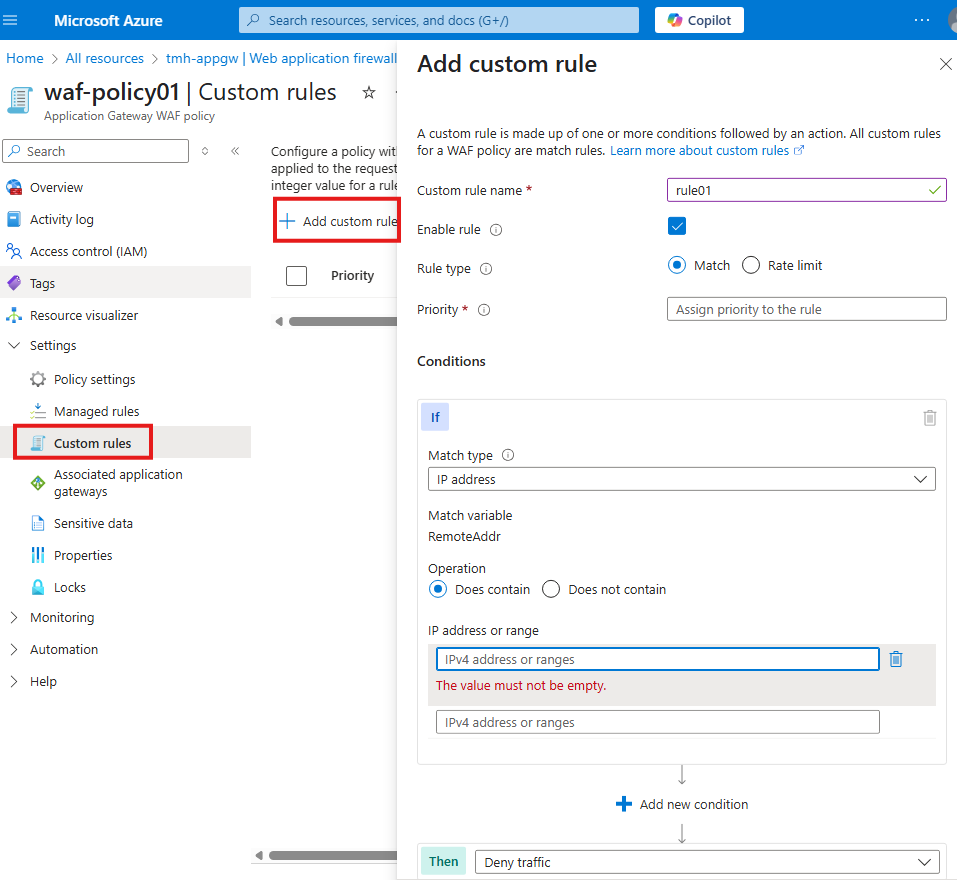
We can add custom rules from custom rules blade:
Section Summary
Protecting Your Web App with WAF
In this section, we explore how to shield your web application from harmful traffic using a Web Application Firewall (WAF). By attaching WAF to the Application Gateway, we add an extra layer of security that can detect and block malicious activity like cross-site scripting, SQL injection, or suspicious patterns in web requests.
Built-In and Custom Protection Rules
WAF works based on a set of rules. Some are managed by Azure, which automatically covers common threats, while others can be custom-built by you—for example, blocking a specific IP address or limiting the number of requests from a single source. You can even control advanced settings like the maximum upload size or request size your app accepts.
Choose How WAF Reacts
WAF has two operating modes: Prevention mode, which blocks harmful requests immediately, and Detection mode, which allows the request but logs the incident for review. This gives you flexibility depending on whether you want to silently monitor or actively protect.
Setting It Up
You’ll learn to create a WAF policy and link it to a new Application Gateway by choosing the WAF V2 tier. As part of this process, you’ll define the back-end (your web app), listener, and rules to manage incoming traffic.
Real Protection in Action
Once everything is deployed, users can access the site safely through the Application Gateway. If someone tries to sneak in harmful input—like a script or a SQL command—WAF will catch it and respond with a 403 Forbidden error, effectively blocking the threat and keeping your app secure.
WAF
WAF can be attached to Application gateway to filter malicious requests.
WAF has some policies based on some rules, these rules can be:
1 – Managed(by Azure)
Like, rules for cross-site scripting, SQL injection, HTTP protocol violation, etc.
2 – Custom
Created by us; We can set rate limit of request from an IP address and we can also block some IP addresses.
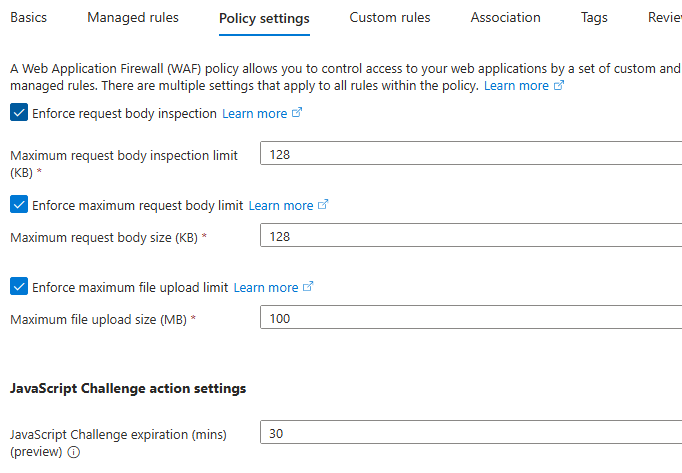
We can also configure additional settings in WAF policy, like:
- what can be maximum size for a web request.
- Max upload file size
WAF Modes
1 – Pretension
Malicious requests will be blocked.
2 – Detection
Malicious requests will be allowed, but details will be logged.
Attach WAF With Application gateway
1 – Create WAF
In the managed rules tab we can see the managed rules
We can view and edit policy settings
Similarly we have tabs for custom rule
2 – Create Application gateway
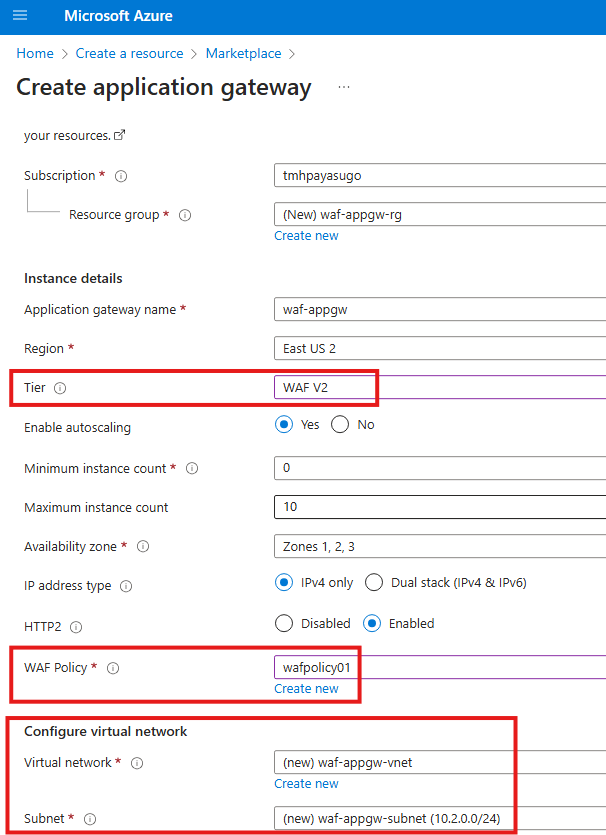
Make sure to set Tier as WAF V2
Select the WAF policy we created earlier.
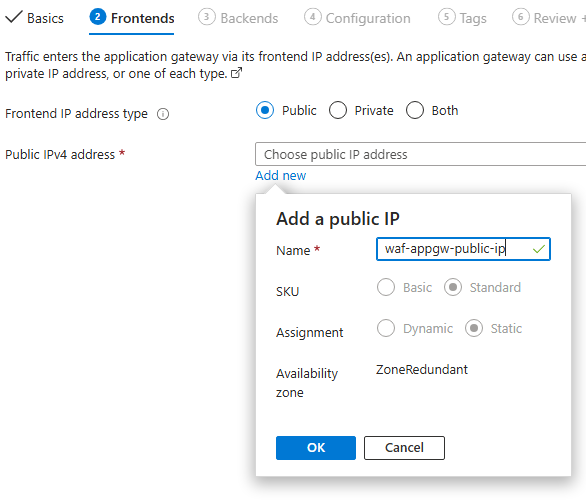
Add a new public IP
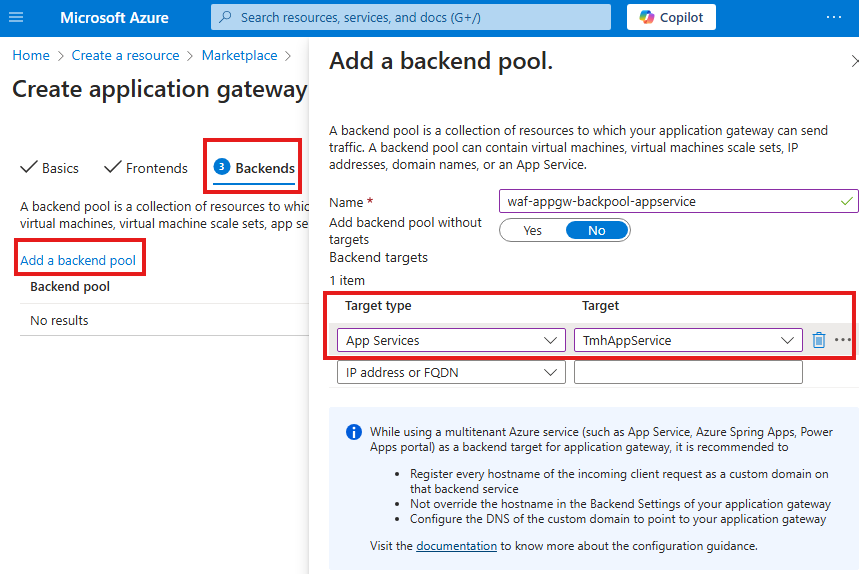
Add the app service as backend pool.
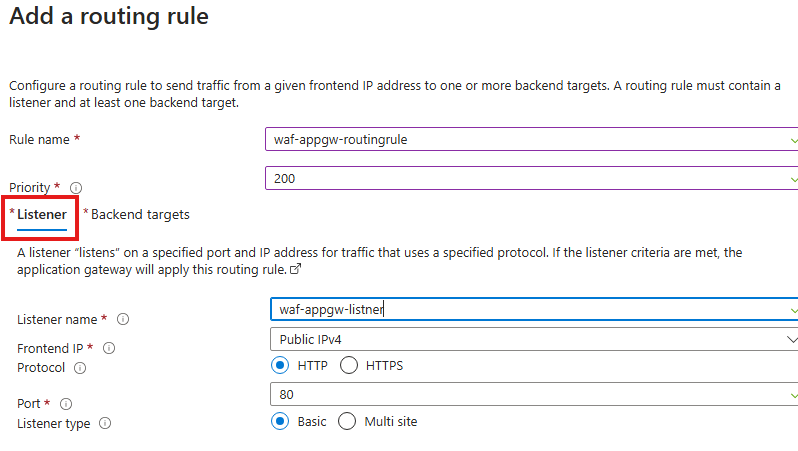
Add listener
Add backend pool and settings
Deploy the Application gateway.
Test the application gateway by sending HTTP request to the frontend IP of application gateway
We will be able to get the site.
Also this Application gateway has WAF policies attached to it:
If web app has any forms and if we try to submit any script, or SQL query it will show 403 Forbidden error
Thus protecting site from scripting and SQL injection attacks.
Section Summary
Connecting Virtual Networks Seamlessly
This section introduces Virtual Network (VNet) Peering, a powerful way to let resources in different VNets talk to each other as if they’re part of one big network. Once peered, virtual machines or services in these networks can communicate using their private IPs—without any extra gateways or public exposure—thanks to Azure’s high-speed backbone.
Regional and Global Peering
VNet peering works both regionally (within the same Azure region) and globally (across regions). But there’s one rule: IP address ranges in peered VNets must not overlap. Once peering is set up, you can easily test the connection between VMs in different VNets using simple tools like ping—just make sure to disable the firewalls on both ends.
Hub-and-Spoke Architecture Made Easy
You’ll learn how to apply VNet peering in a hub-and-spoke design—a common enterprise-grade layout. In this setup, the Application Gateway lives in a central hub VNet and connects to backend resources like VMs or App Services in spoke VNets. This keeps management centralized while allowing secure communication between tiers.
Securing App Services and SQL Databases
To protect an App Service with an Application Gateway, we use a private endpoint so it logically becomes part of the same network. Similarly, for apps hosted in both VMs and App Services that access an Azure SQL database, we can block public access and use private endpoints for secure connections. The App Service must also enable VNet integration to reach the SQL backend.
DDoS Protection—For Networks and IPs
The section concludes with a look at DDoS Protection in Azure. To protect an entire VNet (like one hosting an Application Gateway), you can attach a DDoS protection plan to it. Alternatively, if you only want to protect a specific public IP (say, for a web app), Azure allows IP-based DDoS protection for more focused security.
What is Virtual Network Peering?
With Virtual Network Peering, resources in 1 virtual network can connect to resources in another virtual network.
So 2 virtual network act like they are 1 big virtual network, and resources in any of the virtual network can communicate with each other using their private IP.
In this case traffic uses Azure backbone network.
NOTE:
When we peer 2 virtual networks, they should not have overlapping IP address ranges(CIDR blocks)
1 – Regional peering
2 – Global peering
As a result 2 VNets become part of a large VNet.
Deploy 2 VMs in 2 separate VNets

Now, if we try to ping using private ip from 1 VM to another it will fail.
Adding VNet Peering
Go to Peering blade in settings
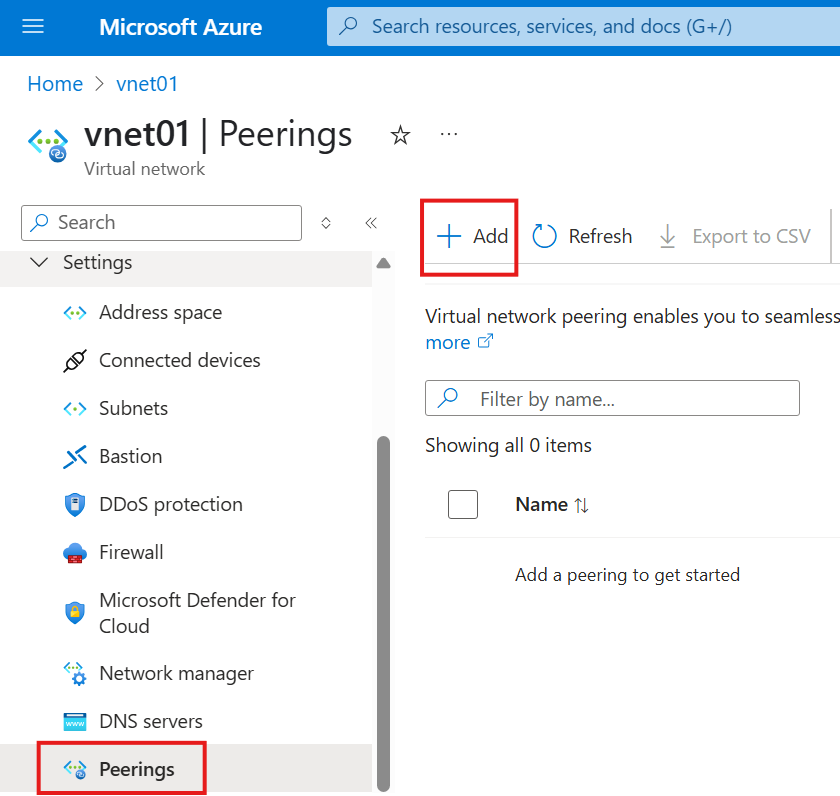
Add a Peering.
Select other VNet we want to peer, also add reverse peering name
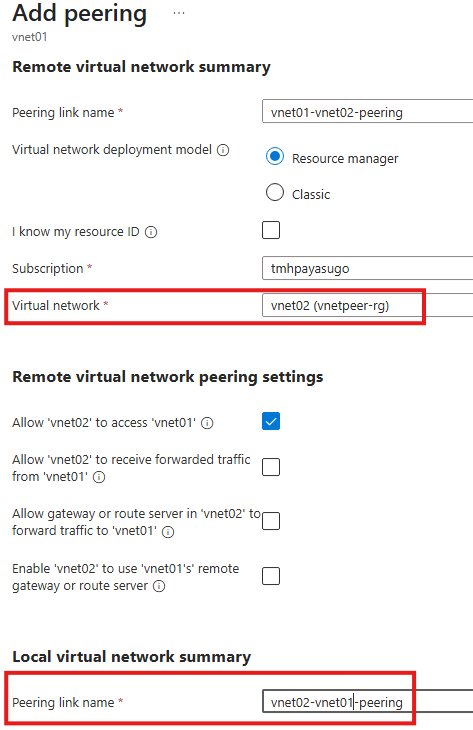
Thus, we are adding bi-directional peering.
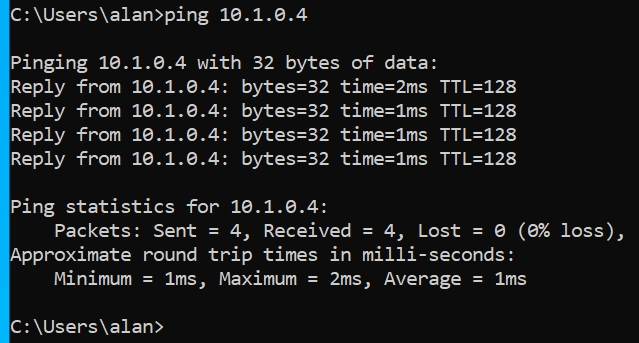
Ping Testing
For ping to succeed;
Turn off public and private firewall
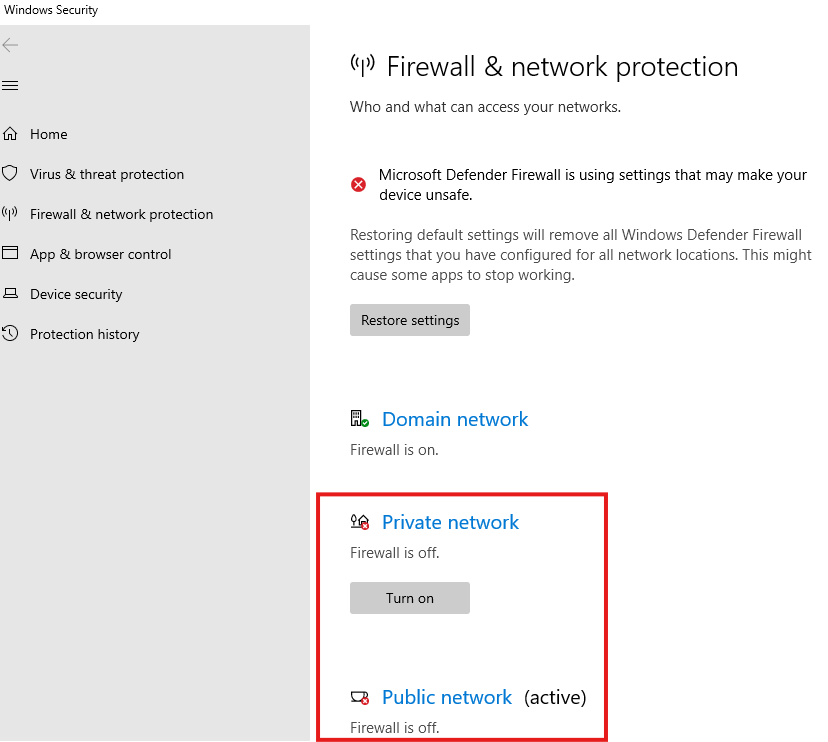
But no need to add any NSG rule for ICMP for the ping to work!!!
Hub And Spoke Design
Application gateway and VM
Earlier we created Application gateway in the same VNet as that of VM it is protecting, but Application gateway should reside in its own virtual network.
Virtual networks of Application gateway and VM should be peered.
NSG should block all ports including RDP, and to remotely connect we must use Bastion.
Application gateway and App service
If there is any app service we want to protect with Application gateway, we should create a private endpoint in App service (a subnet from VNet in which application gateway is located ); Now application gateway and App service web app come under a single Vnet logically.
SQL Backend for Web App in VM and App service
If we have Azure SQL which is acing as database for both apps hosted in VM and app service, public access to this Azure SQL should be blocked.
Azure SQL should have a private endpoint(a subnet from VNet in which VM is located) to connect to VM.
To connect App service to Azure SQL we should :
1 – VNet integration in App service
2 – Private endpoint to connect app service to Azure SQL
Hub And Spoke
In this setup, backend vnet in which SQL DB is located is accessible from frontend vnet, and frontend vnet is only accessible from Application gateway.
DDoS Protection Plan In Azure
1 – DDoS for virtual network
To protect all resources with public IP in a virtual network
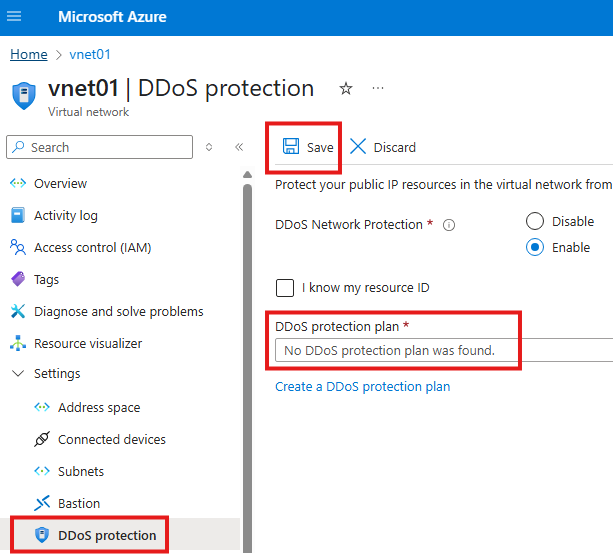
We have to create a DDOS protection plan and attach it to Vnet in which application gateway is located.
2 – DDoS for IP address
To protect only 1 public IP resource
We can also attach DDoS protection to public IP resource.
Section Summary
What is ASG and Why It Matters?
Application Security Groups (ASG) help simplify the way we manage network rules for multiple virtual machines in Azure. Instead of creating complex Network Security Group (NSG) rules with long lists of IP addresses, we can use ASGs to group VMs logically. This makes your network rules cleaner, more organized, and much easier to maintain—especially as the number of VMs grows.
Setting Up a Shared NSG at the Subnet Level
First, we detach the NSG from the individual VM’s network interface and instead attach it to the entire subnet where our web server lives. This way, all VMs in that subnet follow the same NSG rules, reducing the need for managing NSGs VM-by-VM.
We then create another VM in the same subnet—this time, without any NSG on its NIC—and install Nginx on it to serve as an additional web server. Since the subnet already has an NSG, both VMs are protected under the same rules.
Creating and Assigning an ASG
Next, we create a resource called an Application Security Group. Once created, we can attach this ASG to any VM from its network settings. This lets us define groups like “web servers,” “database servers,” or “backend apps” based on their function, not IP.
Using ASGs in NSG Rules
With ASGs in place, we can now write NSG rules using the ASG name instead of typing IP addresses or manually selecting VMs. This not only improves readability and scalability but also ensures future VMs added to the ASG automatically follow the correct security rules—with no extra work.
What is ASG and Why we need it?
ASG is an extension to NSG.
Used to group VMs together.
When writing rules for NSG, if we have many IP addresses, the rules get complicated and difficult to manage. So we can group set of IP addresses using ASG.
1 – Detach NSG from NIC of web server and attach to the entire subnet of the web server.
Go to NIC > NSG blade > select none

Now the NIC will not have any NSG associated with it.
From NSG > Subnets blade, attach to subnet of the webserver
2 – Now create another web server VM inside same subnet, without a NSG attached to its NIC
So that VMs will share same NSG which is attached on the subnet.
To prevent creation of new NSG attached to NIC, while creating VM, in the networking tab, select NIC NSG to be None.
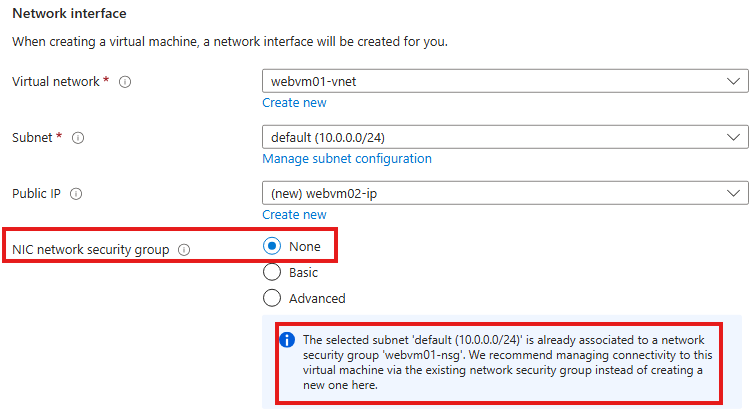
This is default behavior in Azure if there is a NSG attached to the subnet to which VM is deployed.
Install nginx in this VM as well and make it a webserver.
Attaching ASG to VM
1 – Create a resource called: Application security group.
2 – To attach a ASG to VM, go to Network settings blade or ASG blade
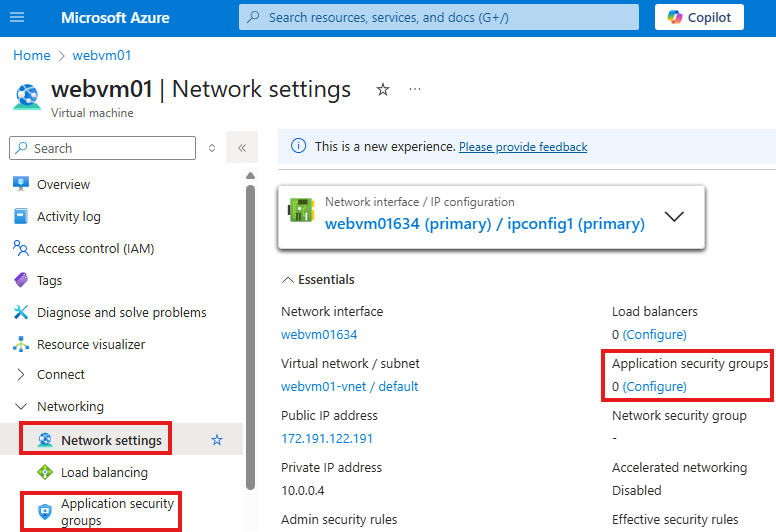
Do this for all VMs that need to be attached to the ASG
Using ASG in NSG rules
Now while creating a NSG rule, we can refer the VMs in ASG as a group.
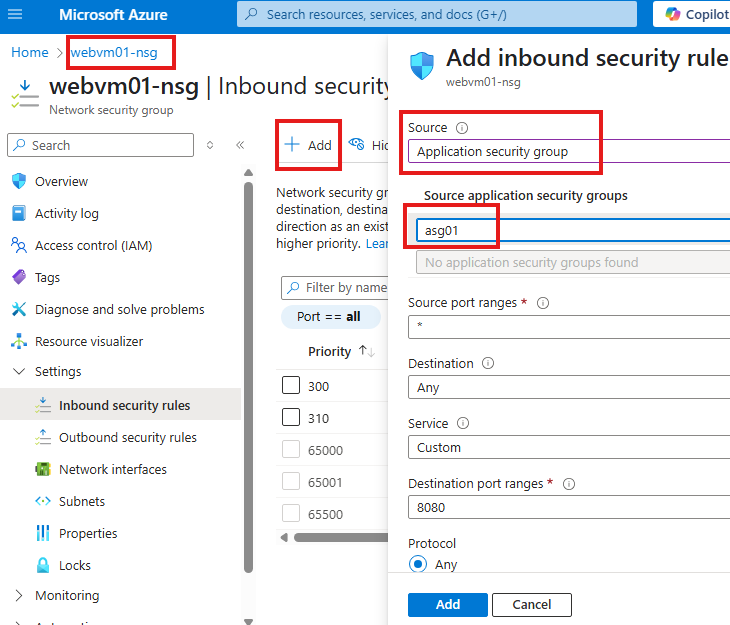
Just select the correct ASG.
Section Summary
Understanding Routes in Azure: Why User-Defined Routes Matter
In Azure, data packets move across networks based on a set of default system-defined routes. These handle most scenarios automatically—for example, routing traffic between VMs within the same virtual network. But sometimes we need more control—like when traffic must pass through a firewall or a virtual appliance first for inspection or logging. That’s where User Defined Routes (UDRs) come in.
Creating and Applying Custom Routes
Imagine a setup with three subnets:
- One hosts a web server,
- Another holds a virtual appliance, and
- The third has a client machine used to access the web server.
Normally, the client can talk to the web server directly. But in this setup, we want all traffic from the client subnet to first go through the virtual appliance.
To do this:
- We create a Route Table and define a custom route saying:
“If traffic is headed toward the web server’s subnet, first send it to the appliance’s IP.” - We associate this route table with the client’s subnet (the source of the traffic).
At this point, traffic is rerouted—but it will fail unless the virtual appliance is also configured to handle and forward that traffic.
Enabling IP Forwarding for Routing to Work
To act as a middleman, the virtual appliance VM must be told it’s okay to pass traffic through:
- Enable IP Forwarding at the NIC level of the appliance VM.
- Enable IP Forwarding inside the operating system (Linux in this case) by editing the system config file (
/etc/sysctl.conf) and restarting the VM.
Result: Controlled, Secure Traffic Flow
Once everything is set up, HTTP traffic from the client VM to the web server will work again—but now it’s intelligently routed through the central subnet’s VM. This setup is useful in real-world scenarios involving firewalls, logging appliances, or custom network inspection tools.
User Defined Routes in Detail
By default there are system routes, that define how data packets pass through within a virtual network.
Why we need a user defined route?
If we have a firewall in a virtual network, we might need all the traffic to passthrough it first.
We can see system defined routes for a NIC under:
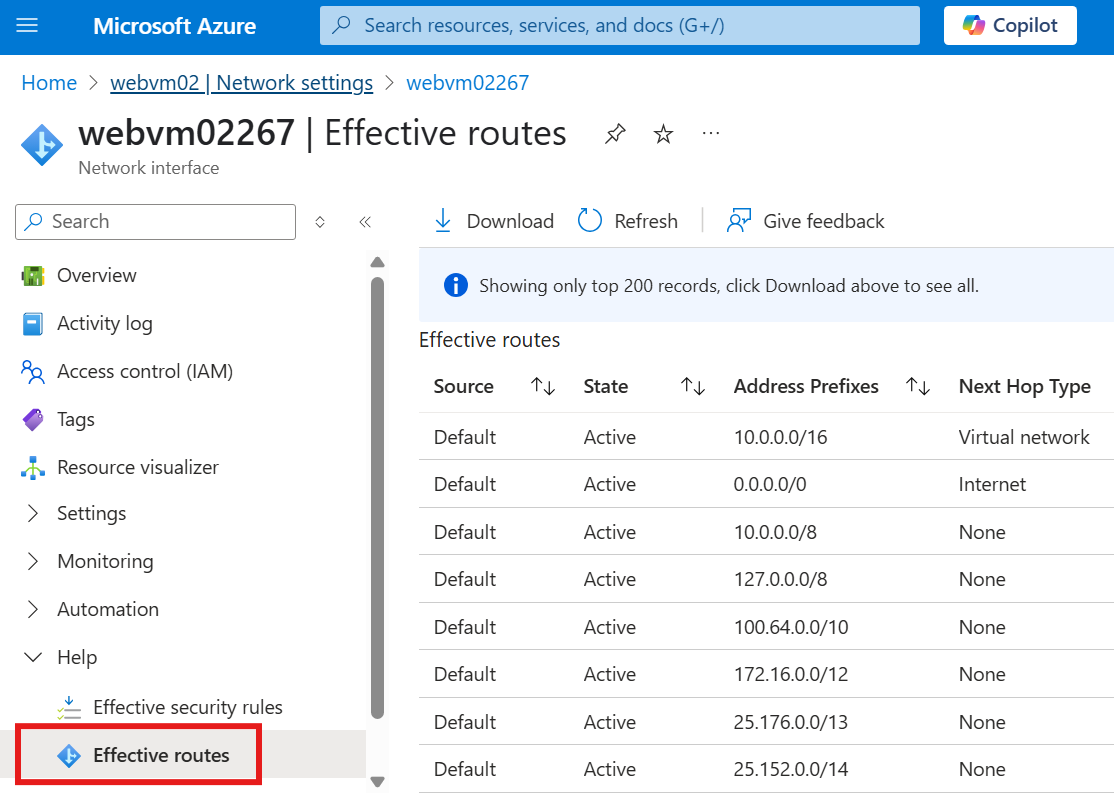
Create User defined Routes
In the current scenario we have 3 subnets:
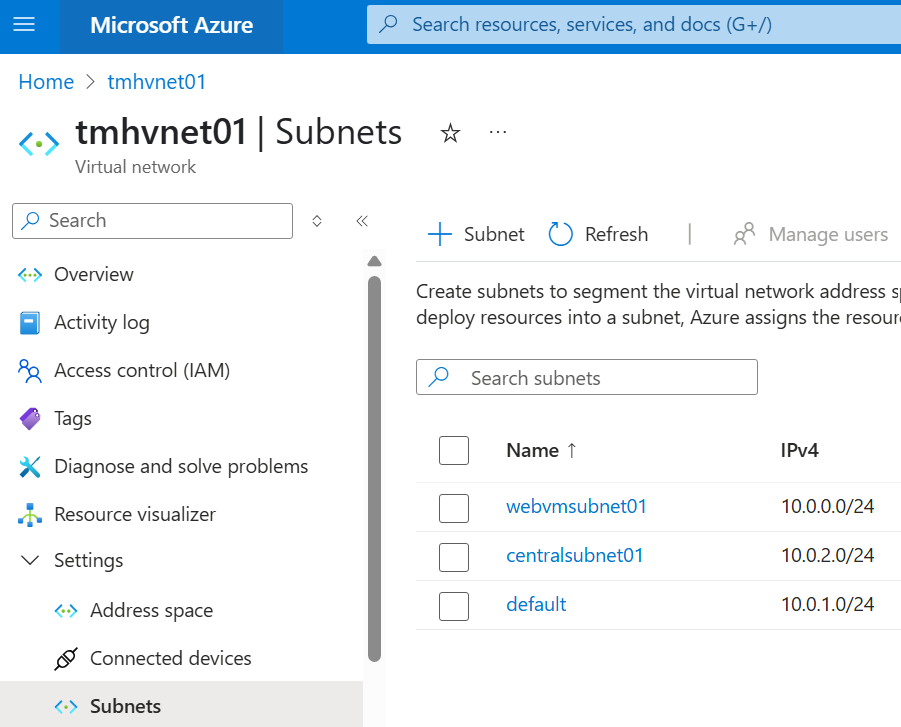
1 – webvmsubnet01, has a webserver
2 – centralsubnet01, has a virtual appliance
3 – default, is subnet with client machine used by user to access the webserver
a VM in default can currently get HTTP response from webvmsubnet01.
Now, we need the data packet to passthrough a server in centralsubnet01.
1 – Define route table
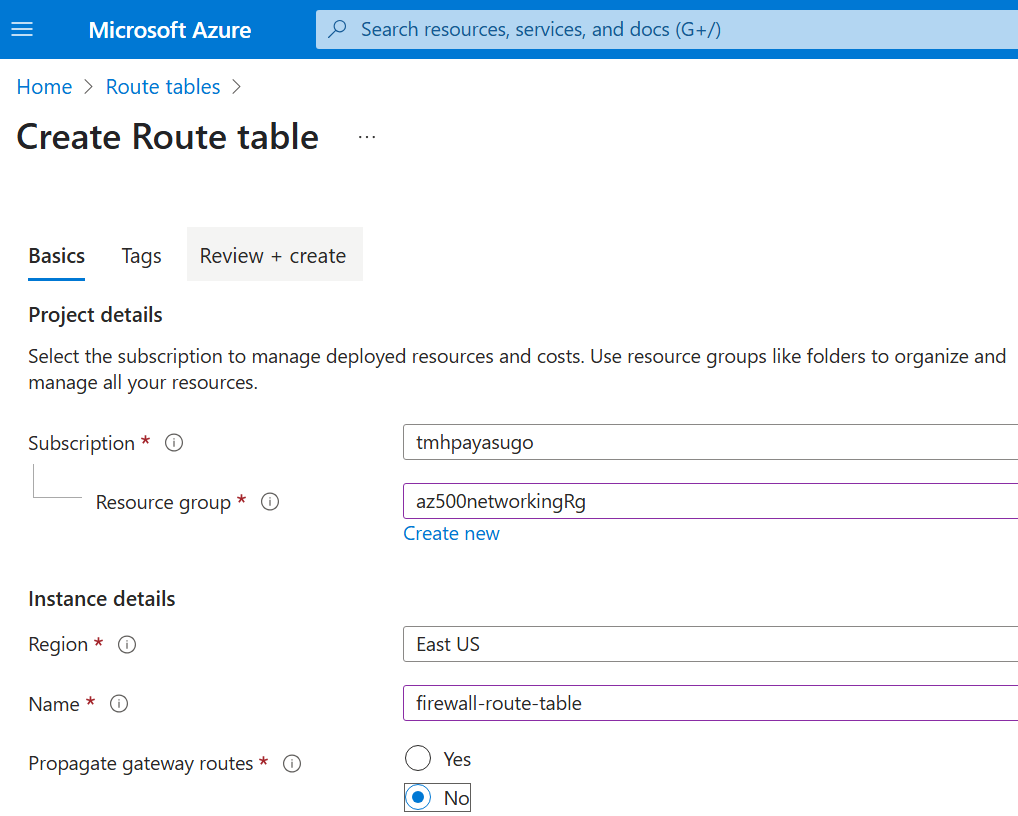
We select propagate gateway routes, if we have an on premise subnet to consider.
Add a route in the route table resource:

Here we are defining that any packets destined for given IP address range (subnet of webserver), should go thorough given server at next hop IP address.
2 – Associate route table to a subnet
We now need to attach this route table to the source subnet.
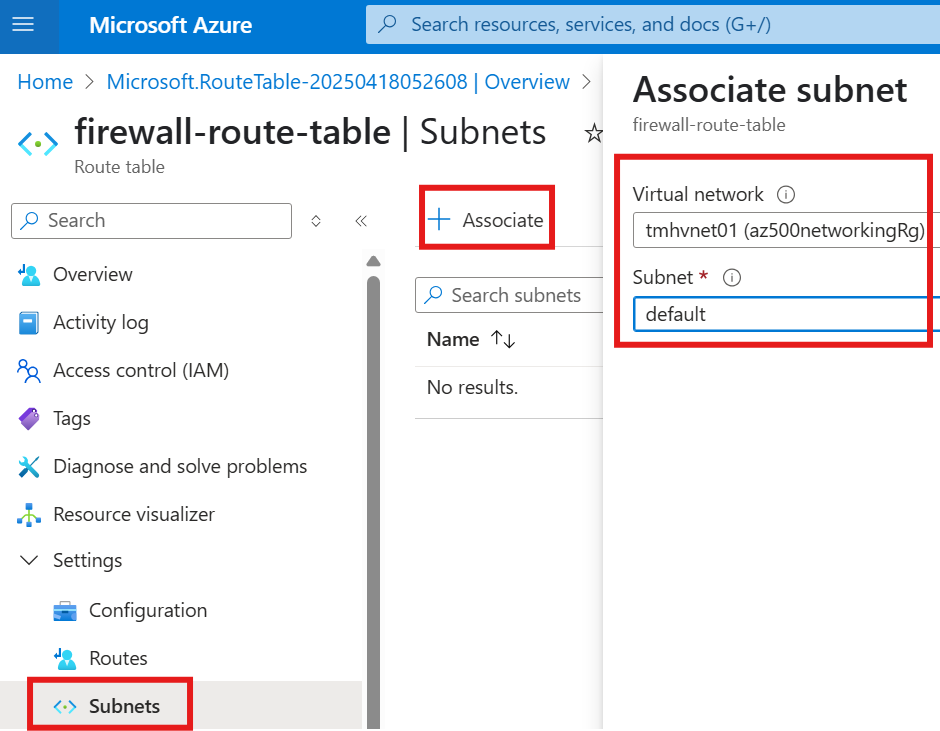
After doing this; HTTP request from default to webvmsubnet01 will fail.
Now, we have to tell the server in centralsubnet01, that it is your job to route the data.
3 – Enable IP Forwarding ( NIC level)
Go to the NIC of the VM in centralsubnet01:
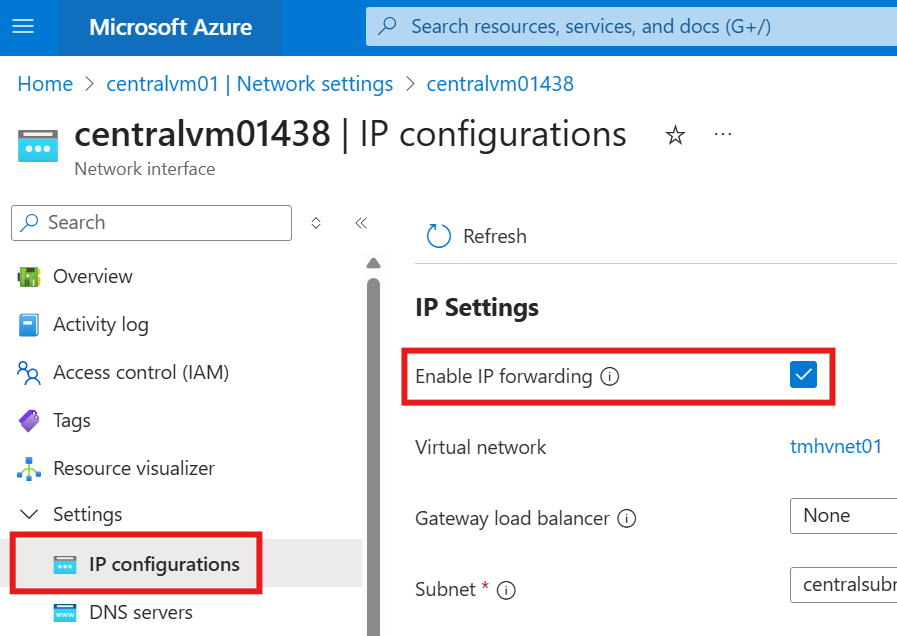
Enable IP forwarding.
4 – Enable IP Forwarding ( OS level, edit config file in VM)
sudo vim /etc/sysctl.confin the VIM editor:
press i for INSERT, and uncomment the line

After editing is complete press ESC
To write the changes, :wq
To read the file to make sure edit is done: more /etc/sysctl.conf
Restart VM
Test the HTTP request from default subnet to webvmsubnet01, and it will work again; It is now being routed through a VM in centralsubnet01.
Section Summary
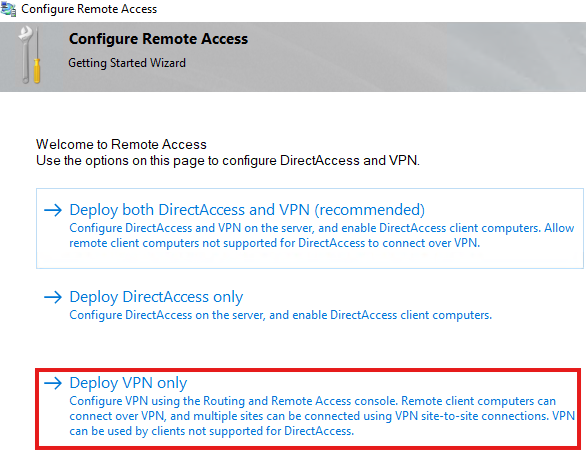
Point-To-Site VPN: Secure Access for Remote Employees
Sometimes, employees need to access company apps hosted in Azure, but it’s not ideal—or safe—to expose those apps to the public internet. That’s where Point-to-Site VPN (P2S) comes in. With P2S, a secure tunnel is created between a client device (like a laptop) and the Azure virtual network, so employees can access internal web apps using their private IPs, not public ones. Azure supports various VPN protocols like OpenVPN, IKEv2, and SSTP, and authentication can be done using certificates, Azure Entra ID, or Active Directory.
In this setup, a VM hosts a simple web app, and its public IP is removed—mimicking an internal-only application. Then, a VPN gateway is created with a gateway subnet, and a certificate-based authentication system is set up. The process involves creating a root certificate, uploading it to Azure, generating client certificates, and installing them on employee devices. Once the VPN client is installed and connected, users can access internal services securely using private IPs, even without public internet access to the VM.
Site-To-Site VPN: Connecting On-Premise Networks to Azure
When a company wants to link its entire on-premise network to Azure’s cloud resources, a Site-to-Site VPN (S2S) is the solution. Instead of individual client machines, an entire on-premise subnet is connected to Azure via a router. In this demo setup, the on-premise environment is simulated using a Windows VM that acts as a software router.
The S2S setup starts with creating a separate virtual network and configuring the Windows server with routing roles. Then, a Local Network Gateway is defined in Azure to represent the on-premise side. This gateway doesn’t consume resources or cost—it just stores information about how to route traffic.
In Azure, the existing Virtual Network Gateway is configured to establish a connection with this local gateway. A shared key is used for authentication. Once connected, the on-premise VM can securely reach Azure-hosted apps using private IP addresses, just like they were on the same internal network.
Point-To-Site VPN
For an employee to connect to resources hosted in virtual network in Azure securely over internet , we need to setup Point-To-Site VPN, so that traffic will flow through a secure tunnel.
For example, to access any web app hosted in VM, we don’t have to access via public IP address.
Secure tunnel can protocols like:
- OpenVPN
- Secure Socket Tunneling
- IKEv2
Client computers that connect should authenticate via:
- Certificate
- Entra ID
- RADIUS
- Active Directory Domain Server
1 – Host a Web app in a VM and disassociate public IP address
This is to mimic an internal application hosted in a company server, that will not be available to public, but only to employees in the company.
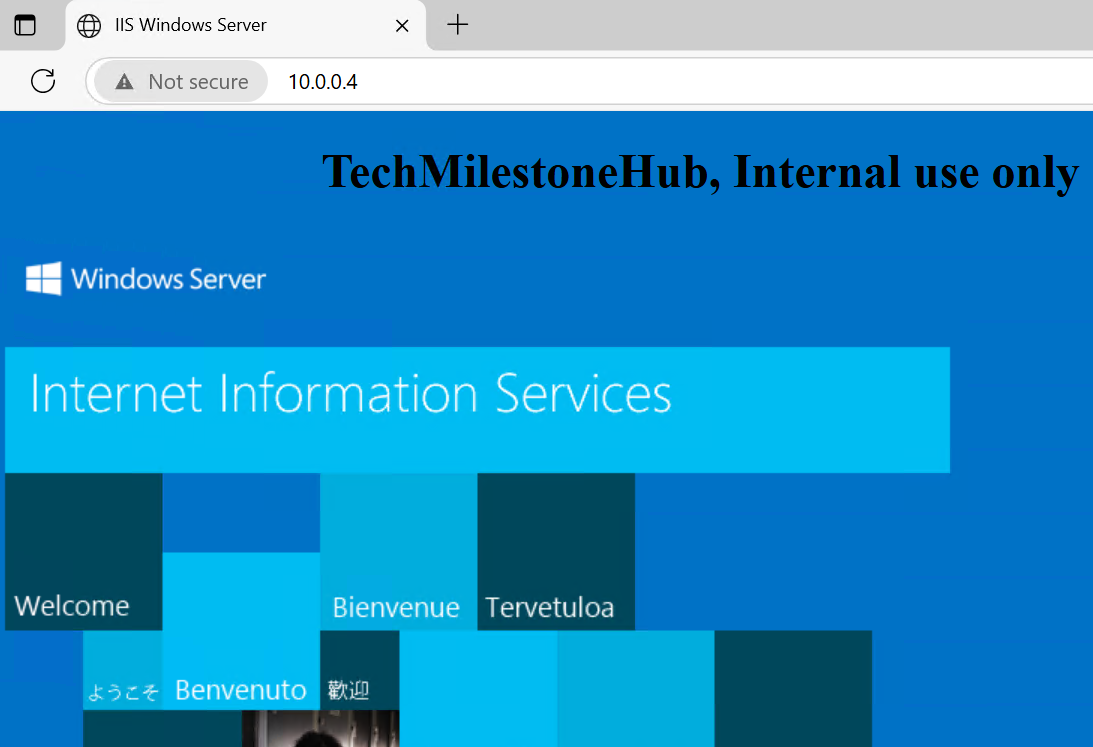
Deploy a Windows server VM, and install IIS role.
Make some edit on the default IIS landing page.
Now, test the site locally by accessing using the private IP of VM
Now, disassociate the public IP from NIC of the VM.
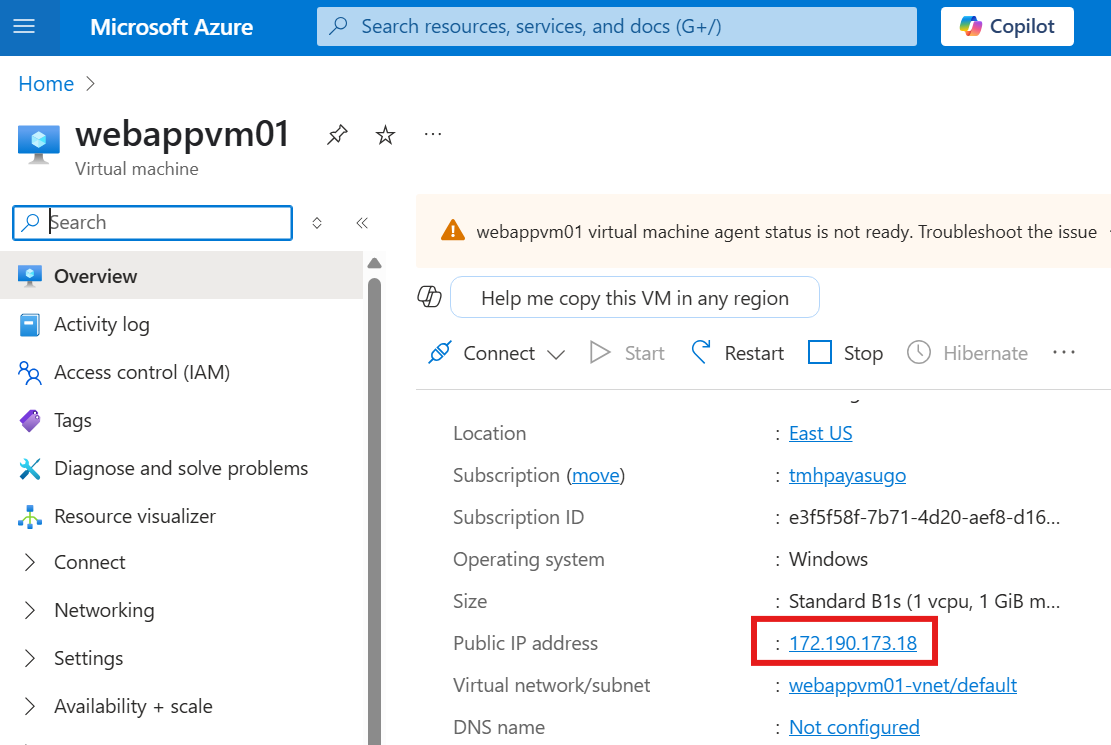
Click on public IP on the VM, to go to public IP resource and disassociate.
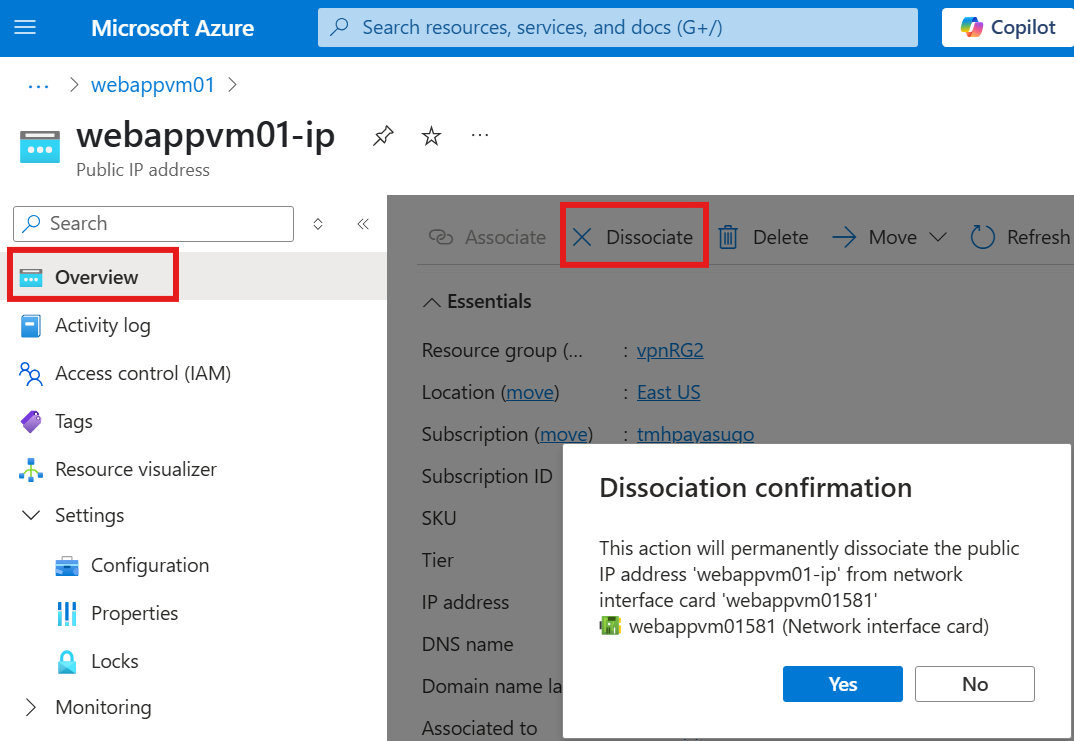
We will be able to associate any NIC or Load balancer, to this public IP.
2 – Setup point-to-site VPN gateway.
Create Gateway subnet
Add a gateway subnet to the same virtual network.
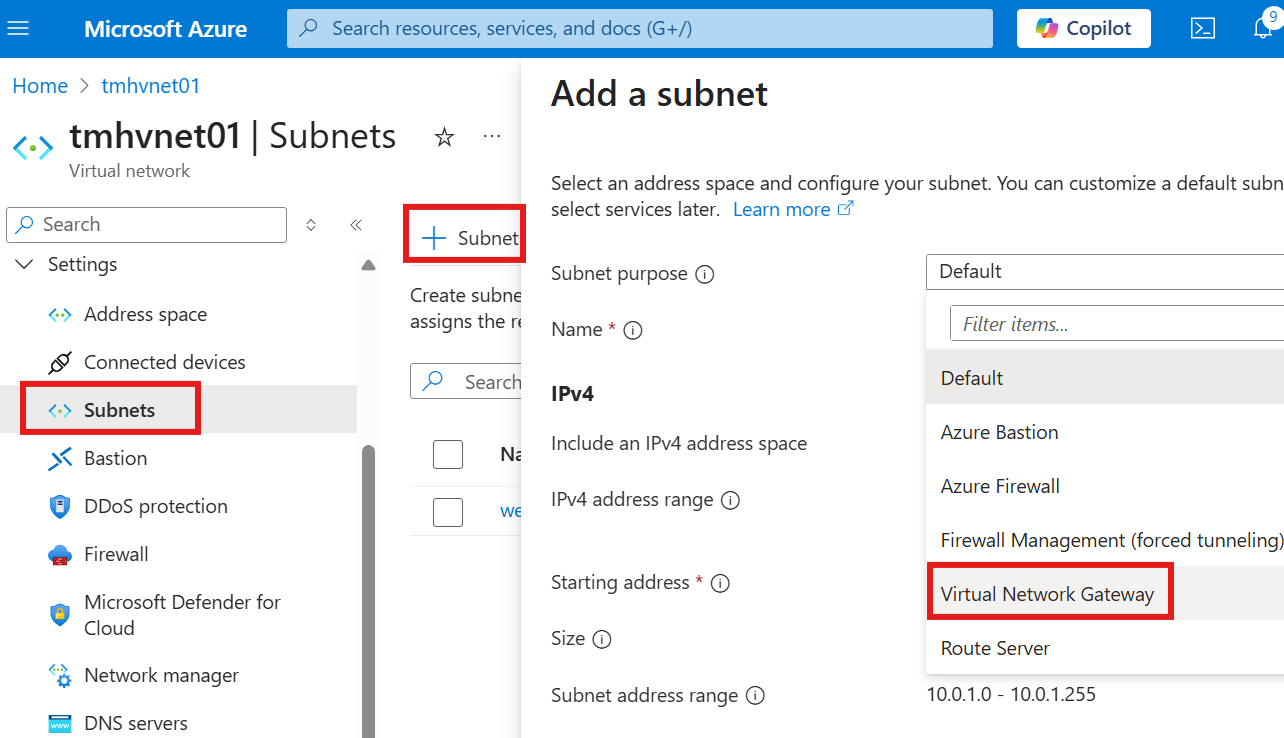
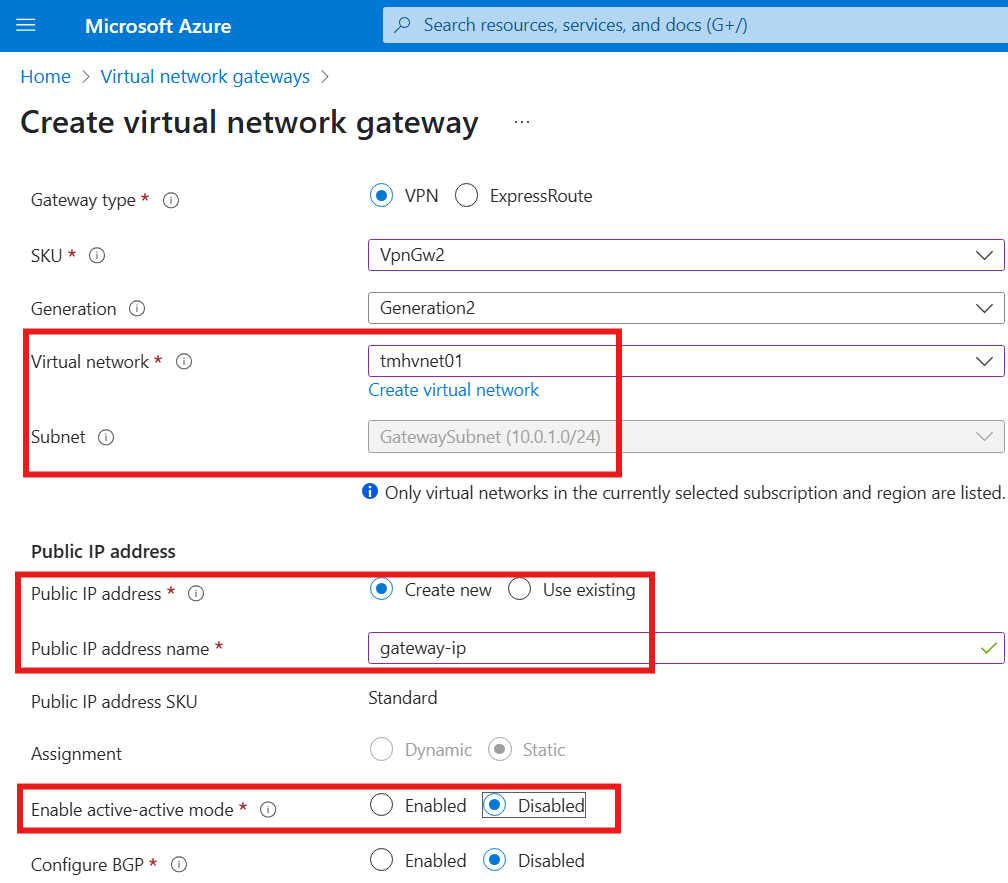
Create Virtual network gateway resource
3 – Certificate for authentication
We need a way to authenticate client device while accessing resource via VPN.
How it is done in an organization:
A company will generate a certificate using Trusted authority service, or it will have a certificate manager hosted on-premise.
1 – generate a root certificate
2 – public key of root certificate is uploaded to Azure VPN gateway
3 – generate client certificate from root certificate, this client certificate will be installed on each clients
Demo using : Self-signed certificate
Generate and export certificates for P2S: PowerShell – Azure VPN Gateway | Microsoft Learn
1 – Create self-signed root certificate
2 – Upload public key to gateway
3 – Install client certificate on client machine
1 – Create self-signed root and child certificate
Execute PowerShell commands in the link.
Generated PowerShell commands will be seen in: Manage user certificates, windows app
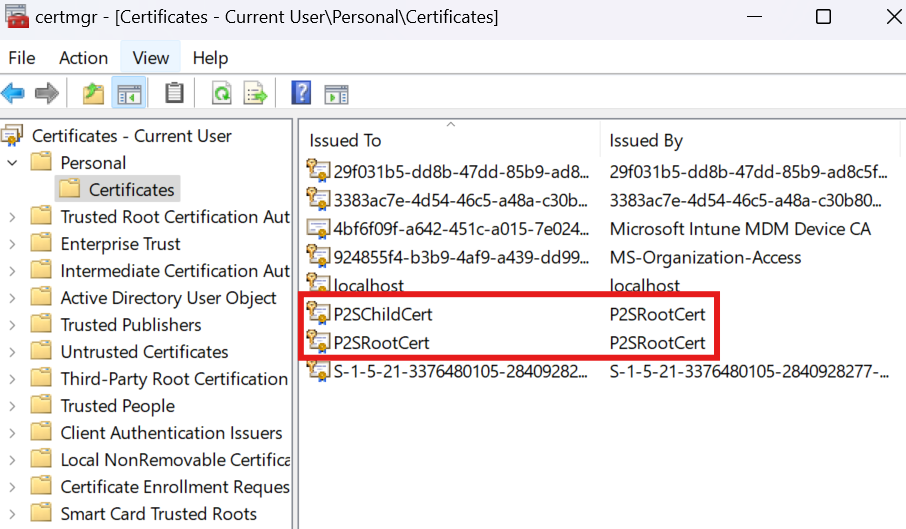
We need to export this client certificate and install it on client machines that will be connecting to VPN.
Right click on Root certificate > All Tasks > Export
No need to export private key.
Select export file format as: Base64 encoded
In Gateway configure the point-to-site, using the saved root certificate
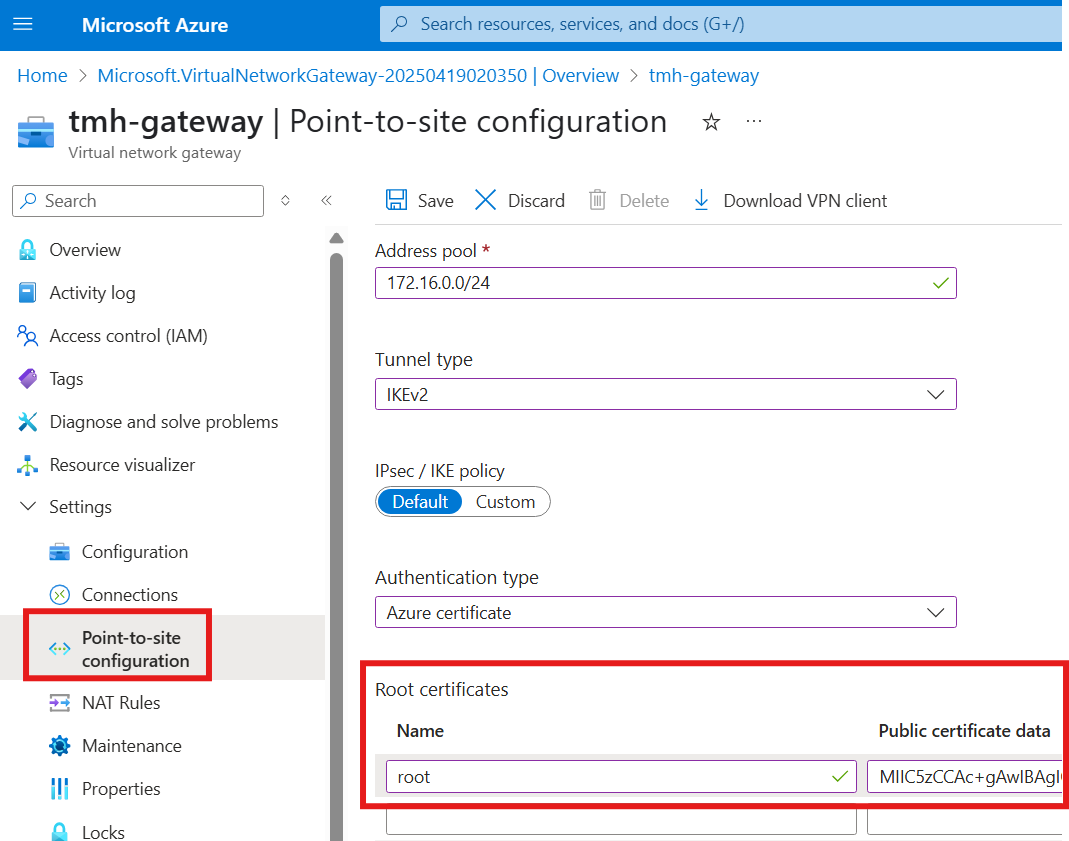
Copy paste the certificate data.
Address pool will be the IP addresses the client machines will be using, when the connect using the VPN.
Click on : Download VPN Client, to install on the client machine.
After installation; go to Windows 11 VPN settings:
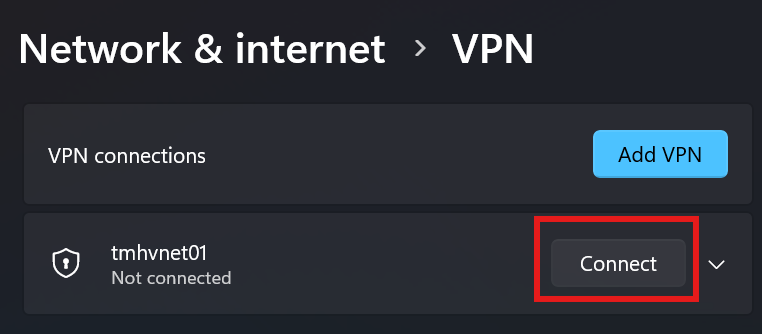
and click connect.
Now, we will be able to connect to webserver using its private IP form the client machine.
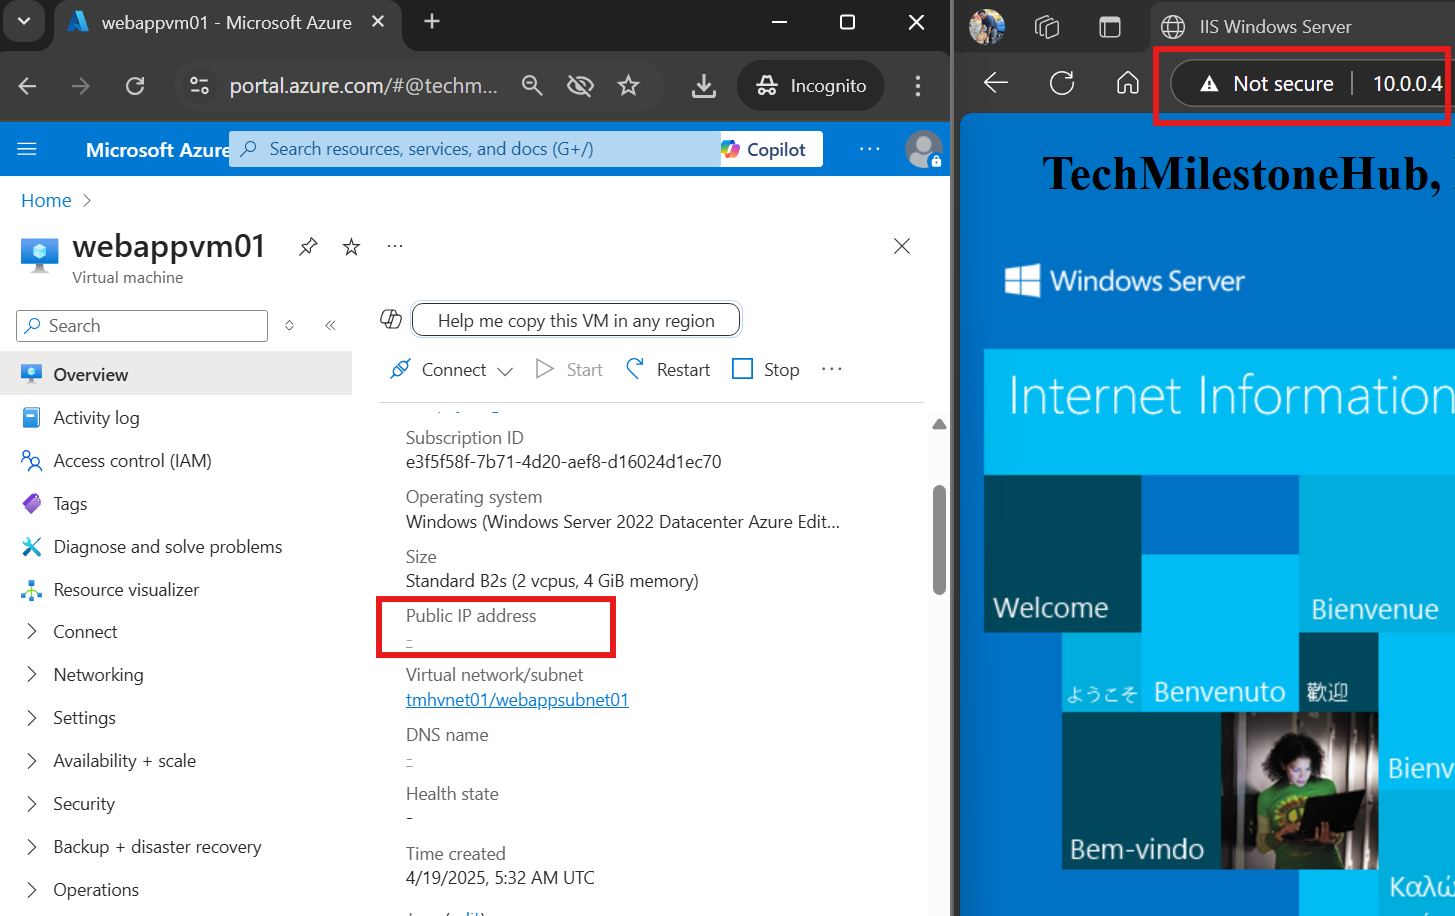
The VM hosted in Azure don’t have a public IP associated with its NIC, still we are able to access the web app hosted on it, because we are connected using VPN.
Site-To-Site VPN
When we want to connect entire on-premise resources to resources in Azure.
On-premise network need a router to route traffic.
We will be mimicking an on-premise network and device using Azure VM itself and also, we will be using a software router in the Windows server making it a routing server.
We will be deploying a local network gateway. Which is not actually any device or a resource, it is just an object to represent on-premise network. It provides information to VPN gateway about routing requests back to on-premise network.
1 – On-Premise Configuration
Step 1 – Create a separate virtual network and deploy a Windows server VM( that will act as a software router)
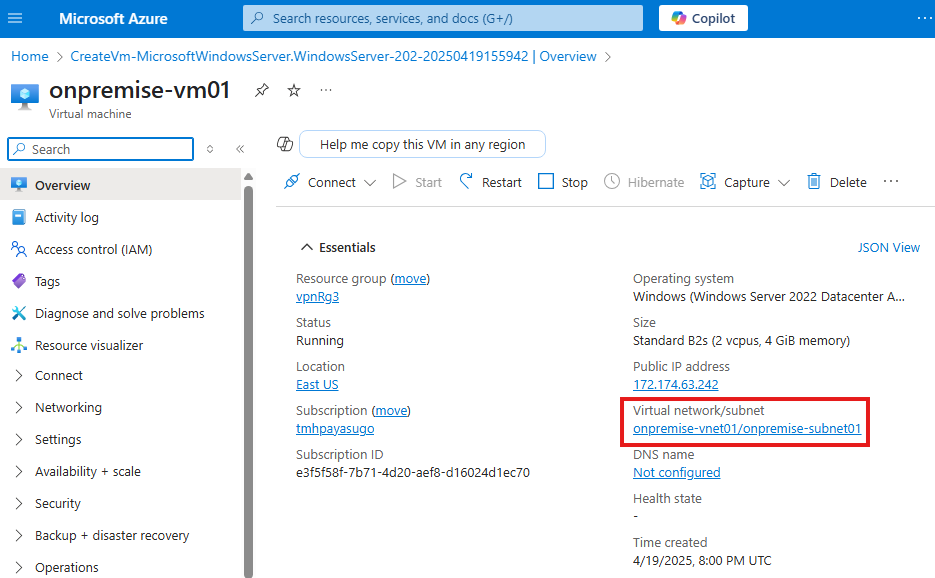
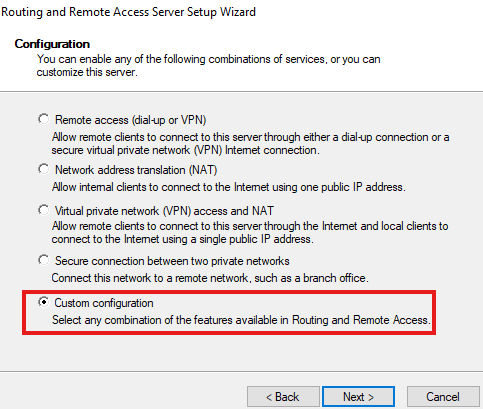
This windows server represents on-premise router; So for us to mimic that we will be installing a role:
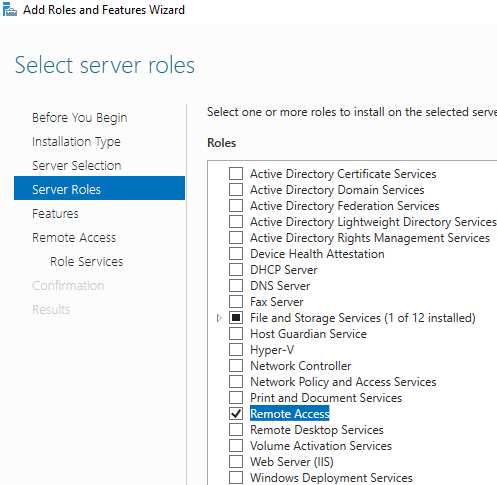
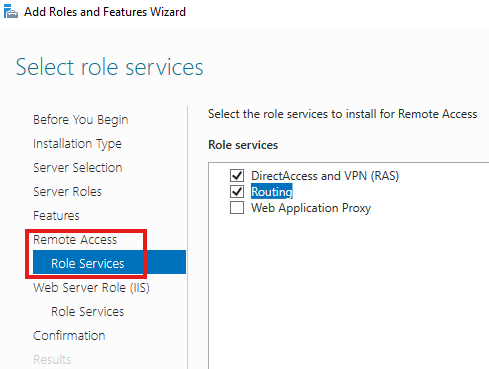
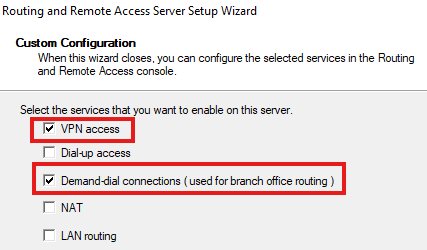
After these roles are installed, we need to configure:
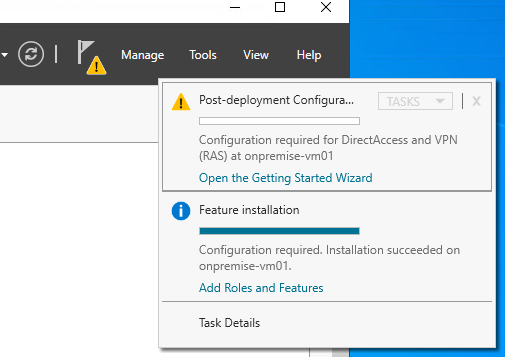
Start wizard
After configuration, we will get a message box to start the service.
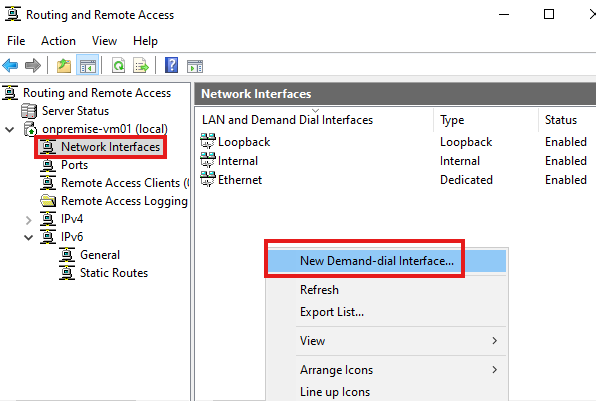
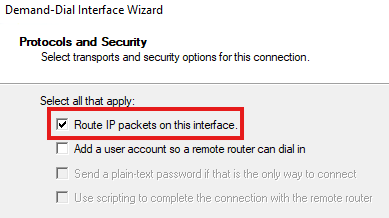
Create a new demand dial interface
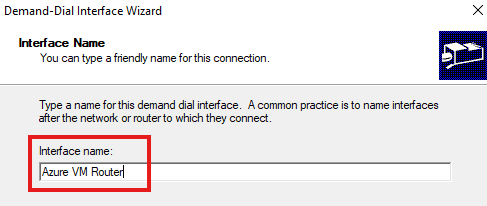
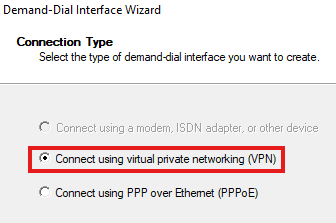
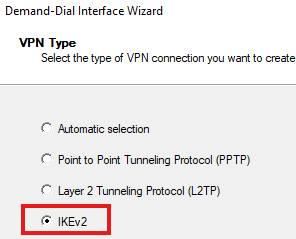
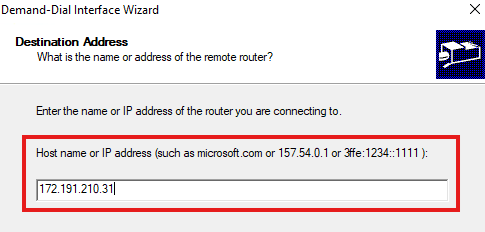
Provide the IP address of gateway
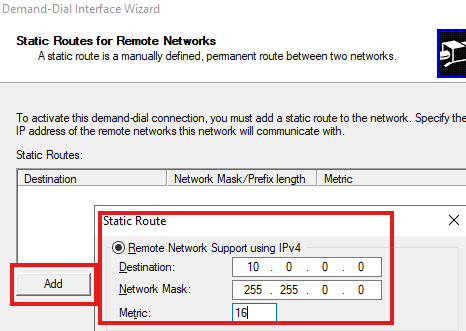
Now, provide the details on Azure virtual network to which the on-premise network need to connect to; We must have already created virtual netwokr in Azure for this.
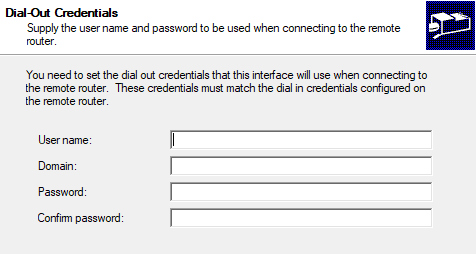
Leave credentials blank
Once setup of software router is complete:
Step 2 – Deploy Local Network Gateway resource ( in Azure, but it is part of on-premise configuration)
This is resource don’t have any backend processes so that it does not have any cost associated, like a resource group. It is just an object.
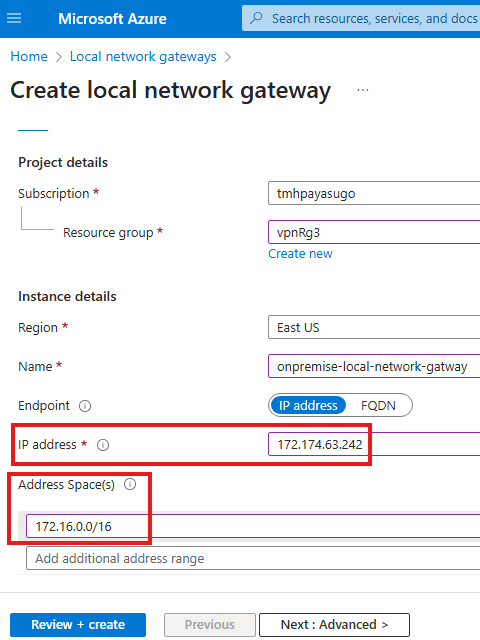
Local network gateway, need a IP address which will be the public IP address of the router that is available on the on-premise network. Here since we will be using our Windows server as a software router, we will give public IP of the Windows server VM.
Local network gateway also need an address space range; Here that will be the address space range of our on-premise virtual network.
2 – Azure Virtual Network Configuration
Step 1 – Configure connection in gateway
To configure site-to-site connection, go to Connections blade in virtual network gateway
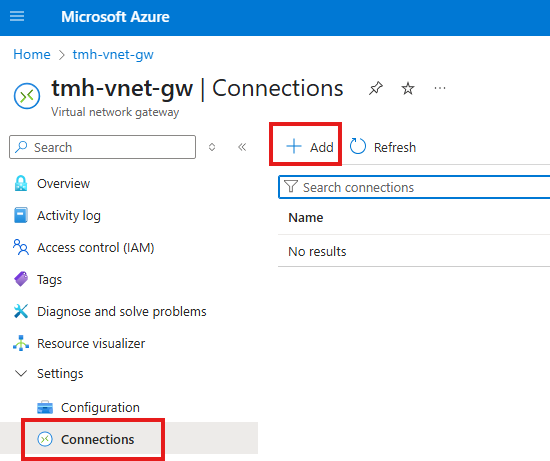
Add a connection
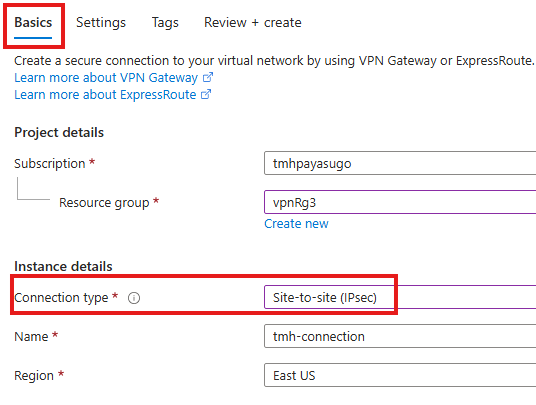
Select connection type as site-to-site
In the settings tab, we give details to configure connection:
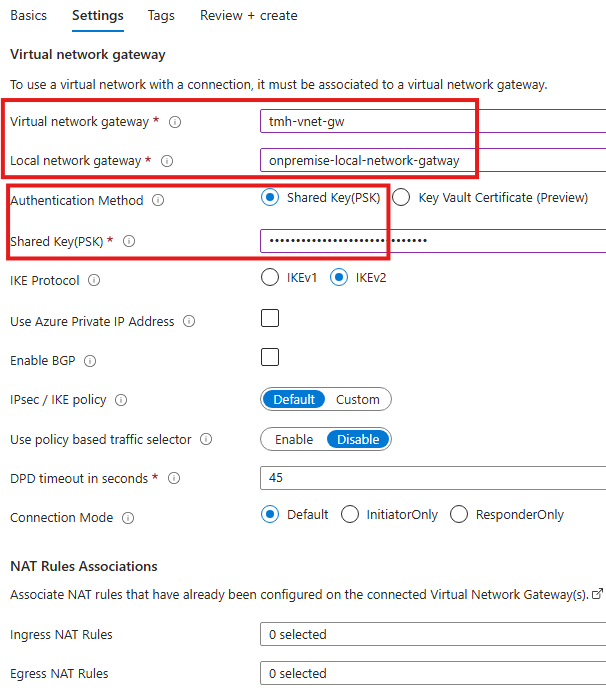
We select the local gateway and virtual network gateway.
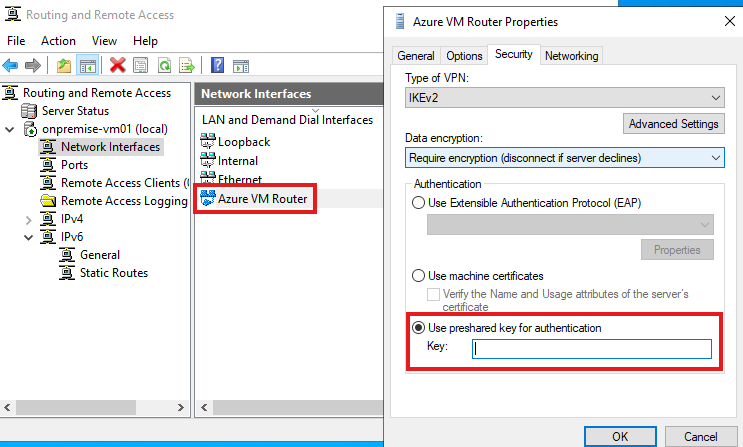
For authentication, we select shared key, it is a simple and unsecure authentication method using password.
3 – Verify the Site-To-Site Connection
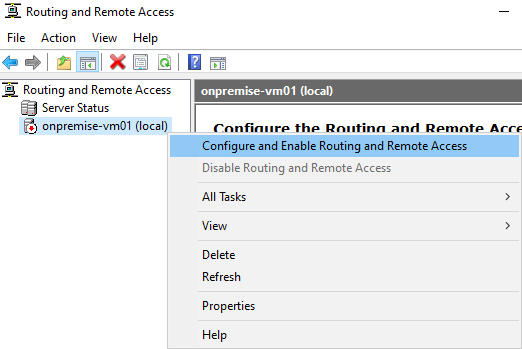
Now establish connection to virtual network gateway from software router in the on-premise VM.
Server Manager > Tools > Routing and remote access
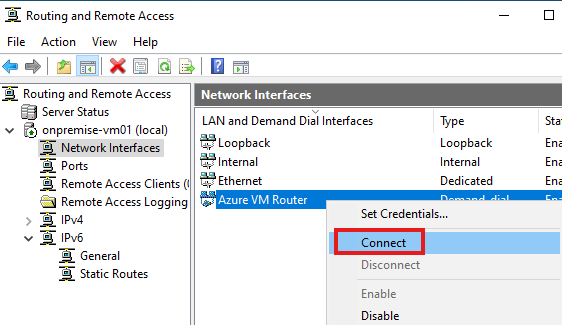
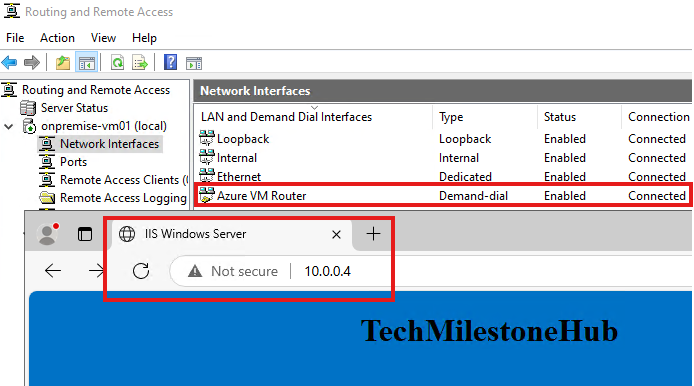
Once it is connected we will be able to access website hosted in company’s virtual network ( from previous section) using server’s private IP.
Section Summary
Azure Network Watcher: Key Tools for Network Diagnostics
Azure Network Watcher is a built-in monitoring and diagnostic service that helps track and troubleshoot network issues in your Azure environment. It doesn’t require manual deployment—Azure automatically enables it per region or per resource group as needed. To access it, simply search for Network Watcher in the Azure Portal.
🔎 Connection Monitor
This tool monitors the connectivity between two endpoints—whether both are in Azure or one is on-premises. It helps ensure VMs, apps, and other resources can reach each other over the network and gives real-time metrics and alerts for packet loss and latency.
🚏 Next Hop
The Next Hop feature helps identify the next route a data packet will take from a source VM to its destination. For example, if you’re accessing a web app on a VM with a public IP, the next hop would be the Internet. But if it’s an internal app accessible only via VPN, the next hop might be the public IP of the VPN gateway.
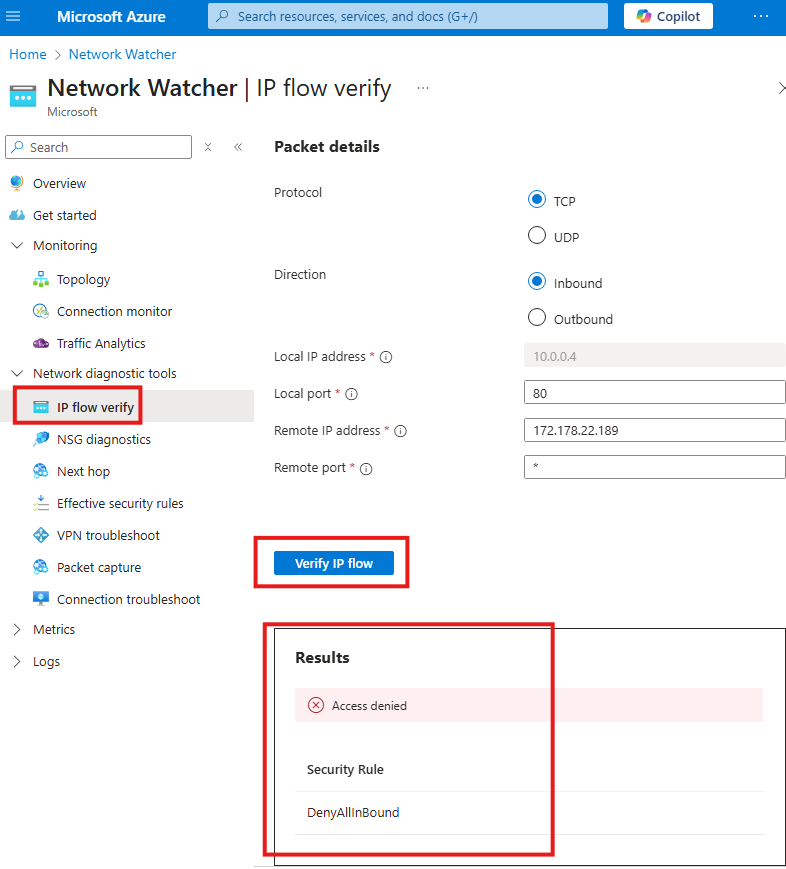
🔁 IP Flow Verify
This utility checks whether a packet from or to a VM is allowed or denied, based on NSG (Network Security Group) rules. It’s useful to quickly pinpoint if traffic is being blocked and exactly which rule is responsible.
🌐 Connection Troubleshoot
Use this tool to test network connectivity from one VM to another resource—be it a VM, domain name, URI, or IP address. It checks DNS resolution, network path, and firewall configurations.
🛡 NSG Diagnostics
This diagnostic utility helps review the configuration of your Network Security Groups. It gives a clear picture of your inbound and outbound rules and whether traffic is being properly filtered.
📊 Traffic Analytics
Traffic Analytics aggregates and visualizes NSG flow data. It helps understand who is talking to whom, how frequently, and from where. It can surface anomalies and performance bottlenecks across your virtual networks.
NSG Flow Logs: Detailed Visibility into Network Traffic
NSG Flow Logs provide JSON-formatted logs that capture traffic through NSGs. These logs are useful to see source and destination IPs, ports, protocols, and flow decisions. They’re saved in a designated Storage Account, and the logs are structured as arrays under a flows key in each file.
⚠️ Important: NSG Flow Logs will be retired in 2027 and are being replaced by Virtual Network Flow Logs, which offer better performance and integration.
To view logs:
- Enable NSG Flow Logs via Network Watcher.
- Choose a Storage Account for saving logs.
- After some time, logs will appear in a new container in that storage account.
Some Tools Available in Network Watcher service
To open Network Watcher service, search for Network Watcher in Azure portal. It is not a resource that we have to create; but we can see resource that was autogenerated with each resource group.
Connection Monitor
To check network connection between machines. This can be either in Azure or on-premise systems.
Next Hop Utility
To see the next route for a data packet. To check if data is being routed to correct destination.
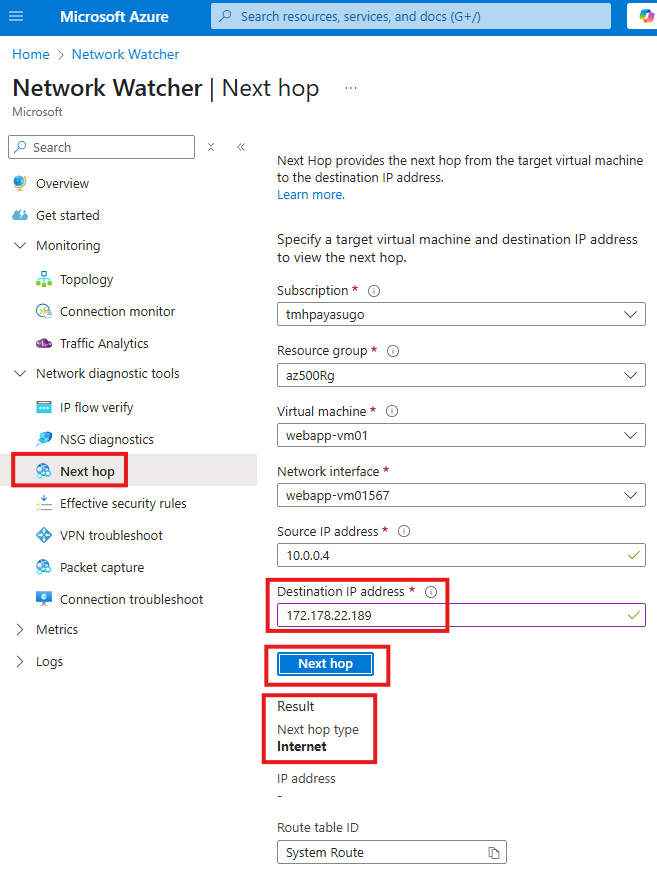
Here the result means that, if we are trying to access a web app hosted in a VM with public IP, next hop will be internet.
If we had an internal application that do not have a public IP, but only employees in an organization can access by VPN connection, the next hop will be the public IP of virtual network gateway.
IP Flow verify
Check if a packet is allowed or denied from or to a VM. If we packet is denied by a security group, we can see the rule denying the packet.
Connection troubleshoot
To check connection from VM to another VM or domain name or URI or IPv4 address
NSG Diagnostics
Gives details to debug and understand security configuration of a network.
Traffic Analysis
Log information of traffic flowing through NSG.
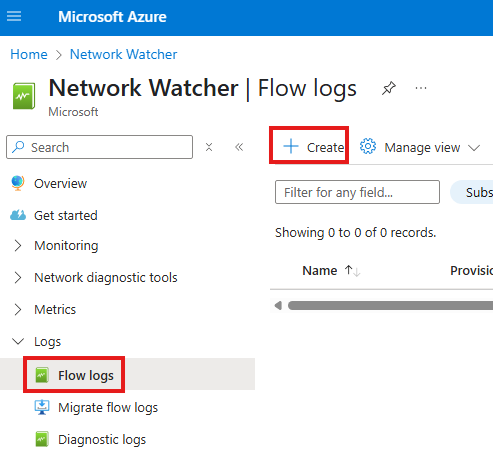
NSG Flow Logs
Provides visibility into user and application activity in cloud networks. Will be retired in 2027.
Will be replaced by : Virtual network flow logs
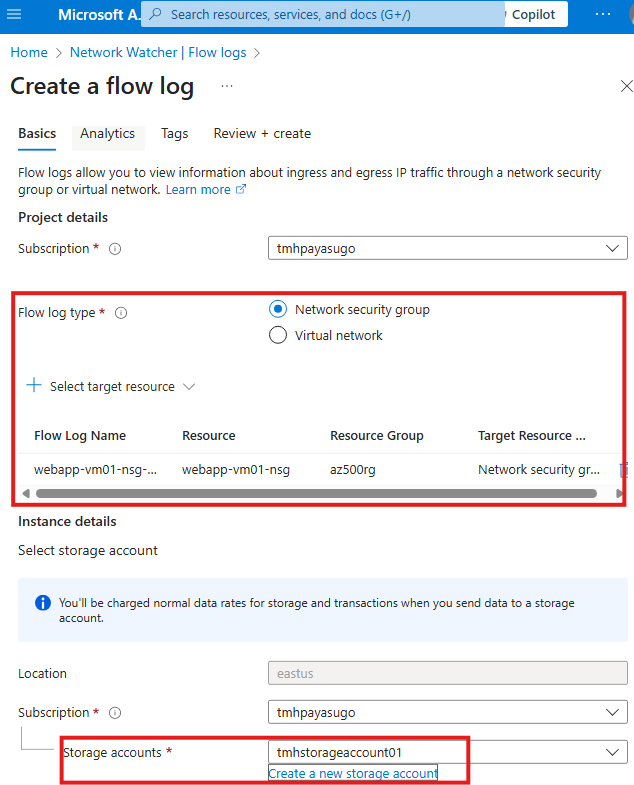
NSG Flow Log resource will be storing the logs in a storage account.
Enter details

Viewing flow logs
After some time a new container will be created in the storage account.
Flows will be stored as JSON file.
There will be a JSON array key called flows, in it there will be array of objects with details like IP addresses etc.
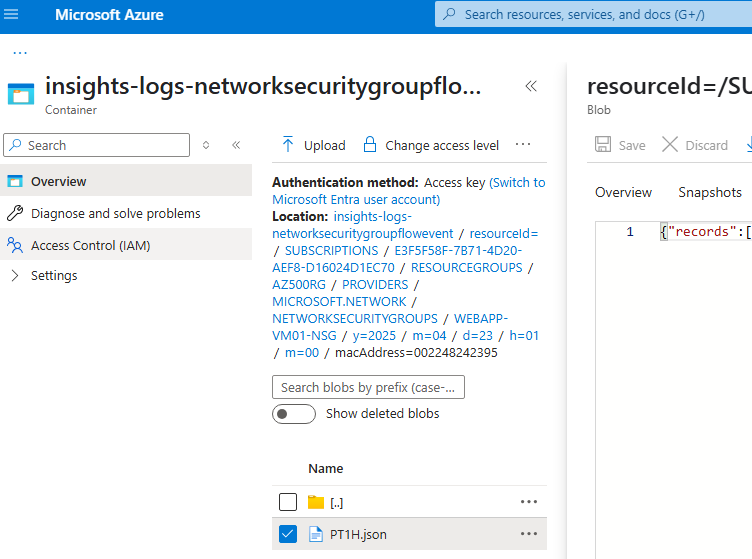
To view details about flow logs JSON keys, go to : NSG flow logs overview – Azure Network Watcher | Microsoft Learn
Section Summary
🌐 Building a Connected Cloud with Azure Virtual WAN
As organizations grow and spread across multiple sites and networks, managing secure connectivity becomes a challenge. Azure Virtual WAN (VWAN) offers a centralized solution to simplify and secure networking between Azure virtual networks, on-premise locations, and remote users—without needing separate gateways for each connection.
🤝 Unifying Virtual Networks with Virtual WAN
With Virtual WAN, you can connect multiple virtual networks in different regions through a central hub called a Virtual Hub. This replaces the need for traditional virtual network peering or separate virtual network gateways. For example, you can have two virtual machines (VMs)—one running a web app and another as a client—on different networks. After linking them through a Virtual Hub, they can securely communicate using private IPs, even though they’re on different networks.
🔐 Secure Remote Access via Point-to-Site VPN
Virtual WAN also supports Point-to-Site (P2S) VPNs, which allow employees to securely access internal resources (like a web app in a VM) from anywhere in the world—without exposing public IPs. Users authenticate using certificates, and once connected, they can access services as if they were on the internal company network.
🏢 Connecting Offices with Site-to-Site VPN
Beyond individuals, entire office networks can connect to Azure using Site-to-Site (S2S) VPN via Virtual WAN. This provides a secure and scalable way to link on-premise infrastructure to the Azure cloud, simplifying enterprise connectivity.
⚡️ Going Private with Azure ExpressRoute
For businesses needing dedicated, high-speed private connections, Azure supports ExpressRoute, which bypasses the public internet altogether. This offers a faster, more reliable connection to Azure services—including Microsoft 365 and Dynamics 365—by linking through Microsoft’s partner edge locations.
Why Azure Virtual WAN?
To setup a multi site networking. To a VWAN, we can connect:
1 – Azure Express route
2 – VPN connections
With VWAN, we don’t need to have separate virtual network gateway for each virtual network; Using VWAN we can connect multiple virtual networks; point-to-site and site-to-site VPN connections can be setup without setting up virtual network gateway for each virtual network.
3 – Virtual network peering
Virtual network peering using Virtual WAN
0 – Environment setup
Create 2 VMs; On separate virtual networks
1 – Windows server VM, hosting a web app
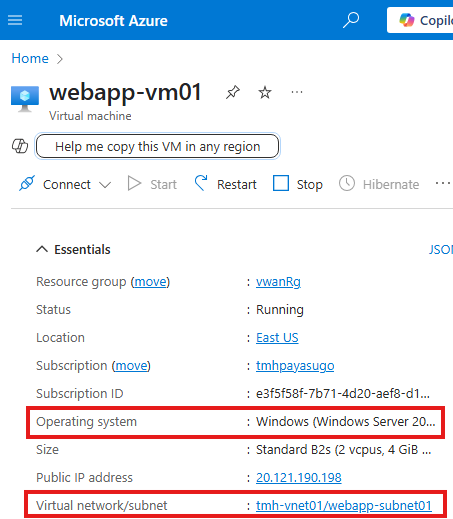
2 – Ubuntu VM to send request to web server VM
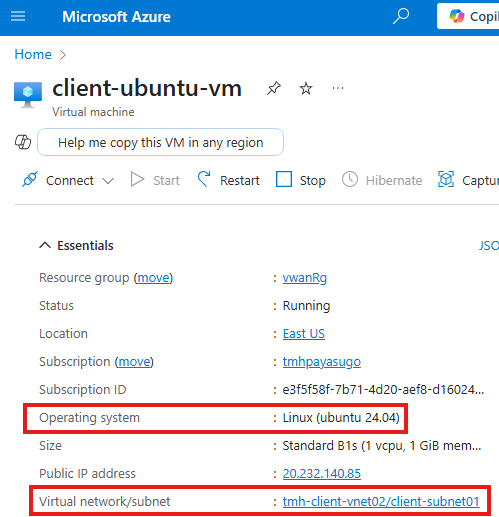
Currently, id client Ubuntu VM try to access web app using private IP of web server, it will be unreachable;

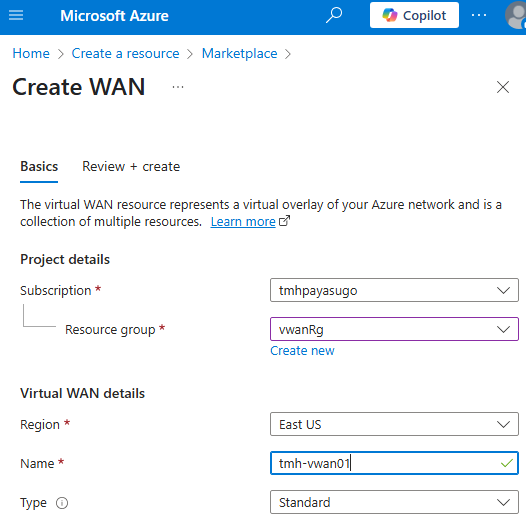
1 – Create VWAN
2 – Create Virtual HUB
VHub is created within VWAN, to connect various virtual networks.
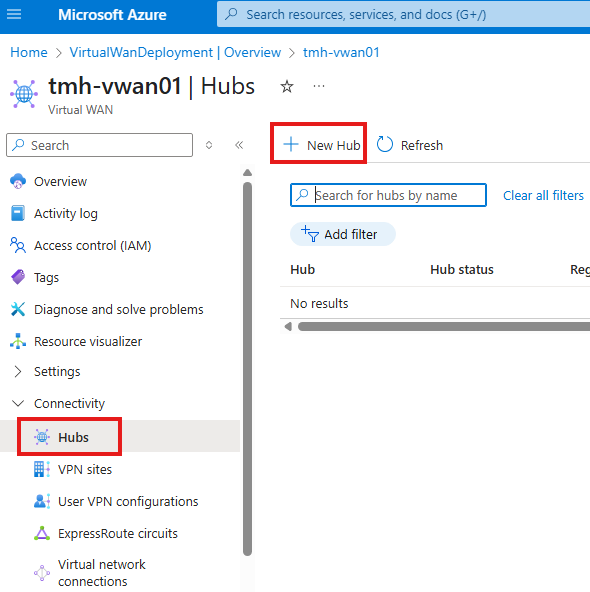
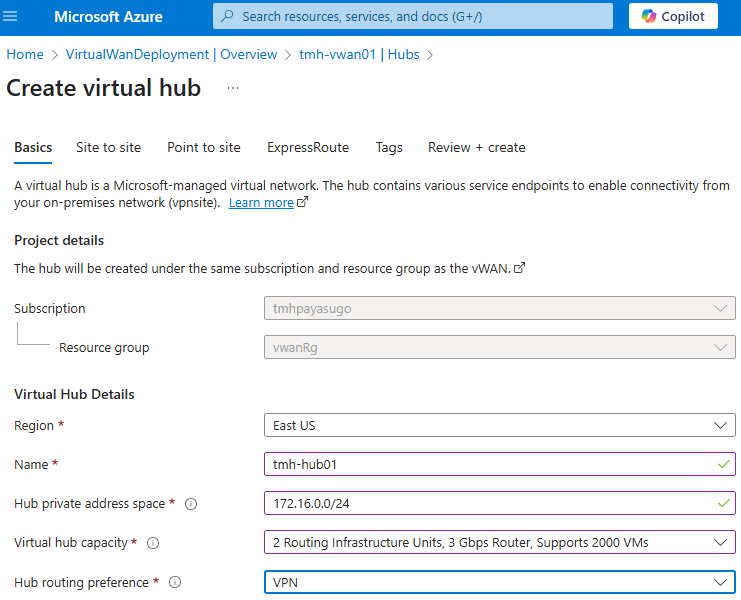
Create the hub; and we will see it under Hubs blade in virtual WAN resource:

3 – Connect virtual networks on to Virtual Hub
To add connections go to Virtual network connections blade:
1 – Add connection for each virtual networks that need to be peered
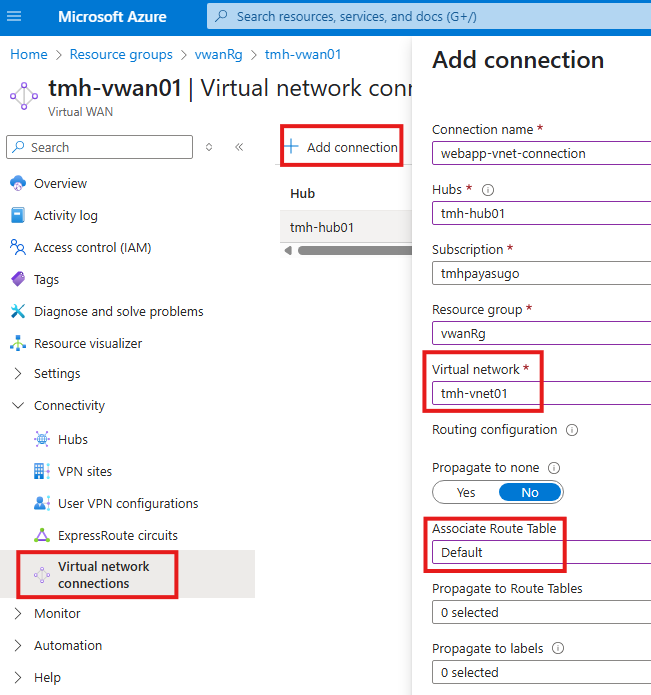
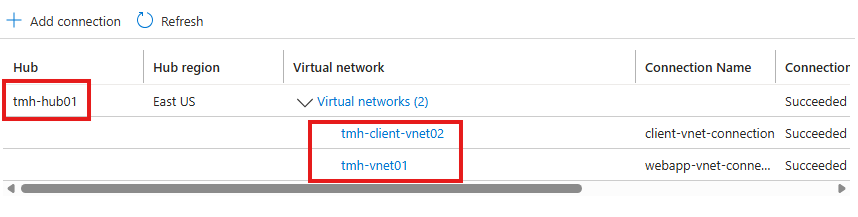
This will create a peering connection
Once we add 2 virtual network connections to hub, we will be able to access web app from Ubuntu client VM using private IP of web server, even though they are on separate virtual networks;
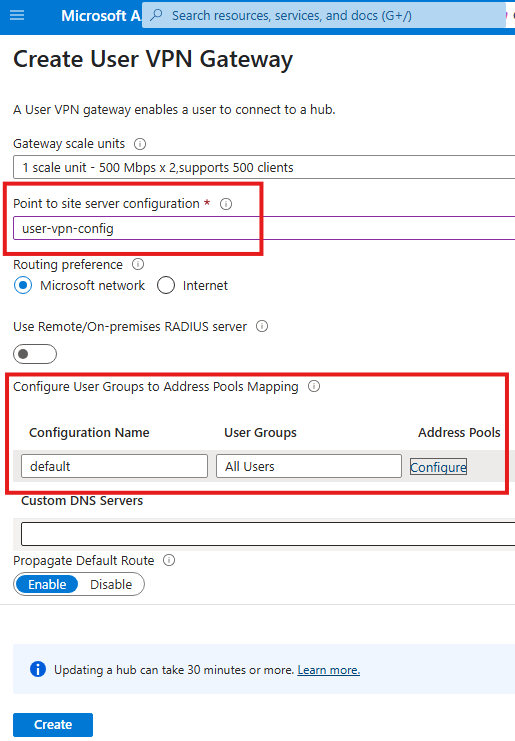
Point To Site Connection using Virtual WAN
Go to User VPN Configurations blade:
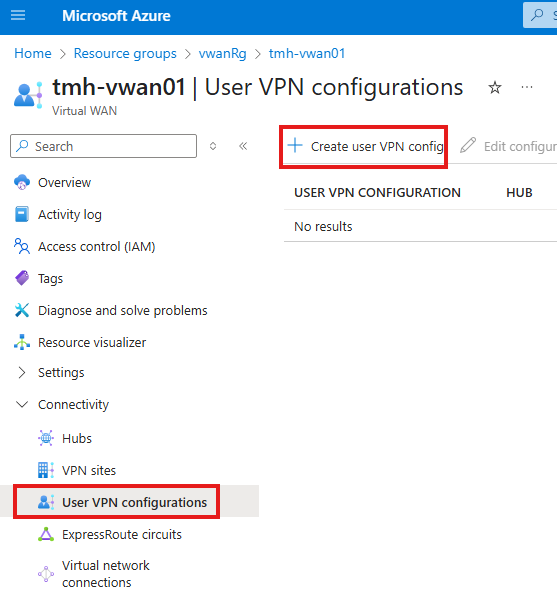
Create a new User VPN configuration:
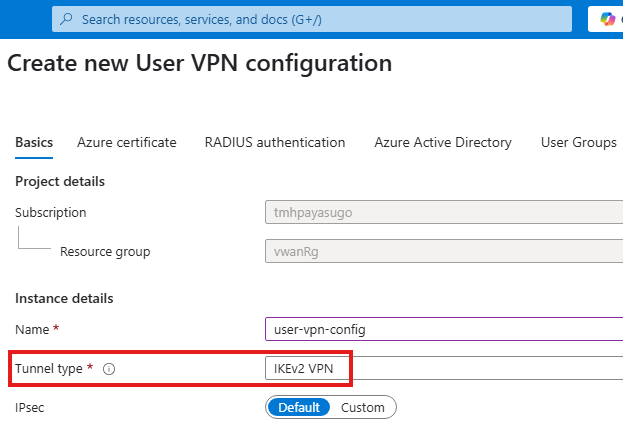
We will be using a self signed certificate for authentication:
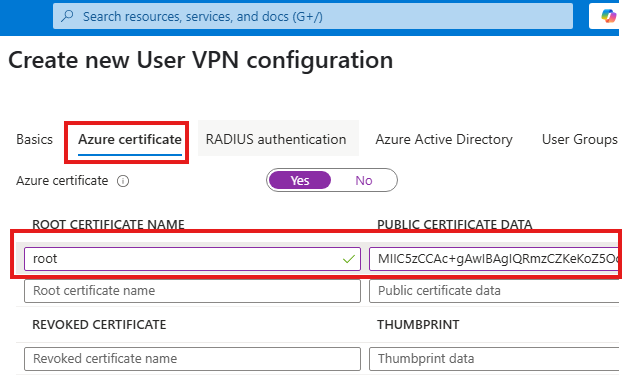
We can skip other authentication methods for now.
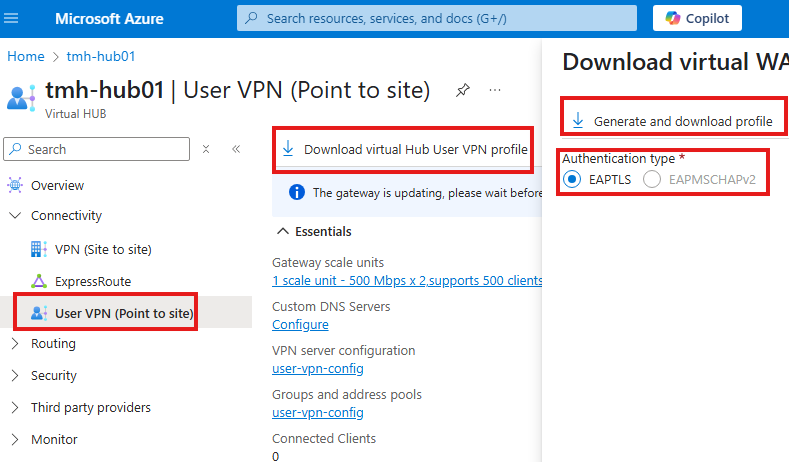
Once we have the configuration, we need to create User VPN Gateway
Go into hub in the virtual WAN,
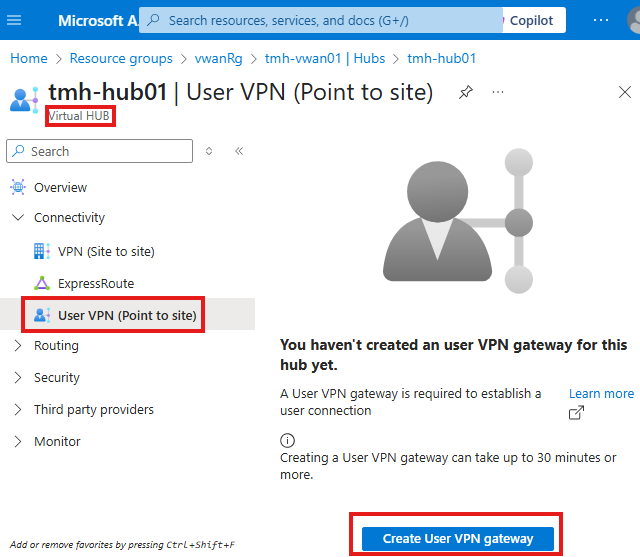
click on User VPN(Point to site) blade.
While creating User VPN gateway, select the VPN config and provide an IP address pool (IPs given to connected clients)
Once User VPN gateway is created, download the VPN profile:
After download and installation; we will see that in the VPN settings of the Windows 11 PC.
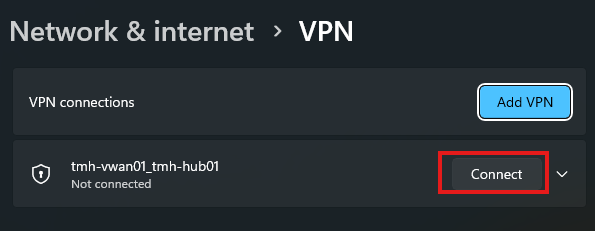
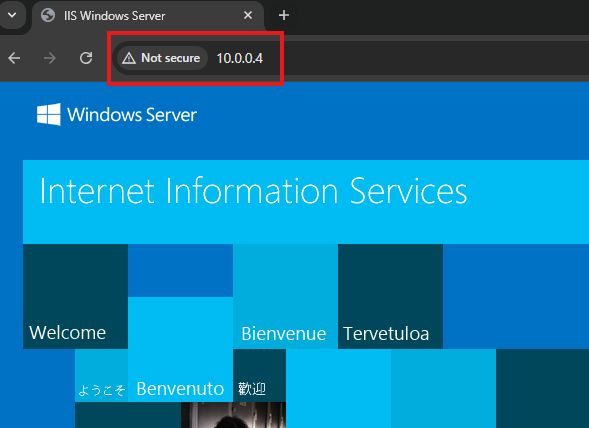
Click on connect.
Once connected, we will be able to access the webserver from the local computer using web server’s private IP.
Site To Site Connection using Virtual WAN
Refer: Tutorial: Create site-to-site connections using Virtual WAN – Azure Virtual WAN | Microsoft Learn
Azure Express Route
Need to have dedicated connection with ISP provider.
Similar to VPN where we create a secure tunnel from on-premise to Azure resource, but difference is express route is a private connection and not through internet.
Microsoft Apps can also be connected;
Company should have ISP connect their Partner edge location to Microsoft Edge.
Section Summary
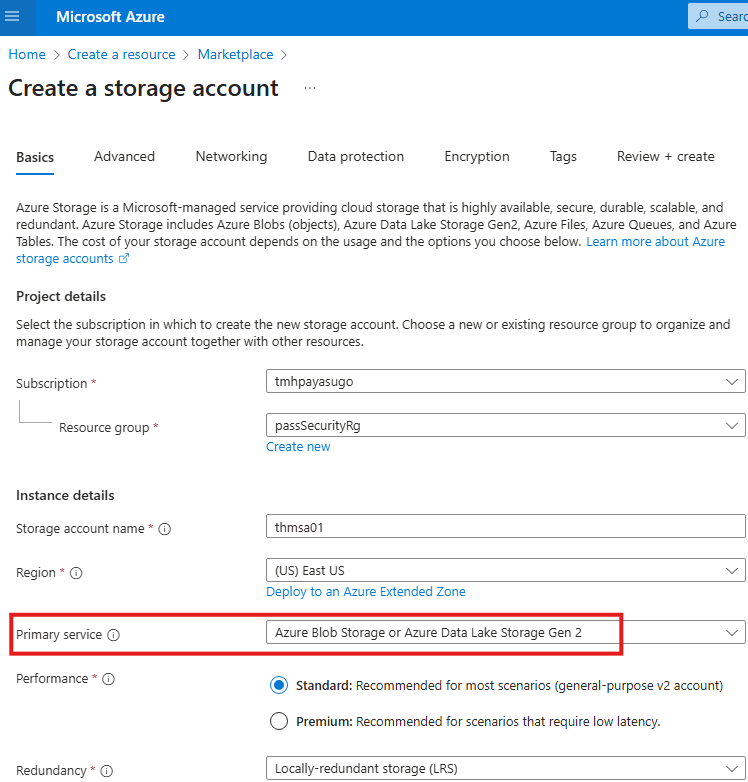
🗄 Understanding Azure Storage Options
Azure offers several types of storage services tailored for different needs:
- Blob Storage is ideal for storing unstructured data like videos, images, documents, and backups.
- Azure Files provides a shared file system accessible over SMB protocol—great for lift-and-shift applications.
- Queue Storage is used for storing messages that need to be processed asynchronously, perfect for decoupling components.
- Table Storage offers NoSQL-style key-value storage, which is fast and cost-effective for large datasets.
These services form the foundation for cloud-based applications, backups, data sharing, and distributed system communication.
🖥 Accessing Storage from Your Local Machine
To work with Azure Storage from your own computer, you can use Azure Storage Explorer, a graphical tool that connects to your storage account using its access key. This lets you upload, download, and manage files without logging into the Azure portal. However, connecting this way sends data over the public internet—which introduces potential security risks.
🔐 Securing Storage Access with Service Endpoints
To keep storage access secure, Azure allows you to use Service Endpoints, which enable communication with a storage account via the Azure backbone network instead of the public internet. This way, data travels securely within Microsoft’s infrastructure. You can further lock down access by configuring firewall rules in the storage account to only allow traffic from specific virtual networks and subnets.
🛰 Using a Jump Server for Secure VM Management
To reduce exposure, internal application VMs in Azure often don’t have a public IP. Instead, a Jump Server with a public IP acts as a secure gateway. You can remote into this jump server and then access your internal VMs from within the virtual network.
By applying a common NSG (Network Security Group) to the subnets, you can:
- Deny all inbound traffic by default
- Allow only specific traffic, such as RDP from your jump server to your application VM
This approach enhances security by limiting the surface exposed to the internet.
🧱 Enforcing Firewall Rules in Storage Accounts
By default, a storage account accepts connections from anywhere. You can harden security by allowing access only from subnets with a configured service endpoint. Once the service endpoint is active, you can go to the storage account’s firewall settings and whitelist only that subnet. This makes the storage account feel like part of your virtual network, even though it technically isn’t.
🛡 Advanced Security: Monitoring and Outbound Restrictions
To validate and monitor storage communication:
- Use Wireshark to inspect traffic and match Azure service IPs (downloadable from Microsoft’s public IP list).
- Configure NSG outbound rules to:
- Deny all other traffic
- Allow traffic only to Azure Storage, using the
Storageservice tag instead of hardcoded IPs (since Azure IPs are dynamic).
Azure Storage Options
1 – Blob Storage
To store unstructured data like; videos, images etc.
2 – Azure Files Storage
3 – Storage Queue
4 – Table storage
Locally Connect to Storage account
We can create a container and upload files to it.
To access the storage account contents from a local client computer, we can install : Azure storage explorer.
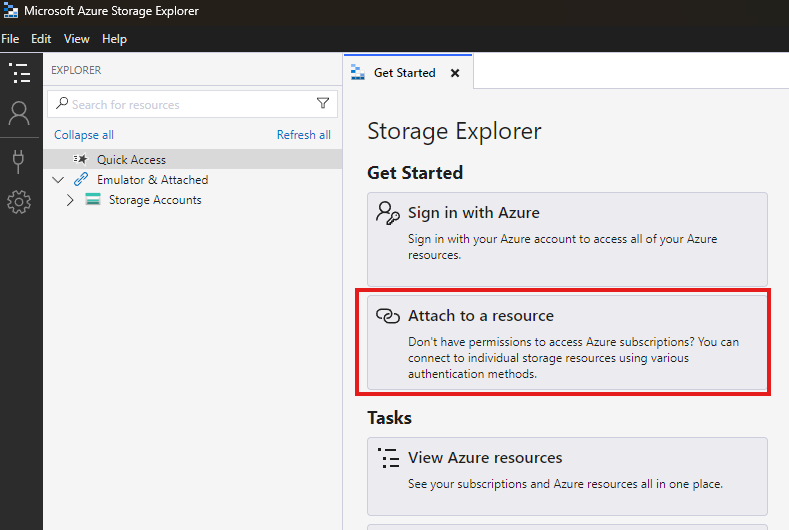
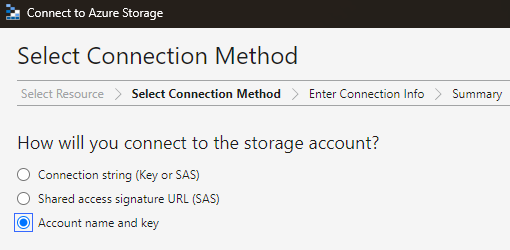
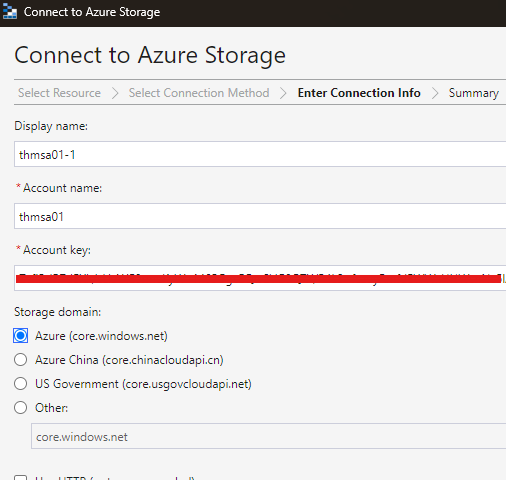
Here, we can connect to storage account without login in using Azure credentials. We do this using access key of the storage account.
Copy key from Access Keys blade (security + networking)
Connecting this way means that the connection requests and access to storage account will happen over public internet. To make it more secure, we need to user service endpoint.
Service Endpoint: To Access storage account from a virtual network
When we use a service endpoint, secure communication happens over Azure backbone network, not over public internet.
But, still the storage account will be accessible over public internet. To prevent this we can use firewall feature in storage account to deny access over public internet.
Jump Server
In Azure virtual network, if we have some VM servers that host internal applications, we don’t need to assign a public IP for them, to reduce attack surface area.
To remotely managed these VMs, we can have a separate jump server in same virtual network with a public IP.
Common NSG
We will be using a common NSG for both subnets in virtual network.
Step 1 : Create App VM
This is VM hosting internal application; We create this without a public IP and a NSG associated with its NIC.
Step 2 : Create Jump server VM
Now create VM for jump server:
This VM will have public IP, but NIC will not be associated with NSG
Step 3 : Create a new NSG and NSG rules
Associate the NSG with both subnets of the VMs.
1 – Add inbound security rule to deny all traffic
2 – Add NSG rule to allow RDP into jump VM
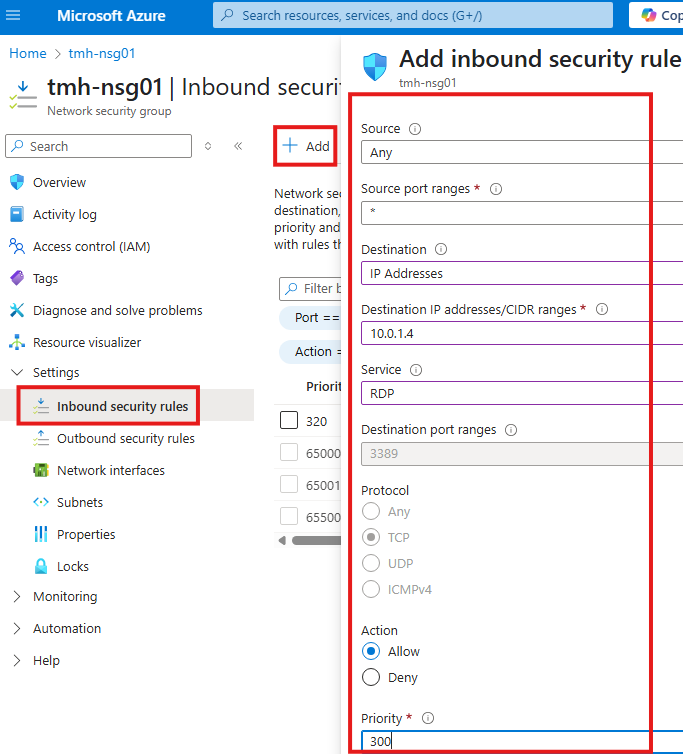
3 – Add NSG rule to allow RDP from jump VM to app VM

Connect to storage account using storage explorer tool, from app VM.
Same way we did from local computer.
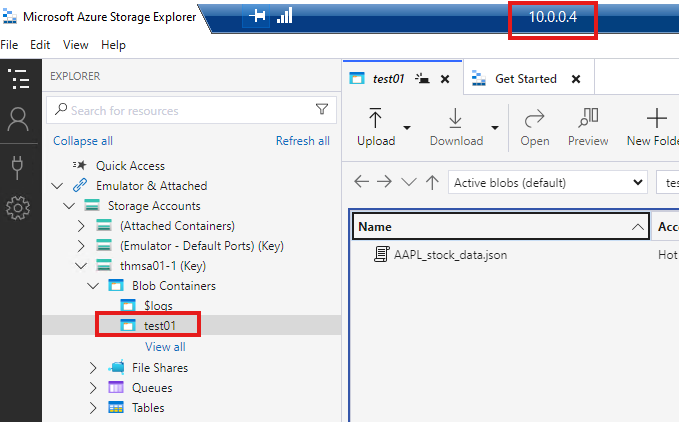
We will be able to connect to storage account and see the files.
Storage account firewall
There is a firewall service available as part of storage account; By default, it will allow connections from everywhere;
We can edit this, and have only connection from a subnet to the storage account.
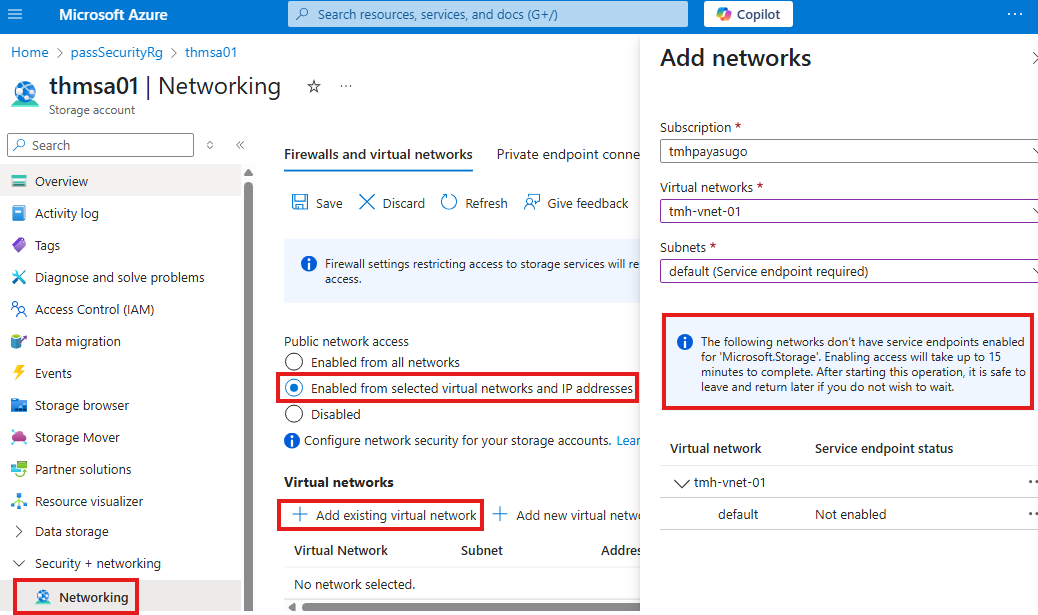
But, before doing this, we need to enable service endpoint for that subnet.
Creating service endpoint
To create service endpoint for a subnet, we need to go to virtual network resource > Service endpoints blade:
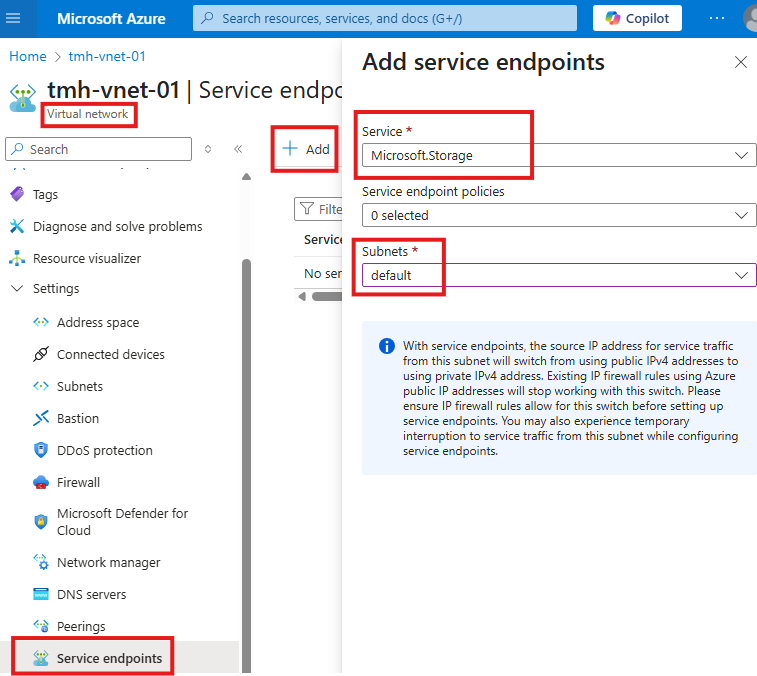
After adding service endpoint to the virtual network; We will be able add that subnet to the storage account firewall.
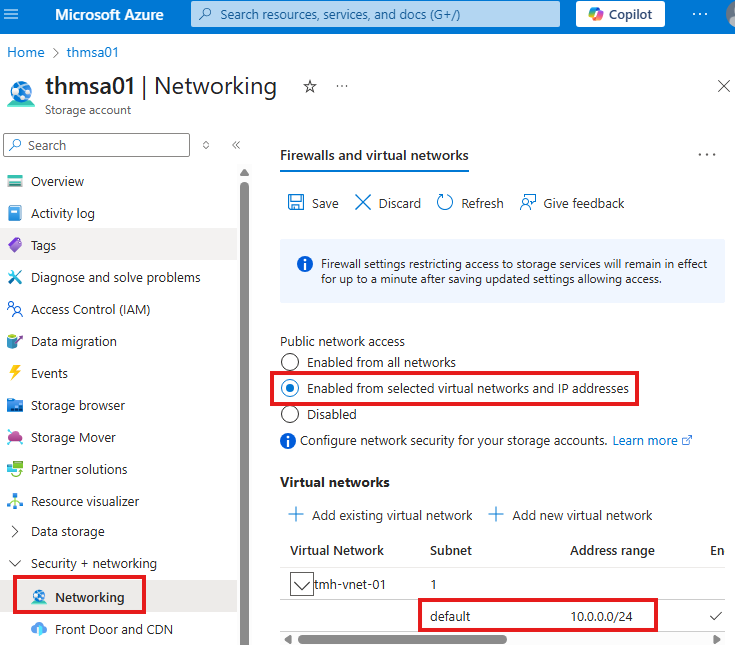
Now, the storage account can only be accessed from this subnet.
With these steps, storage account will act like it is part of the subnet, but actually, communication is happening over Azure backbone network.
Verify Connection using Wireshark
Download IP address ranges and service tags of Azure: Download Azure IP Ranges and Service Tags – Public Cloud from Official Microsoft Download Center
Azure uses certain IP address ranges for a service in a region; Try to check if any of those IP address is found in Wireshark logs.
Using NSG to allow access only to storage account
1 – Deny all outbound connections:
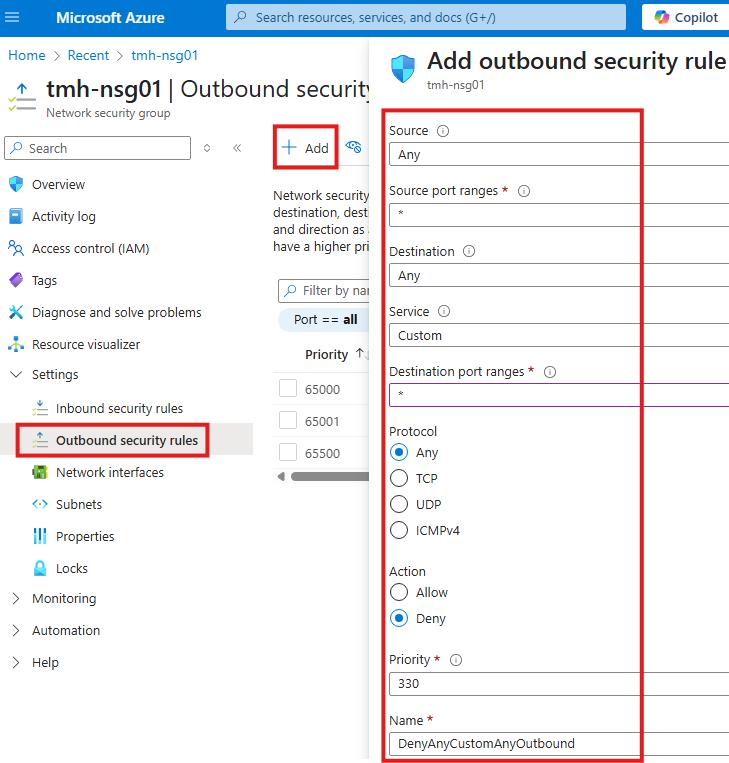
2 – Allow only outbound traffic to Azure storage account
We cannot put Azure public IP address in the rule, as they keep on changing.
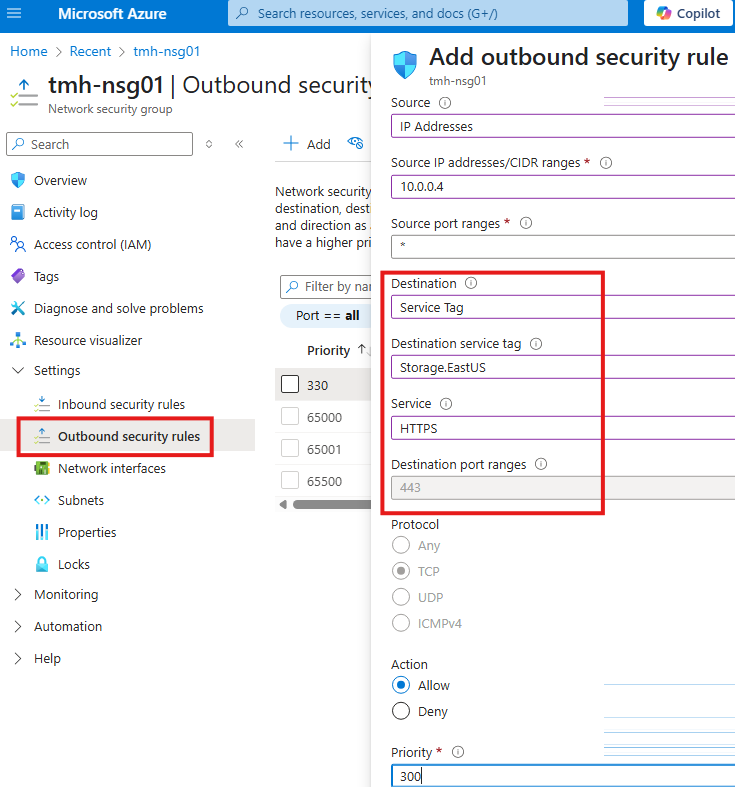
Here we target destination service tag of storage account for our region.
Section Summary
Secure Your Secrets with Azure Key Vault
In modern cloud applications, securely storing sensitive data like API keys, passwords, and connection strings is critical. Azure Key Vault helps you achieve this by allowing you to store and manage secrets in a centralized, secure manner.
Setting Up the Vault
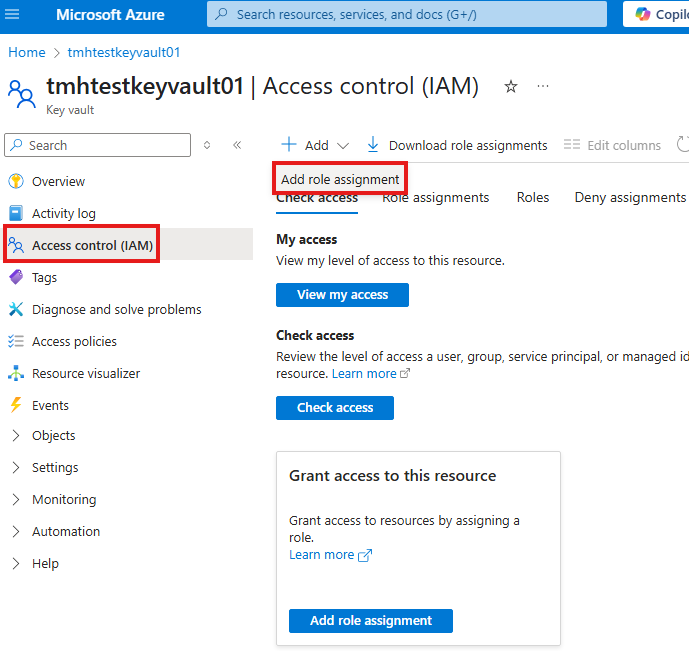
When creating a Key Vault in Azure, you’ll need to choose a permission model—either Access Policies or RBAC (Role-Based Access Control). Even global Azure administrators don’t automatically get access, so you’ll first assign yourself the Key Vault Administrator role. Once that’s done, you can start storing encryption keys, secrets, or certificates.
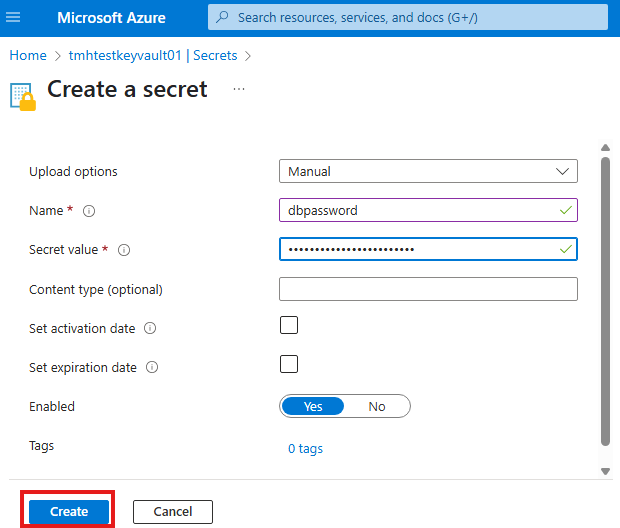
Storing and Accessing Secrets
For example, you might create a secret to store a database password. Applications can then securely retrieve this secret at runtime. To allow your Azure-based virtual machines or services to communicate with the vault, a Service Endpoint can be configured on the relevant subnet. This allows private, secure communication over the Azure backbone instead of the public internet.
Application Integration
To allow a .NET application to fetch secrets, you’ll register the app in Entra ID (Azure Active Directory) to give it a unique identity. You then create either an Access Policy or RBAC role assignment in Key Vault that grants this app permission to read secrets. Using libraries like Azure SDK for .NET, your app can securely authenticate using credentials like client ID, secret, and tenant ID, and then access secrets via the Key Vault URI.
RBAC: A Modern and Recommended Model
While Access Policies still work, RBAC is the preferred method because it allows finer control and integrates seamlessly with Azure’s broader role-based access system. For example, you can assign the Key Vault Secrets User role to allow an app to read secrets—nothing more, nothing less.
Managing Deletion and Recovery
Azure Key Vault offers soft delete functionality, meaning secrets aren’t immediately removed—they can be recovered if deleted accidentally. If purge protection is enabled, they can’t be permanently deleted until the retention period ends, adding a safeguard against mistakes. Additionally, Key Vault supports backup and restore, letting you download secrets offline and restore them when needed.
Why It Matters
By using Azure Key Vault, you add a strong layer of security to your cloud apps. It separates sensitive data from code, reduces your exposure to attacks, and ensures only the right identities have access—following the principle of least privilege.
Creating a secret in Key Vault
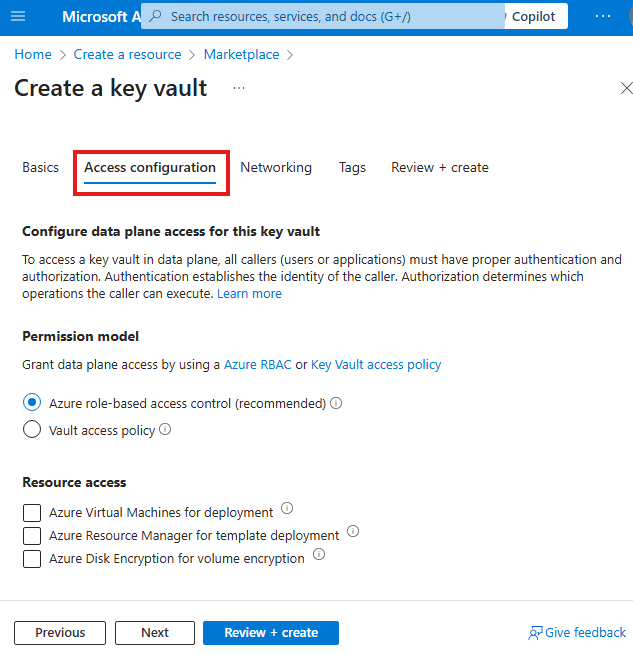
While creating the resource, we have to select a permission model.
First, we need to give our self Key Vault Admin role; even Azure admin don’t have access by default.
We can generate or import: Encryption keys, secrets and certificates
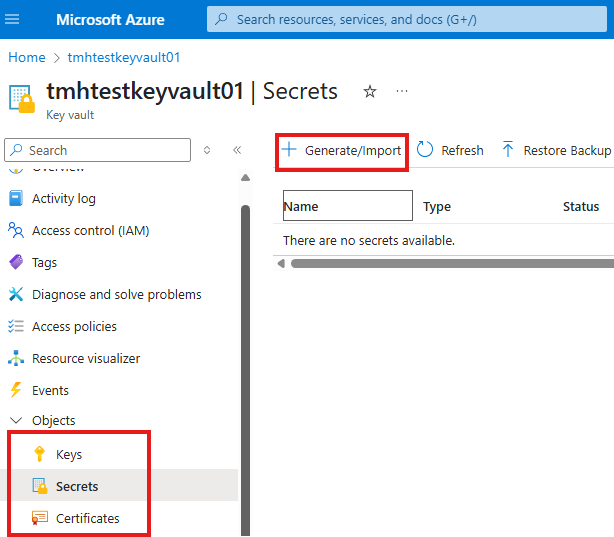
We can create a secret to store a database password.
Now, our apps can connect to key vault and securely fetch the value.
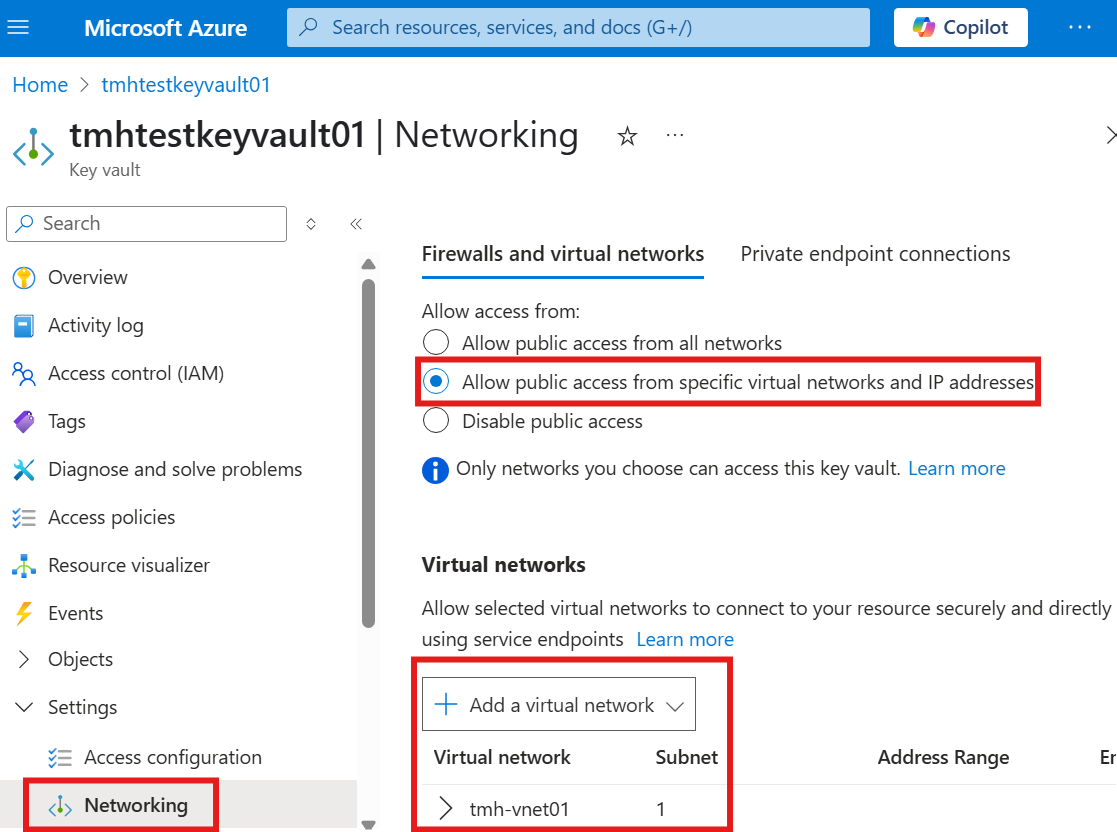
Service Endpoint for Key Vault
For Azure resources in a virtual network (IaaS), to communicate with key vault and access secrets in it, we need to create a service endpoint in virtual network.
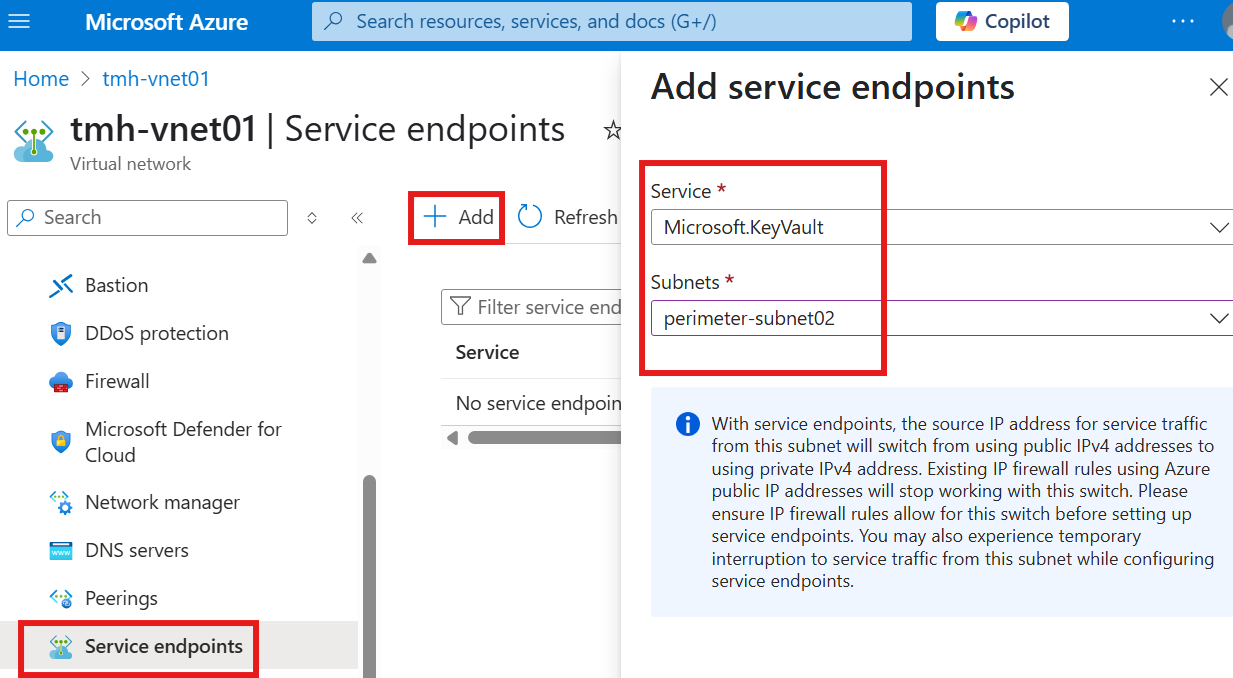
Add any subnet in the virtual network as service endpoint.
Now, we can add the virtual network, to allow access to key vault.
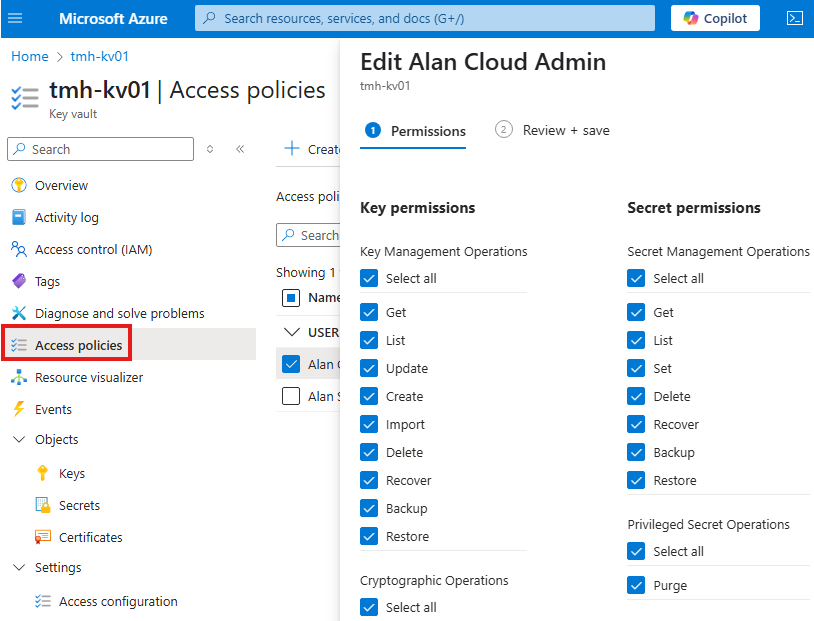
Key Vault Usage : Access Policy
If we select permission model as access policy, we can define policies on which security principal can do what in the key vault.
.NET Application fetching value from key vault
Go to Entra admin center and register an application object.
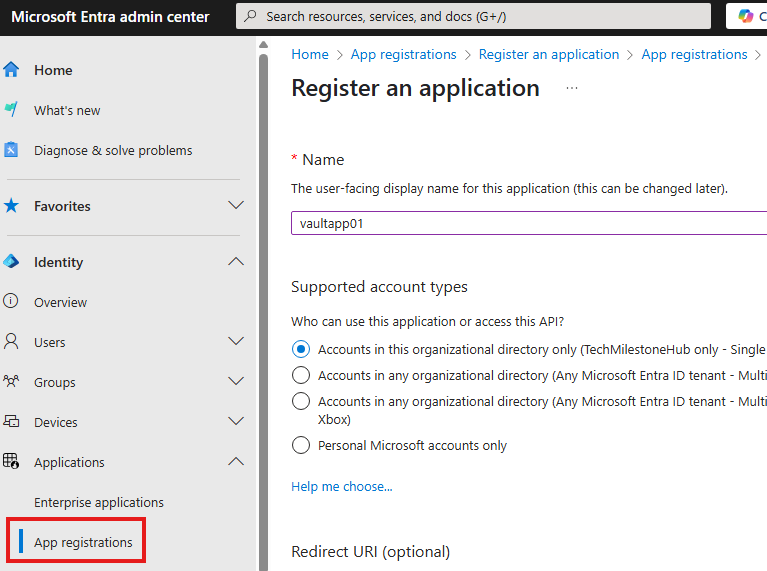
Now, the app has an identity in Entra ID. Now, we can give permission to this app object.
Now, in vault create an access policy for this application object.
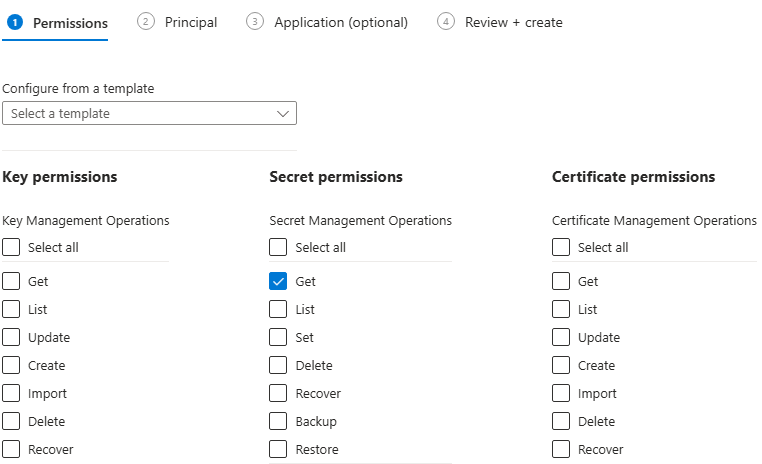
Our application will be only getting the value from vault.
Select the application object as security principal to apply the permissions:
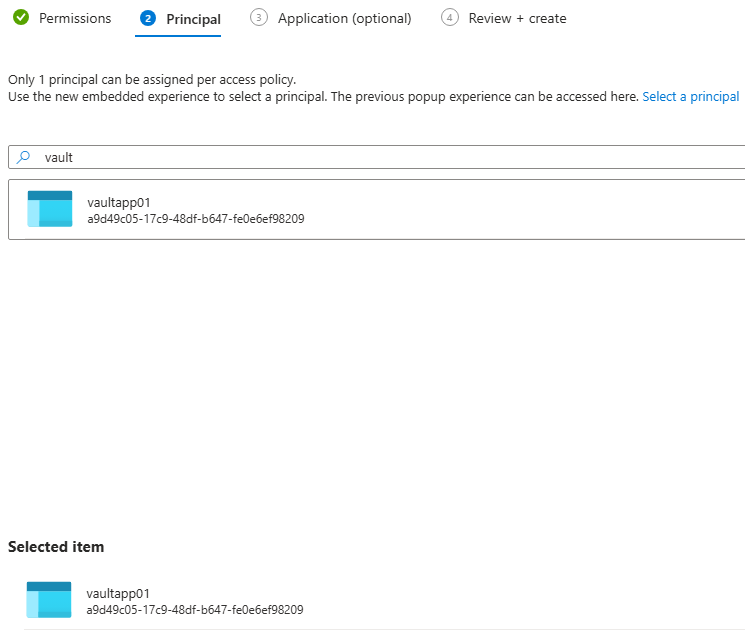
.NET Code Explanation
Download the code here:
ClientSecretCredential clientSecretCredential=new ClientSecretCredential(tenantId, clientId,clientSecret);ClientSecretCredential object is a token generated, to access the vault.
SecretClient secretClient=new SecretClient(new Uri(keyVaultURI),clientSecretCredential);SecretClient object will have the fetched secret.
We get : Client Id, Tenant Id, Client secret from the application object
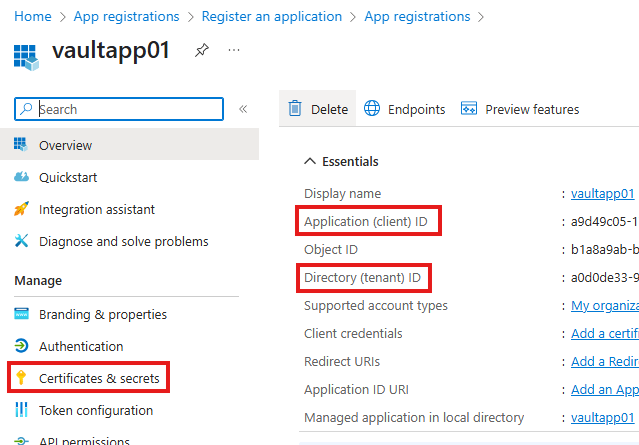
We may need to create a new client secret and copy the value.
Key Vault Usage : RBAC
We can switch the permission model using access configuration blade:
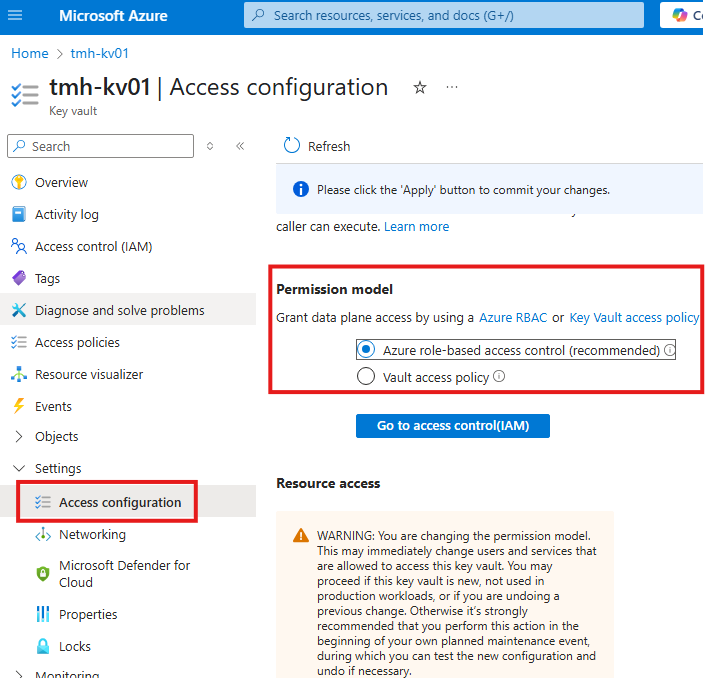
Now, we can have roles assignments in the key vault.
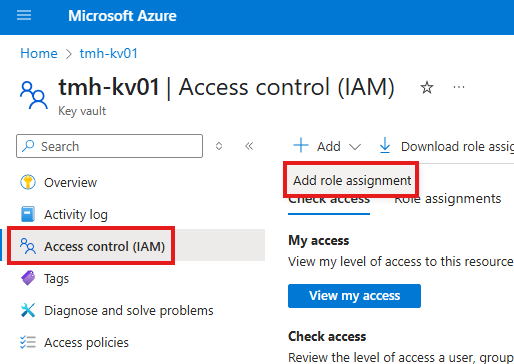
Add role of : Key vault secrets user, for just reading the secret from vault, to the application object.
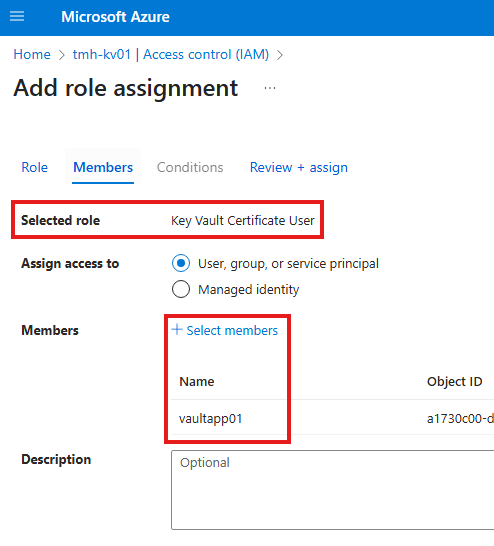
RBAC is the recommended approach.
Key Vault : Deletion And Recovery
If we delete an object from key vault, it is a soft delete. To permanently delete, we have to do it in 2 steps, first soft delete and then purge.
If purge protection is enabled, we cannot purge it till retention period is over.
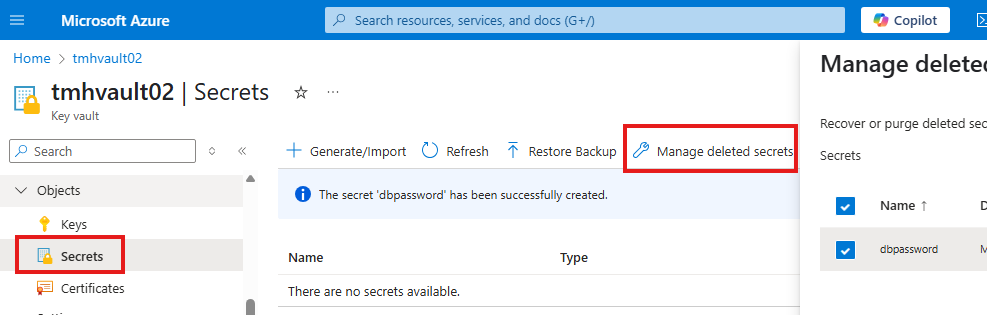
Key vault secret officer role will let us do managed deleted keys.
Azure key vault backup and restore
This is a service that provides an offline copy of secrets, incase we lose access to key vault.
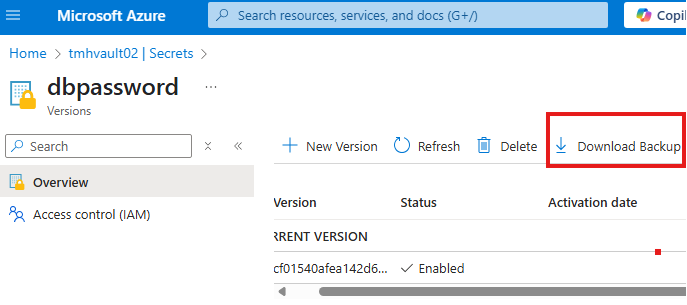
Here we can download offline copy and restore it.
Section Summary
Protecting Cloud Networks with Azure Firewall
In a modern cloud environment, securing internal applications and controlling access is a top priority. Azure Firewall is a cloud-native, intelligent network security service designed for just that. It helps filter both incoming and outgoing traffic and acts as a barrier between trusted and untrusted networks.
Azure Firewall SKUs: Choose What You Need
Azure offers two versions of its firewall service:
- Standard: Provides Layer 3 (network) and Layer 7 (application) filtering. It also uses Microsoft’s threat intelligence to block known malicious IPs.
- Premium: Adds advanced protection like signature-based intrusion detection and prevention (IDPS), which can recognize attack patterns and block them.
Managing at Scale with Azure Firewall Manager
For organizations using multiple subscriptions, Azure Firewall Manager simplifies management. You can create centralized firewall policies and apply them across environments, including both regular VNets and Virtual WAN hubs.
Building a Secure Hub-and-Spoke Network
To organize cloud networks like real-world offices, we use a hub-and-spoke model. Internal virtual networks (spokes) host applications or databases. A central hub network handles internet access, firewall inspection, and secure connections like VPN or Azure Bastion.
- Create Internal VM (Spoke): This VM simulates an internal server with no public IP and no NSG at the NIC level.
- Use Azure Bastion for Secure Access: Deploy Azure Bastion in the hub VNet to connect to internal VMs securely—without exposing them to the internet. Behind the scenes, Azure uses its own jump server to establish a session from your browser.
- Deploy Azure Firewall in the Hub: Add a special subnet (
AzureFirewallSubnet) and place the firewall there. It will inspect and control traffic going to or from the internet or between spokes.
Routing Internet Traffic Through the Firewall
To force outbound traffic from internal VMs to pass through the firewall:
- Create a route table.
- Add a rule directing internet-bound traffic (
0.0.0.0/0) to go through the firewall’s private IP. - Associate this route table with the subnet that hosts your internal VMs.
Now, unless allowed by the firewall, no internet traffic will go through.
Creating Firewall Rules
You control traffic with rules, grouped into rule collection groups. Azure Firewall processes rules in this order:
- DNAT (Destination NAT) Rules: Redirect external traffic to internal VMs (e.g., SSH via firewall).
- Network Rules: Allow or block traffic based on IP and port.
- Application Rules: Allow or block based on domain names (e.g., allow access to
www.microsoft.com).
Example:
- To allow browsing, create an application rule for HTTPS (port 443).
- To SSH into VM via firewall, create a DNAT rule that forwards firewall’s public IP on port 4000 to your VM’s internal IP on port 22.
Replacing Azure Bastion with DNAT
If you’d rather not pay for Azure Bastion, you can create DNAT rules. These allow you to connect to internal VMs using the firewall’s public IP, translating the traffic to the VM’s private address.
Adding On-Premise Access via VPN
To simulate on-premise access:
- Create another spoke VNet that represents an on-premise environment.
- In the hub network, add a VPN gateway and update peering settings to allow forwarded traffic and gateway access.
- Update routing so any traffic from on-premise destined for internal apps goes through the firewall’s private IP.
This ensures all cross-network communication is inspected and secured.
Azure Firewall
It is cloud native intelligent firewall.
Azure Firewall SKUs
SKU(Stock keeping unit), represents a purchasable product version in Azure.
There are 2 versions of firewall
1 – Standard
Does L3, L7 filtering
Has threat intelligence feed from Microsoft Cyber security
2 – Premium
Includes Signature based IDPS, detect attack based on certain patterns.
Azure Firewall Manager
Used to manage firewalls across multiple subscriptions.
Uses policies to apply firewall rules.
Azure Firewall Manager, supports firewall in both VNet and Virtual WAN(Secure Virtual Hub) environments.
Create A Firewall
Search for Firewall in Azure Portal.
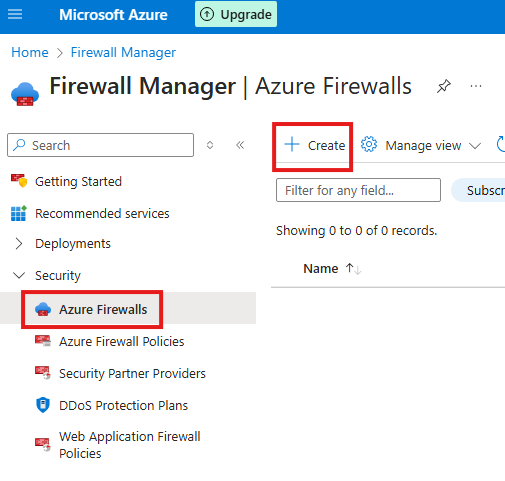
When we create a new firewall, it will be under Firewall Manager.
Hub and Spoke Design
1 – Create a private VM, on a separate virtual network(spoke)
Create an Ubuntu VM without NSG and public IP, to represent an internal VM in a organization.
2 – Adding Azure Bastion to hub virtual network
A service that can connect us to VMs without public IP.
Behind the scene, Azure is using a Jump server to access the private VMs.
So bastion need these resources and also it will have a public IP address, so there will cost for this service.
Create a virtual network, with Azure bastion subnet:
Create a virtual network and add a bastion subnet.
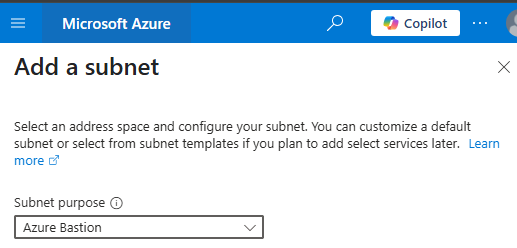
Select subnet purpose as Azure Bastion
Create a peering between hub virtual network and spoke virtual network
Create virtual network peering from hub virtual network to spoke virtual network.
Create Azure bastion resource
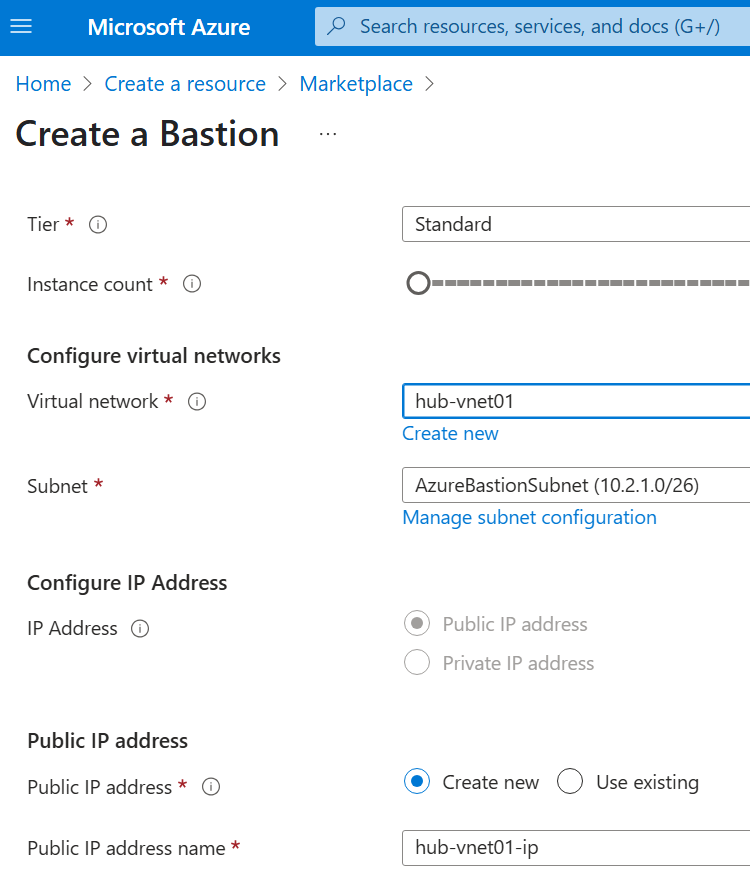
While creating bastion resource, we need to select the virtual network with bastion subnet, we created earlier.
Connect VM using Bastion
Now go to VM and connect VM using bastion.
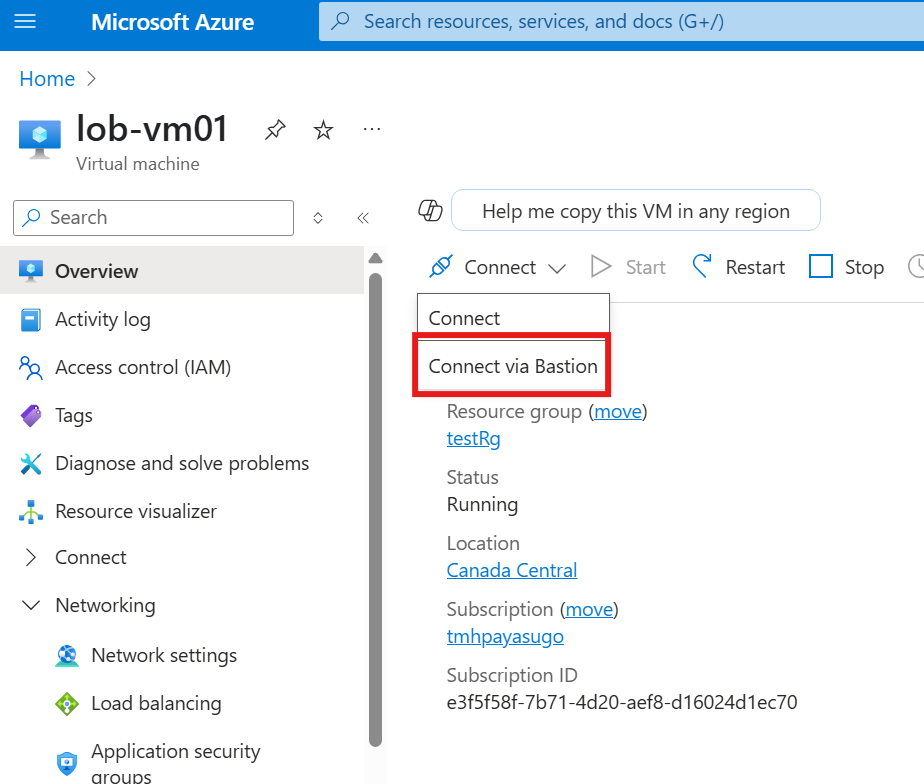
VM will detect that, there is a peering connection from its own virtual network to another virtual network(hub) with a bastion subnet.
Now, we will be able to access VM via browser.
3 – Adding Firewall to hub virtual network
Add a Firewall subnet to hub
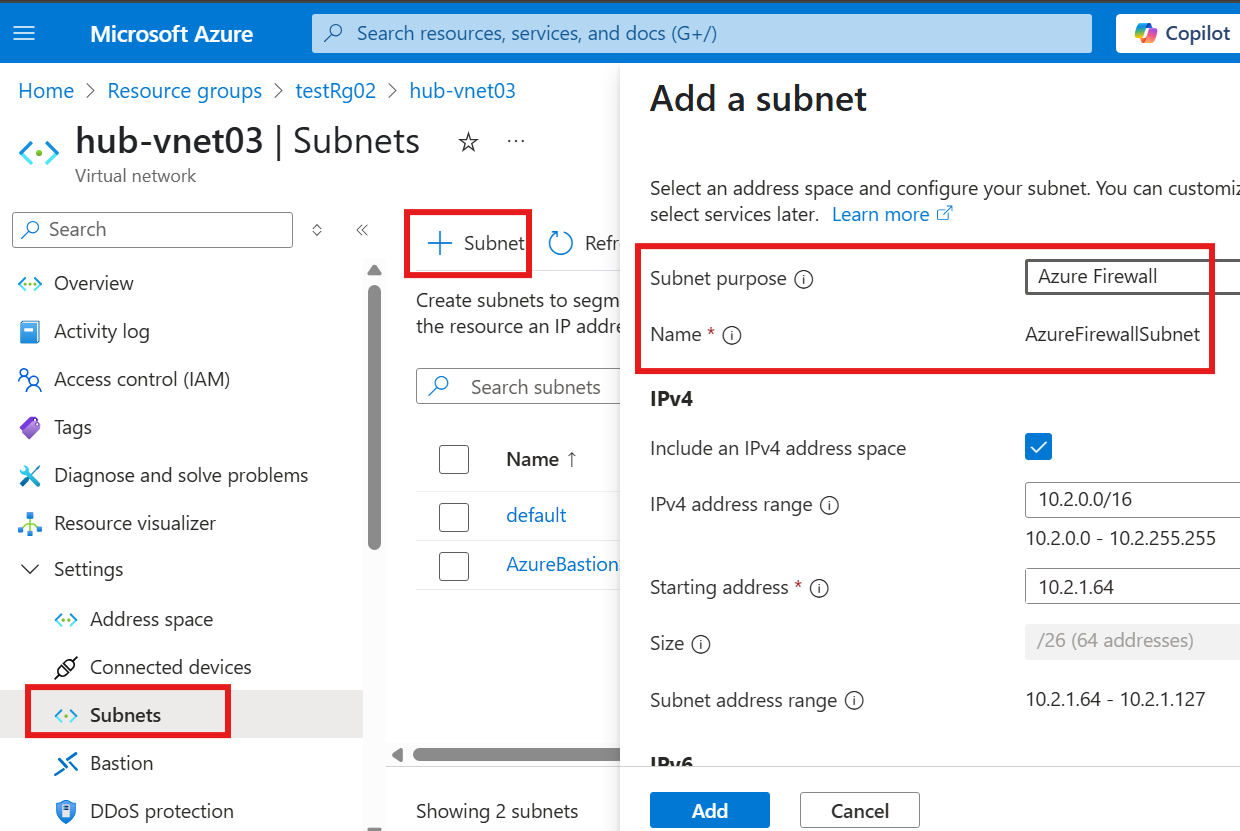
Add the subnet.
Create firewall resource
From marketplace, select firewall from Microsoft.
There is cost for firewall and policy as well.
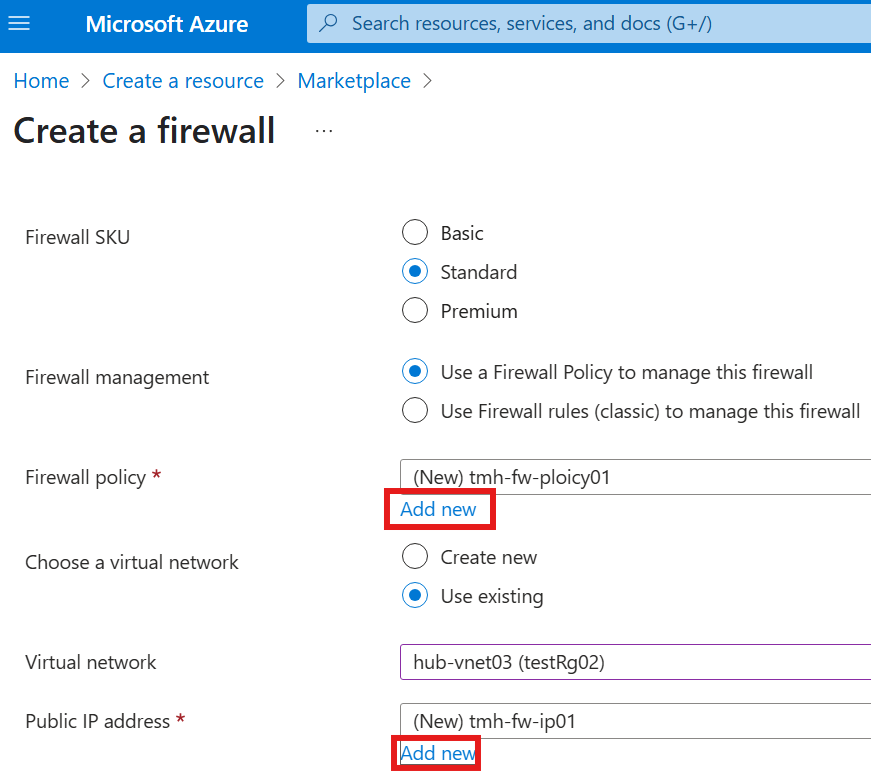
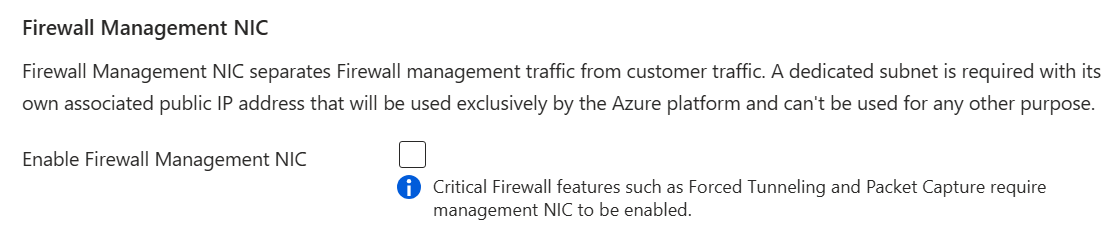
We don’t need to enable Firewall management NIC and forced tunneling
4 – Create route table
No any outbound traffic to internet from spoke network, should go through firewall in hub network. To accomplish this we need to create a route table resource.
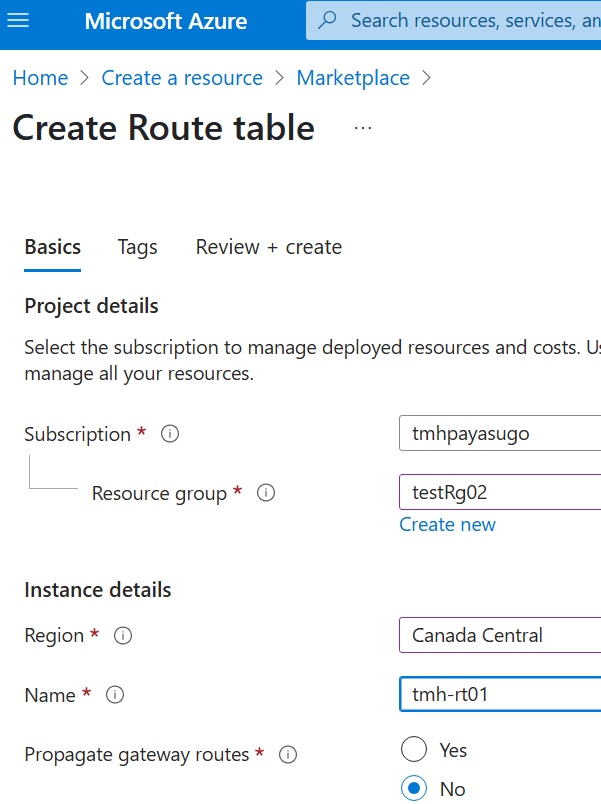
Add a route in the route table.
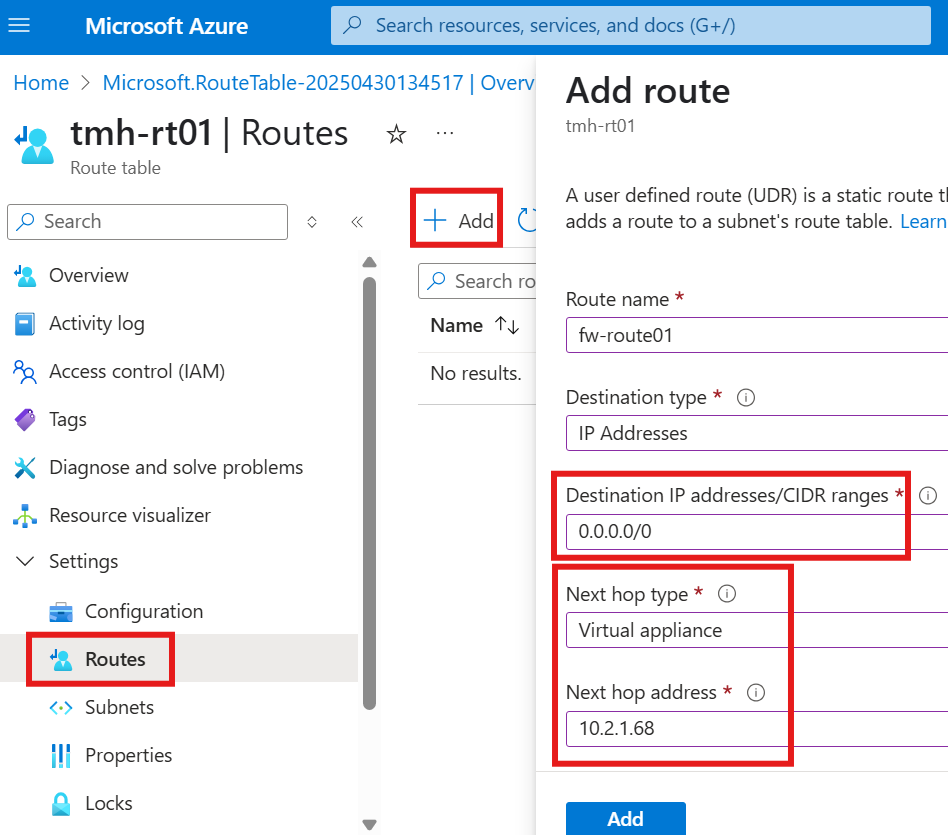
Create a route so that all traffic destined for internet (0.0.0.0/0), will go though firewall. Provide the private IP of firewall as next hop address.
Now, in the subnets blade of the route table resource, associate the subnet for which the routes will be applicable.
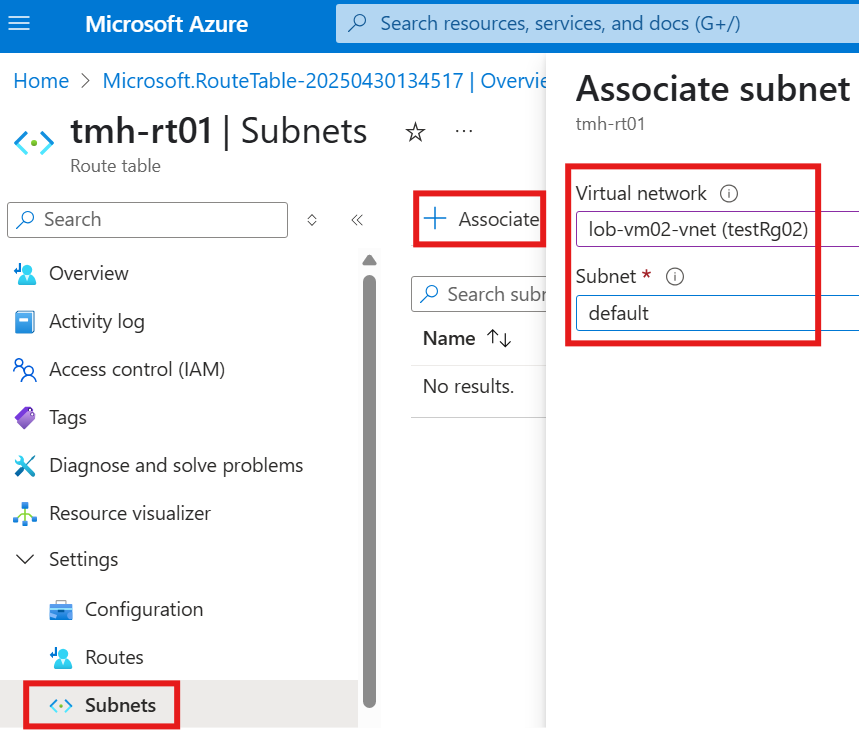
Here associate subnet of internal VMs of organisation.

Now, request from the VM to internet will fail.
5 – Firewall rules
To allow traffic via firewall appliance, we need to create rules.
There are groups (collections) of rules. There are 3 types of collections:
1 – DNAT rules
2 – Network rules
3 – Application rules
This is the order of priority for processing of rules.
To allow outbound traffic to any website, we need to create application rule.
To allow inbound connection to VM, we need to create DNAT rule.
Create firewall rules
To create rules, we need to do that on the firewall policy.
From firewall resource, go to Firewall Manager blade (settings)
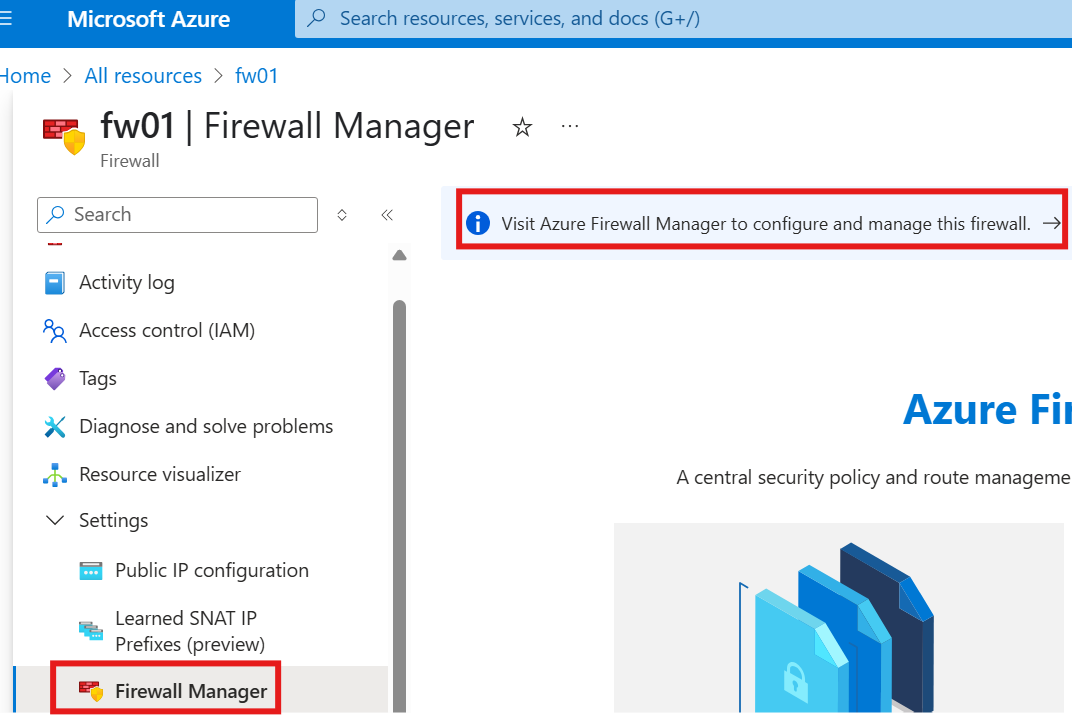
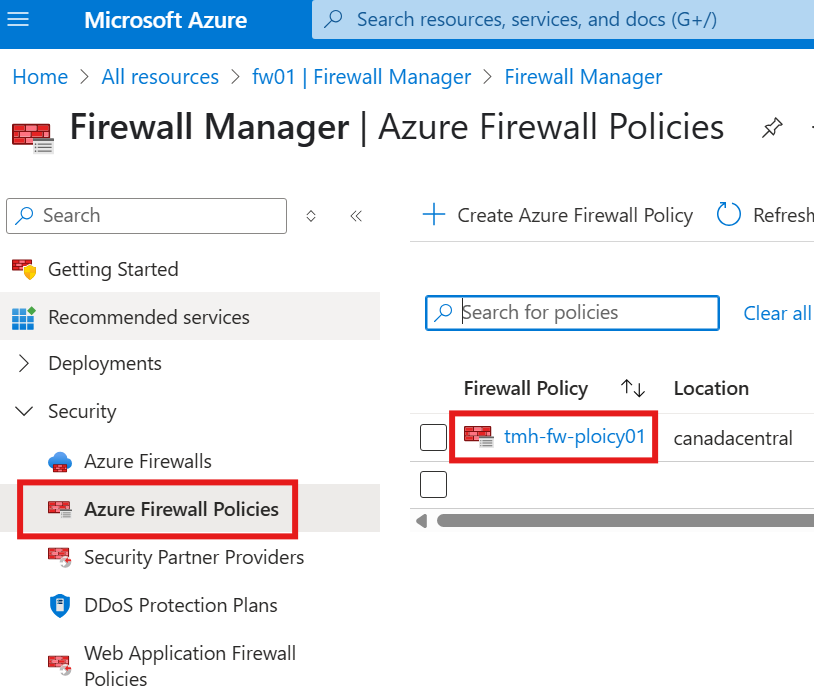
From firewall manager, go to Azure Firewall policies blade, to edit existing policy
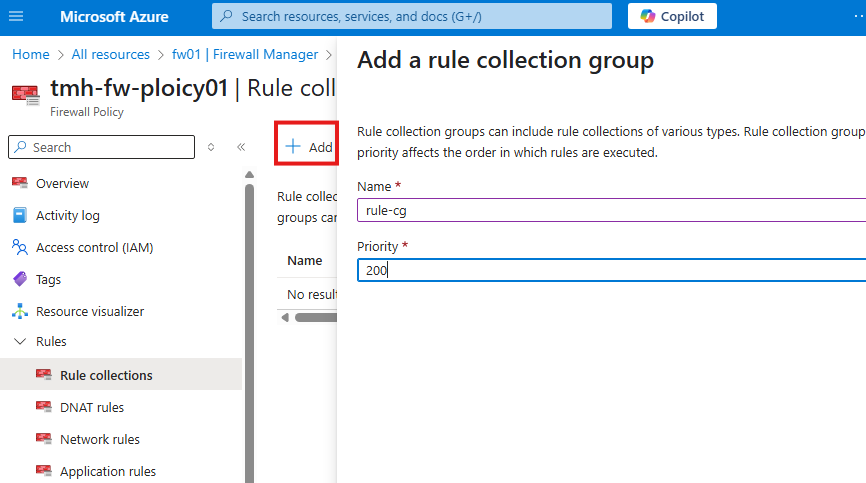
Here we add a rule collection group.
When we create different type of rules like App rules, DNAT rules etc., we can add them to this collection group.
Application rule
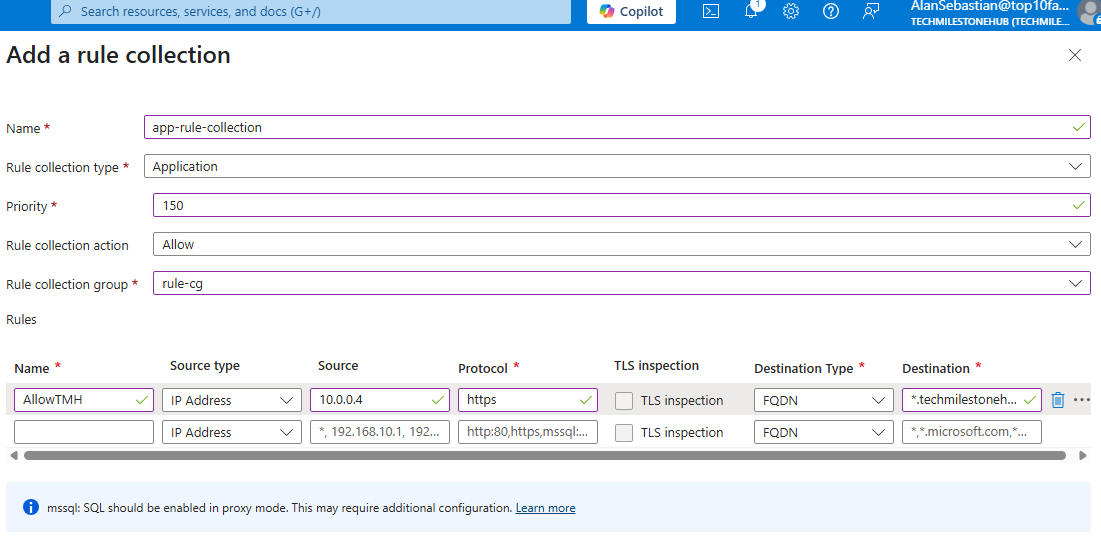
Add a rule allow https connection to the website, from private IP of VM.
DNAT rule
We can create a DNAT rule to allow connections to VM using public IP of firewall, so that we don’t have to use Azure Bastion service to connect to our private VM.
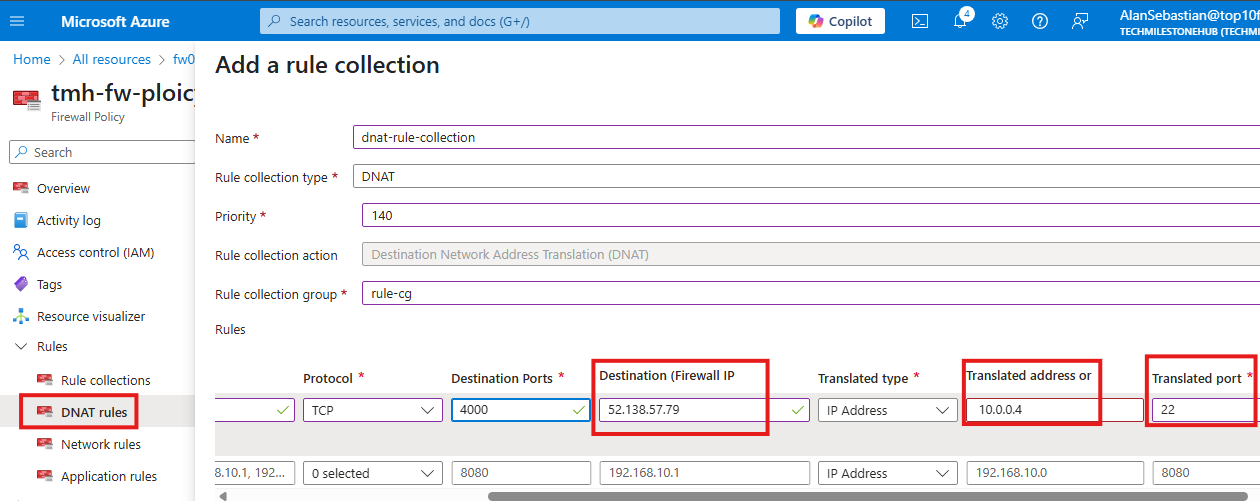
Add DNAT rule so that TCP request to port 4000 of firewall’s public IP, will get translated to private IP of VM
Once rule is added, we can send a SSH request to port 4000 of firewall’s public IP address.
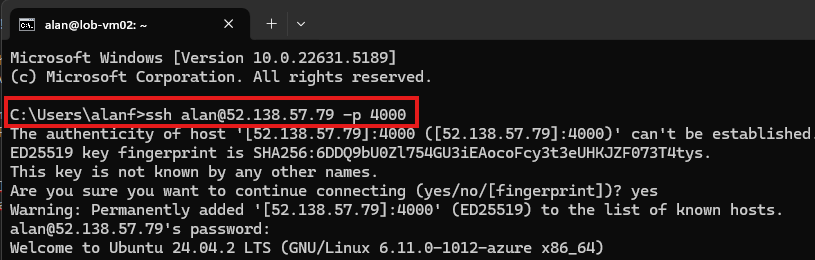
This will translate the request to private VM, and we will be able to connect.
6 – Adding another spoke network (on-premise) to connect via VPN
In organizations, user should be able to access internal applications hosted in internal VMs.
Internal webserver is on virtual network, and users will be on separate on-premise network.
These are soke networks.
In the hub network, we have firewall appliance, Azure bastion etc. , here is where we can have virtual network gateway for VPN connection.
Change peering settings
For that we need to change peering settings of the hub network.

Add route
Any request to webserver VM’s(internal VM) subnet should have next hop address of firewall’s private IP.
This route should be attached to subnet of virtual network gateway. This means, this route will be applicable to any traffic originating from this subnet(source).
More settings …