Giving A User access to resource in Azure portal
Azure AD (Entra ID) is identity solution for azure portal(for resources) and also for Microsoft 365 Applications
A normal user will not have access to create or manage a resource in Azure portal.
To give a user access to a resource we use RBAC(Role-based access control).
Create a simple resource in Azure for testing
To create a resource in Azure even for a Global Admin with E5 license, we need to have a Azure subscription, either free trial or pay-as-you go
We will be creating a storage account resource for testing.
Give user access to resource
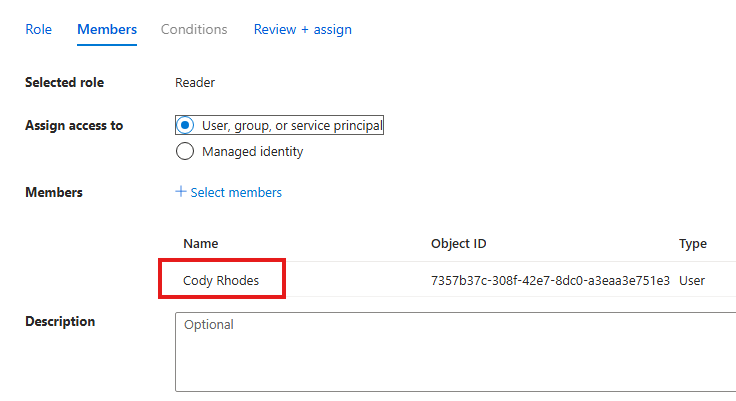
To give Reader access to a storage account.
Go to the Resource > Access Control (IAM)
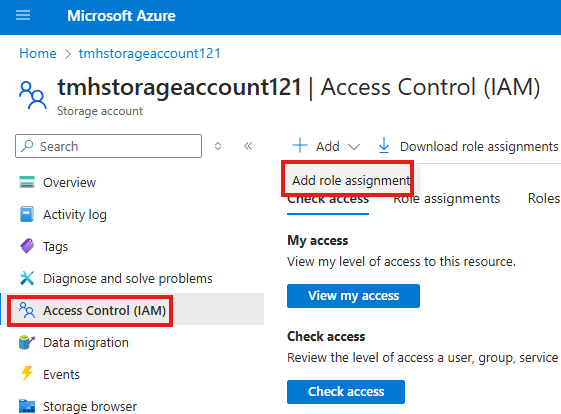
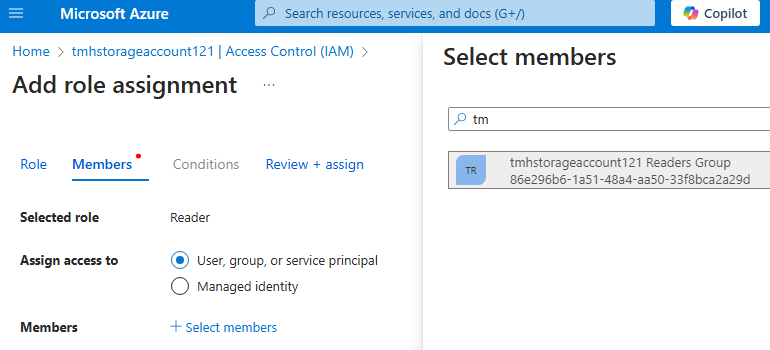
Add Role Assignment, and choose Reader role.
In the assignment tab, select user or group(recommended) to assign the role to:
After we create this Access control, if any user in this group login to Azure portal, they can see and will have reader access to this resource. Other users will not see this resource.
Azure AD Roles
These are roles used to carry out activities in Azure AD only, like create user, create group, create application and more.
Azure AD Roles v/s RBAC Roles
RBAC Roles are used to give users access to resources in Azure.
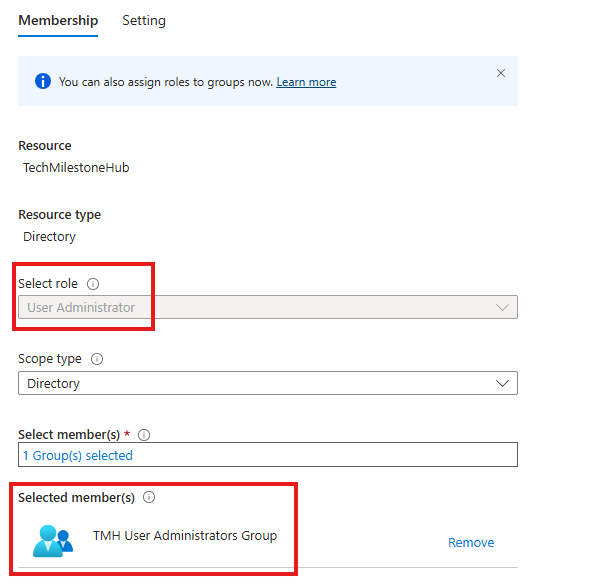
Assign an Azure AD Role
Here will be assigning a User Administrator role to a user.
User Administrator, is required to create and manage users in Azure AD.
Login to MS Entra Admin Center as Global Admin
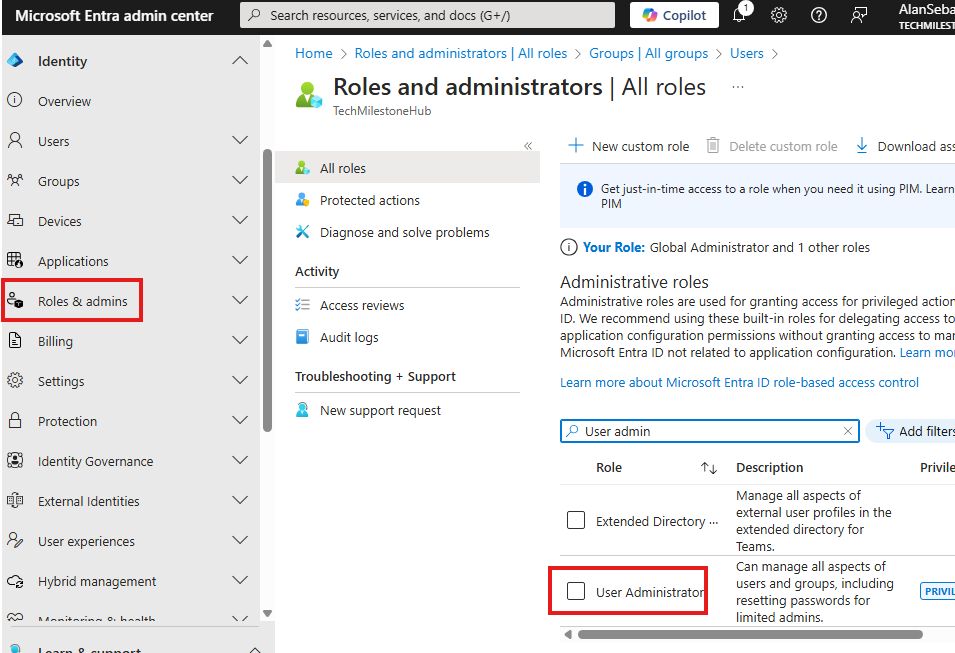
Double click on the role and now we can assign this role to a group or users.
As best practice we have to assign roles to a group. If we have to assign an Entra ID(Azure AD) role to a group, we have to do something while creating the group.
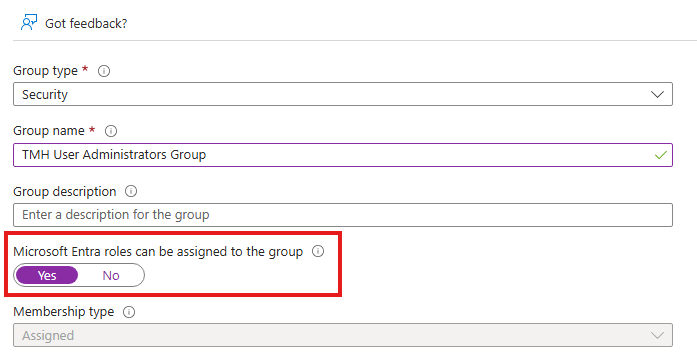
Now, when the group is created we can assign the User Administrator Azure AD role to this group.
Assignment can be either: Eligible or Active
Users in this group can manage users and roles in Azure AD.
External Identities And Licenses
Companies sometimes don’t want some temporary users as part of their domain.
For example some contractors or auditors that need some limited access to company resources.
Azure AD Premium P2, now Microsoft Entra ID P2, is included with Microsoft 365 E5 and offers advanced identity protection and privileged identity management features
Create External User
When we create a user in MS Entra Admin Center, choose: Invite External User.
User will get an email invitation and when link.
We can also bulk invite users.
Redirection URL : When the external user sign in for first time this is where they will be redirected to. By default it is : myapplications.microsoft.com
We can also bulk invite user by downloading a template file.
Prerequisites
1 – Add and verify a custom domain in Azure AD (Entra ID)
2 – For a user to do Azure AD Connect configuration on-premise, they should have Global Administrator role.
3 – A tool called IdFix is used to identify any issues with on-premise user accounts for syncing.
4 – Azure AD Connect should be installed on a domain joined windows server.
5 – For express settings we need to have an enterprise account
What we will do

Setup DC
We will be installing Azure AD connect in a separate domain joined server.
1 – Create a Windows server VM in Azure and promote it as Domain controller.
2 – Add a user and make them member of Enterprise and Domain Admins
3- DNS of virtual network should be IP of DC
Setup Another Server For AD Connect
Create another VM and join the VM to domain.
Install Azure AD Connect and once installation is complete it will sync the on premise user to cloud AD.
Enable Pass-Through Authentication
When on-premise user try to sign in, their credential should pass through on-premise AD first, to ensure on-premise security policies are implemented first.
Open AD Connect > Configure > Change User sign-in
Choose Pass-through authentication and click Next:
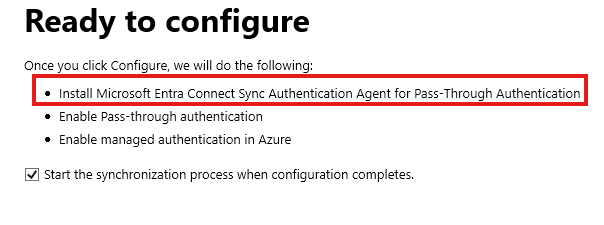
It will install an agent and enable pass-through authentication.
Once configuration is completed, check Entra Admin Center
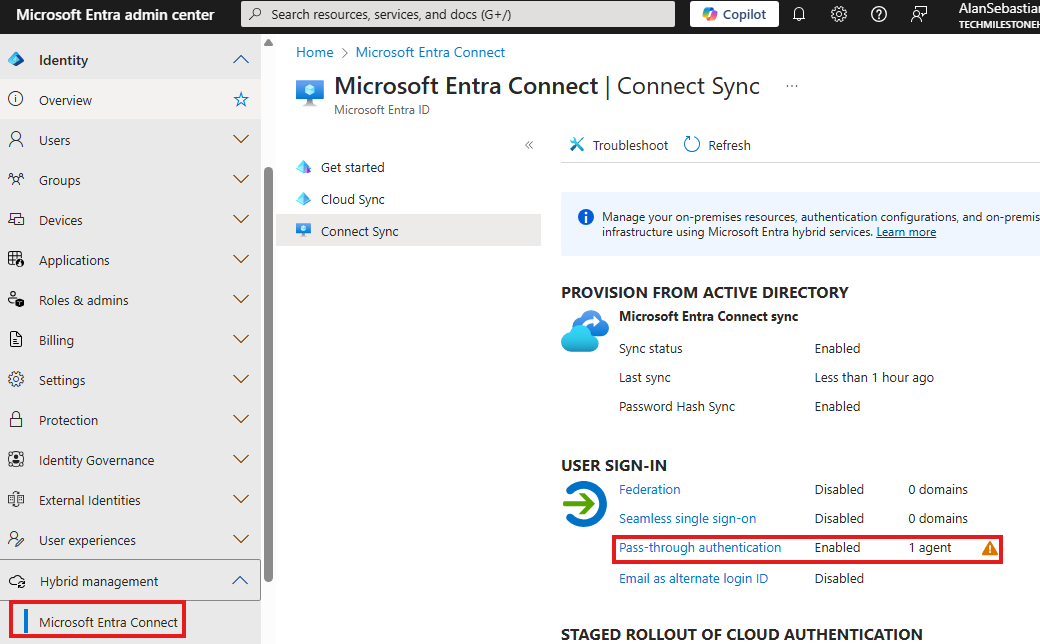
Check : Identity > hybrid management > Entra Connect
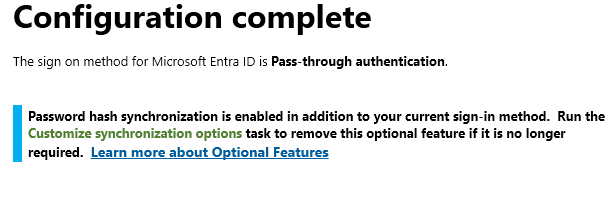
Disable Password Hash Synchronization
AD Connect > Configure > Customize Sync Options
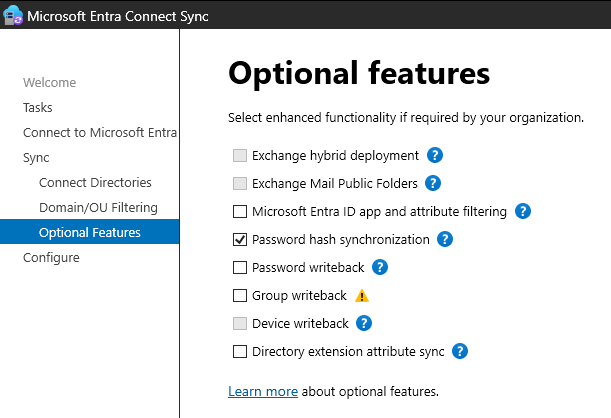
In the optional features we can disable password hash sync
Password Hash Synchronization v/s Pass-Through Authentication
In Password Hash Synchronization, authentication is dome using cloud AD, in Pass-Through Authentication, authentication has to go through on-premise AD.
Pass-Through Authentication in Action
There could be some password policies or authentication configuration that can be implemented on-premise only.
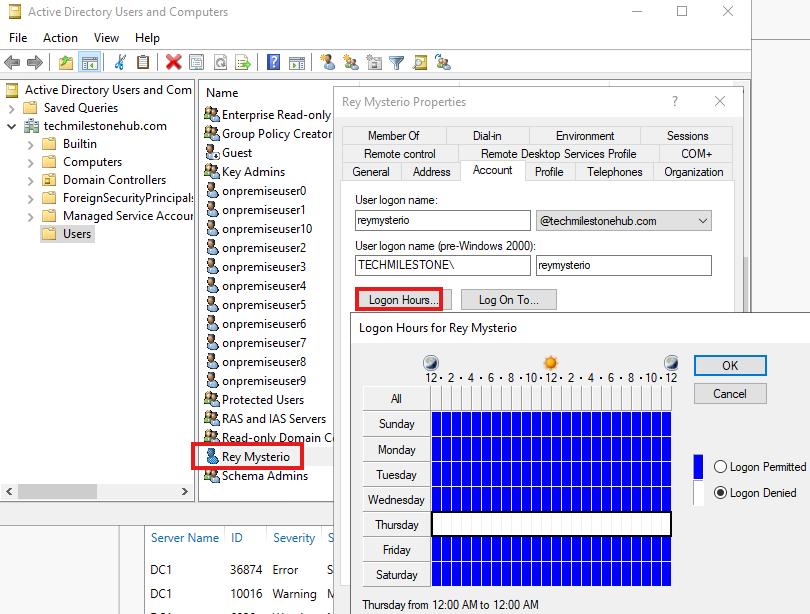
Here we are denying logon for today from on-premise AD, we cannot do this from Azure AD.
Now, if we try to sign in to any cloud portal, Azure portal, as that user we cannot sign in:
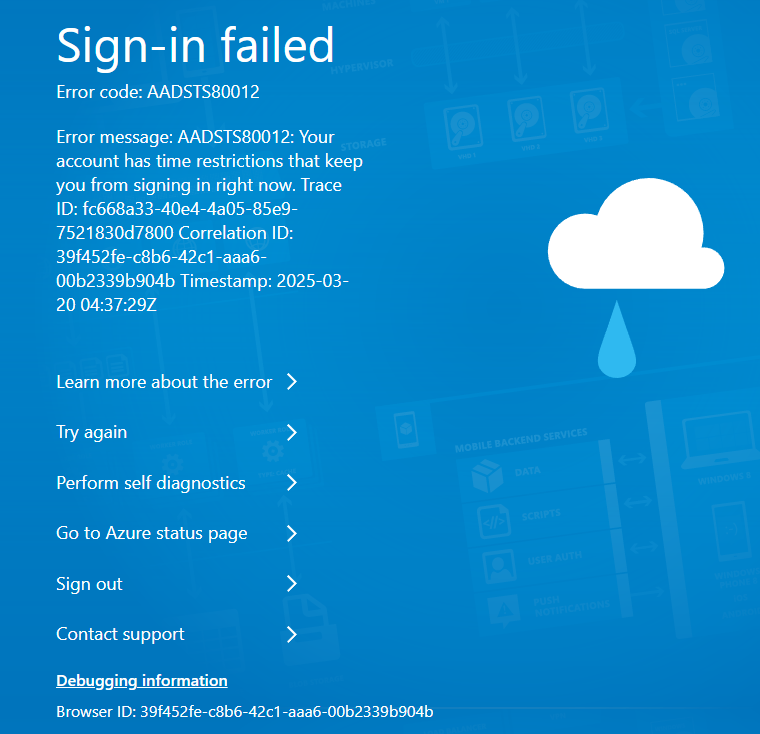
Here, authentication is first happening through on-premise active directory.
If pass-through authentication is enabled, if on-premise AD is down user will not be able to login.
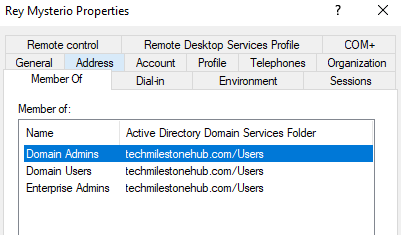
User Properties of Synced users.
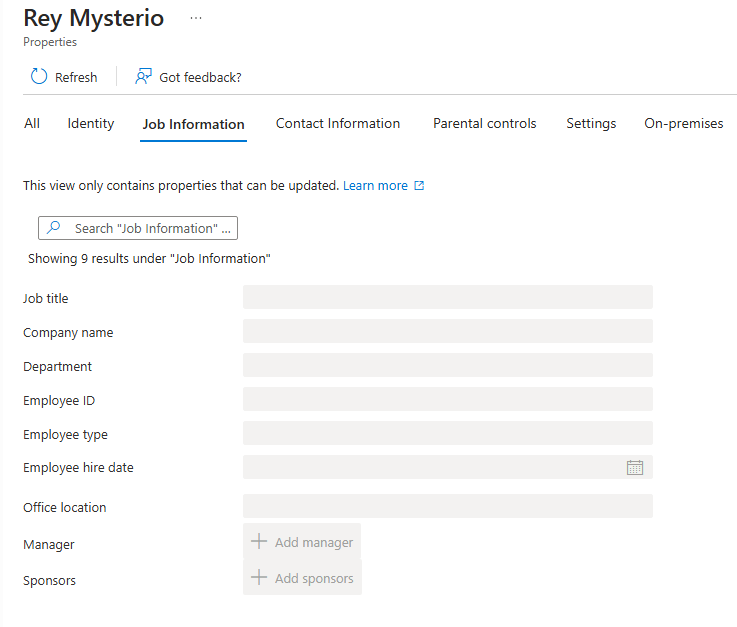
Synced users properties will not be editable form cloud portals. We have to edit it from on-premise AD itself.
OU: Selectively Sync Using AD Connect
We can select only 1 on-premise OU to sync with Azure AD.
AD Connect > Configure > Customize Sync Options
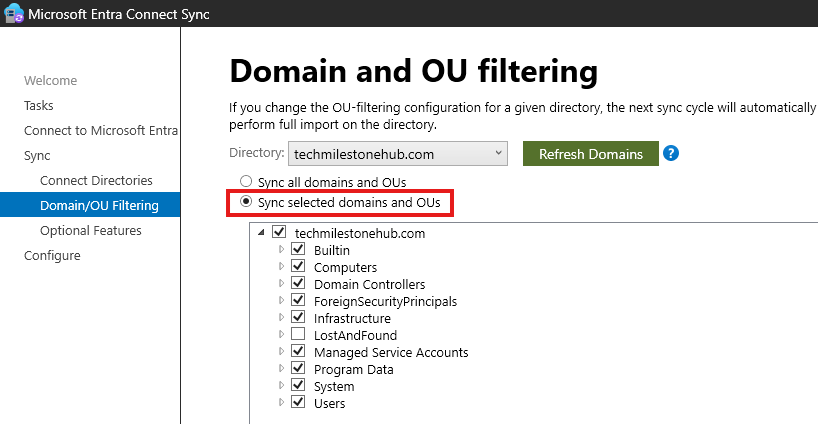
All OUs in the on-premise will appear here. We can select only the OU we wan to sync.
Only users in that OU will appear on Azure AD, other users will be gone.
Azure AD Connect : Single Sign-On
1 – Join A VM to domain.
If SSO is disabled, when on premise user after signing in to VM, when try to access ant cloud portal, they will be asked password
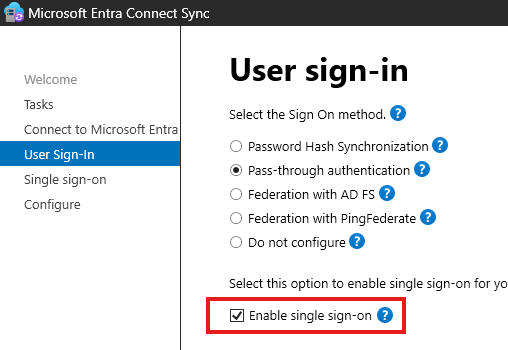
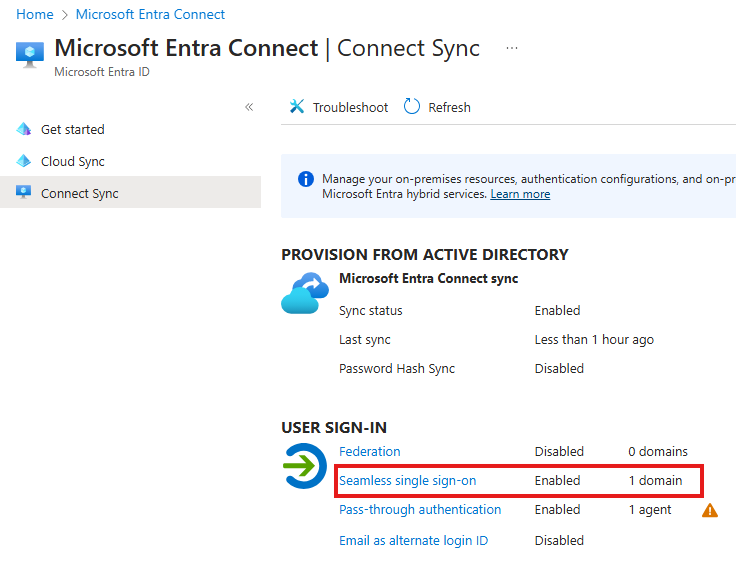
2 – In AD Connect tool(In AD Connect server) > Configure > User Sign-in : Enable Single sign-on
Once enabled, we can see that from the Entra Admin Portal:
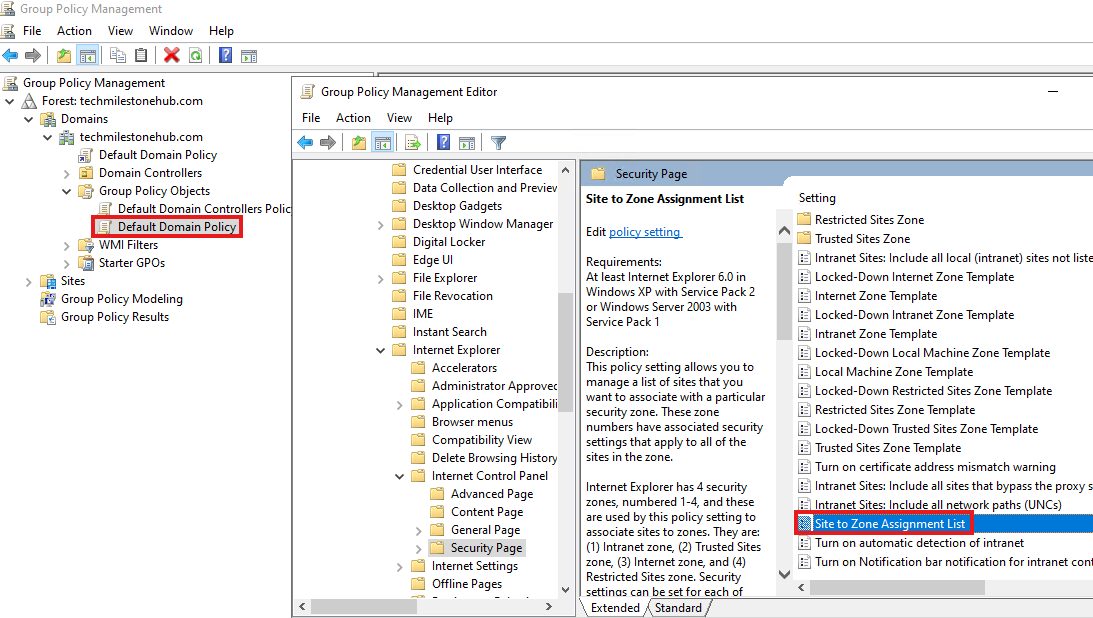
3 -Configure Group policy
Refer : Quickstart: Microsoft Entra seamless single sign-on – Microsoft Entra ID | Microsoft Learn
To enable SSO, we have configure some client settings.
1 – Need to modify users intranet zone settings
Open the Group Policy Management Editor tool(in DC server).
Edit the group policy that’s applied to some or all your users. This example uses Default Domain Policy.
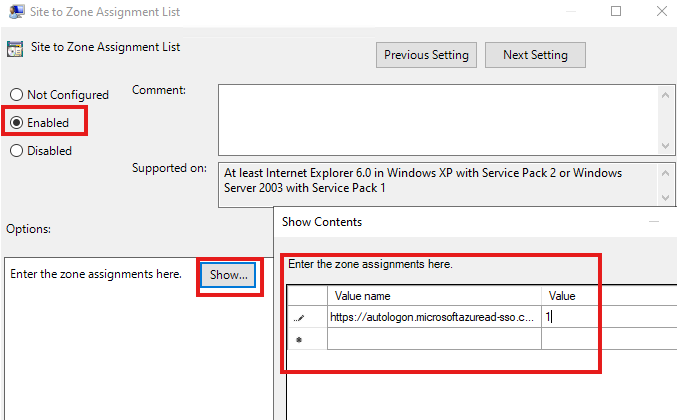
Go to User Configuration > Policies > Administrative Templates > Windows Components > Internet Explorer > Internet Control Panel > Security Page. Select Site to Zone Assignment List.
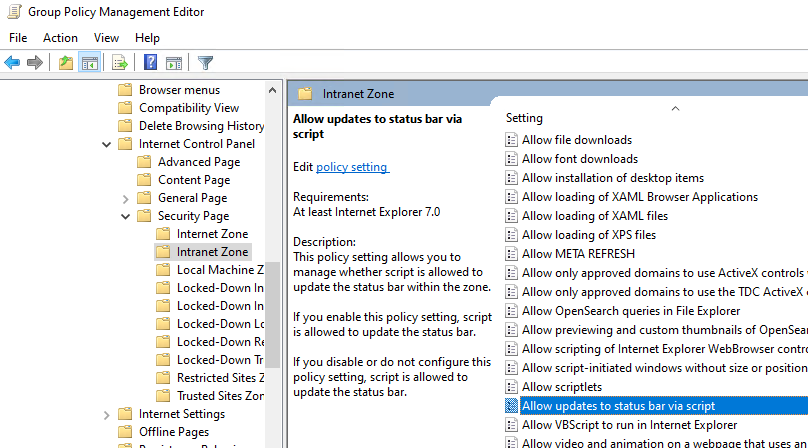
Go to User Configuration > Policies > Administrative Templates > Windows Components > Internet Explorer > Internet Control Panel > Security Page > Intranet Zone. Select Allow updates to status bar via script.
Azure AD Connect : Password Reset
For hybrid synced users, admin cannot reset password from Entra Admin Portal.
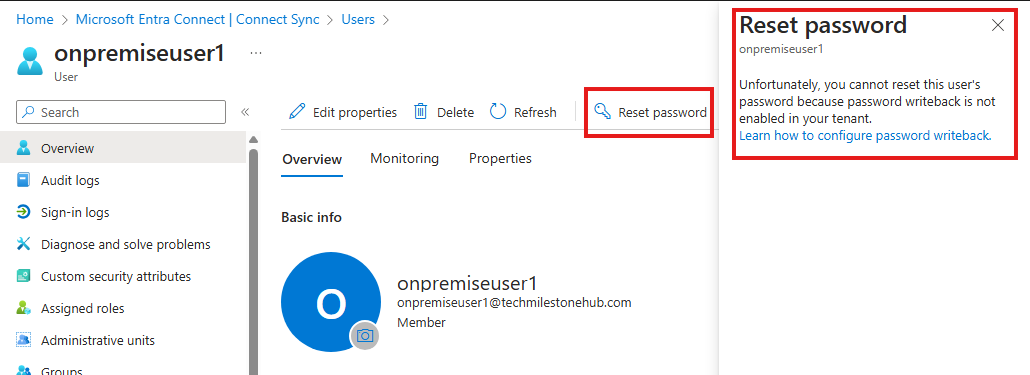
To do this, we need to do some steps
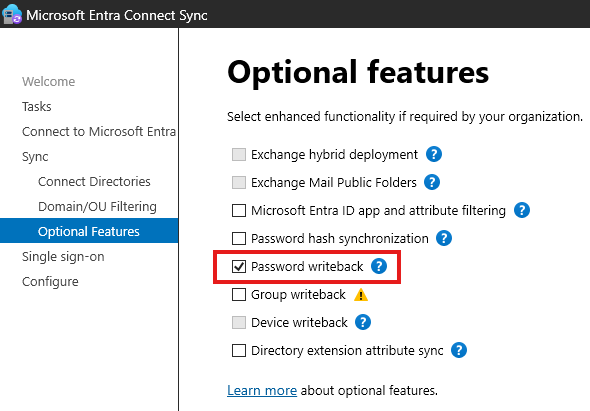
1 – Enable password writeback
Ad Connect Tool > Configure > Customize Sync options
2 – In Entra Admin portal enable password write back
All Users > Password Reset
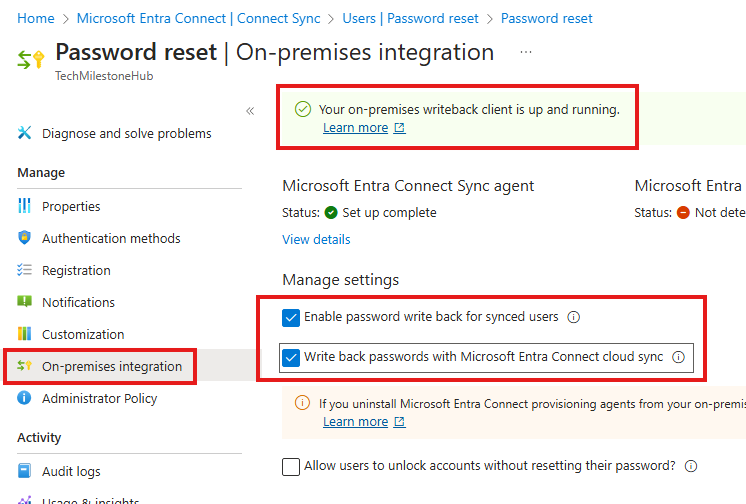
On-premise integration > Check write back password.
3 – Set permissions on the account
For detailed steps: 11 – Self-Service Password Reset – TechMilestoneHub
AD Connect Health
Refer: 13 – Azure AD Connect Health – TechMilestoneHub
Ad Connect : High Availability
We can have an additional server with AD Connect installed, called staging server. This will not be synced readily. We also need to install a pass-through authentication agent.
Azure AD Directory Extensions
Sync on-premise attributes
On-premise user attributes can be seen if we enable Advanced feature view : View > Advanced features
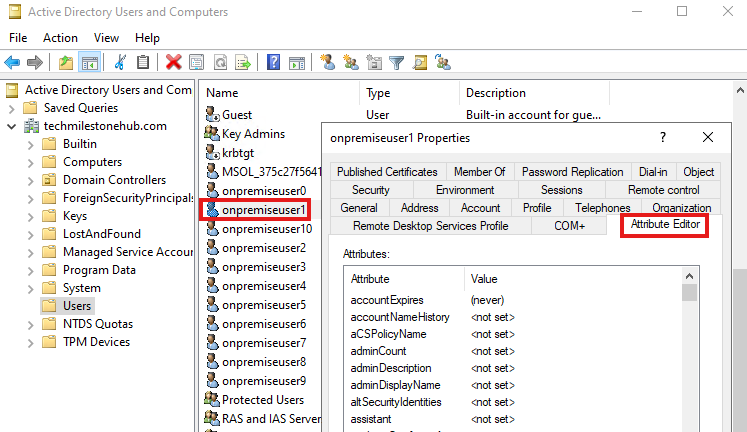
We can see user attributes in Attribute Editor Tab
To sync any edits we make here:
Ad Connect > Configure > Customize sync options
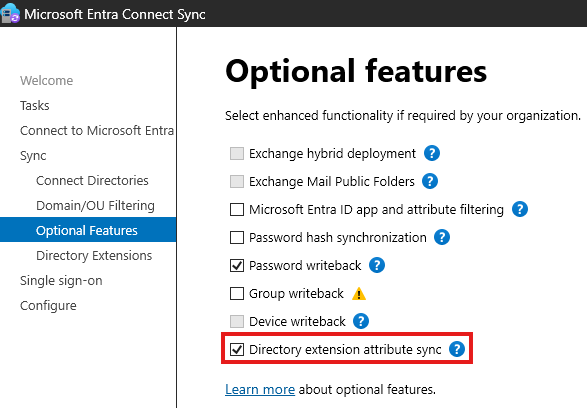
on the next tab:
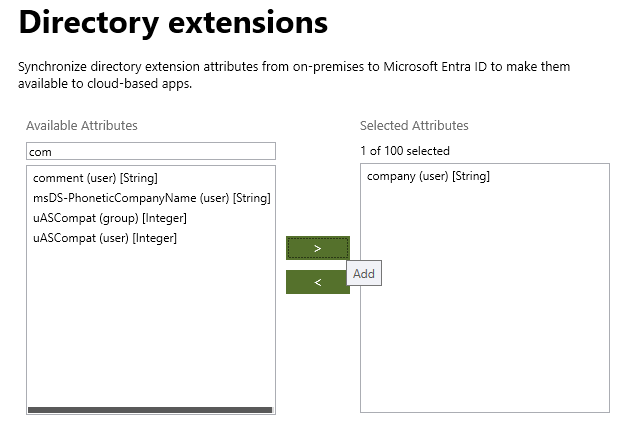
We can choose that attributes to sync.
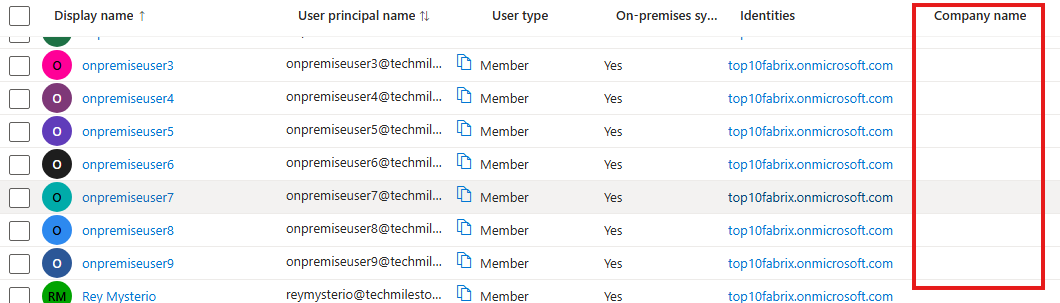
This attribute will show up as column in Entra Admin portal > All Users
AD Connect : PowerShell
First we need to install a module called : MSOnline
Install-Module MSOnlineConnect to MSOL service
Connect-MsolServiceTo get company information, check if AD is synchronoised
Get-MsolCompanyInformationTo disable synchronisation
Set-MsolDirSyncEnabled -EnableDirSync $falseAzure AD Connect : Group Filtering
During the installation of AD Connect, choose custom installation instead of Express.
During installation, in Filtering section we can choose Sync selected
Entra (Azure AD) Cloud Sync
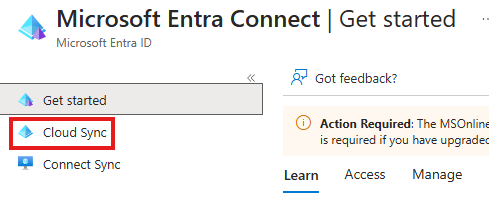
Similar to Connect sync, there is cloud sync
Application Objects
For an app to access resources in Azure, we have to create an app object in Azure AD.
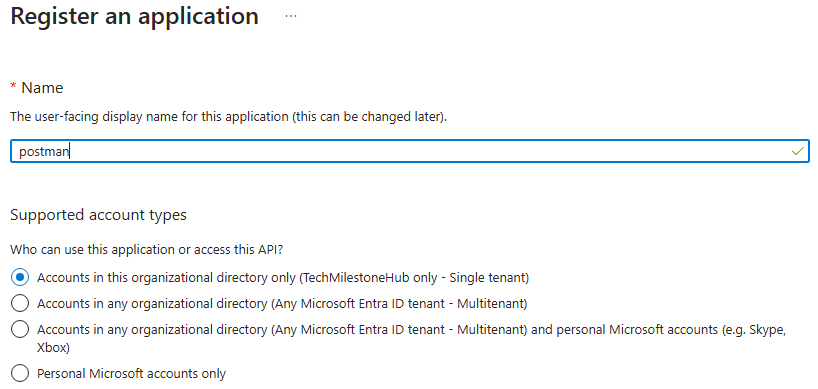
For postman application to get users from Azure AD, we have to create app object for postman app.
To register an app go to Entra admin center
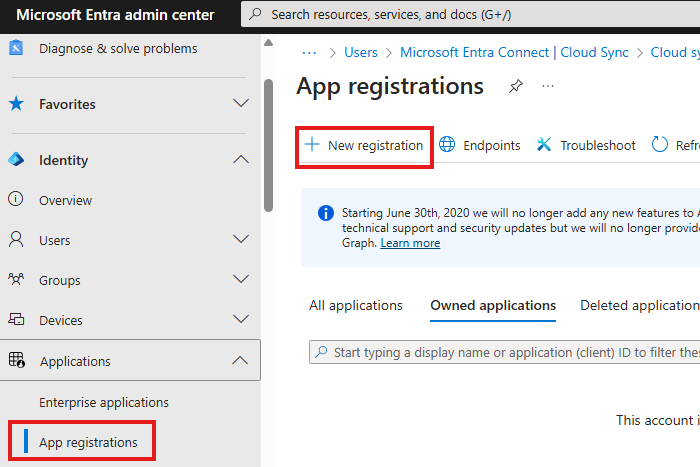
Add a new registration
API Permissions
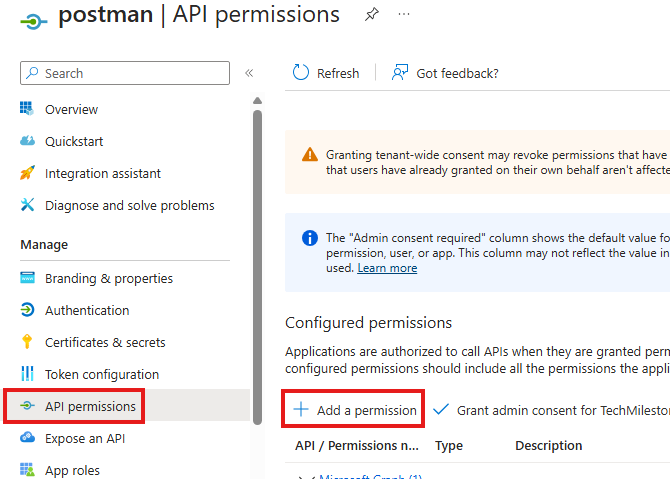
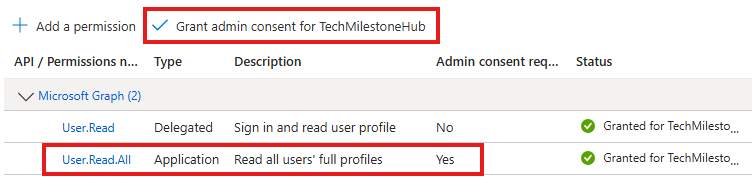
Here postman tool will require a Microsoft Graph API permission to get all users details. We will be requestion that.
Also there are 2 types of permissions:
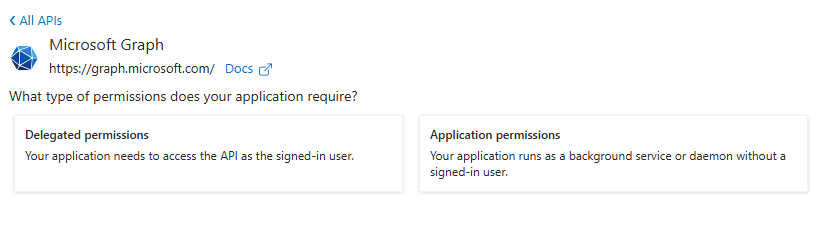
1 – Delegated permissions
This is when a user in Azure AD will be signing in to the app. Then app will get the permission of that user.
2 – Application permission
This is when permissions should be independent of what user is signing in to the app.
We will be selecting application permission.
We will get a list of sections of permission, choose User> Read.All
Admin should gran permission to read all user data
Application permission: Postman app utilizing API Permission
1 – Get access token
Send a post request to OAuth endpoint offered my Microsoft:
POST to URL :
https://login.microsoftonline.com/{tenant}/oauth2/v2.0/token

or

https://login.microsoftonline.com/common/oauth2/v2.0/token
Body Type is
x-www-form-urlencoded
Body is key-value pairs of
grant_type: client_credentials
scope: https://graph.microsoft.com/default
client_id, client_secret from app object.
Client id from overview, client secret from Certificates and secrets
2 – Fetching Users:
The next request is made to fetch the users information
a. URL – https://graph.microsoft.com/v1.0/users
b. Method needs to be a GET method
c. In the Headers section, add a header with the name of Authorization and the value as Bearer along with the access token received in the prior request
Delegated permissions: .NET Application Accessing Storage account data
A user in Azure AD will login to a .NET Application to access storage account in Azure.
1 – Upload File
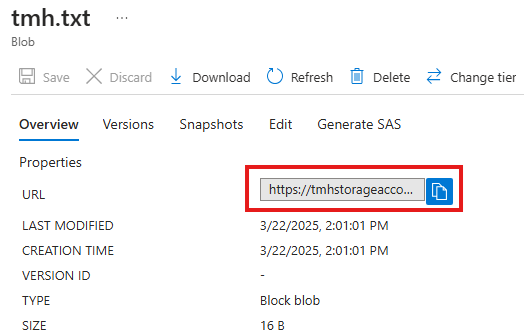
In storage account create a container and upload a file that app need to access.

upload a text file to the new container.
We will get a URL to access the file in the container
If we try to access we will get message: Public access is not permitted on this storage account.
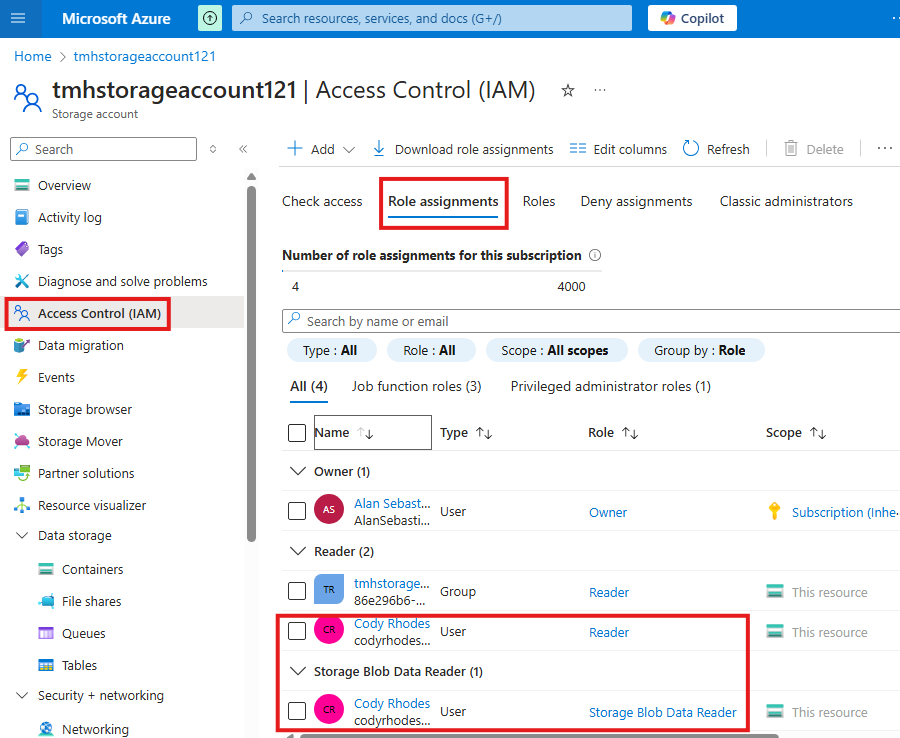
2 – Assign Roles to user
Now, we will give one of AD user access to this resource. Go to Access Control blade of the storage account.
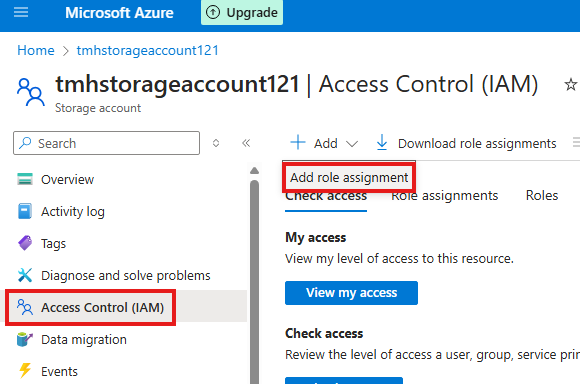
Add role assignment.
Give Reader role (give user permission to read the properties of storage account, but not what is inside) to a user in AD.
Also, Give Storage Blob data reader role, for the same user to allow user to read the contents of the container.
Assign access to user, not managed identity.
After the assignment check the Role Assignment tab of storage account to see all the assigned roles:
3 – Create Application Object (Register the application)
Entra Admin Center > Applications > App registration
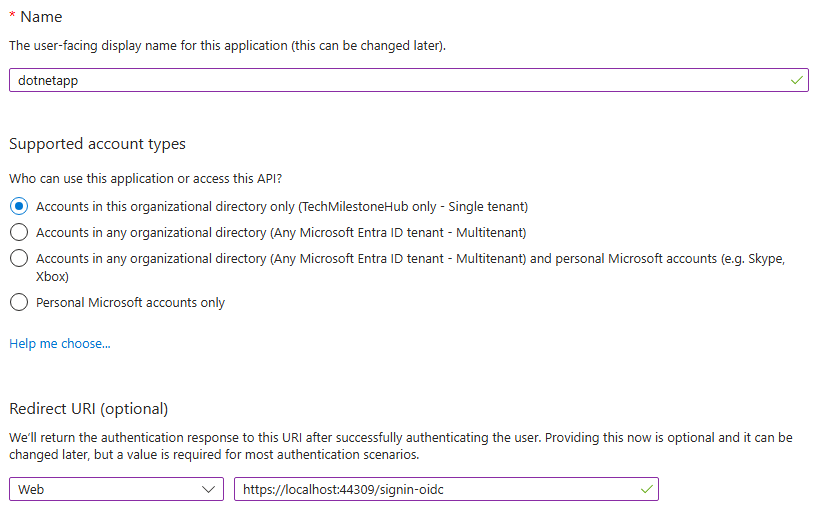
Provide the redirect URI, while registering
Go into the app we registered
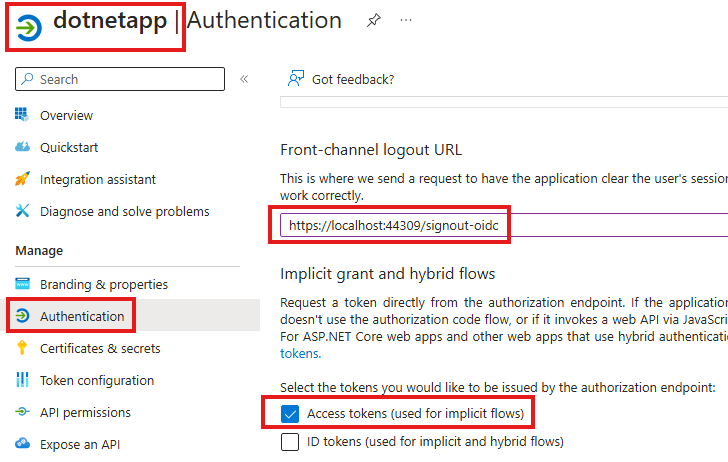
in Authentication blade, provide sign-out Uri and select the token type we want to issue.
4 – API Permission
We need to give the .NET App, API permission to the storage account.
Go to registered application > API Permission > Add permission : search for Azure storage
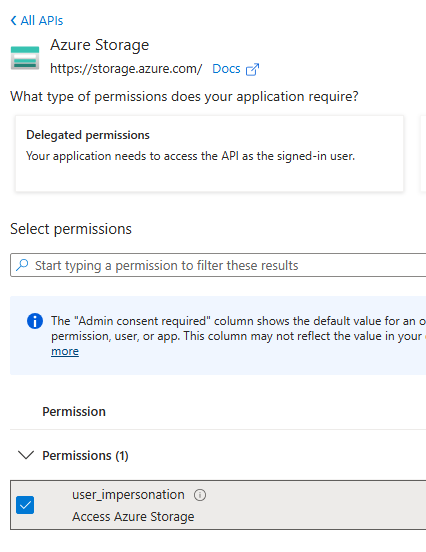
Add the user_impersonation permission; That means app will be impersonating a user in AD.
In the app, we need to update: Tenant ID, Client ID(Application ID), Client secret
Tenant ID, Client ID(Application ID) will be available on the Overview blade of the registered application.
For client secret we need to create a secret from Certificates& Secrets blade
5 – Sign in to app as the user
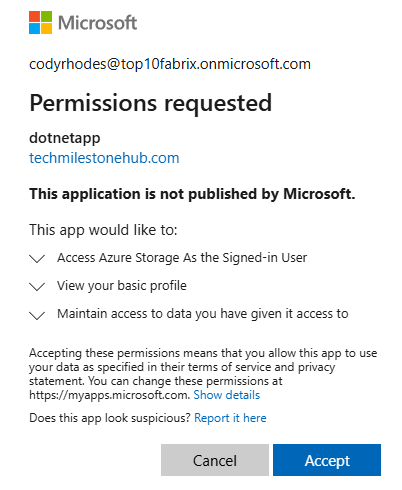
While signing in, user need to provide the permission to the app to access the storage account. App tells user that I will be impersonating you, and using your permissions to access storage account.
Azure AD Roles, Related to Applications
1 – Application Administrator
Allows all aspects of application like app registration, app proxy settings
Can grant delegated and application permissions.
User will not become owner of the application while registering.
2 – Cloud Application Administrator
Allows all aspects of application like app registration, but NOT app proxy settings
3 – Application Developer
This is minimal role for app registration.
User can register applications, even if app registration by users is disabled in : User > User settings
User can grant permission to consent
User will be registered as owner of app.
Azure AD Application Proxy
This allows cloud users to access on-premise application.
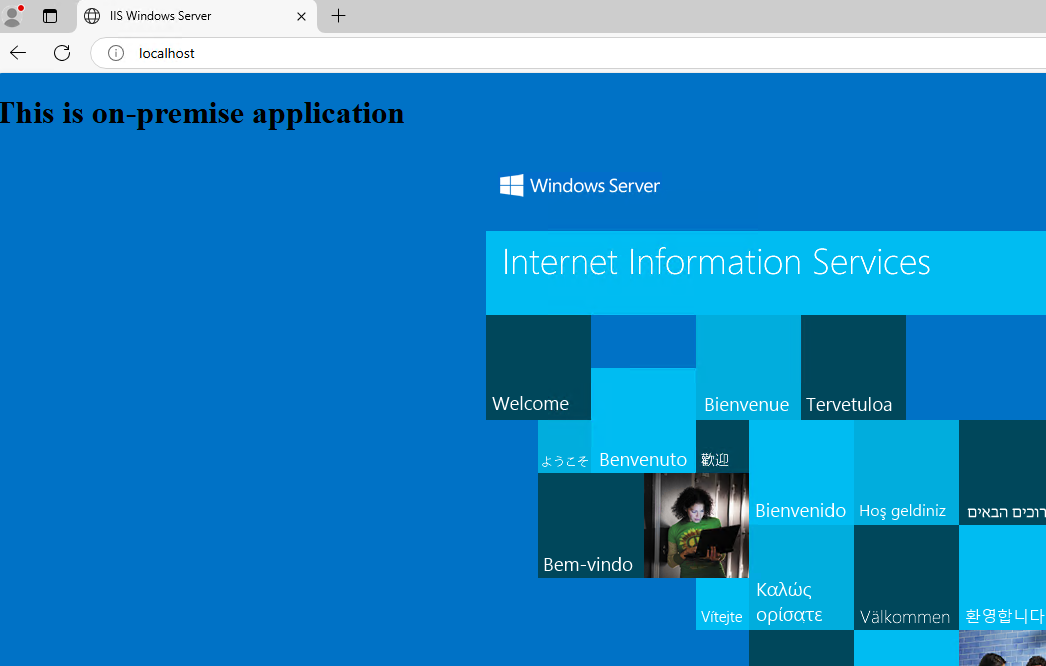
1 – Create an on-premise demo application
On any domain joined server From server manager add role of Web Server(IIS)
For testing just edit : Files in C:\inetpub\wwwroot
This will be our on-premise application.
Test app locally : http://localhost
From another domain joined VM, test if DNS is working to access the application:
dc1.techmilestonehub.com <vmName>.<domainName>.com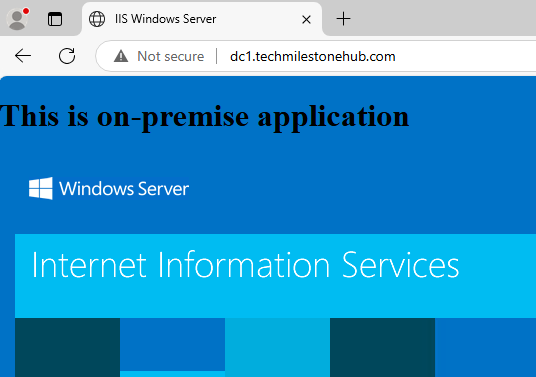
This web app will not be available outside the on-premise virtual network.
2 – Create application proxy server
To make on-premise application available for Azure AD users.
Create a VM and join to domain.
1 – Regedit changes if needed (for win 2019 servers)
In : Computer\HKEY_LOCAL_MACHINE\SOFTWARE\Microsoft\Windows\CurrentVersion\Internet Settings\WinHttp
Create new DWORD : EnableDefaultHttp2
In:
Computer\HKEY_LOCAL_MACHINE\SYSTEM\CurrentControlSet\Control\SecurityProviders\SCHANNEL\Protocols\TLS 1.2\Client
AND
Computer\HKEY_LOCAL_MACHINE\SYSTEM\CurrentControlSet\Control\SecurityProviders\SCHANNEL\Protocols\TLS 1.2\Server
Create 2 new DWORDs
DisabledByDefault
Enabled with value 1
In:
Computer\HKEY_LOCAL_MACHINE\SOFTWARE\Microsoft.NETFramework\v4.0.30319
new DWORD: SchUseStrongCrypto with value 1
2 – Install Connector
Download and install Private Network Connector, from Entra Admin portal, on the VM.
After installation, we will be able to see connector in Entra Admin portal > App proxy section
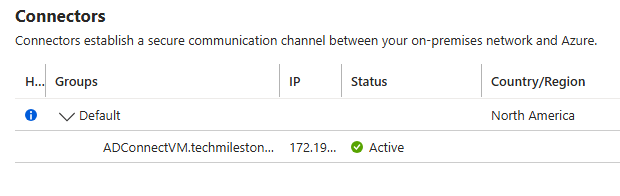
Enable the connector.
Click on Configure App
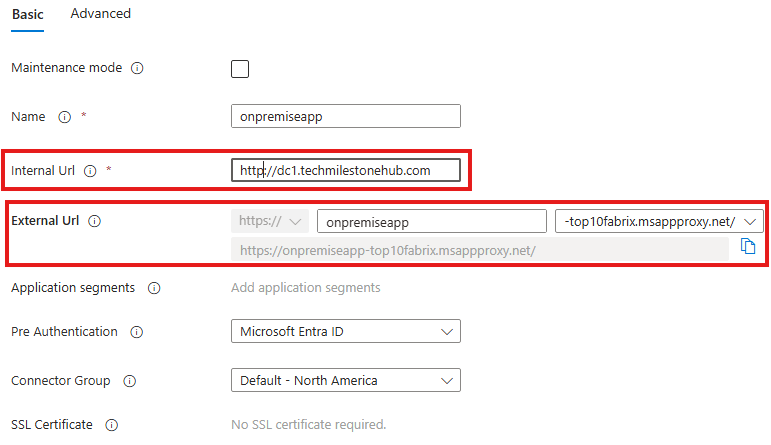
provide internal URL of on-premise application to get an external URL.
We will be able to see the application in the enterprise application in Entra Admin portal, along with other registered applications.
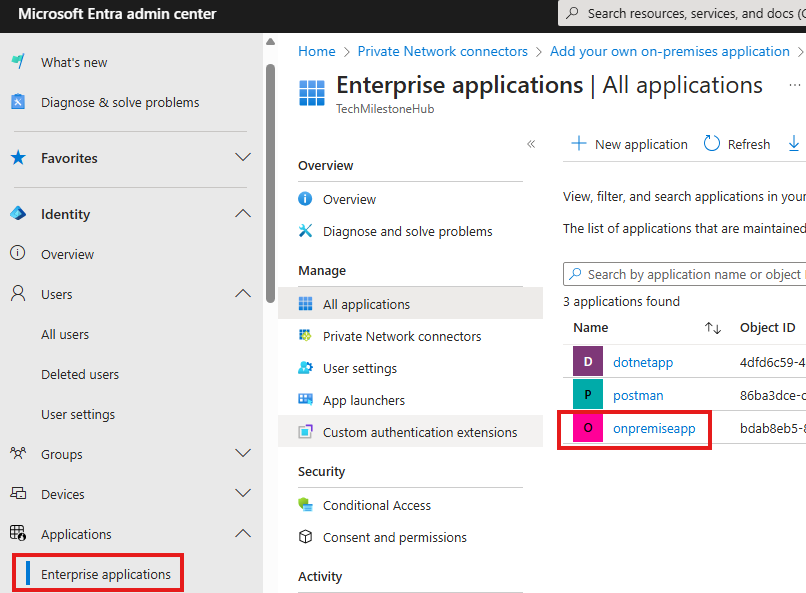
Go into the application and in User & Groups blade, we can assign groups of users(recommended, than assigning users directly) that can access this application.
Now, go to external URL provided by the application proxy connector:
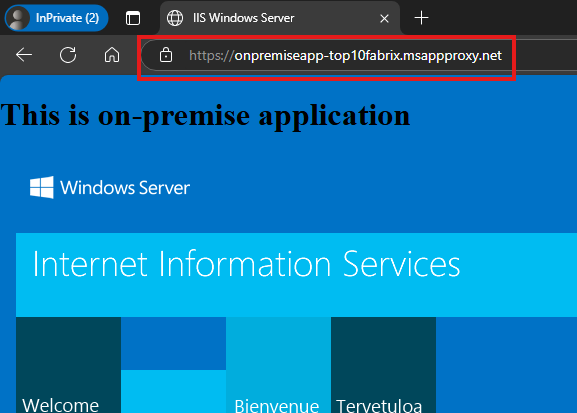
The app can be accessed anywhere on internet, by user in Azure AD, who is in the group that can access the application.
Enterprise Applications
1 – Assigning application to a user
We can user our Azure Identity for Enterprise applications as well.
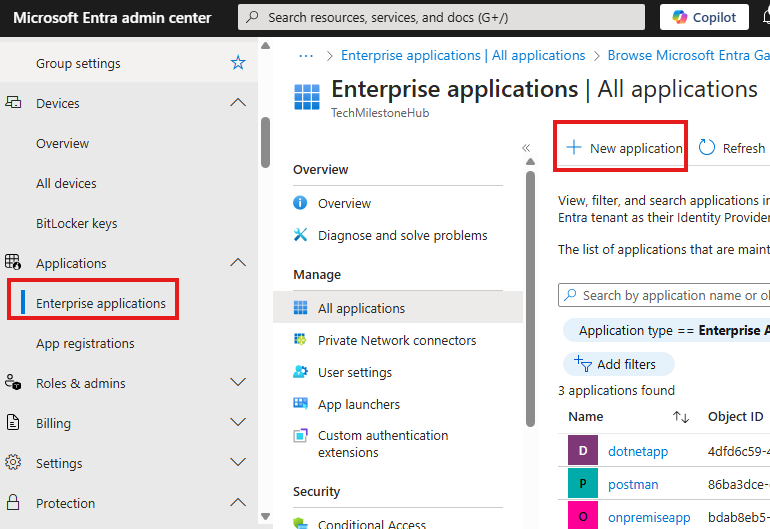
In Entra admin portal > Applications > Enterprise application > New Applications:
Here we can add our own applications or SaaS applications from others like Dropbox for business.
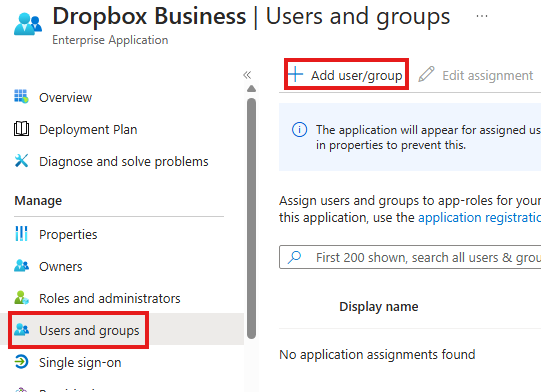
In the applications Users & Groups blade, we can assign users/groups that can access the application.
From single sign-on blade we can enable single sign-on.
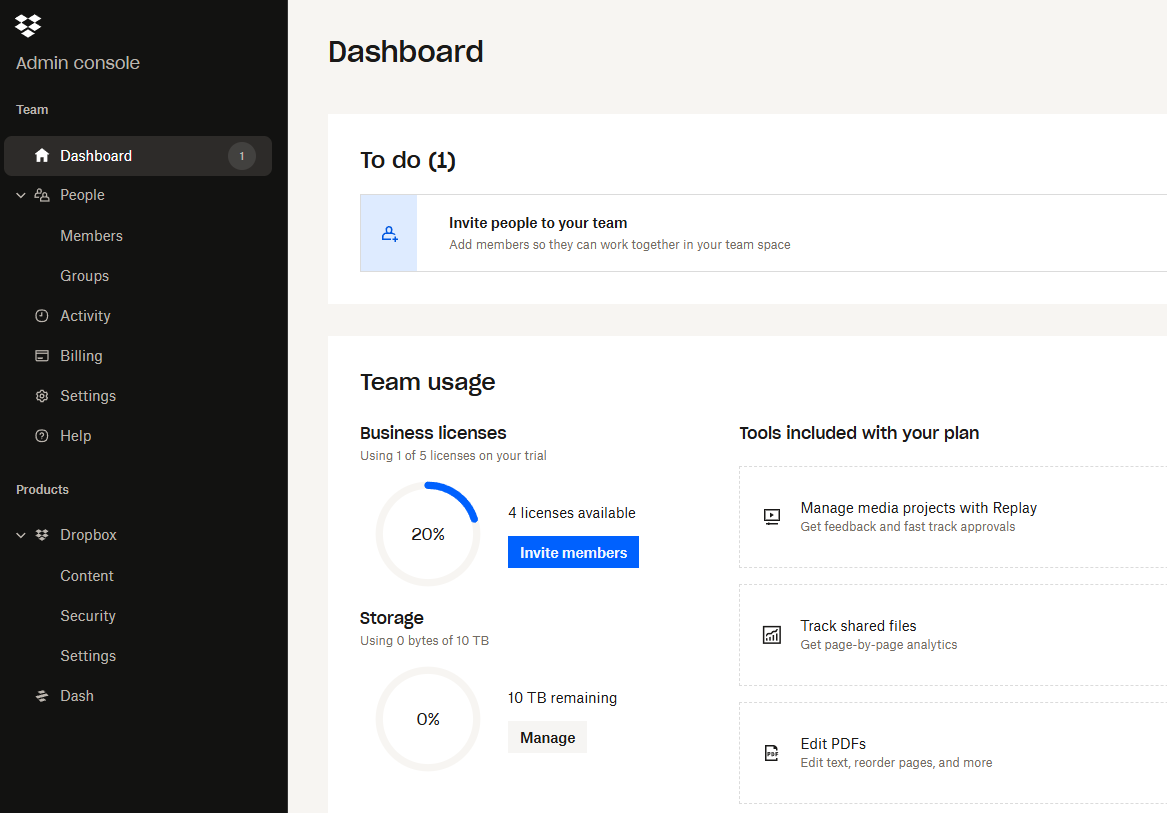
For user to access the application: user can login to : myapplications.microsoft.com
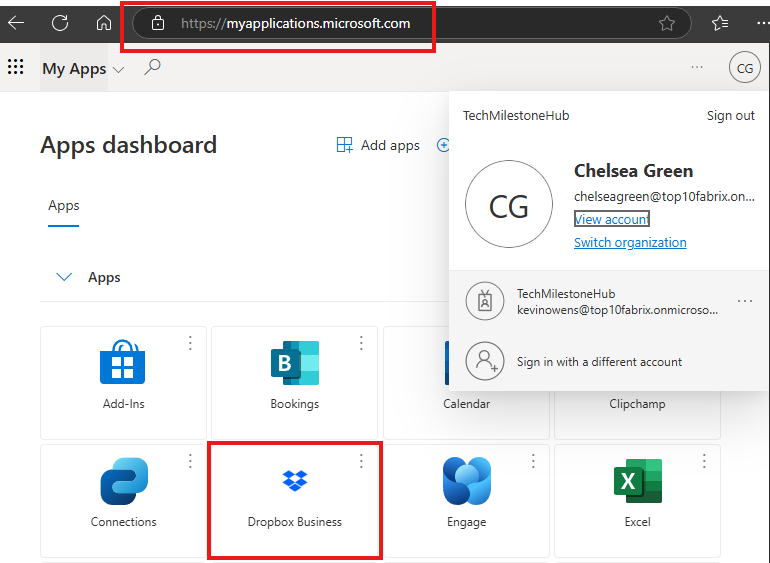
If single sign-on is enabled, user can just click here login to the app.
2 – Enable SSO
We need to register an admin account in Drobox with a plan that has SSO, and will be able to invite user, this will be our global admin account (use any email to do this) in Dropbox. Dropbox global admin may have to give credit card details.
Now in Entra Admin Portal > Enterprise applications:
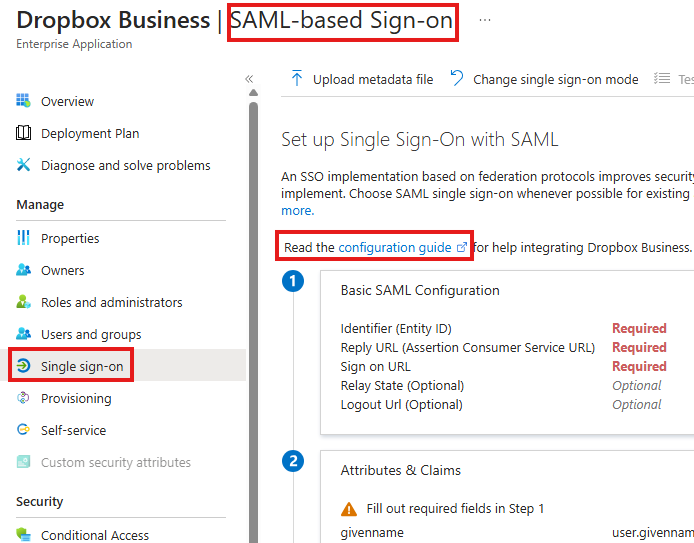
In the SSO section, Azure AD global admin can configure SAML SSO, with details from Dropbox settings.
Go to Dropbox>settings to get the required URLs for configuration
After this users with permission to drobox will get be able to go to Dropbox from their applications portal.
Enterprise Applications : Self service
Users can request access to applications.
Go to self-service blade to enable users to request access to this application.
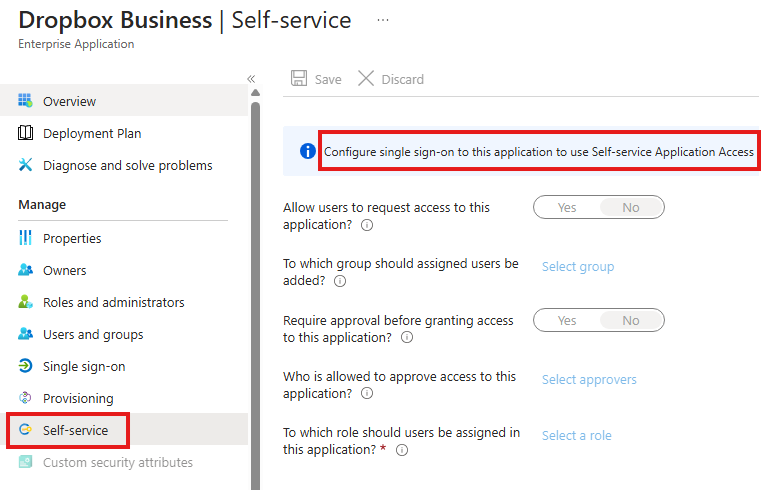
We need to enable SSO for this.
Access Reviews
Users may leave organization or change departments. So admins need to review is the users still need the access they have.
Require Azure AD P2 license included in MS E5
Who ever is doin the review need license, if users are doing self review, all of them need the license.
Access Review Setup
1 – Creating an access review
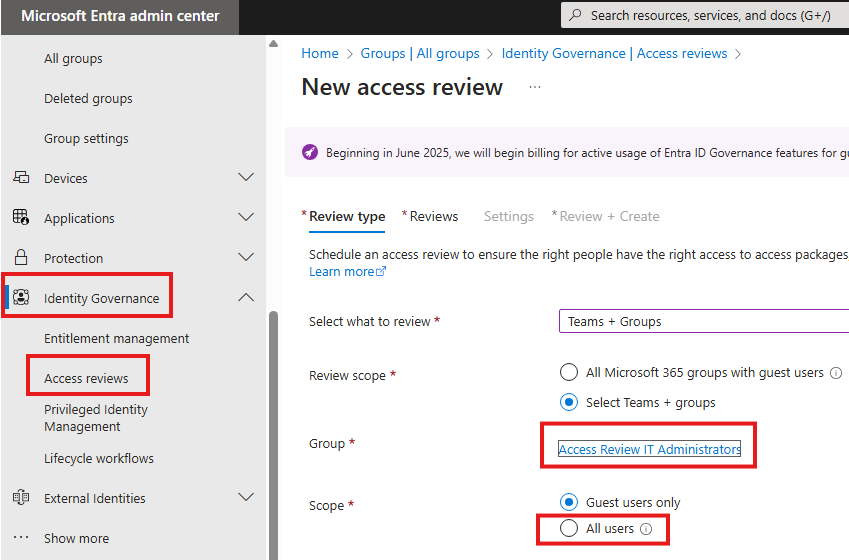
In the review tab, we can select who can review the group. Someone will be reviewing the group.
Here we have options like if review frequency, what to do if reviewer does not respond, duration of review (after this review will be stropped)etc.
2 – Contacting the access review
Login as the user who is assigned to do the review to myaccess.microsoft.com

When we go into review now, we will see we can review the users in the group.
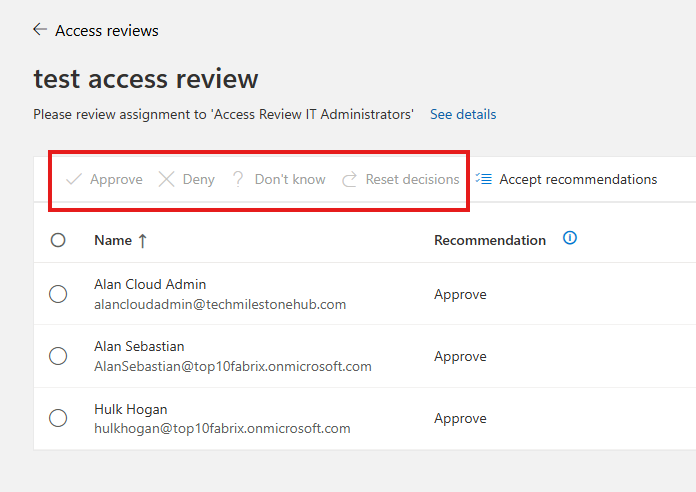
We will get auto recommendation based on last sign-in
In the Entra admin portal, we can see the status of access reviews;
If we selected a self-review, user will get a question, if they still need access.
If we selected Manager review, manager of the user will get review. Users in 1 group can have different managers, this property can be set in Azure AD attributes for each user.
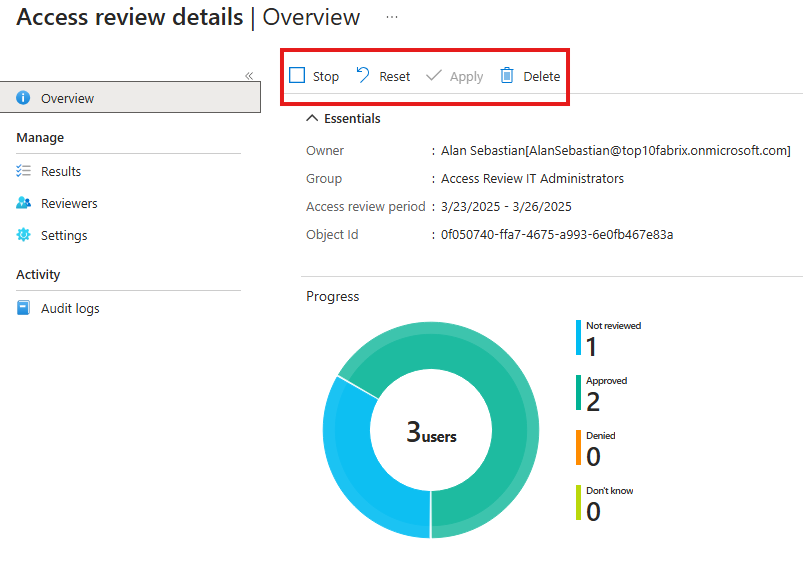
Here we can stop, reset or delete reviews.
Only when we Apply here, the review results will take place.
To auto-apply review result, we have to choose that option while creating the review.
Users that are denied, will be removed from the group : Access Review IT Administrators.
Here we reviewed if users need access to be in the group called Access Review IT Administrators.
We can change review choice within the validity period of the review.
Entitlement Management
Helps to on-board users.
Helps us to create access-package, which will:
1 – Give user access to Azure AD security groups or MS 365 groups
2 – Assign user to application
3 – Give user access to SharePoint online site
1- Creating Access Package
Is a bundle of resources, a user will need access to.
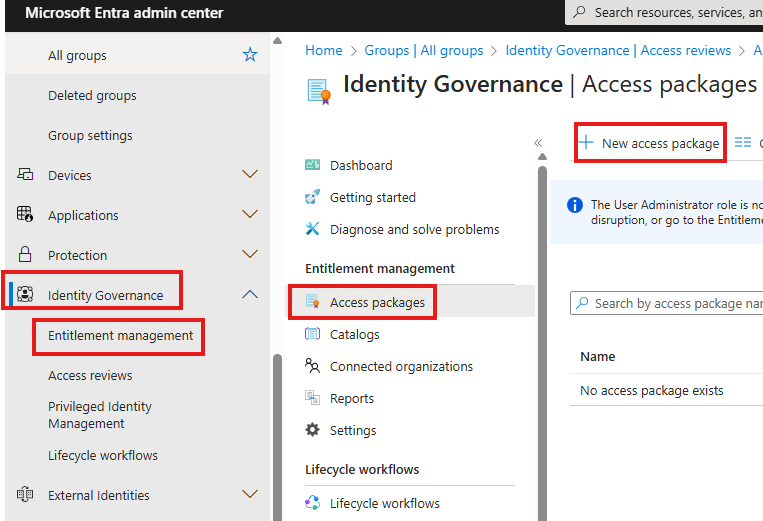
While creating the package, we can define to what all resources this package will give access to.
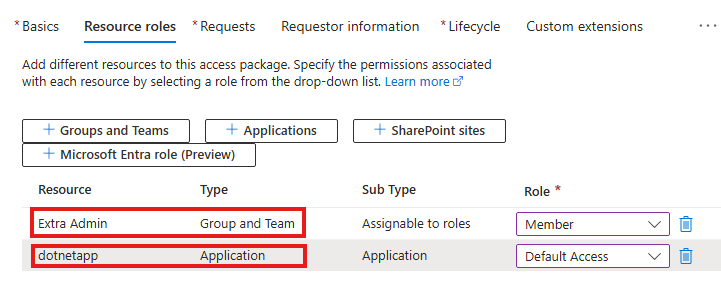
This will select groups teams and application this package will give access to.
in the request tab, we can specify which users can request for this access package

While creating access package also we can set access review.
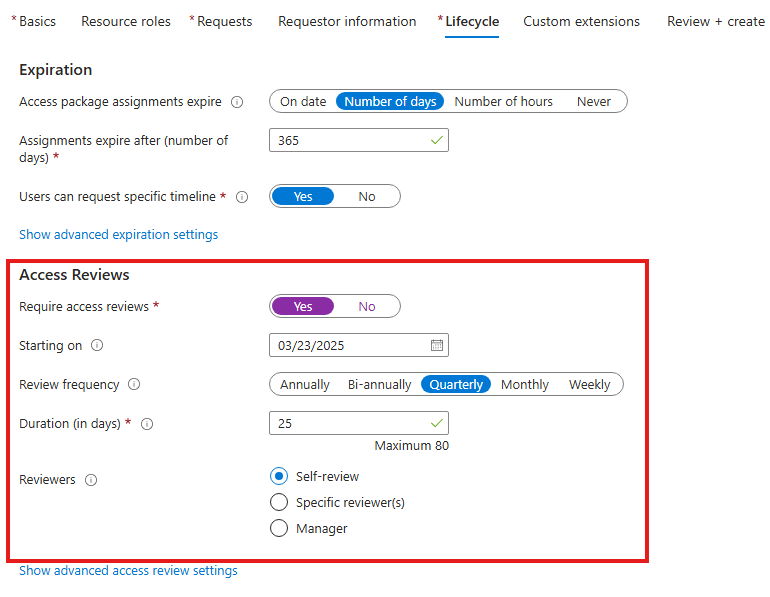
Review and create
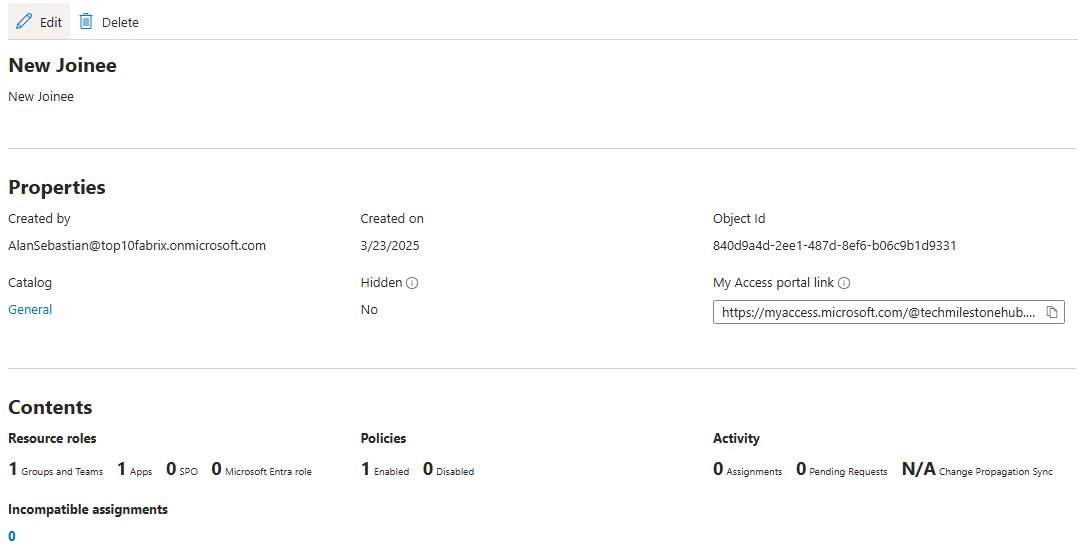
We created an access package called New Joinee. Any one in the All Company group can request this package. Once the get the package, they will have access to the resources defined.
2 – Requesting Access Package
As new user(who is eligible to request the package), sign in to : myaccess.microsoft.com(Access portal)
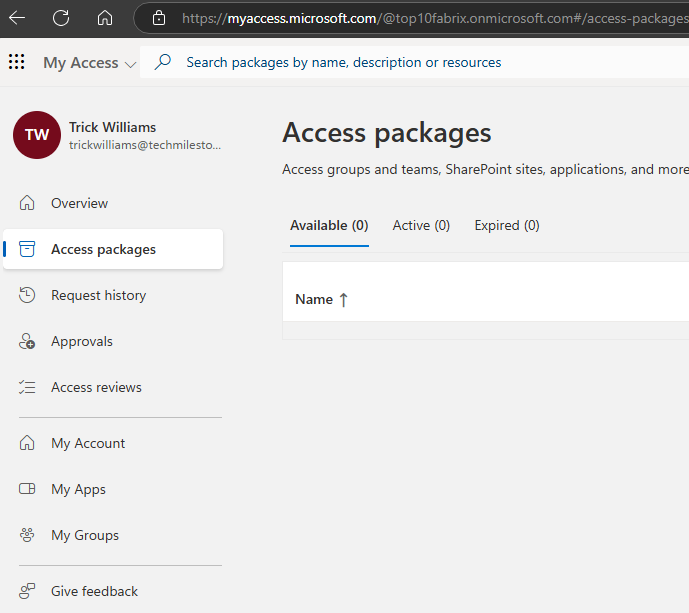
User can request from the available access packages.
Once the request it success, new user will get access to the groups and applications.
Privileged Identity Management
To control access to key resources in Azure, Azure AD and MS 365.
User should get access only when required.
Features include
1 – Just-in-Time access: only when required
2 – Time-bound
3 – MFA
4 – Approval: approval is required for any role
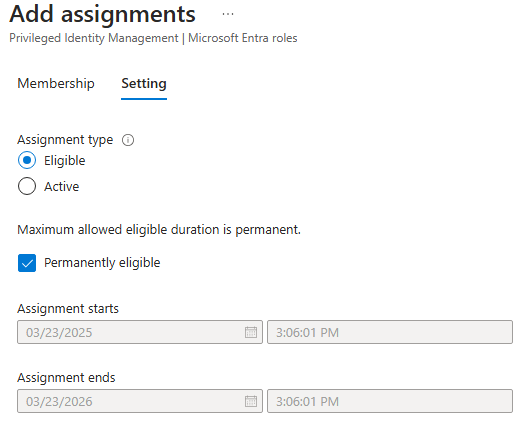
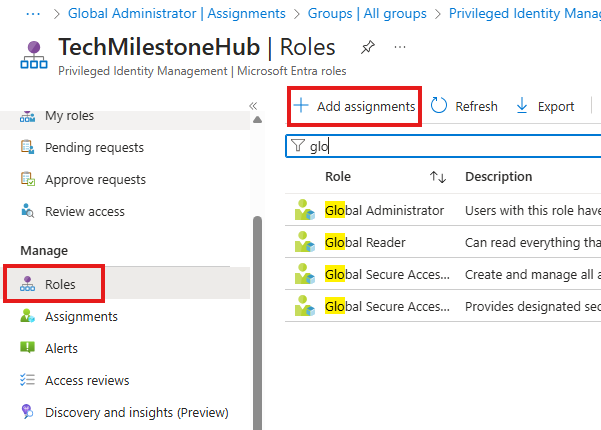
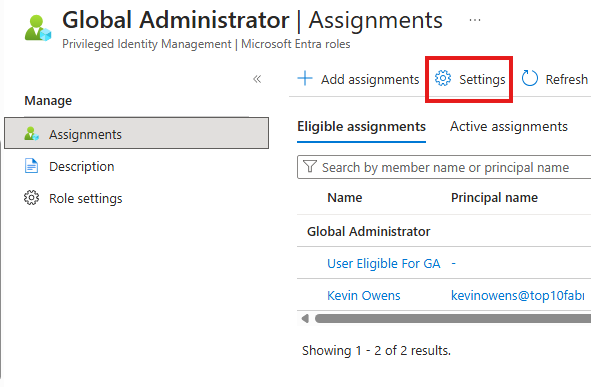
1 – Assign Eligibility
Instead of active assignment of role to a user, we can just make the user eligible for a role.
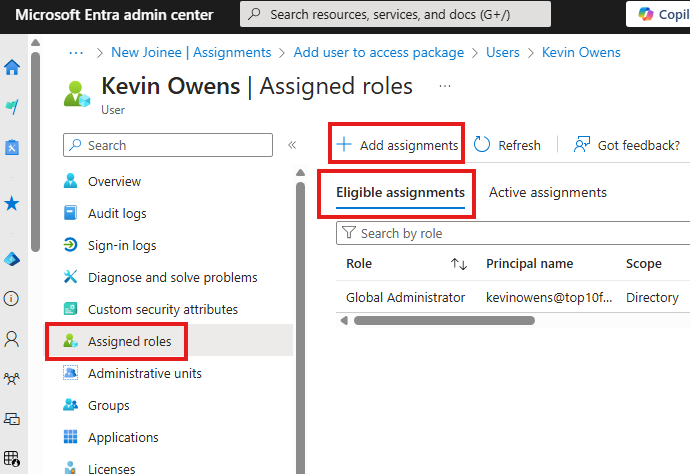
Assigned Roles > Add assignment
For this we have to make Assignment Type as Eligible, in the settings tab.
2 – Activating eligibility: PIM My Roles
An eligible user can login to Entra Admin Center:
Go to Privileged Identity Management > Microsoft Entra Roles > My Roles
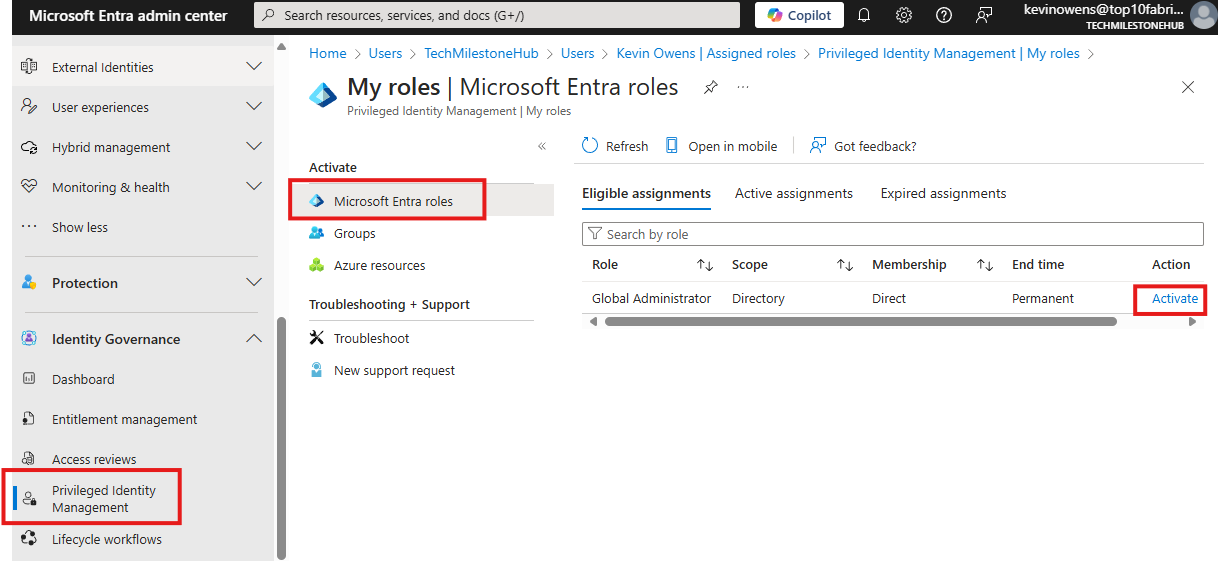
Some verification may be required.
Once activated user will get the role.
User is now global admin.
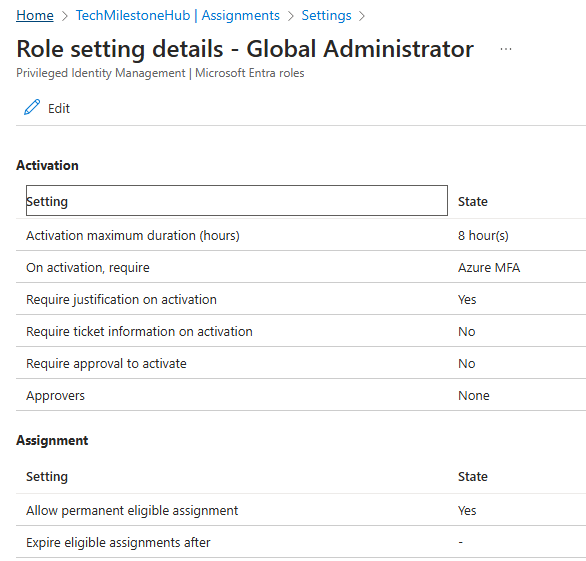
PIM: Role Settings
Global admins can view PIM settings and can view who all are eligible for what all roles.
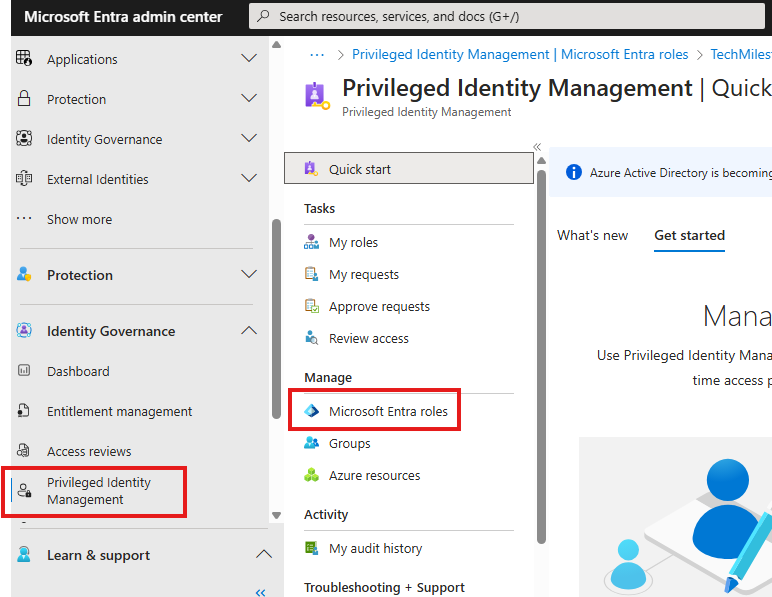
In the assignment settings, we can search for any role and modify settings:

Here we can set PIM role settings like how long role should be active, who need to review etc.
Eligibility for a PIM Role
This is where we can set to which all users should be eligible for this role, instead of going to each user or groups(best practice) and setting eligibility like we did before.
Go to PIM > Roles blade for this
Select Global Admin Role
Assign a group to this role
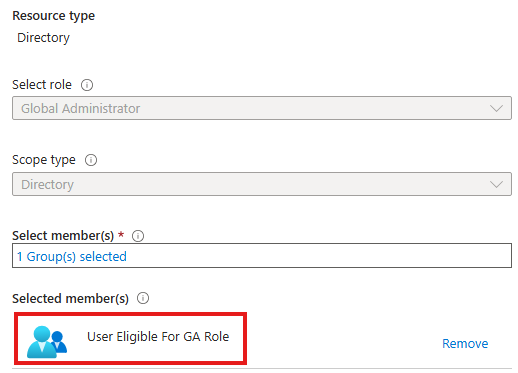
Users in this group will be eligible for the role of Global Admin.
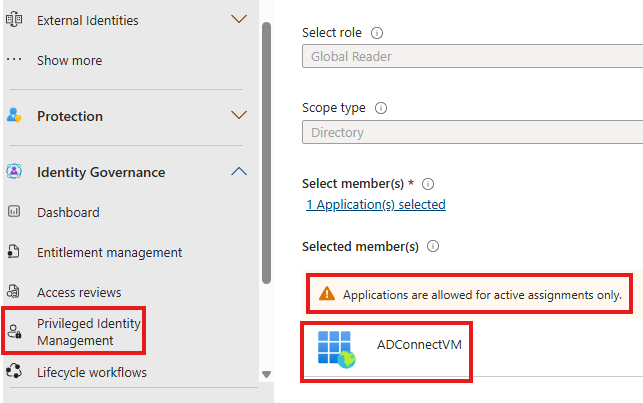
PIM: Different Identity Types
Other than users and groups, there are identity type like:
Service principals, manage identities.
For VMs we can enable Managed identity.
Managed identity can be system assigned or user assigned:
To enable a managed identity of VM, go to : Identity blade (security) of VM
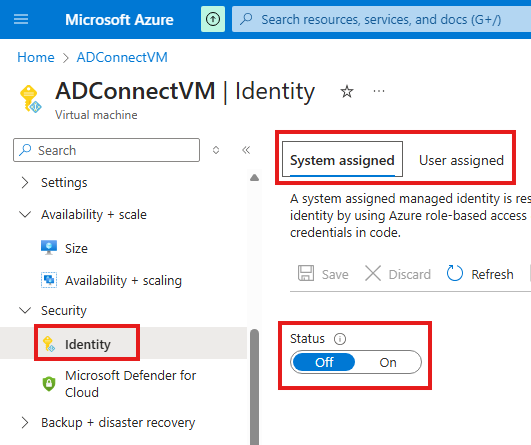
In PIM, when we assign roles to managed identity, we cannot make the manage identity just eligible for the role. We need to do an active assignment.
PIM: Role Assignment Approvers
For a Role assignment in PIM, we can add approvers by going into: Settings > Edit
Here, if we want to add approvers for Global Admin role, we can.
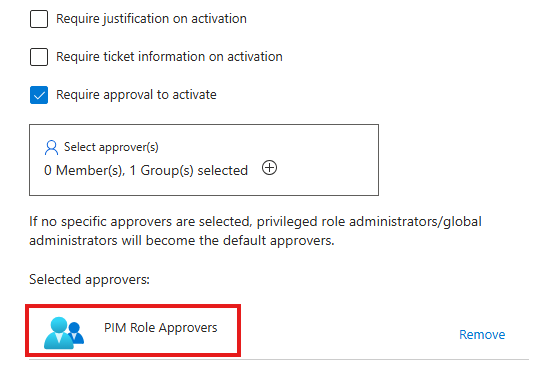
Now, even for user eligible for this role, need approval from users in group called: PIM Role Approvers
Now, when an eligible user go to PIM > My Roles to activate their eligible Global Admin role, it will not get activated right away, but a approval request will be sent to users in approval group.
User in the approving group, has to go to PIM > Approve Request, to view all the pending approval requests.
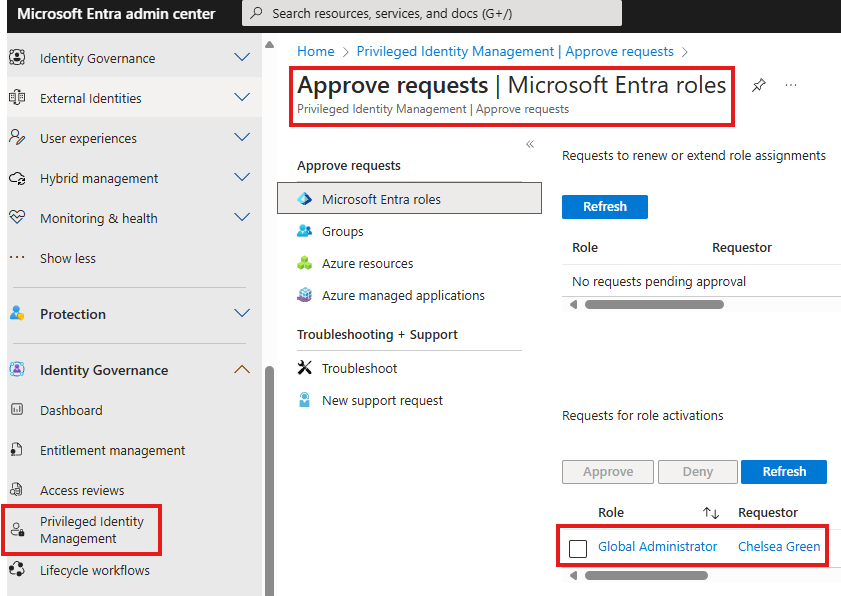
Here they can approve.
PIM: Access review
Like regular access review, there is access review under PIM as well.
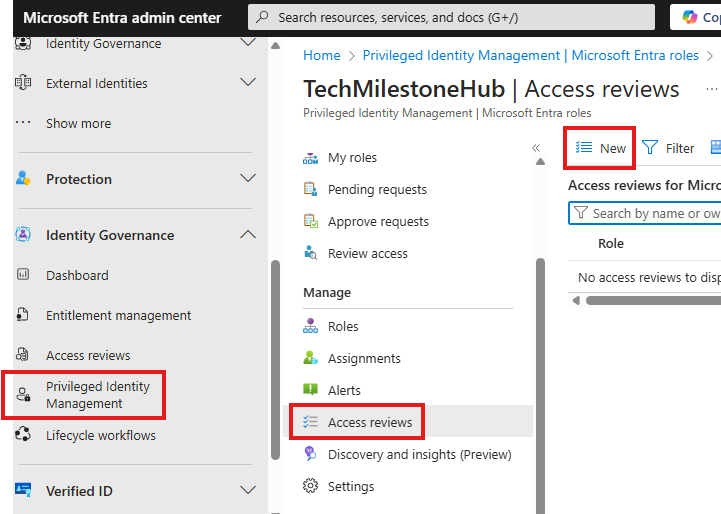
Here 1 access review is created for each role. Review is assigned to some user, who will decide if users who are eligible still need to be eligible.
Approver can also view audit logs of users to approve.
Azure AD : Sign-in Logs
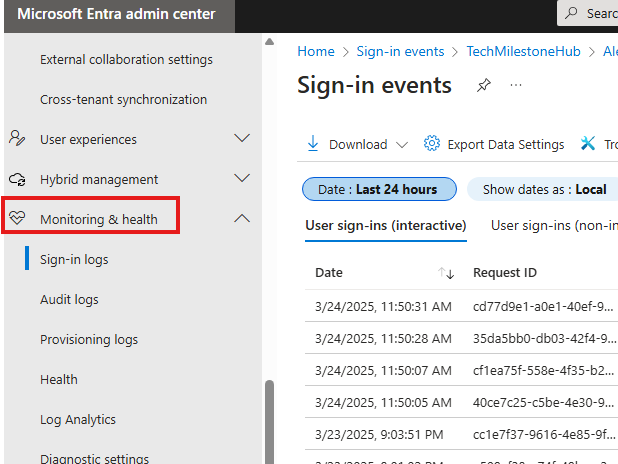
1 – Provide status of sign-in by user
2 – Provide location, IP address of sign-in
Roles To Access Sign-in Logs
1 – Global Admin/Reader
2 – Security Admin/Reader
3 – Reports reader
Azure AD: Audit Logs
Show activities done in Azure AD
Logs Retention And Monitor
Log will be available for 30 days. If we need for more days, we need to stream the logs to data store.
We can stream logs to Logs Analytics Workspace.
We can monitor logs using Azure Monitor in Azure portal.

1 – Create Log Analytics Workspace
2 – Add diagnostics settings
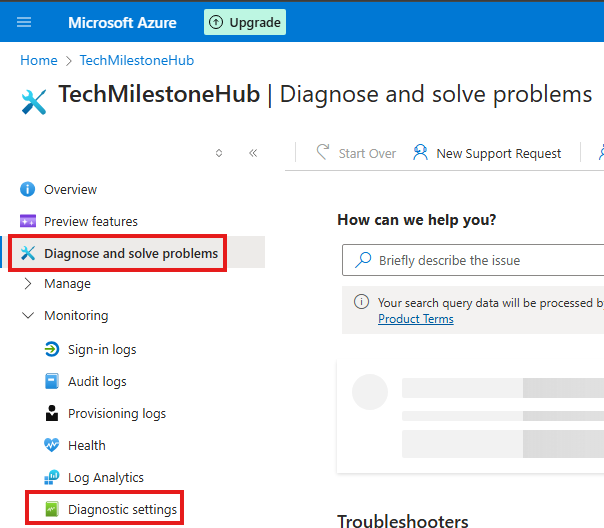
Azure portal > Entra ID > Diagnose and solve problems > Diagnostic settings > Add Diagnostic Settings
Here we can select the logs and Log analytics workspace to send the log to.
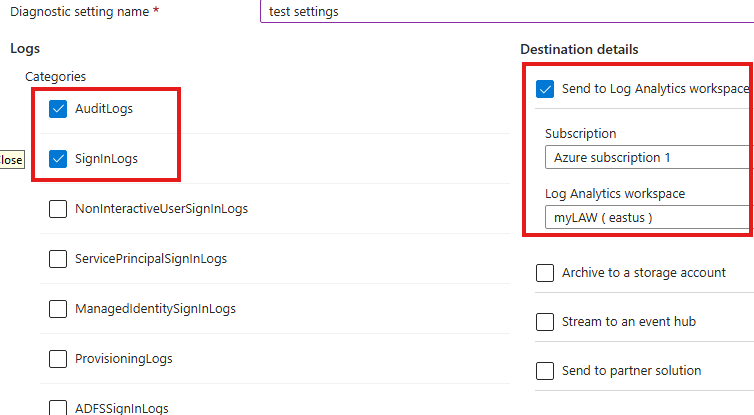
Here we did a Diagnostic settings to bring sign-in and audit log to log analytics workspace.
It will take some time for logs to show up here.
After some time we can go to Log Analytics Workspace resource we created and run queries to view the logs:
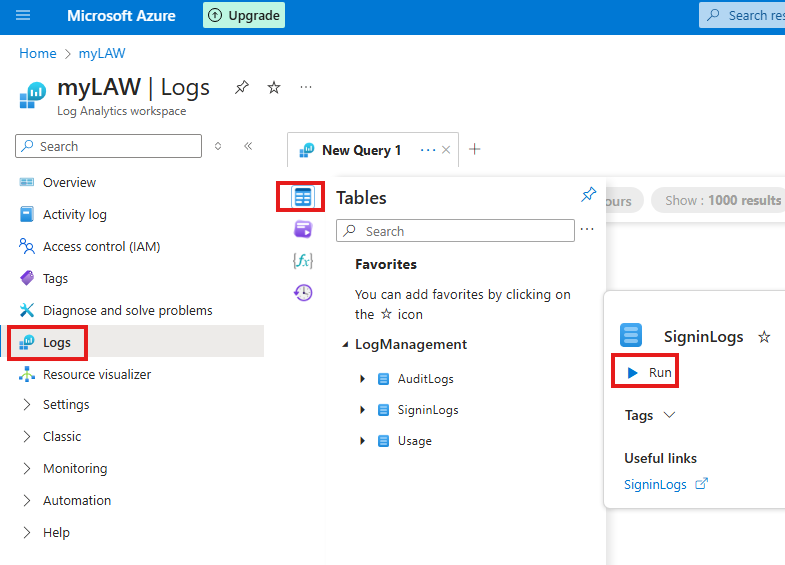
here we can query logs using simple of KQL Mode

Azure Monitor
Azure Monitor > Activity Log
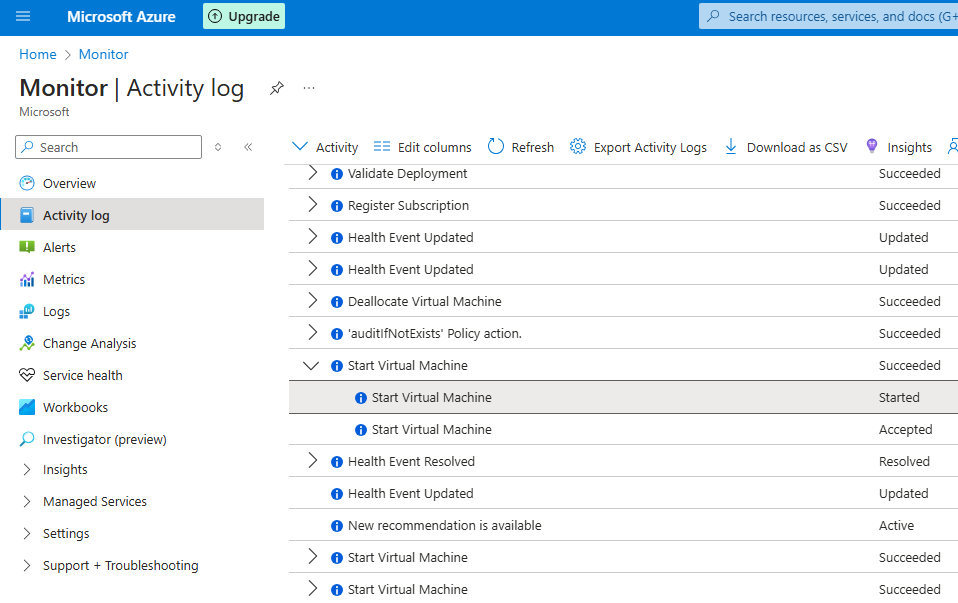
Here we can see all the activities done with azure resources.
Azure Monitor > Metrics
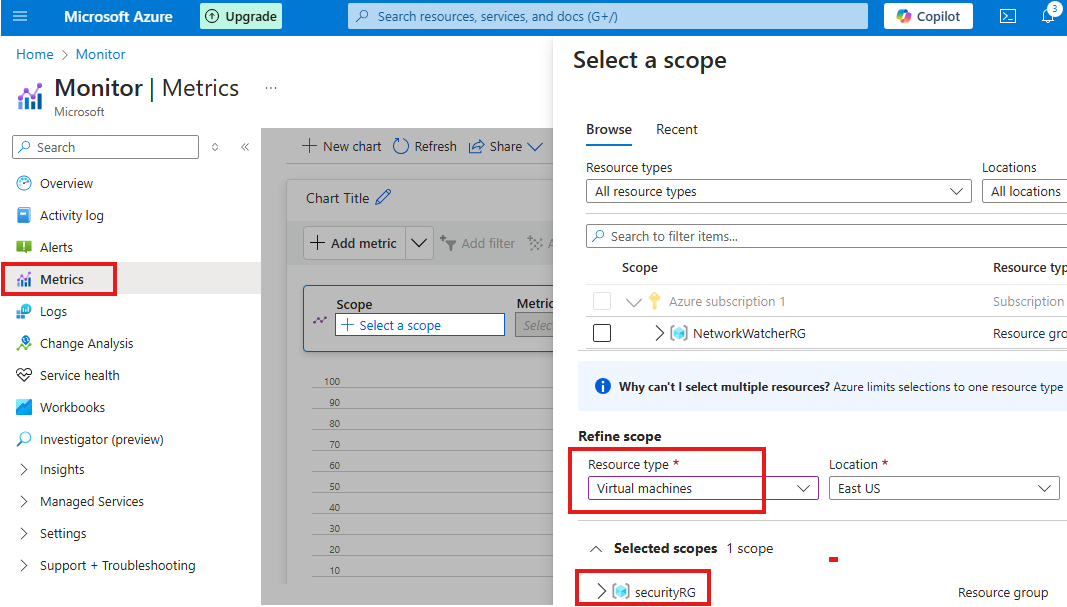
Here we can see some metrics related to azure resources, like CPU usage of VMs etc.
Azure Monitor > Alerts

Here we can create some alert rules based on resource utilization.