Create Virtual Network
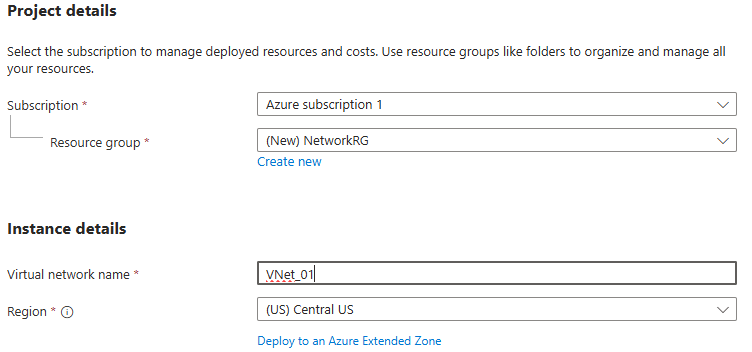
Add IP address spaces

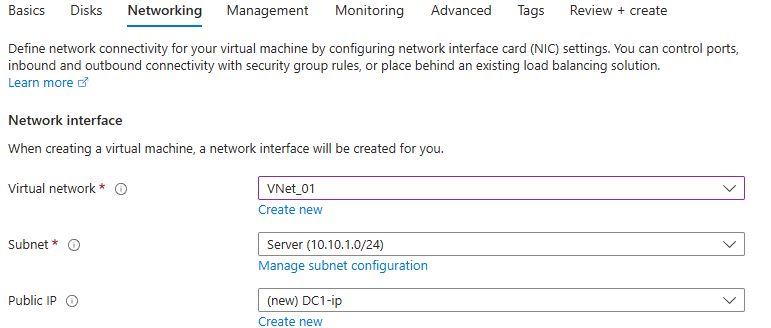
Create VM Server
In the same region;
Select the virtual network we created;
Make disk Standard SSD to save cost.
In Management Tab, schedule auto shutdown.
1 – Set Private IP as a static IP for the created server
Network Setting > Network Interface
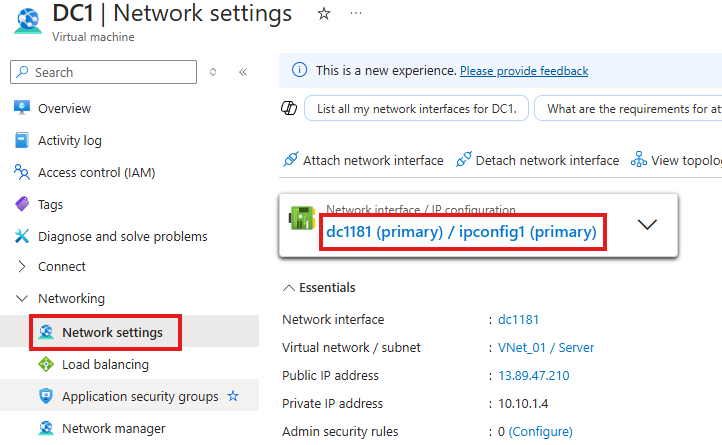
Go to IP Configurations
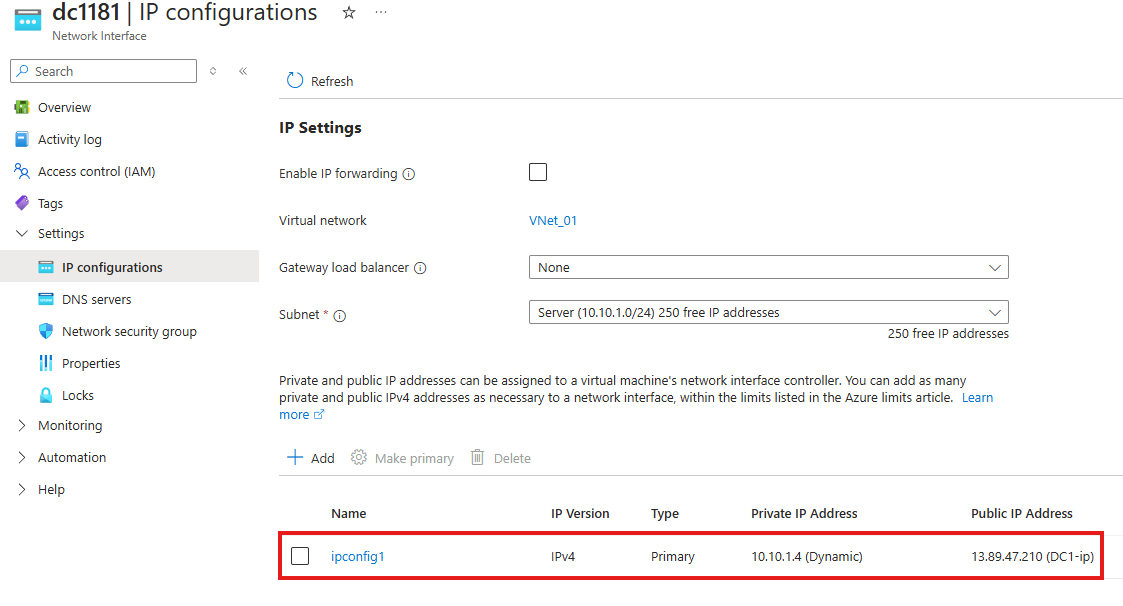
Make IP static here; and give our IP address for the server

Promote Server As Domain Controller
Run the script:
| Declare variables Update DomainName, DomainNetBIOSName and Password with your settings $DatabasePath = “c:\windows\NTDS” $DomainMode = “WinThreshold” $DomainName = “” $DomainNetBIOSName = “” $ForestMode = “WinThreshold” $LogPath = “c:\windows\NTDS” $SysVolPath = “c:\windows\SYSVOL” $Password = “” Install AD DS, DNS and GPMC start-job -Name addFeature -ScriptBlock { Add-WindowsFeature -Name “ad-domain-services” -IncludeAllSubFeature -IncludeManagementTools Add-WindowsFeature -Name “dns” -IncludeAllSubFeature -IncludeManagementTools Add-WindowsFeature -Name “gpmc” -IncludeAllSubFeature -IncludeManagementTools } Wait-Job -Name addFeature Get-WindowsFeature | Where-Object {$_.InstallState -eq ‘Installed’} | Format-Table DisplayName,Name,InstallState Convert Password $Password = ConvertTo-SecureString -String $Password -AsPlainText -Force Create New AD Forest Install-ADDSForest -CreateDnsDelegation:$false -DatabasePath $DatabasePath -DomainMode $DomainMode -DomainName $DomainName -SafeModeAdministratorPassword $Password -DomainNetbiosName $DomainNetBIOSName -ForestMode $ForestMode -InstallDns:$true -LogPath $LogPath -NoRebootOnCompletion:$false-SysvolPath $SysVolPath -Force:$true |
Update DNS Address in Virtual Network
We do this so that any clients in the server can locate the DNS server and Domain controller.
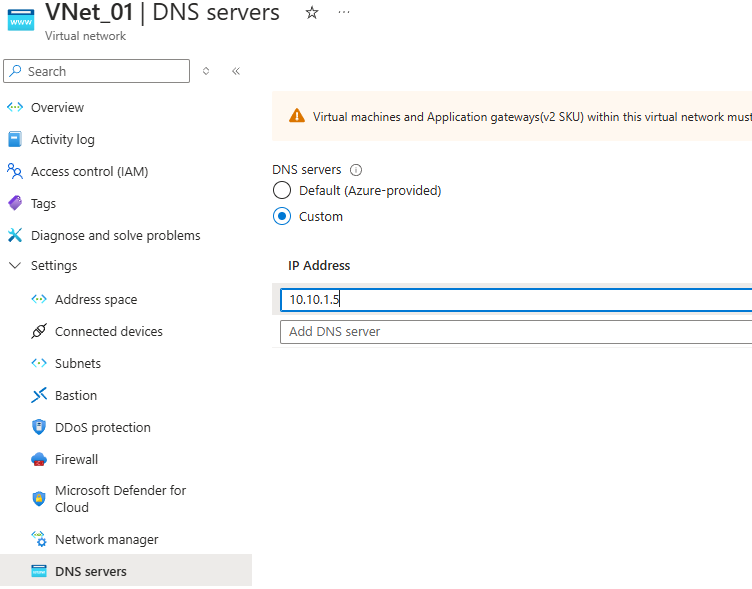
Now if any clients join the domain they will be able to join the resources.
Add Custom Domain To Azure AD
In Azure portal Go to Microsoft Entra ID:
Manage > Custom Domain > Add Custom Domain
Verify your domain with the TXT record provided by Azure.
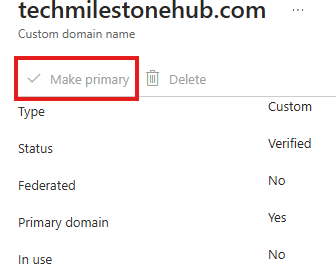
Set Primary Domain
Make the newly verified domain as primary
RBAC And Cloud Native Access Control
Cloud native Identities means, identities that only exists in Azure AD (Microsoft Entra ID), not the once replicated from on-premise AD, and not considered as hybrid.
Account used to create the Azure portal account is Global Administrator.
Roles can be viewed from Entra ID > Roles and Administrators
Global Admin can assign and modify RBAC roles.
To Assign And Modify RBAC Roles
As Global Admin go to Subscriptions > IAM(Access Control) > View My Access
It will say GA has owner role on subscription.
GA is set at tenant level; Owner can be set only at a group level like : MG, Subscription, RG etc.
1 – Create User Add To Group
E ID > Users > Create New User
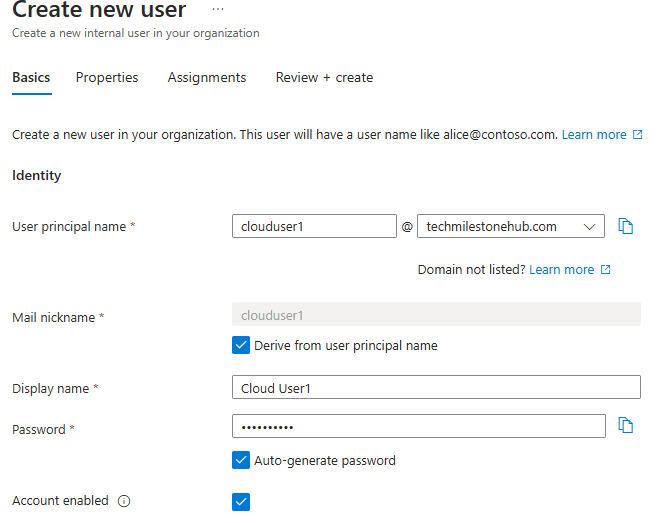
Usage location should be our region.
Review and create the user.

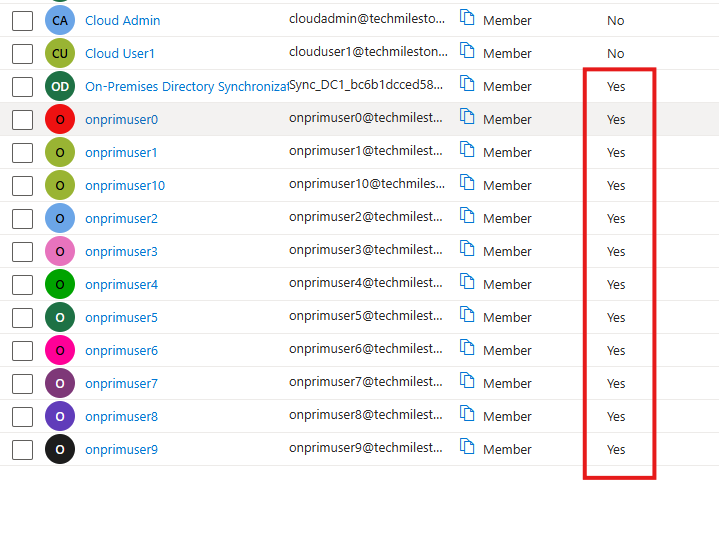
On-premise sync enabled : No, means this is not a hybrid user.
Create a group:
E ID > Groups > New Group : Select security Group
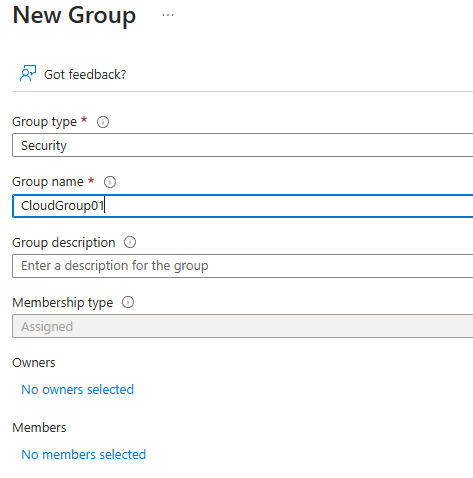
Security group is for access controls, Microsoft365 groups are for collaborations.
Add members to the created group
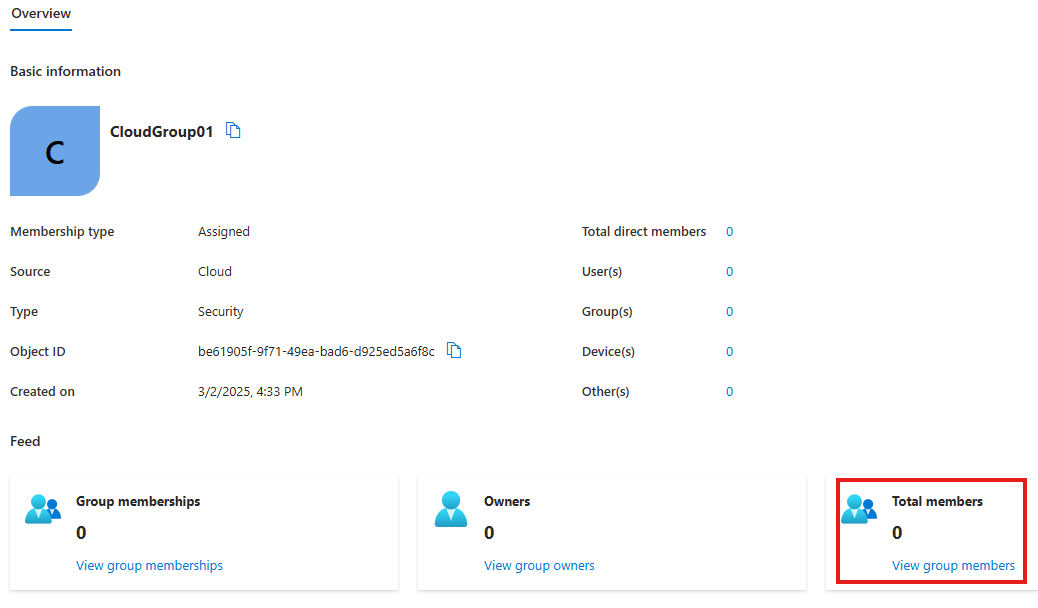
View Group Members > Add Members : Select the previous user we created
2 – Login as The user
Go to : portal.office.com > Login as the new user
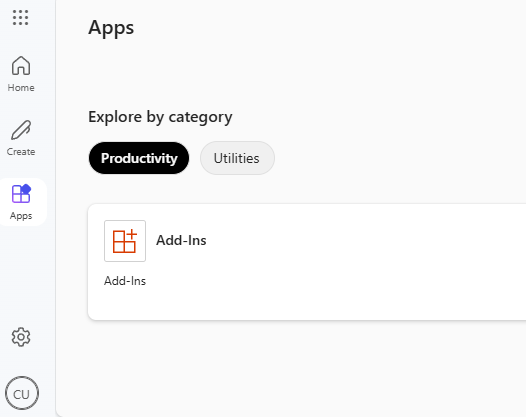
We don’t see any apps here now.
3 – Give Global Reader Role to the user
E ID > Roles And Administrators : Search for Global Admin role
Add assignment > Select the user
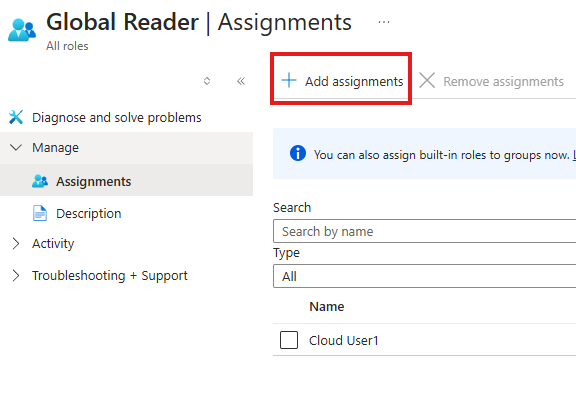
User can now login to admin.microsoft.com
From here we can view users and groups; but cannot modify.
Hybrid Identity
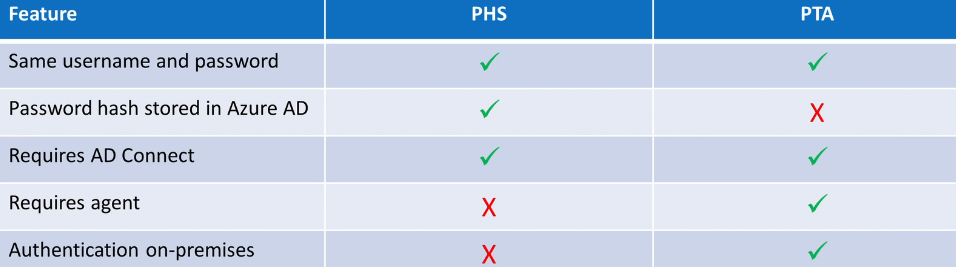
There are 3 authentication methods for hybrid Identities
- Password Hash Synchronization (PHS)
- Pass-Through Authentication (PTA)
- Active Directory Federation Service (AD FS)
ADFS
Uses browser redirects to 3rd party service.
User Principal Name (UPN)
It is an internet ID, with format : username@domain
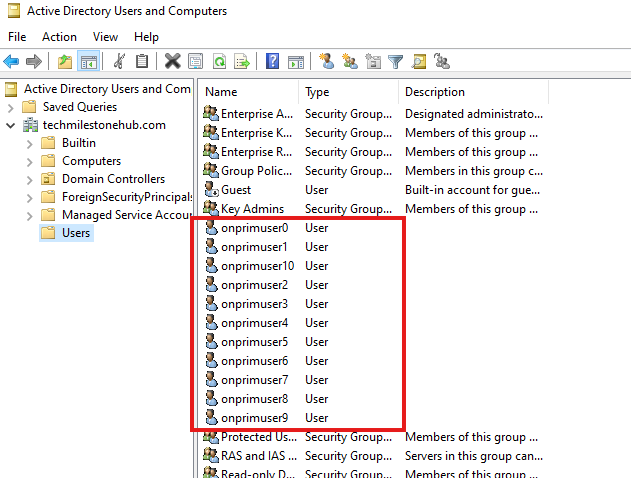
Create Users in On-Premise Doman
Run PowerShell script to add 10 users.
Source Anchor
A setup in hybrid Entra environment so that, on-premise user who changes any name will not be duplicated in cloud.
Prepare User For AD Connect Using IDFix
Download IDFix from: https://microsoft.github.io/idfix/
ID fix will check for errors and source domain is healthy and ready for sync.
Usually the username created when creating AzureVM server will not have a logon name.
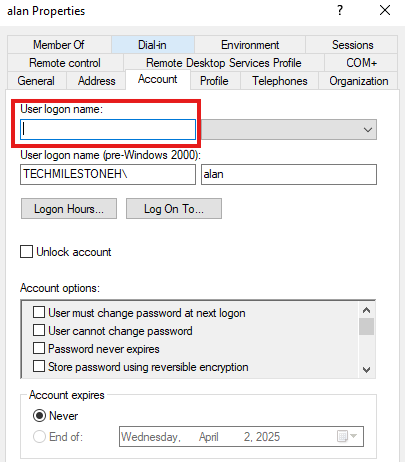
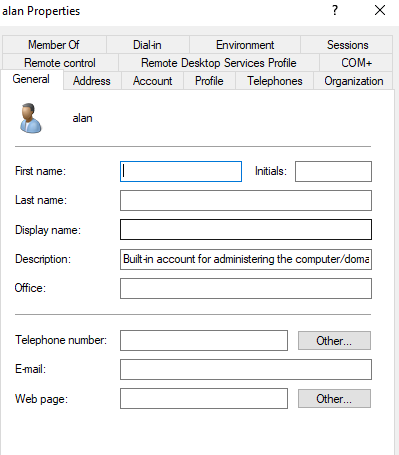
We need to add missing information for the first user in Azure VM server.
Non-Routable Domain Users
Also, if there is any user with non-routable domain is present, IDFix will show that.
So we need to add a routable domain using tool: AD Domains and trusts; Then run script to change domain of those user.
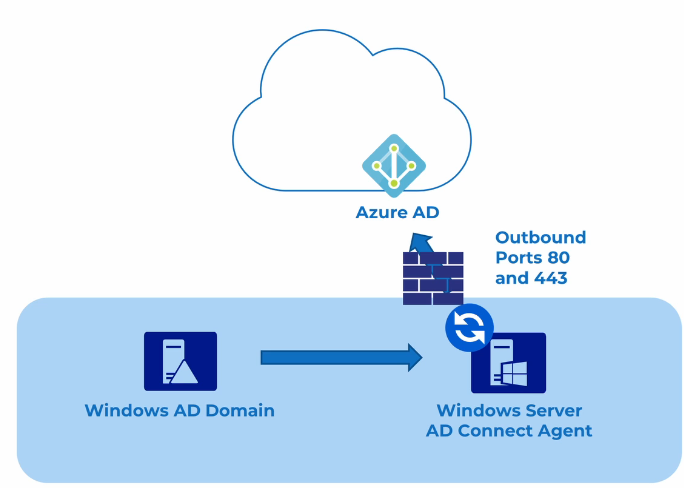
Azure AD Connect
2 versions available
- Azure AD Connect Sync
- Azure AD Connect Cloud Sync
Sync is 1 way; There is exception if Self-service password reset(SSPR) is enabled, AD Connect can sync from cloud to on-premise(password write-backs).
Roles Required in Entra ID: Global Admin, Hybrid Identity Admin
1 – Enable TLS 1.2
Run PowerShell script
Restart the server
2 – Add Global Admin Account in Azure
The account used to first login to Azure portal is an external B2B account. That means it is created outside the tenant. That account is sourced from Microsoft.
We need an account sourced from Entra ID Tenant.
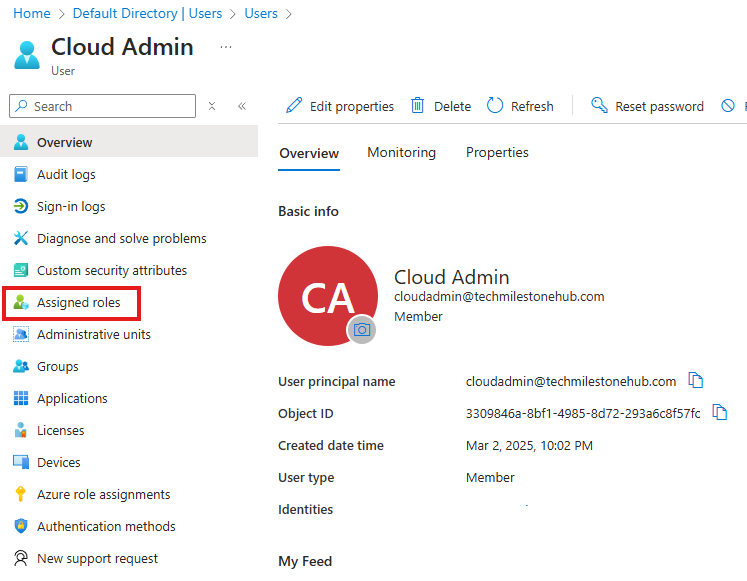
Assigned Roles > Add Assignment : Add Global Admin Role
Login to portal.office.com, as the new user
3 – Configure AD Connect Sync using the new Global Admin User
Download Entra Connect Sync, and run installer
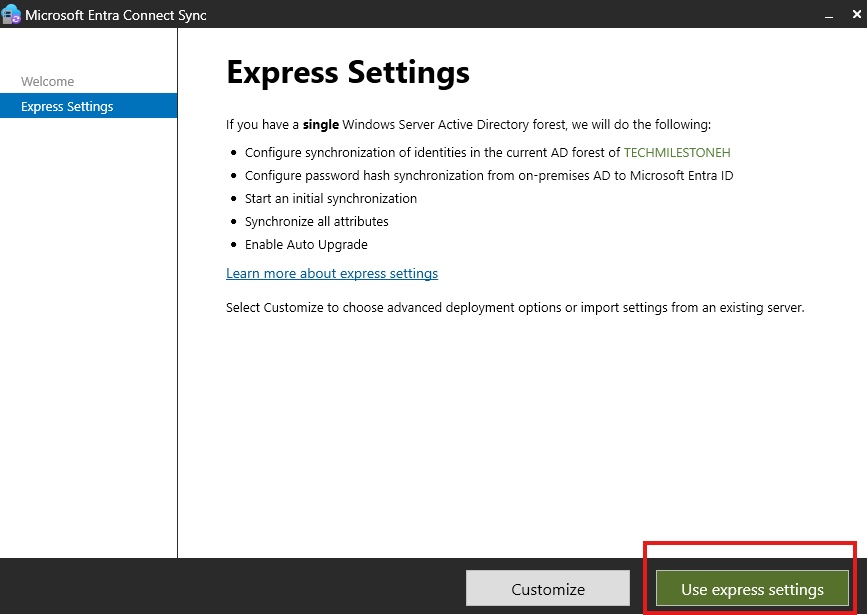
Choose express settings
Enter credentials of Global Admin User
Login
Now, enter credentials of enterprise Admin (on-premise)
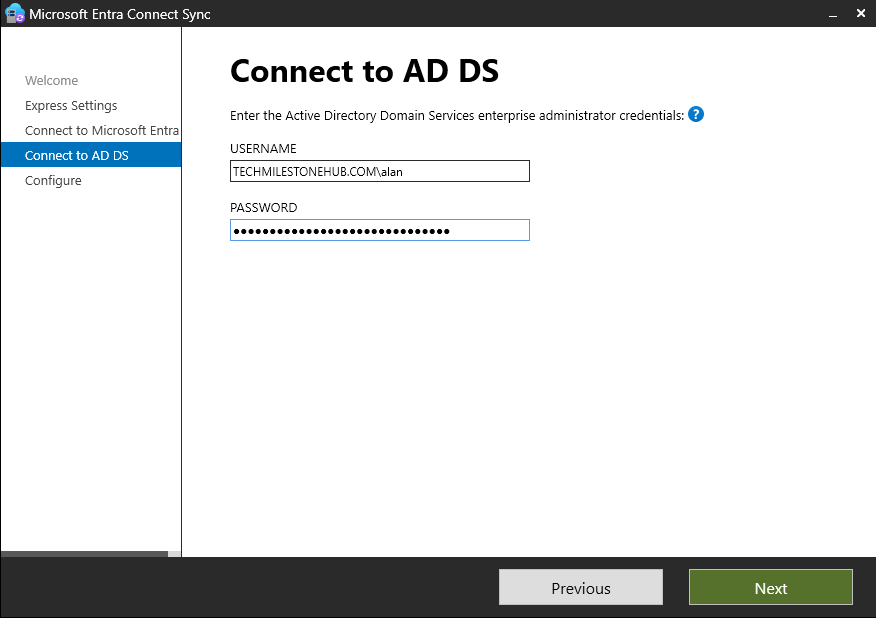
Click Next
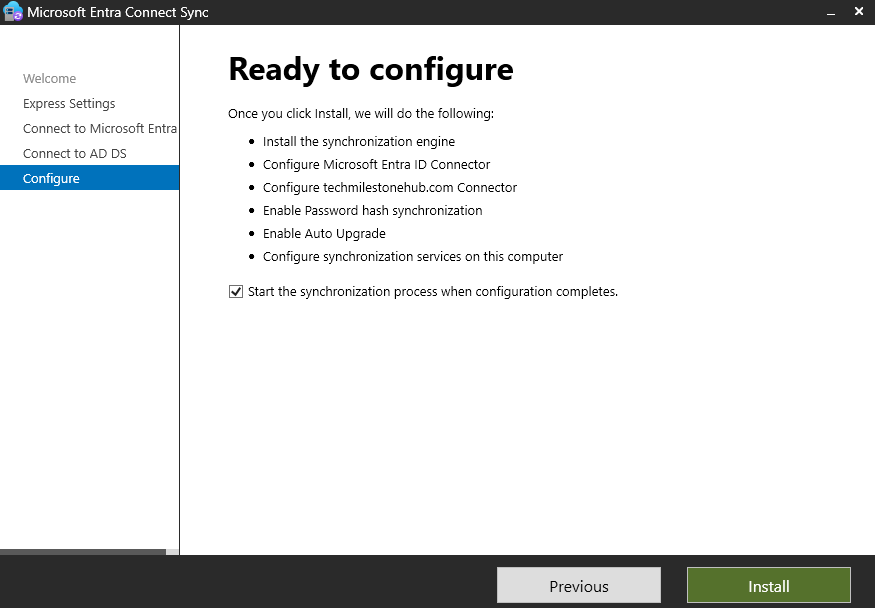
Install
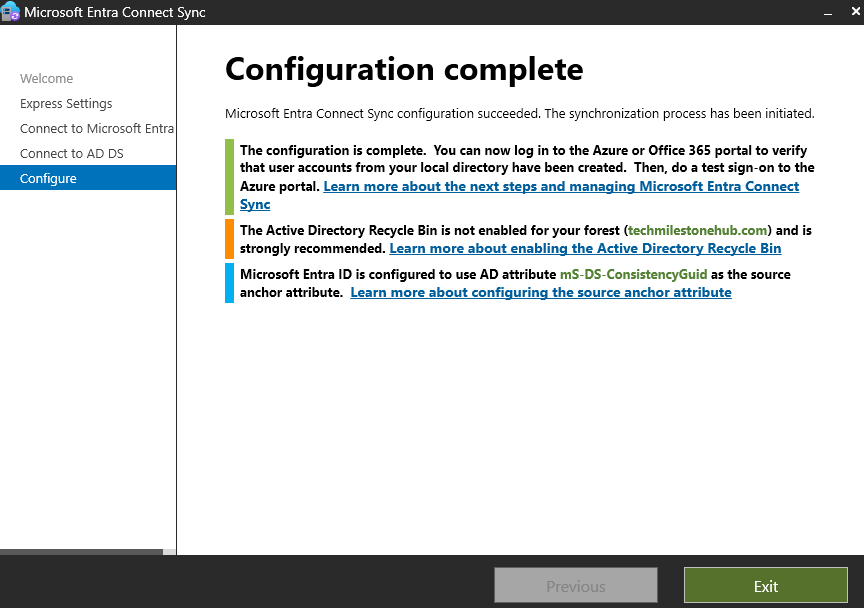
Check User in Entra ID
Test Created User
Go to : myapps.microsoft.com
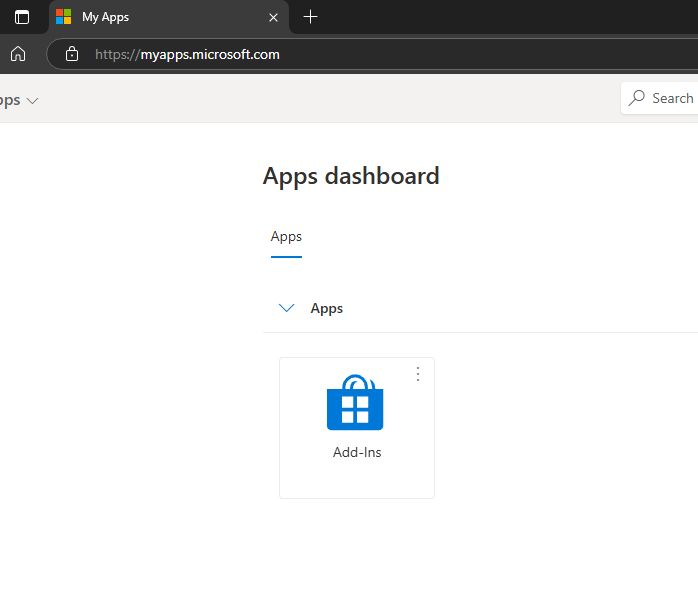
Login as any user.
Enable Azure AD Premium 1
Check if free trial is available.
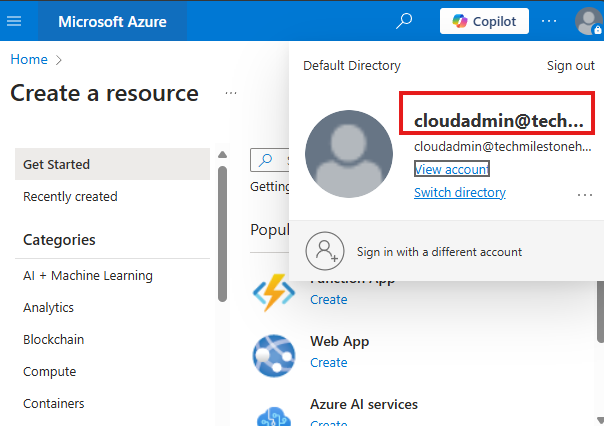
We can also buy form admin.microsoft.com (Admin Center); Logins as newly created Global Admin User.
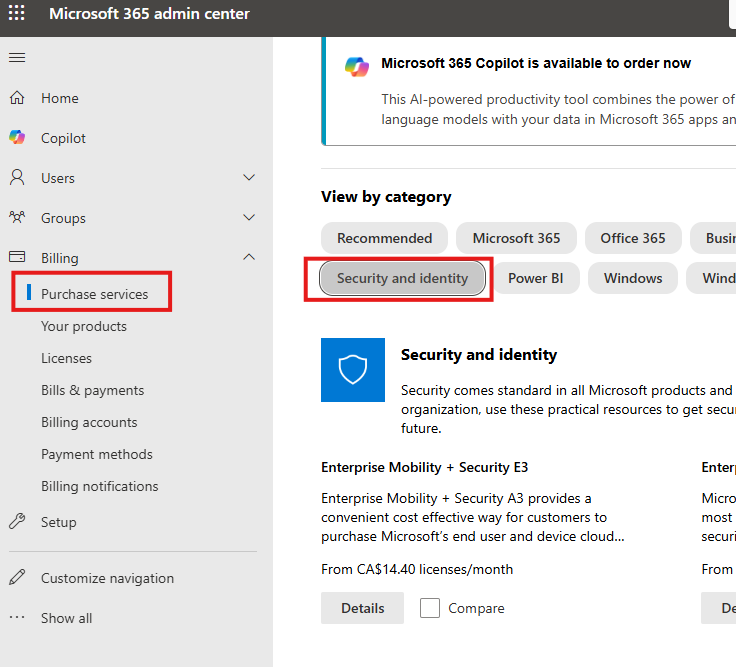
Here search for Azure AD Premium P1.
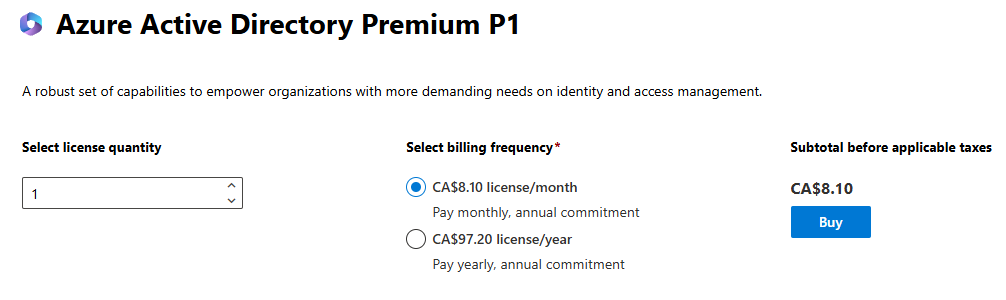
After purchase we will see it under Licenses blade
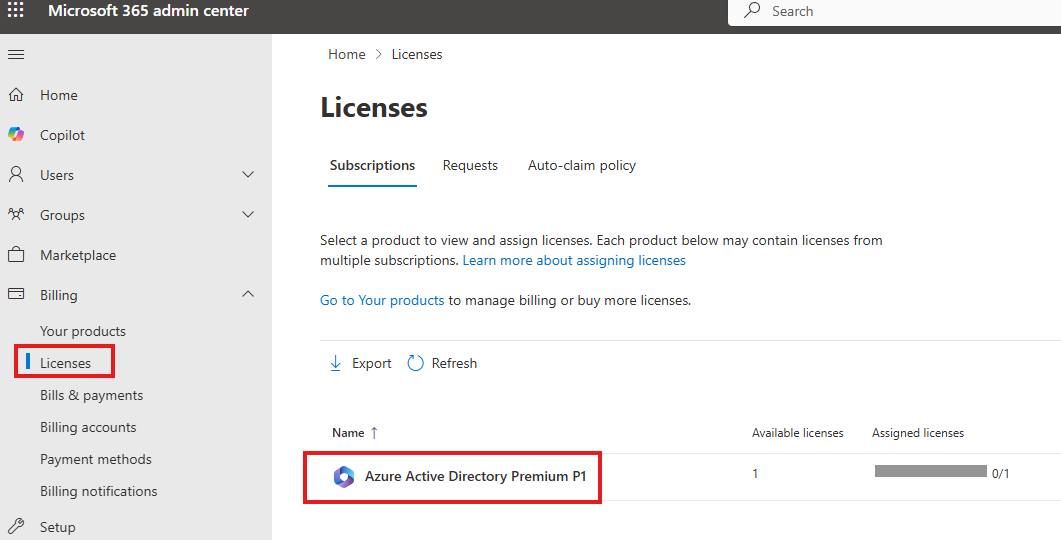
Assign License To User
User > Active Users
These are some of security features that Microsoft want all uses to implement, even if they don’t have any premium features.
MFA for all users
Legacy auth protocols like IMAP, SMTP, POP are disabled for clients.
We cannot selectively enable or disable these. If we have an app that uses IMAP, we cannot turn that off alone, we have turn off all SDs.
We cannot set conditions for MFA, we need CAP(Conditional Access Policy) for that.
Enable MFA And Login To Azure Portal
As cloud admin enable MFA using Authenticator app and login to Azure portal.
This account cannot create any resources, because this account don’t have a subscription.
Owner role is required for that.
Disable Security Defaults
Entra ID > Properties > Manage Security Defaults > Disable
Company Branding
Go to Entra ID > Company Branding
Upload Banner, logo images
Now when users sign in:
We can see that company branding has been applied.
Notifications
Go to : Entra ID > Properties
Add details for
Technical contact
Global privacy contact
Privacy statement URL
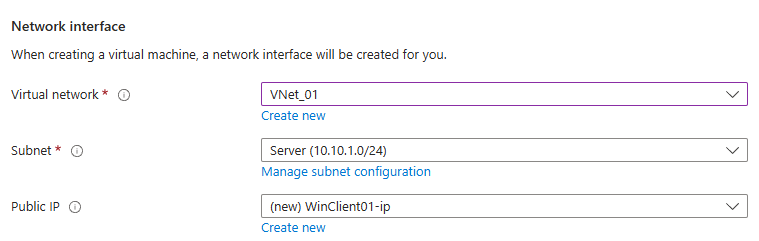
Create a Client VM
Create a Windows 10 Client VM in Azure.
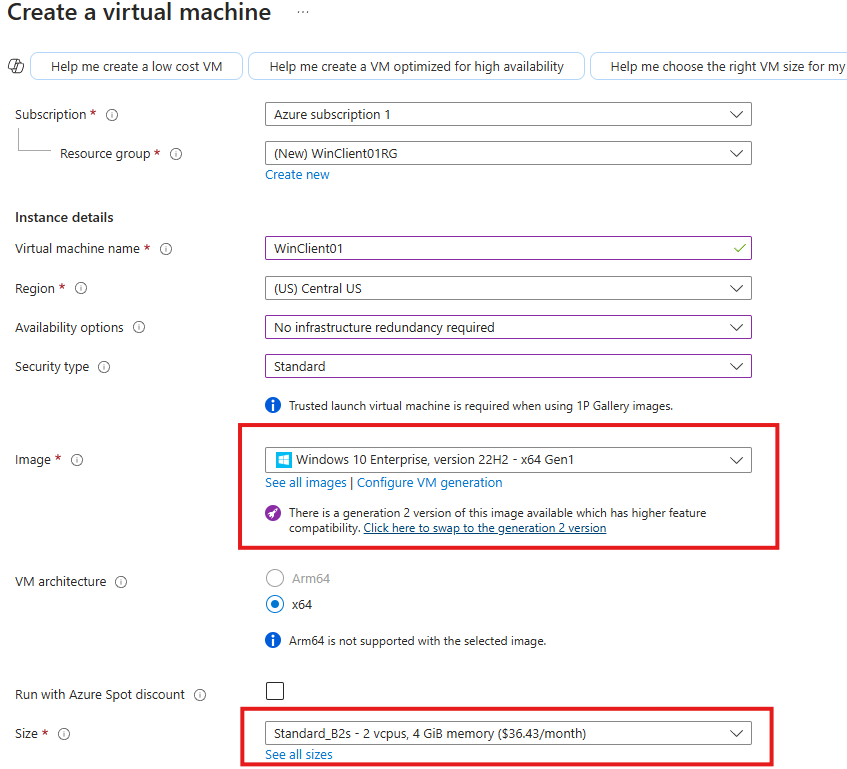
Select Virtual network of Domain Controller
3 Options With Devices
- Azure AD Registration
- Azure AD Join
- Hybrid Azure AD Join
Azure AD Registration
Provides option for BYOD
Limited administration options
Users login with their own credentials, not Azure or Windows AD account
Can be enrolled in In-Tune; Users can access Teams, Emails in the device, In-Tune applies policy to make sure device meets security requirements.
In Windows 10 Client > Setting > Accounts > Work or School > Login with the azure tenant user we created before.
In Azure portal Check Entra ID > Devices

Here we will see Azure AD Registered client device.
Azure AD Join
Devices are owned by organization.
Need Azure AD account.
Can be managed by In-Tune and SCCM.
Used by organizations that are cloud only.
Hybrid Azure AD Join
For organizations that have device joined to a Windows AD, and synced to Azure AD.
Owned by organisation.
Users sign in by Windows AD account.
Support Legacy OS, Windows 7.
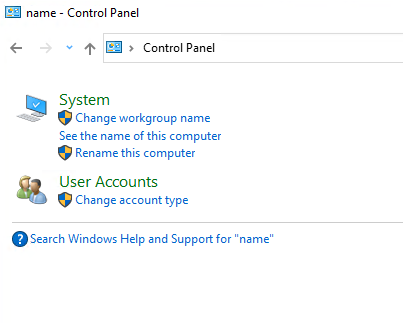
Join Client Computer to Windows AD
Go to Control Panel (search “name” ) > Change Workgroup name
Change > Enter domin
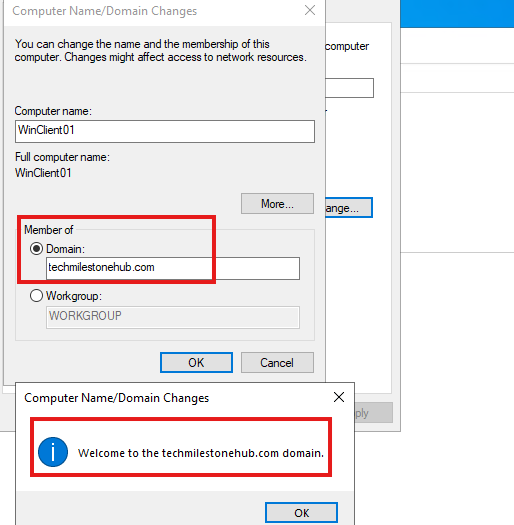
It will ask credentials for Enterprise Administrator Account (on-premise)
Restart computer
Hybrid Join
Right now the newly added client computer will not be seen in Azure AD. So we have to do this.
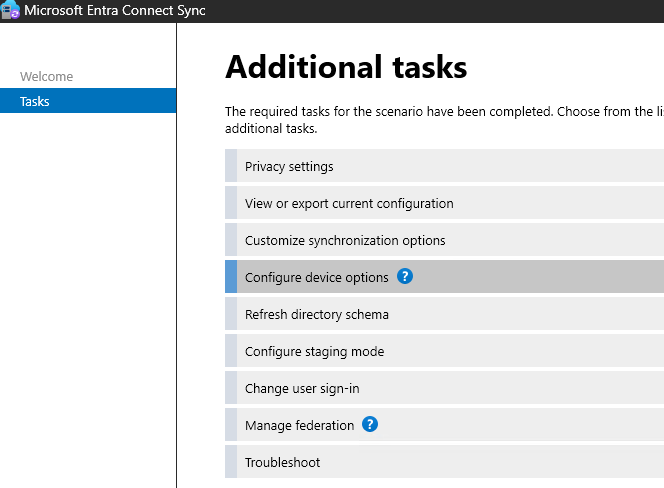
Open Entra Connect Sync App in the DC.
Configure > Configure Device Options
Give Cloud Global Admin Credentials
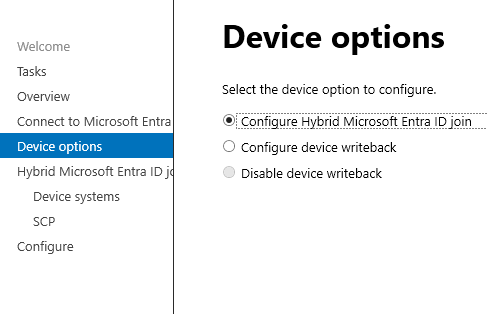
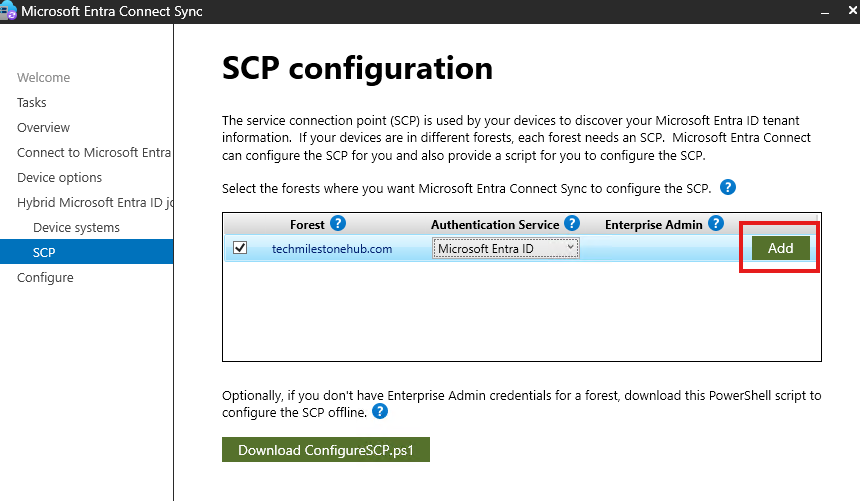
Enter enterprise admin (on-premise) credentials.
Click Configure
Manual Sync Using Azure AD Connect Sync using PowerShell
in PowerShell > Start-ADSyncSyncCycle
Check status in client
in Cmd > dsregcmd /status
We see some error:
Device State |
+———————————————————————-+
         AzureAdJoined : NO
      EnterpriseJoined : NO
          DomainJoined : YES
            DomainName : TECHMILESTONEH
           Device Name : WinClient01.techmilestonehub.com
Server Message : The device object by the given id (14c5008e-33bb-4749-b994-b2504149d0b4)
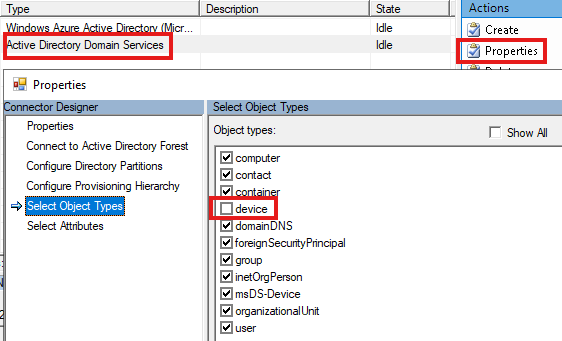
Open Sync Service Manager (comes with Azure AD Connect Sync)
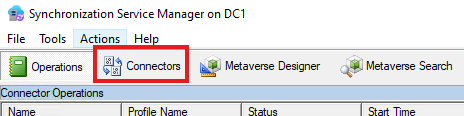
Make sure device is selected under Active Directory Domain Service (on-premise).
Now login to Azure Portal as Cloud Admin : Entra ID > Manage > Devices
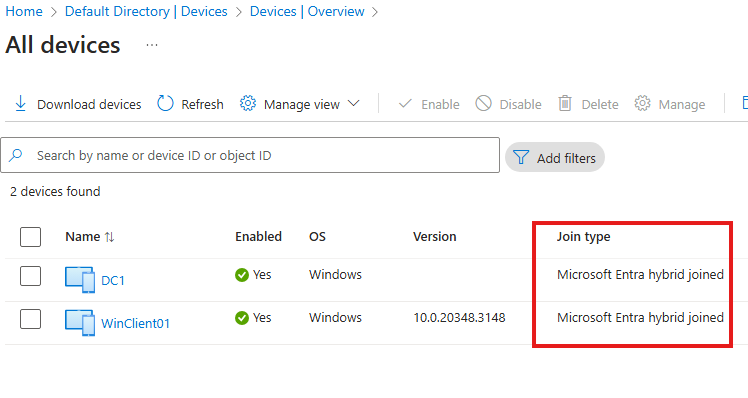
You will see that on-premise DC and client is hybrid joined.
Note:
If a device is just registered first and then later Azure AD joined, when user logs in the device will be only Azure AD joined.
SSO is already enabled when we did hybrid AD join;
In AD Connect tool > Configure > User Sign-in : Enable Single sign-on
Here we are only testing SSO.
Remote Access To Client Machine
Give hybrid users, remote access to client machine(on-premise)
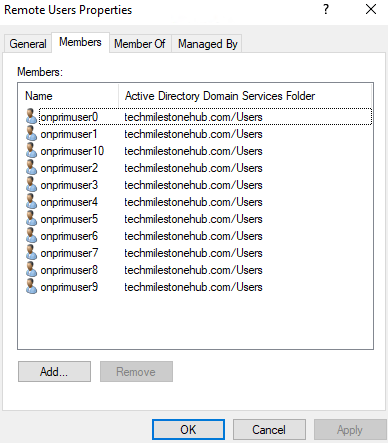
Add on-premise(now hybrid) user to a Global, Security group : Remote Users
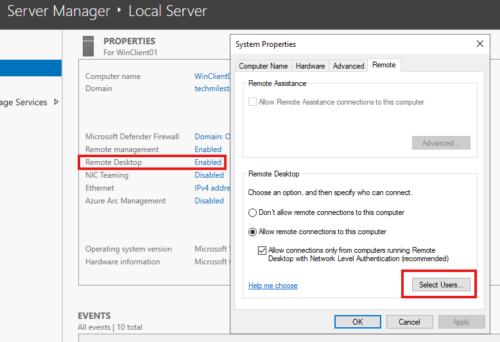
Allow this group remote connection to client.
In Window 10 Client : Remote settings > “Select Users that can remotely access this PC”
In Windows Server Client : Server Manager > Local server > Remote Desktop
Remote to client machine
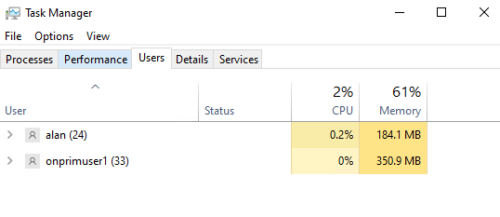
Now as hybrid user remote to client machine from DC;
In edge browser > go to : portal.office.com
Here we will experience SSO; we will not be asked username or password.
Many users can login to client machine at a time.
SSO Options For Windows and Azure
1 – Windows Active Directory Federation Services
Use user cookies and redirection to keep users signed in.
Managed Domain and Federated doman
2 – Seamless SSO
Worked with managed domain. Uses a computer account in Windows AD, uses service principles.
User Kerberos and SAML tokens to sign the user into Azure AD from a domain joined computer.
Recommended for legacy windows clients 7/8.1.
3 – Primary Refresh Token (PRT)
JSON web token issued for Windows 10 server 2016 or later, also iOS, Android for SSO.
Issued when user logs in to Azure AD joined or hybrid Azure AD joined device.
Also issues when, user logs in to Azure AD registered device.
Also, when a secondary work or school account is added on the device or selects option:
“Allow my organization to manage this device.”
3.1 – Working of PRT
Azure AD Cloud Ap plugin is used to verify user credentials with Azure AD during sign-in.
Azure AD WAM plugin enables SSO for app that rely on Azure AD for authentication.
Dsreg is an Azure AD component that is part of windows and handles device registration process.
When we register or join a device (hybrid join or Azure AD join), Dsreg creates 2 cryptographic key pairs: 1 – Device key; 2- Transport key.
Device key, is bound to Trusted platform Module(TPM) of the device if device has one. DK is bound to the ID of the device.
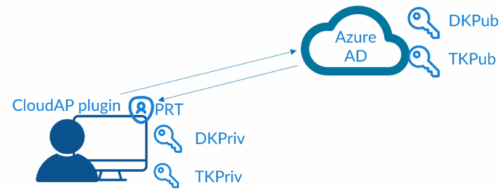
Private keys are stored locally and public keys are sent to Azure AD.
When user logs in Cloud AP plugin request PRT using the credential provided, and caches PRT locally.
Once a user is logged in WAM plugin is used to access apps.
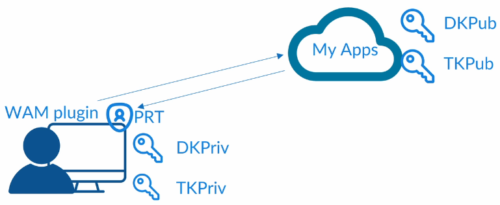
WAM plugin uses PRT to request access to the app, thus enabling SSO, injecting PRT into browser request. For request to each app new PRT is issued and updated.
PRT token is valid for 14 days and renewed as long as user is active on the device.
Cloud AP plugin renews every 4 hours as long as user is logged in.
PRT browser support is included natively in Edge browser, other browsers need extension.
Relies on Factors like :
- Something you know
- Something you have
- Something you are
MFA Options in Azure
1 – Security Defaults
2 – ADFS
If Azure AD domain is federated, we can enforce MFA with ADFS. This provides option to enforce MFA for 3rd party services.
3 – Per-User MFA
Enforce MFA for individual users.
Not recommended in production. Azure recommend use of conditional access policy.
Limited flexibility, need to be manually updated, cannot be enforced based on groups.
Used by organization that use free tier Azure AD.
4 – Conditional Access Policies for MFA
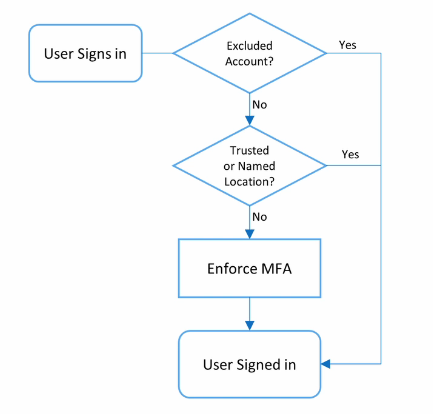
Emergency Access Accounts
Accounts without MFA, also known as break glass account. Highly privileged, not assigned for any user.
MFA Service Settings
These are settings available for MFA in Azure AD.
1 – App Password
For legacy apps that don’t use MFA.
2 – Trusted IP addresses
These are IP addresses designated as trusted sites. MFA wont be prompted.
3 – Verification Options
Various options for MFA: app, SMS, etc.
4 – Trusted Devices
No MFA prompt for trusted devices.
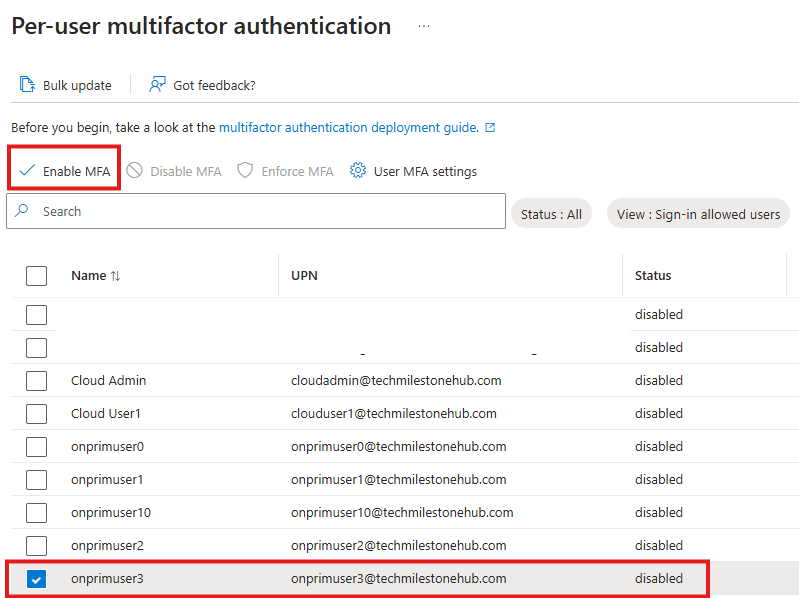
Enable Per -User MFA
From DC login to portal.azure.com as Cloud Admin.
Entra AD > Manage > Users > Per-User MFA
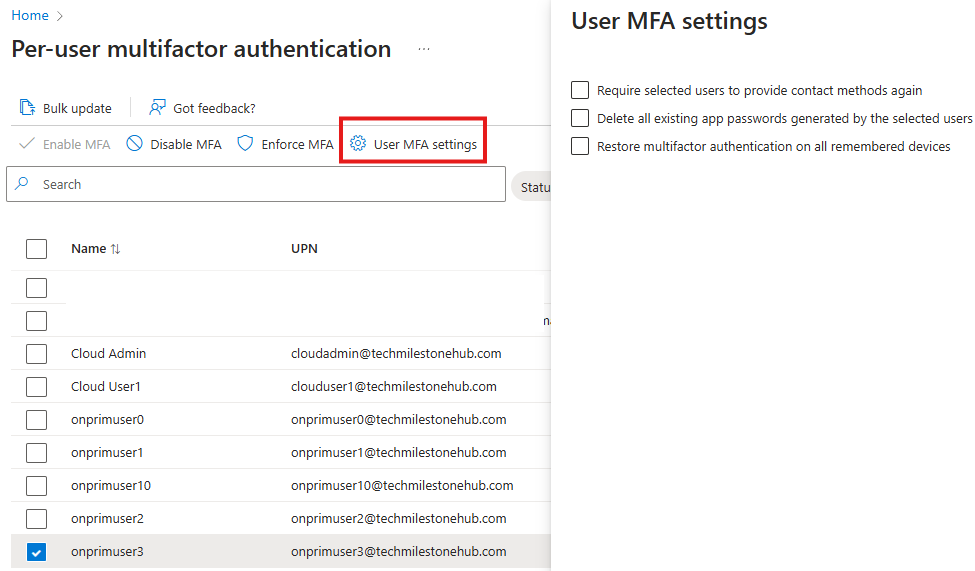
User MFA Settings
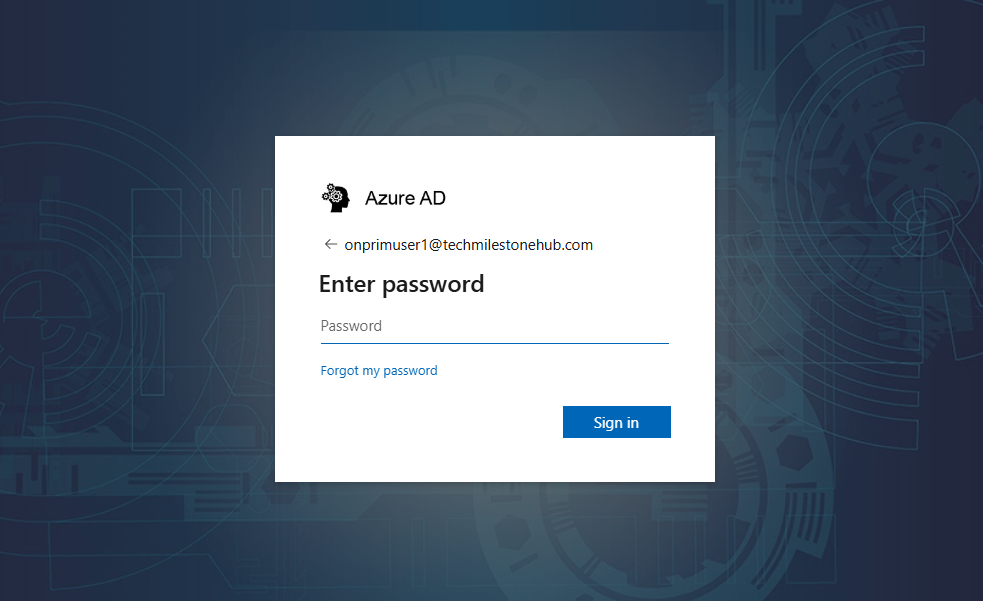
Login as this user in the client computer
When RDP, use full UPN: onprimuser3@techmilestonehub.com
Go to myapplications.microsoft.com
Now, we will see that i wont ask us any username or password(SSO), but it will ask us to set up MFA using authenticator app.
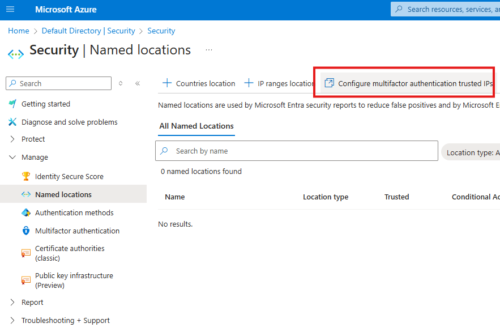
Add Trusted IP Address
Cloud Admin can goto Entra AD > Manage Users > Per-User MFA > Service settings(tab)
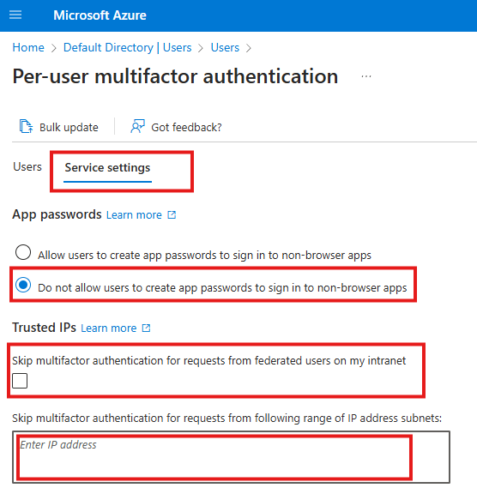
Here we can enter IP of client machine; We have to give subnet mask as well; so if only 1 IP we have to give /32; e.g.: 1.1.1.1/32
This will allow that IP address to by-pass MFA prompt.
For enabling users to connect from anywhere, and also to enforce security posture.
3 Sections
CAP has 3 sections
- Signals
- Decision
- Enforcement
1 – Signal
Signal means, data about the access request.
Identity
User, group, IP address, IP location
Device status:
Is it Azure/hybrid AD joined
Does it meets security requirements?
Application
Apps request is tyin to access
Advanced Signals (Require higher license that Premium P1)
From Real-time and calculated risk detection from Azure AD Identity protection.
Microsoft Cloud App Security to monitor user activity in real time.
Signals are collected an policies are applied only after first level of authentication: username and password.
2 – Decisions
Block Access
Enforce MFA
Require Device to be complaint
Allow only Hybrid AD joined devices
Require approval for client apps
3 – Enforcement
Once we have signal and decision is made, that decision will be enforced.
CAP Modes
3 Modes are available for CAP
- On
- Off
- Report-Only
Report-Only
Provides information on what would have happened if the policy was enabled.
4 Results When report-only
- Success
- Failure
- User action required: Conditions was applied, but required action from user
- No applied: Did not satisfy conditions to apply policy
Conditional Access: What-If Tool
Using this we can test what-if scenarios on already existing policies or before applying new policy.
Testing CAP
1 – Disable per-user MFA
Use PS script.
Connect to MS Online using Cloud Admin Account
Script will disable per user MFA from all users
2 – Create Emergency access account
Create a new user: Azure AD > Manage> Users > New User
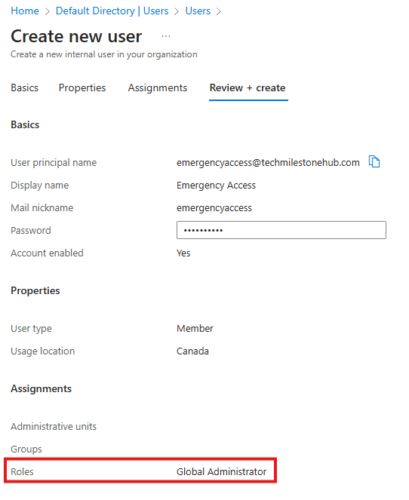
That’s it emergency access account is nothing but a global admin account.
3 – Create CAP
Process now different
entra.microsoft.com
Taking to Entra Admin Center
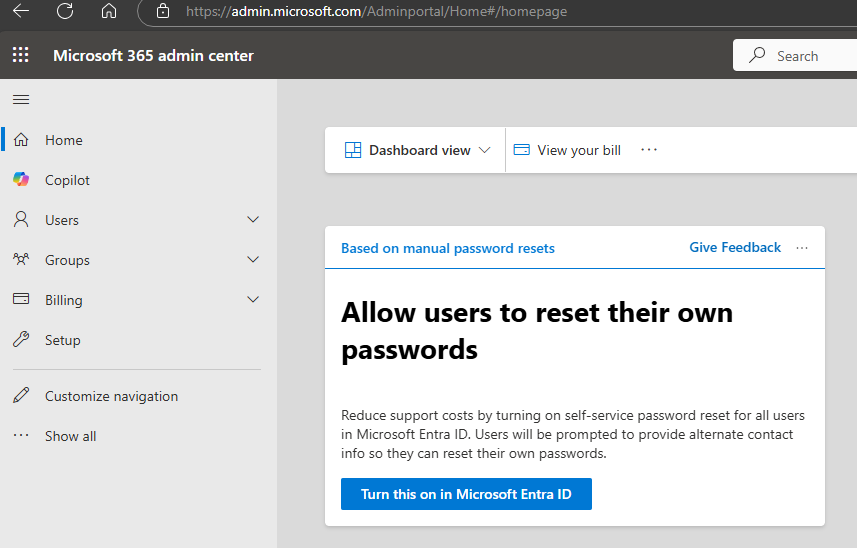
Azure AD Premium P1 license allows user to SSPR in hybrid accounts as well. Cloud Admin can assign and reassign license in Microsoft 365 Admin center.
Password is updated in on-premise system by a feature called password write-back.
Enable Password Write-back
Check if password write-back is enabled at:
Entra AD > Manage > Password Reset > On-premise integration
will see a message :
“No agents that are capable of performing password writeback have been detected. Install a sync agent and set up your sync engine before enabling password writeback”
To enable password write-back:
Go to server with Entra Connect Sync installed:
Open Entra Connect Sync > Configure > View/Export current configuration :
Take note of Synchronized directory account

TECHMILESTONEHUB.COM\MSOL_bc6b1dcced58
Set permissions on the account
Open tool : Active Directory Users and Computer
Turn on advanced features view : View > Advanced features
Right click domain > properties > Security (tab) > Advanced
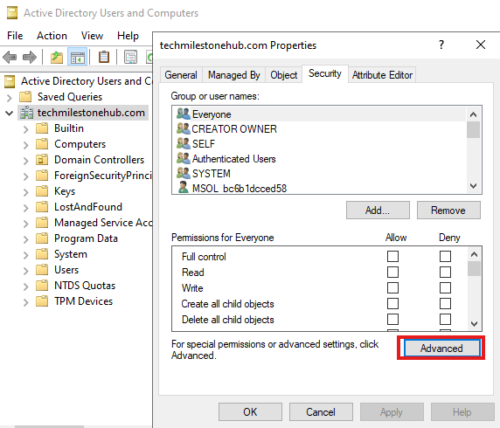
Add : Find the account used for synchronized directories
Click on Select a principal.
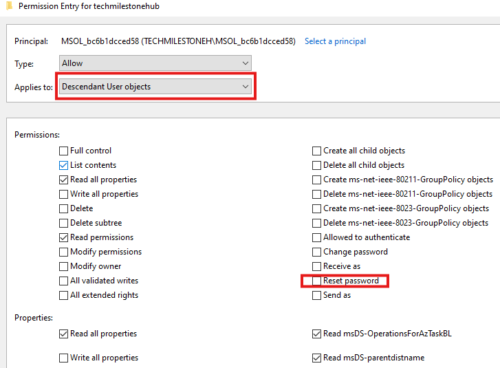
Applies to Descendant User objects
In permission: select reset password
In properties: check following boxes
Write lockoutTime
Write pwdLastSet
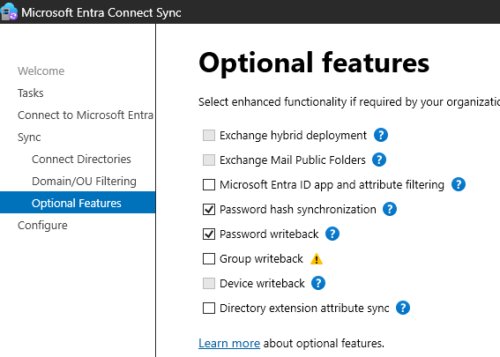
Configure Entra Connect Sync For password write-backs
Open Entra Connect Sync > Configure > Customize synchronization options
It will ask for credentials and MFA of cloud admin user
In the optional features select password write-back
Configure Entra For password reset
Here we configure who qualifies for SSPR here:
Entra ID > Manage > Password Reset > Properties > select All
Entra ID > Manage > Password Reset > Authentication Methods
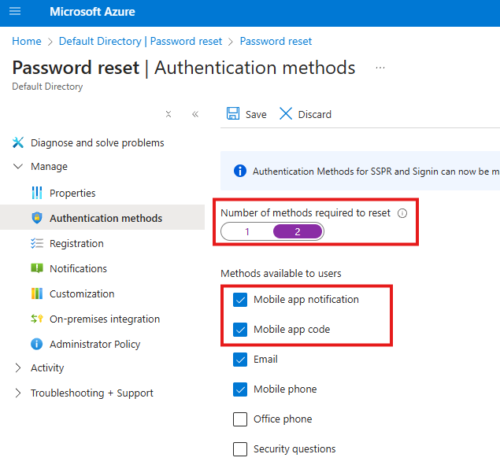
Select security questions as well.
Entra ID > Manage > Password Reset > Registration
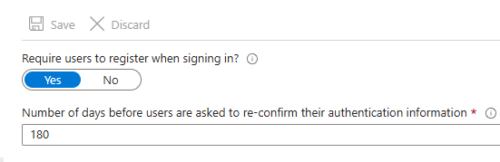
Leave default
Entra ID > Manage > Password Reset > Notification
Here can enable notification for user and admin, if password is reset.
Entra ID > Manage > Password Reset > On-premise integration
Here it will say password write-back is enabled.
Test SSPR
Login as a user. This user should have Azure AD Premium P1 license.
First login to portal.azure.com to check if login is working.
Then go to : aka.ms/sspr
Here go through MFA prompts to update password.
Once password is updated, sign back in to azure portal and also windows machine using RDP, to verify user can sign in to hybrid environment using same password.
That means password write-back is working correctly.
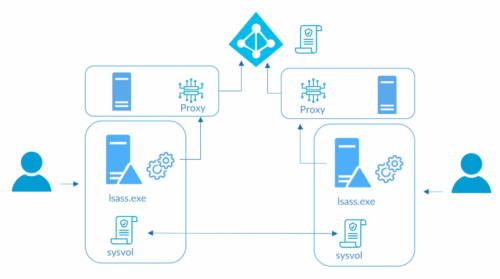
Overall Process
1- We configure password policy in Azure AD
2 – We install agent in on-premise windows DC. This agent will check if password changes are in line with policy in Azure AD, this policy is stored locally and replicated with DCs, in sysvol folder.
There must be a proxy server to check the policy with Azure, to prevent DCs from accessing internet directly.
Agent will download the policy every hour.
3 – Deploy to Audit mode first.
4 – Communicate password change requirements with users.
5 – Password will be validated only when changed.
Configure Password Protection Service In Azure
Login as Cloud Admin to Azure portal.
Go to : Entra ID > Security > Authentication Methods > Password Protection
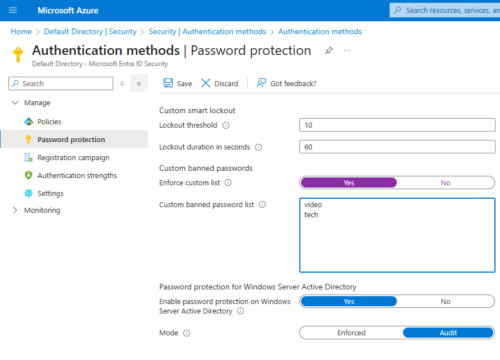
If it is not enforced, we can only see the report in summary, password will not change.
Azure Password Protection Policy Proxy Service
Requirements
Need server 2012 R2 or later.
.NET 4.7.2 is required.
Should allow DC to access the server.
Outbound internet access with TLS 1.2
Global Admin account is required to register proxy service.
Steps:
Make sure .NET 4.7.2 is installed, Check: Server manager > Add Roles and Features
Download software : Azure AD Password Protection for Windows Server Active Directory, from link: https://www.microsoft.com/en-us/download/details.aspx?id=57071
This contain both proxy and agent. In real production environment, these will be installed on separate servers.
| AzureADPasswordProtectionProxySetup.exe | 5.3 MB |
| AzureADPasswordProtectionDCAgentSetup.msi | 2.6 MB |
install proxy
Run PowerShell script.
in the script we are running a service called : AzureADPasswordProtection
It need credential to communicate with Azure AD.
So we need to register AzureADPasswordProtection proxy service with Azure AD and on-premise AD. That is done using the script. Enter Cloud Admin credentials for both.
Azure AD Password Protection Agent
Need server 2012 R2 or later.
.NET 4.7.2 is required.
Sysvol replication must use DFSR(default in lates versions of windows)
Steps:
Once we have proxy service installed and register, we can install agent.
Install and reboot.
Run PS lines to see password protection summary report and test out password change on a user.
Note:
After updateting policy in Azure, we have to restart the : Azure AD Password protection DC Agent service
Verify Password Protection Service
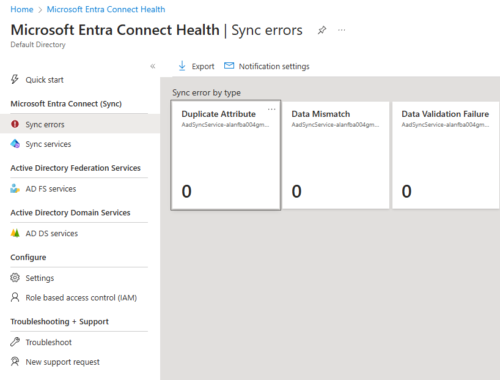
Portal to Monitor On-premise Windows by Azure AD
Supports: Azure AD Connect Sync, Windows AD, Windows AD FS
Evaluate every 2 hours.
Require Azure AD Premium P1/P2 license.
Install Azure AD Connect Health Agent on Windows DC
Go to : entra.microsoft.com
Login as Cloud Admin
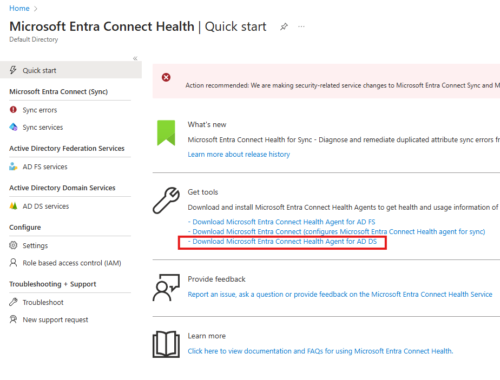
Download the agent.
Install on DC
Register using PowerShell command: Register-MicrosoftEntraConnectHealthAgent
After registration we need to test if Azure health agent can access the health end-point.
Test-MicrosoftEntraConnectHealthConnectivity -Role ADDS
Configure Alerts
Go to Entra Admin Center > Microsoft Entra Connect Health > Sync errors > Notification settings
We can put in any email here.
Review Portal Information
To filter out object from Windows AD to sync to Azure AD, exapmple
1 – Filter disabled accounts
2 – Pilot deployment
3 – Filter computer and services account if needed
4 – Multi Tenant Azure AD topology
Azure AD Connect Filter Options
We can filter based on:
1 – Group membership
2 – OU
3 – Domain Filter
4 – Attribute based filter
Azure AD Connect Sync Meta-verse
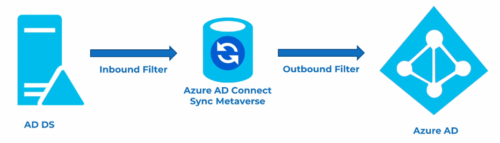
Azure recommends using inbound filter, because it is easier to maintain.
Only use outbound filter, when evaluating objects from more than one forest.
Sync Deletion Threshold
Prevents deletion of 500 or more objects
Enable-ADSyncExportDeletionThreshold – enables the deletion threshold
Disable-ADSyncExportDeletionThreshold – disables the deletion threshold
Get-ADSyncExportDeletionThreshold – displays the current threshold
Set-ADSyncExportDeletionThreshold
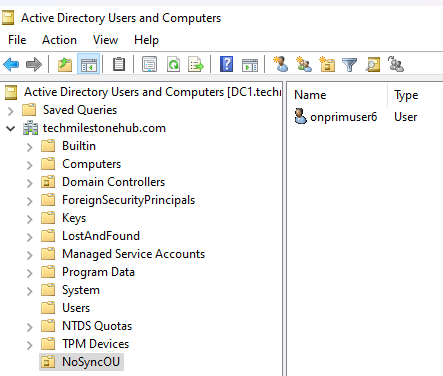
Azure AD Connect Source Filter : Lab
In Windows DC, using power shell script, disable Azure AD sync.
Create a new OU and move (right-click > move) 1 user into this OU.
Configure Azure AD Connect sync to configure OU filter
Azure AD Connect sync > Configure > Customize sync options
Enter Cloud Admin credetials
Domain/OU filtering
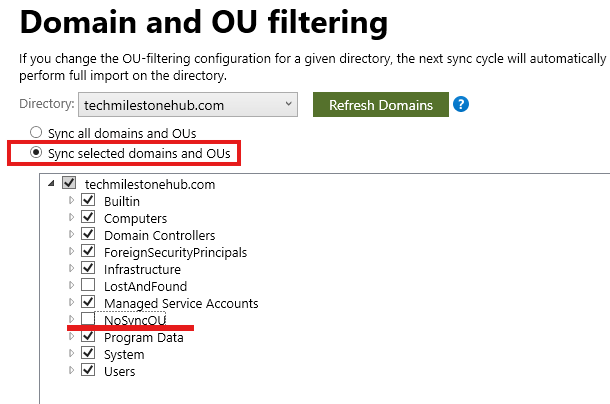
Unselect the OU, we don’t want to sync.
Configure Azure AD Connect sync to configure attribute filter
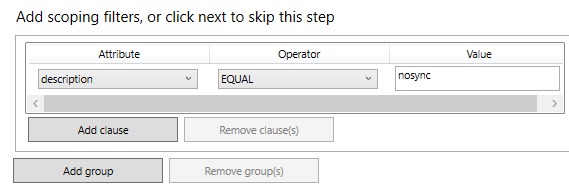
In Windows AD, For description attribute for any user put: “nosync”
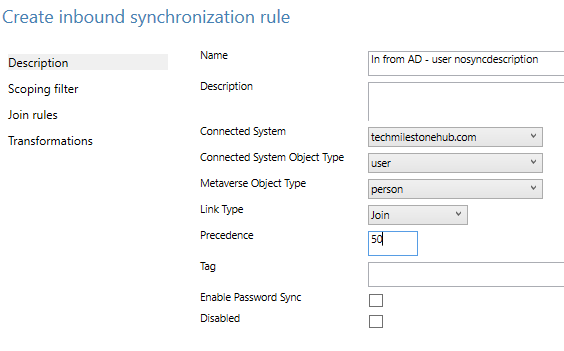
In windows server open Sync Rules Editor > Add new rule
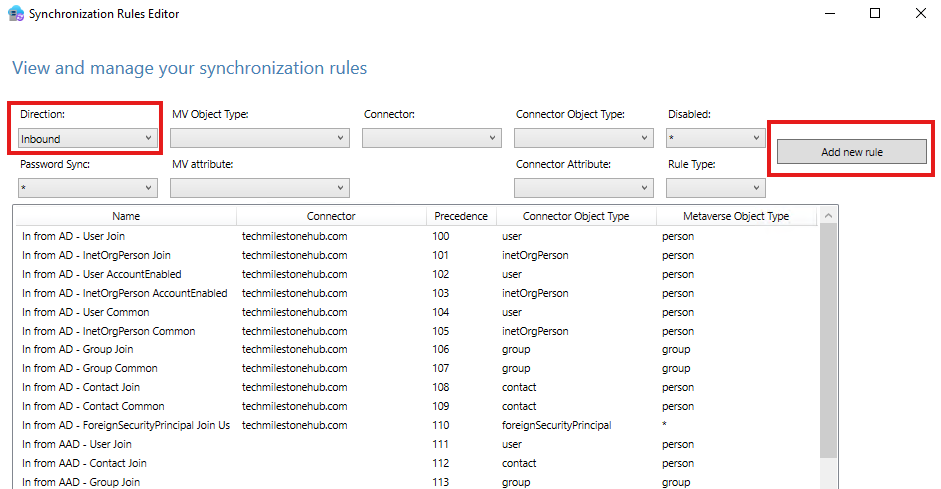
Create the rule
Add filter rule
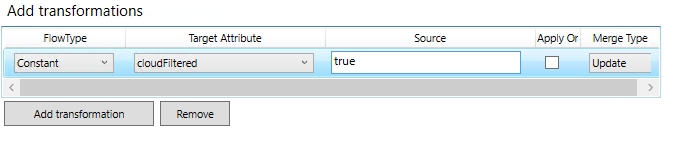
Add tranformation
Test the filter
Do a halfway sync, using sync service manager
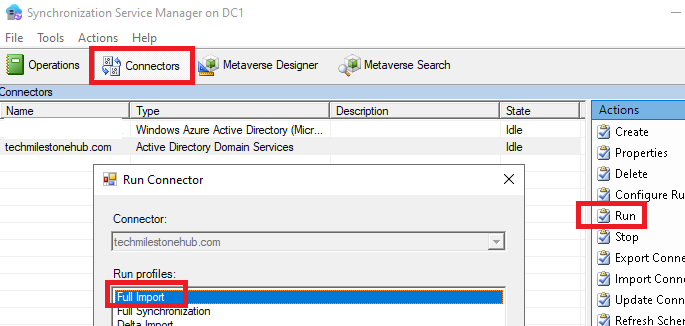
When the run is completed, we will see the changes under statistics
We can export the sync result as CSV using PowerShell command.
This is half way sync, that will give insights on what will happen when synced.
Now to actually sync to Azure we need to run
> Start-ADSyncSyncCycle
Check Azure AD > Users
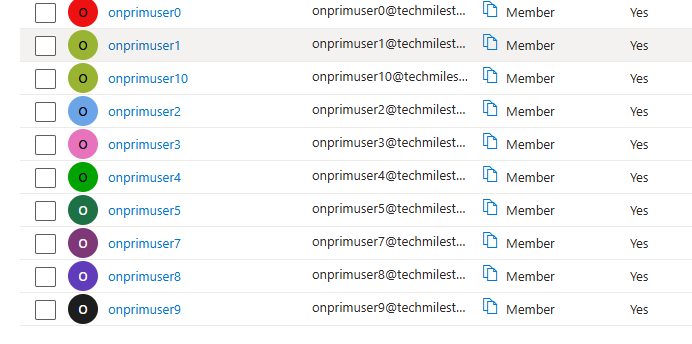
onprimuser6 is deleted.
After testing re-enable the sync scheduler.