Automating Email Notifications in SharePoint (Create & Test a Rule)
In this section, you’ll learn how to create a simple automation rule in SharePoint that sends an email whenever a new item is added to a list. This is especially useful for tracking new customers, support tickets, requests, or any important entries.
Instead of manually checking your list for updates, SharePoint can automatically notify you. 🚀
🔔 Why Use Automation Rules?
Automation rules in SharePoint help you:
📩 Receive instant email notifications
⏳ Reduce manual follow-ups
👀 Stay informed about important changes
⚙️ Turn rules on or off anytime
🛠 Manage rules easily from one place
In this example, we’ll set up a rule that sends an email whenever a new customer is added to a Customers list.
Video Explanation
🛠️ Create an Automation Rule (Item Created)
Automation rules are created directly from the list where you want the trigger to happen.
Step-by-Step Instructions
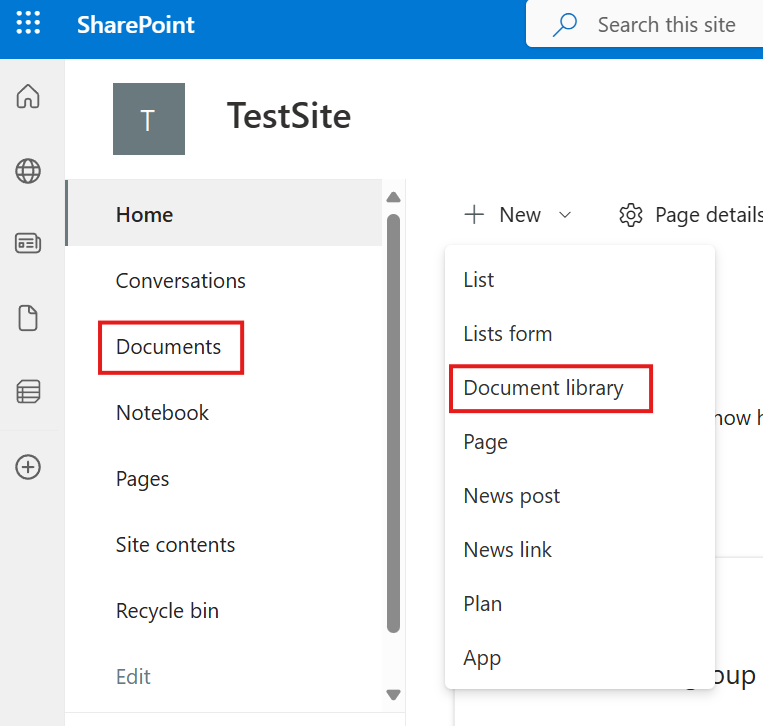
Open your SharePoint list (e.g., Customers).
At the top menu, click Automate.
Select Rules from the dropdown.
Click Create a rule.
You will see three rule options:
Rule Type
When It Triggers
🆕 Item Created
When a new item is added
✏️ Item Modified
When an existing item is changed
🗑 Item Deleted
When an item is removed
Choose Item Created.
Select who should receive the notification (e.g., yourself or another team member).
(Optional) Add a custom message.
Click Create.
✅ Your rule is now active.
You’ll see:
A short description of the rule
A toggle switch to turn it ON/OFF
The ability to manage it later via Automate → Manage Rules
This gives you full control over your notifications.
🧪 Test the Automation Rule
Now that the rule is created, let’s confirm it works.
Add a New Item
Go to your list.
Click Add New Item.
Fill out all required fields.
Click Save.
The moment you save the new entry, SharePoint triggers the rule.
📬 Verify the Email Notification
Open your Outlook (or email client).
Check your inbox.
You should receive:
A notification email
Details about the newly created item
A link to open the list item directly
🎉 If the email arrives, your automation is working perfectly.
🔄 Managing Your Rules Later
You can always:
Edit the rule
Disable it temporarily
Delete it completely
To do this:
Go to Automate → Manage Rules
This makes it easy to adjust automation as your workflow evolves.
✅ Quick Recap
Automation rules help you stay updated automatically
You can trigger notifications for created, modified, or deleted items
Rules can be enabled, disabled, or edited anytime
Testing confirms everything is working as expected
By using SharePoint automation rules, you make your lists smarter and your workflow more efficient. 🚀
Send Email Alerts When an Associate Is Assigned in SharePoint
In this section, you’ll learn how to automatically notify an employee when they are assigned to a customer in a SharePoint list. This is a practical real-world scenario where responsibility changes need to be communicated immediately.
Instead of manually informing associates when they are assigned to a customer, SharePoint can handle this automatically using built-in automation rules. 🚀
🎯 Why This Rule Is Useful
When working with a Customers list, you may have a column called Associate (Person or Group type).
If someone changes the associate assigned to a customer:
📩 The new associate needs to know immediately
⏳ You avoid delays in task ownership
🔄 Responsibility transitions smoothly
👀 No one misses important assignments
This rule ensures that whenever the Associate field changes, the new associate receives an automatic email notification.
Video Explanation
🛠️ Create a Rule for “Item Modified” (Associate Field Change)
To notify associates when they are assigned to a customer, we need to create a rule that triggers when the Associate column is modified.
Step-by-Step Instructions
Open your SharePoint list (e.g., Customers).
Click Automate in the top menu.
Select Rules.
Click Create a rule.
Choose Item Modified.
You will now configure the condition.
⚙️ Configure the Trigger Condition
After selecting Item Modified, you’ll be asked which column change should trigger the alert.
Select the Associate column from the dropdown.
Set the condition so that the rule triggers when:
The Associate value changes (to any new value).
💡 You do NOT need to specify a particular name. The goal is to notify whoever becomes the new associate.
📩 Configure the Email Notification
Next, set up who should receive the notification.
Choose to notify the Associate column value (the new assigned person).
Add a custom message if desired.
Example custom message:
“You have been reassigned to this customer.”
This makes the email clearer and more professional.
Finally:
Click Create.
✅ Your rule is now active.
🧪 Test the Rule
To confirm everything works:
Open a customer item.
Click Edit.
Change the Associate field to another user.
Click Save.
Now check the newly assigned associate’s email inbox.
📬 They should receive:
An email notification
The name of the customer
Your custom message
A link to the list item
If the email arrives, your automation is working perfectly.
🔍 What This Rule Achieves
Scenario
Result
Associate is reassigned
New associate gets notified
Responsibility changes
No manual follow-up needed
Customer ownership updates
Immediate awareness
✅ Quick Recap
Use Item Modified rules for field change notifications
Select the Associate column as the trigger
Notify the new value (the new associate)
Add a custom message for clarity
Test by editing the list item
By using this automation, you ensure that team members are instantly informed when they are assigned new responsibilities — improving accountability and workflow efficiency. 🚀
Searching, Collaboration, Navigation & RSS Feeds in SharePoint
In this section, you’ll explore some everyday SharePoint features that help you find information faster, collaborate with your team, navigate easily, and stay updated automatically. These tools may look simple, but together they make SharePoint feel less like a storage system and more like a smart workspace.
💡 Why these features matter
Quickly locate files, pages, and list items
Interact with coworkers directly on content
Access all your sites and lists from one place
Receive automatic updates without manually checking
Video Explanation
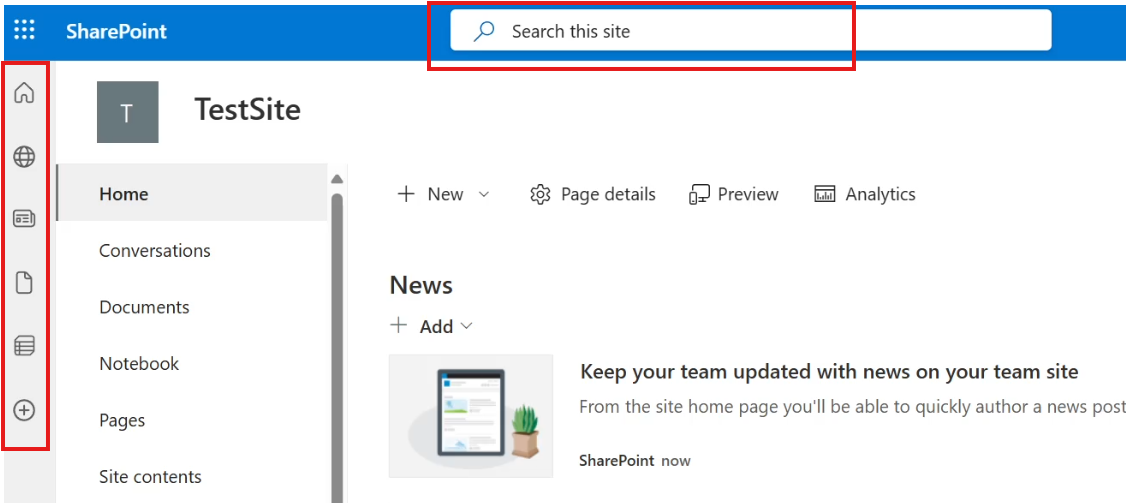
🔍 Searching in SharePoint
SharePoint includes a powerful global search system available at the top of every site. It doesn’t just search file names — it searches inside files, lists, pages, images, and even metadata tags.
This means you can locate almost anything across your workspace in seconds.
What you can do with search
Find documents, lists, and pages
Locate images tagged with keywords
Jump directly to a specific list item
Filter and sort results for faster navigation
How to perform a search
Go to the search bar at the top of SharePoint.
Type your keyword or phrase.
Press Enter or click the 🔍 icon.
Refine your results
After searching, you can narrow results using:
Tabs
All – everything related to your search
Files – documents only
Sites – related SharePoint sites
News – posts and announcements
Images – pictures and media
Filters
File type
Last modified date
Sorting options
➡️ Clicking a result opens the exact item location, including breadcrumbs showing where it exists in SharePoint.
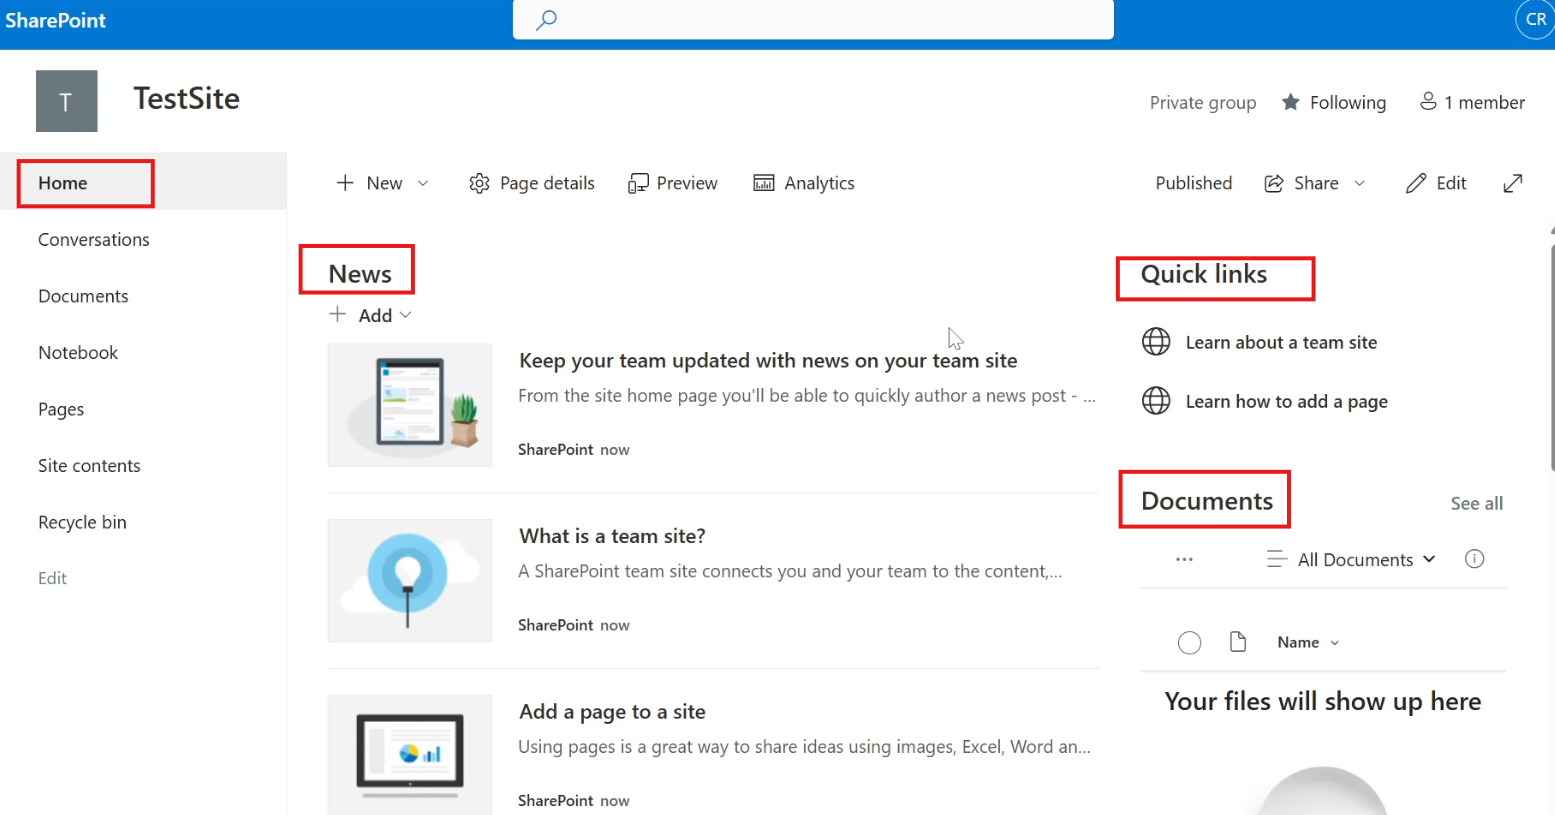
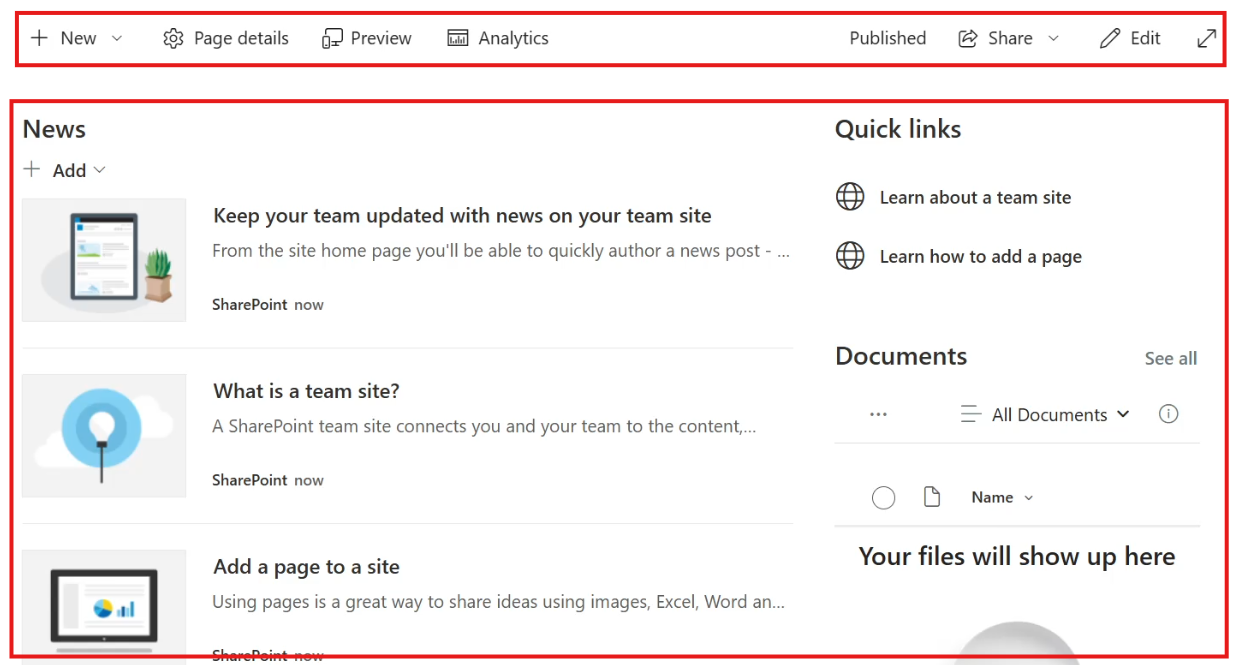
💬 Collaboration & Social Features
Modern SharePoint pages include interactive elements similar to social media platforms. Instead of emailing updates, conversations can happen directly on the content itself.
This keeps communication contextual and organized.
Collaboration tools available
👍 Like pages
💬 Comment on content
👤 Mention coworkers using @name
📊 View page analytics
How to interact with a page
Scroll to the bottom of a modern page.
Click Like or type a comment.
Use @Name to notify someone.
Click Post to share.
📢 Mentioned users receive a notification, helping teams respond quickly without separate messages.
Page insights you can view
Total views
Activity trends
Popular content
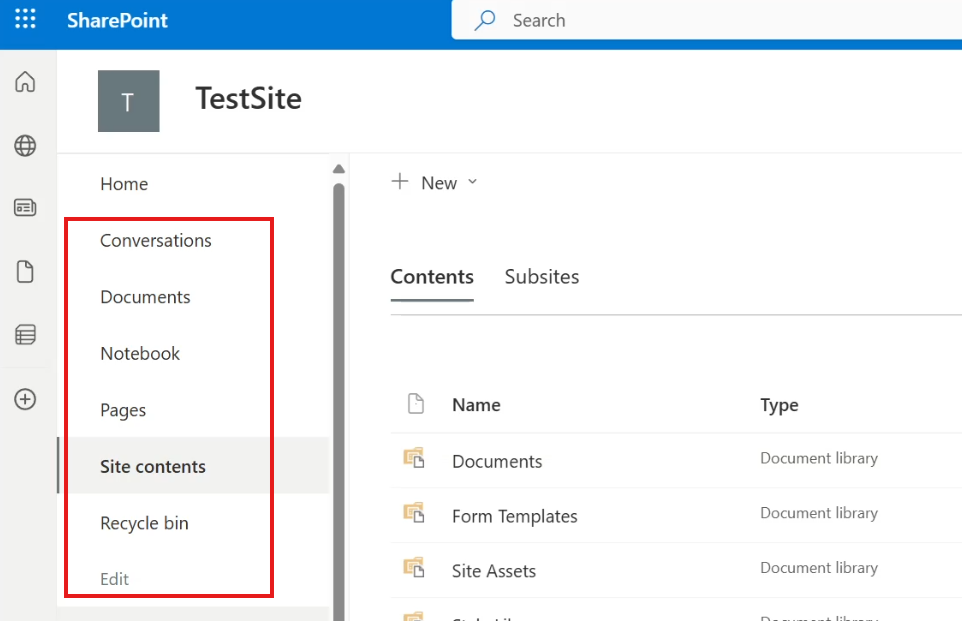
🧭 Navigating the SharePoint Home Page
The SharePoint Home page is a global dashboard — different from a site homepage. It acts as your personal starting point across all sites and content.
You can return to it anytime using the Home icon (top left).
What you’ll find here
Frequently used sites
Quick access cards
Activity summaries
Page popularity indicators
Shortcut icons
📰 News
📁 My Files
📋 My Lists
🌐 Create Site
My Lists feature
Shows every list you created across SharePoint — even from different sites.
Each list displays:
List name
Associated site
Create menu
The Create (+) button lets you quickly create:
News posts
Pages
Sites
Documents
Lists
Forms
Presentations
Notebooks
➡️ Think of this page as your SharePoint control center.
📡 Creating an RSS Feed in SharePoint
RSS feeds automatically notify you when changes occur in a list or library. Instead of checking manually, updates come to your RSS reader.
This is especially useful for tracking uploads, edits, or team activity.
Why use RSS feeds
Monitor changes automatically
Track uploads and edits
Centralize updates from multiple sources
How to get an RSS feed link
Open your SharePoint list or library.
Switch to Classic View.
Click the Library/List tab in the ribbon.
Select RSS Feed.
Copy the generated link.
What happens after subscribing
Whenever content changes:
New uploads appear in the feed
Creator name is shown
Timestamp is included
➡️ Your RSS reader collects these updates automatically, keeping you informed without opening SharePoint repeatedly.
✅ Quick Recap
Search helps you instantly find content across SharePoint
Social features enable communication directly on pages
The Home page acts as your central dashboard
RSS feeds notify you about updates automatically
Together, these features improve productivity by reducing navigation time and keeping everyone informed.
👥 Managing User Permissions in SharePoint (Visitors, Owners & Removal)
Permissions are one of the most important parts of SharePoint. They control who can view, edit, or fully manage your site. Instead of giving everyone the same access, SharePoint organizes users into groups — making security easier and safer to manage.
In this section, you’ll learn how to:
Invite users with limited access (Visitors)
Promote users to full control (Owners)
Remove users when access is no longer required
🔐 Best Practice: Always grant the least privilege first. You can increase access later, but preventing accidental edits is much harder after they happen.
Video Explanation
🔹 Invite a User as a Visitor (Read-Only Access)
Visitors are users who can view content but cannot edit anything. This is ideal for stakeholders, auditors, or team members who only need to read information.
When added to the Visitors group, the user can open pages, lists, and documents — but editing options are hidden.
What Visitors Can Do
View pages, lists, and documents
Download files
Search site content
What Visitors Cannot Do
Add or edit list items
Upload or modify files
Change site settings
Steps to Add a Visitor
Click the ⚙ Settings icon (top right)
Select Site permissions
Scroll down and click Advanced permission settings
Locate the Visitors group
Click Grant Permissions
Enter the user’s name or email
Choose the Visitors group
(Optional) Add a message
Click Share / OK
The user receives an email invitation and is automatically added after opening the link.
💡 Tip: If a user should only see information and not modify it — always use the Visitors group.
🔹 Promote a User to Site Owner (Full Control)
Owners have the highest level of access in SharePoint. They can manage permissions, edit content, and configure the site.
Only assign this role to trusted individuals responsible for maintaining the site.
Owners Can
Add, edit, and delete content
Manage permissions
Create lists and libraries
Change site settings
Control structure and navigation
Steps to Make a User an Owner
Go to ⚙ Settings → Site permissions
Open Advanced permission settings
Select the Owners group
Click New → Add users to this group
Enter the user’s name
Add a message (optional)
Click Share / OK
After accepting the email invitation, the user becomes a site owner immediately.
⚠️ Important: Owners can grant permissions to others — only assign this role when necessary.
🔹 Remove a User from a Permission Group
Sometimes access needs to be revoked — for example when a project ends or a team member changes roles. Removing a user from a group immediately updates their permissions.
If they belong to multiple groups, they will still keep access from the remaining groups.
Steps to Remove a User
Go to ⚙ Settings → Site permissions
Click Advanced permission settings
Open the group (e.g., Owners)
Select the user
Click Actions → Remove users from group
Confirm the removal
The permission change takes effect instantly after refresh.
🧠 Reminder: Removing from Owners does not remove access completely if the user still belongs to Members or Visitors.
✅ Quick Permission Overview
Group
Access Level
Typical Use
Visitors
Read-only
Stakeholders, viewers
Members
Edit content
Team contributors
Owners
Full control
Site administrators
Proper permission management keeps your SharePoint environment secure, organized, and collaborative — while preventing accidental changes or data loss.
Managing Default and Custom Permissions in SharePoint
In this section, you’ll learn how SharePoint permissions actually work — not just how to click buttons, but why they’re structured this way. SharePoint follows a security model based on permission levels → assigned to groups → groups contain users.
Understanding this flow is important because:
🔐 You should never assign permissions directly to users (hard to manage later)
👥 Permissions should be controlled through groups
🧠 Always follow the Principle of Least Privilege — give only the access required
🛠 Custom permission levels allow you to fine-tune access instead of using only built-in roles
Once you understand the default permissions, creating your own secure setup becomes much easier.
Video Explanation
1) Understanding Default Permission Levels
Before creating custom permissions, it’s important to understand how SharePoint’s built-in permissions are structured.
SharePoint comes with predefined groups and permission levels:
Default Groups
Owners → Full control
Members → Edit content
Visitors → Read-only
Each group is assigned a permission level, and that permission level is actually a collection of many smaller capabilities (view, edit, delete, manage site, etc.).
How to View Default Permission Levels
Click the Settings (⚙️) icon (top-right)
Select Site permissions
Click Advanced permission settings
In the top menu, click Permission Levels
You will see levels such as:
Full Control
Design
Edit
Contribute
Read
Example: What “Read” Permission Allows
Allowed
View lists and libraries
Open items
View pages
Not Allowed
Edit items
Delete items
Manage site settings
Change appearance
Personal permissions
👉 This is why Visitors can see content but cannot modify anything.
Key Idea: The Read permission is intentionally restrictive — it protects your data while still allowing access.
2) Creating a Custom Permission Level
Sometimes default permissions are too broad.
Example:
Read = too limited ❌
Edit = too powerful ❌
So you create a custom permission tailored exactly to your needs.
In our case: We want users to read and edit items but not fully control the site.
Steps to Create Custom Permission
Go to Permission Levels page (same place as above)
Open the Read permission level
Click Copy Permission Level
Now configure it:
Name:Read and Edit Description: Can read and edit items
Modify Permissions
Keep everything from Read AND additionally enable:
✔ Edit Items
✔ Approve Items
Then click Create
You now have a new permission level available alongside default ones.
💡 Best Practice Create permissions based on real job responsibilities, not convenience.
3) Create a Group and Assign the Custom Permission
Permissions should be assigned to groups, not directly to users. This keeps your site manageable as your team grows.
Why Use Groups?
Add/remove users without changing permissions
Cleaner security structure
Easier auditing
Scalable management
Create a New Group
Go to Advanced permission settings
Click Create Group
Fill details:
Group Name: Read and Edit Group Description: Members can read and edit
Under Give group permissions to this site ✔ Select Read and Edit
Click Create
Add a User to the Group
Now add people who should have this access.
Open the newly created group
Click New
Enter the user name
Add a message (optional)
Click Share
The user is now part of the group and automatically inherits permissions.
What the User Can Do Now
Because the user belongs to the custom group:
They CAN
View lists
Edit existing items
They CANNOT
Create new list items
Manage site settings
Change structure
This proves the custom permission works exactly as designed.
Key Takeaways
SharePoint permissions work as: Permission Level → Group → Users
Always assign permissions to groups, not individuals
Default permissions are often too broad
Custom permissions allow precise control
Follow the least privilege principle for security
Using this approach keeps your SharePoint environment secure, organized, and easy to maintain as your organization grows.
SharePoint Lists are like smart, collaborative tables where teams can store, track, and manage information. Think of them as an upgraded version of Excel—built directly into SharePoint with powerful features like filtering, automation, and integration with Microsoft 365 tools.
In this section, you’ll learn the different ways to create a list:
From Excel data
From scratch
By copying an existing list
Using ready-made templates
Video Explanation
🚀 Why Use SharePoint Lists?
Before jumping into the steps, here’s why lists are so useful:
🗂 Centralized Data – everyone works from the same source
🎛 Custom Columns – text, choice, number, date, people, and more
🤖 Automation Ready – works with Power Automate & Power Apps
📈 Scalable – perfect for small trackers or large systems
🧱 Method 1 – Create a List from Excel
If you already have data in Excel, you don’t need to retype anything.
Step-by-Step
Prepare Excel Data
Ensure your data has proper column headers
Select the range
Use Format as Table in Excel
Import to SharePoint
Click New → List → From Excel
Upload the file
Preview the table
Configure Columns
Set the correct data type for each column
Choose which column should act as Title / Primary Key
Use Choice type for fields like Department or Location
Create the List
Give it a name (e.g., Customers)
Click Create
✅ Your Excel data is now a fully functional SharePoint list!
🧱 Method 2 – Create a List from Scratch
Perfect when starting fresh.
Steps
Go to New → List → Blank List
Give your list a name
By default, you’ll get a Title column
Add custom columns:
➕ Add Column → Single line of text → Name
➕ Add Column → Choice → Department
Options: Accounting, Sales, HR, etc.
Add items using New Item
💡 Tip: You can rename the Title column to something meaningful like Employee ID.
🧱 Method 3 – Create from an Existing List
Reuse structure without rebuilding everything.
Click New → List → From Existing List
Choose a list to copy
Give the new list a name
Click Create
👉 The new list will contain the same columns and settings.
🧱 Method 4 – Use SharePoint Templates
SharePoint includes ready-made list templates like:
🐞 Issue Tracker
👥 Employee Onboarding
📦 Asset Manager
📝 Event Itinerary
Just:
Select New → List
Scroll to Templates
Pick one
Name it → Create
Instant professional structure! 🎉
🎯 What You’ve Learned
You can now create SharePoint lists:
From Excel imports
From scratch with custom columns
By copying existing lists
Using built-in templates
These lists can become the backbone of tracking customers, employees, assets, projects, and more.
✏️ Editing Lists in SharePoint
SharePoint lists aren’t just for storing data—they’re meant to be edited, updated, and customized as your team works. SharePoint gives you multiple ways to modify list items: quick single-item edits, bulk updates using grid view, and even advanced customization through content types and form layouts.
Let’s walk through the most practical ways to edit and manage your SharePoint lists.
Video Explanation
📝 Edit a Single List Item
This is the most common method when you need to update one record or attach supporting files.
How to edit an item:
Go to your list from Site Contents
Click the item you want to update
Select Edit from the top menu (or from the three dots ⋯ menu)
Update the fields in the form
(Optional) Upload files in the Attachments section
Click Save
💡 Best for: Quick corrections, adding documents, or updating one record at a time.
🔓 Enable “Allow Management of Content Types”
Sometimes you may find that certain items can’t be edited. This usually happens because content type management is turned off.
Enable it like this:
Open List Settings (gear icon → List Settings)
Go to Advanced Settings
Set Allow management of content types = Yes
Click OK
After this:
A new Content Types section appears
You can view and edit the default “Item” content type
Add extra columns from site or list columns
💡 Why this matters: It unlocks deeper control over list structure and ensures full editing flexibility.
📊 Edit in Grid View (Excel-Style Editing)
Need to update many rows fast? Grid view turns your list into a spreadsheet.
Steps:
Open the list
Click Edit in grid view
Update cells directly like Excel
Click Exit grid view to save
⚡ Best for: Bulk updates, data cleanup, and fast entry.
🧩 Powerful Features in the Edit Form
The SharePoint edit form includes more than just fields:
💬 Comments – discuss changes right on the item
🕒 Activity Log – view history of edits
✏️ Edit Columns – choose which fields appear
🎨 Configure Layout – customize header/body/footer (even with JSON)
🔗 Copy Link – share a direct link to the item
These tools help you turn a simple list into a collaborative workspace.
🎯 Key Takeaways
Use basic edit mode for quick updates & attachments
Enable content type management for advanced control
Use grid view for bulk, Excel-like editing
Customize the edit form for better user experience
With these options, SharePoint lists become flexible tools that adapt to how your team works—not the other way around. 🚀
🧩 Working with SharePoint List Features
SharePoint lists are more than simple tables—they’re interactive tools designed to help you explore, organize, and collaborate on data. In this section, we’ll look at some of the most useful built-in list features: sharing individual items, sorting and grouping, using the filter pane, and calculating column totals.
These features make large datasets easier to understand and help teams work smarter together. 🚀
Video Explanation
🔗 1. Item Page in a SharePoint List
Every list item has its own dedicated page where you can view details, track activity, and collaborate through comments.
What you can do:
📎 Copy Link – share a direct URL to a single item
💬 Comments & Activity – discuss updates in context
👥 User Presence – see when others are viewing the same item
How to share an item link:
Open your list and select an item
Click the three dots ⋯ next to it
Choose Copy Link
Share the URL with teammates
💡 Perfect for: Sending someone directly to one record instead of the whole list.
📊 2. Sort and Group Your Data
Large lists can feel overwhelming—sorting and grouping help bring order.
Benefits
Sorting organizes alphabetically or numerically
Grouping clusters similar items into collapsible sections
Try this:
Click any column header
Choose Sort A→Z or Sort Z→A
Select Group by to create categories
Use the arrows to expand or collapse groups
👉 To return to normal view, open the column menu again and uncheck Group by.
🎯 3. Use the Filter Pane
The filter pane lets you narrow results across multiple columns at once—great for big datasets.
Steps
Click the filter icon (top right)
Select values from one or more columns
Click Apply
Use Clear All to reset
Example: Filter Office = Toronto AND Brand = Mercedes to see only matching records.
💡 Ideal for: Finding exactly what you need in seconds.
➕ 4. Column Totals
Need quick calculations? SharePoint can show them directly in the list view.
Available options
🔢 Count – works on any column
➗ Sum & Average – available for numeric fields
How to enable totals:
Click a column header
Select Totals → Count / Sum / Average
View results at the bottom of the list
Combine with Group by to see subtotals per category
✅ Key Takeaways
Copy Link to share individual records instantly
Sort & Group to make long lists readable
Filter Pane to zero in on the right data
Totals for quick insights without Excel
With these features, SharePoint lists become a powerful dashboard for everyday teamwork—no technical skills required! 💪
⚙️ Working with Advanced Column Types in SharePoint Lists
SharePoint lists become truly powerful when you move beyond simple text columns. By using advanced column types, you can tag items, assign ownership, and manage dates with precision—making your data easier to organize, search, and analyze.
Let’s explore three essential column types:
🏷 Multi-select Choice columns for tagging
👤 Person or Group columns for assigning responsibility
📅 Date columns for accurate time-based data
Video Explanation
🏷 1. Multi-Select Choice Column – Smart Tagging
Tags help categorize records so you can filter and group them later. A Choice column with multi-select lets users assign multiple labels to the same item.
How to create it:
Open your list → Add Column → Choice
Name the column (e.g., Tags)
Enter options such as:
Loyal
Price Driven
Buy Zone
Enable Allow multiple selections
(Optional) Turn on Allow values to be added manually
Click Save
What users see: When editing an item, they can pick multiple tags from a dropdown—perfect for flexible categorization.
💡 Great for: Customer segmentation, project labels, priority flags.
👤 2. Person or Group Column – Assign Ownership
Need to assign a record to someone in your organization? The Person/Group column connects directly to your company directory.
Steps to add:
Click Add Column → Person or Group
Name it (e.g., Associate)
Enable Show profile photos (optional)
Click Save
How it works:
Users can search by name or email
The field pulls real profiles from Microsoft 365
Ideal for task ownership and accountability
💡 Perfect for: Assigning cases, owners, reviewers, or contacts.
📅 3. Date Column – Convert Text to Real Dates
If dates are stored as plain text, you lose sorting, filtering, and validation. Converting to a Date and Time column unlocks powerful features.
Convert an existing column:
Click the column header
Select Column Settings → Edit
Change type to Date and Time
Optional:
Enable Include Time
Turn on Friendly Format
Click Save
Result: Your dates can now be sorted chronologically, filtered by range, and used in automation.
💡 Essential for: Birthdays, deadlines, renewals, and schedules.
✅ Why These Columns Make a Difference
Column Type
Business Benefit
Multi-Select Choice
Flexible tagging & filtering
Person/Group
Clear ownership & collaboration
Date
Accurate time-based operations
🎯 Final Thoughts
Using the right column types transforms a basic SharePoint list into a smart information hub. You’ll get:
Better organization
Faster filtering
Clear accountability
Reliable date handling
Start upgrading your lists today and watch your data come to life! 🚀
🧮 Working with Calculated Columns in SharePoint
Ever wished SharePoint could do the math for you? That’s exactly what calculated columns are for! Instead of manually entering values like age, totals, or status messages, SharePoint can generate them automatically using formulas.
For example, if your list has a Date of Birth column, you can create an Age column that updates itself—no manual updates needed. Let’s dive in!
Video Explanation
✅ What Are Calculated Columns?
A calculated column generates its value using data from other columns in the same list. It’s perfect for:
🎂 Calculating age from Date of Birth
🧾 Combining First Name + Last Name into Full Name
📊 Performing math on numeric fields
🚦 Displaying status messages like Completed / Pending
🛠 How to Create a Calculated Column
Step 1 – Add a New Column
Open your SharePoint list
Click Add Column
Choose See all column types → click Next
Step 2 – Select Calculated Type
Name your column (e.g., Age)
Choose Calculated (calculation based on other columns)
Step 3 – Enter the Formula
To calculate age from Date of Birth:
=DATEDIF([Date of Birth], TODAY(), "Y")
DATEDIF finds the difference between two dates
"Y" returns the result in years
Step 4 – Set Return Type
Choose Number
Set Decimal Places = 0 (age should be a whole number)
Step 5 – Save 🎉
Click OK—your Age column will now calculate automatically!
💡 Tips for Writing Formulas
Always use column names in square brackets → [Column Name]
Calculated columns work only with data inside the same list
You can use logic like IF statements, math, and text functions
📌 Useful Calculated Column Examples
1. Create Full Name
=[First Name] & " " & [Last Name]
➡ Combines two text fields with a space.
2. Status Based on Percentage
=IF([Completion] >= 100, "Completed", "In Progress")
Calculated columns turn a simple SharePoint list into a mini application. Whether you’re calculating age, totals, statuses, or messages—SharePoint does the heavy lifting while you focus on insights.
Start experimenting with formulas and make your lists work smarter, not harder! 💪
🔗 Creating and Using Lookup Columns in SharePoint Lists
Lookup columns are one of the most powerful features in SharePoint lists. They allow you to connect two lists together, so data can be reused instead of duplicated.
For example, instead of typing the same repair shop details for every customer, you can maintain a separate Repair Shops list and simply link customers to it. Any updates to the shop details will automatically reflect in the Customers list. Smart, right? 😎
Video Explanation
✅ Why Use Lookup Columns?
🔁 Reduce Data Duplication – Enter data once, reuse everywhere
🎯 Maintain Consistency – Updates in one list reflect in others
🧭 Better Navigation – Jump easily between related records
📊 Cleaner Reports – Structured relationships between lists
1️⃣ Create a Source List (Repair Shops)
Before creating a lookup column, we need a list that will act as the data source.
🛠 Steps
Go to your SharePoint site → New → List
Choose Blank List and name it Repair Shops
Add these columns:
Shop Name – Single line of text
Email – Single line of text
City – Single line of text
Rename the Title column → Shop ID (acts as unique identifier)
🎉 This list will now be used as the lookup source.
2️⃣ Create Lookup Column in Customers List
Now we’ll connect the Customers list to Repair Shops.
🛠 Steps
Open the Customers list
Click Add Column → See all column types → Next
Configure:
Name: Repair Shop
Type: Lookup
Get information from: Repair Shops
Display column: Shop Name
Under Add additional columns, select: ✔ Shop Name ✔ Email
Click OK
🎯 Result
Your Customers list will now show:
Repair Shop (dropdown)
Shop Name (auto-filled)
Email (auto-filled)
3️⃣ Test the Lookup Relationship
🧪 Steps
Edit a customer record
In Repair Shop, choose a shop from dropdown
Click Save
✅ The related Shop Name & Email appear automatically!
🔄 What Happens When Source Data Changes?
👉 If you update the email in Repair Shops, 👉 The change instantly reflects in Customers list!
Also:
Clicking the shop name in Customers opens the Repair Shop item page
Users can view or edit details (based on permissions)
🚀 Key Benefits Recap
🧩 Builds real relationships between lists
🔁 Single source of truth
⚡ Real-time updates across lists
🗂 Cleaner, more professional data structure
💡 Pro Tip
Use lookup columns for:
Assigning vendors to orders
Linking employees to departments
Connecting projects to clients
Any scenario where the same data repeats!
Lookup columns transform SharePoint from simple lists into a mini relational database—without any coding. Start connecting your lists and make your data smarter today! 🚀
💬 Adding Comments and Tracking Version History in SharePoint Lists
SharePoint lists aren’t just for storing data—they’re built for team collaboration and accountability. Two standout features make this possible:
🗨 Comments – discuss items directly inside the list
🕓 Version History – track every change and restore older versions
Let’s see how these tools help keep communication clear and your data safe.
Video Explanation
🗨 Comments in SharePoint Lists — Collaborate in Context
Comments let your team talk about a list item right where the data lives. No more hunting through emails or chats to find updates!
🌟 Why Comments Are So Useful
Keep discussions tied to the exact item
Tag teammates with @mentions
Build a timeline of decisions and notes
Perfect for customer lists, tasks, approvals, and projects
🧭 How to Add a Comment
Open your SharePoint list
Click the item you want to discuss
Select Edit to open the item form
On the right side, find the Comments section
Type your message
Use @Name to mention a colleague
Click Send
💡 Tip: When you @mention someone, they get a notification—great for quick follow-ups!
🕓 Version History — Never Lose Track of Changes
Version History records every update made to a list item:
Who changed it
When it was changed
What the previous values were
If something goes wrong, you can easily roll back to an earlier version.
🎯 Why Use Version History?
🛡 Protect against accidental edits
📋 Meet auditing/compliance needs
👀 See exactly who modified what
⏪ Restore previous information in seconds
🧭 How to View Version History
Go to your list
Click the three dots (…) next to an item
Select Version History
You’ll see:
Version number
Modified date/time
Modified by
🔁 What You Can Do from Here
For any version, you can:
View – open details of that version
Restore – bring it back as the current version
Delete – remove that version from history
✅ Restoring doesn’t erase newer versions—it simply creates a new “latest” version based on the old one.
⚙ Pro Tip: Enable Versioning
Make sure version history is turned on:
List Settings → Versioning Settings → Enable versioning
This ensures SharePoint keeps a full timeline of edits.
🚀 Key Takeaways
Comments keep conversations organized and visible
@mentions notify the right people instantly
Version History protects your data
You can always roll back mistakes
Together, these features turn SharePoint lists into a true collaboration workspace, not just a spreadsheet replacement 👍
🧩 Working with Columns and Conditional Fields in SharePoint Lists
SharePoint lists become truly powerful when you start customizing columns and adding smart conditional logic. Instead of overwhelming users with unnecessary fields, you can show only what’s relevant—keeping forms clean, accurate, and easy to use 👍.
In this section, we’ll cover:
➕ Adding new columns to an existing list
✏ Filling values for current items
🎯 Showing fields conditionally based on user selection
Let’s build this step by step!
Video Explanation
➕ Adding Additional Columns to a List
As your business grows, your lists often need to capture more information. Adding new columns lets you expand without breaking existing data.
🧪 Example Scenario
You have a Repair Shops list with:
Shop ID
Shop Name
Email
City
Now you want to track:
Shop Type – Independent or Affiliated
Affiliation Name – Only for affiliated shops
🧭 Steps to Add New Columns
Open your SharePoint list
Click + Add column
Choose Choice
Name it Shop Type
Add choices:
Independent
Affiliated
Enable: Require that this column contains information
Click Save
Now add the second column:
Click + Add column
Select Single line of text
Name it Affiliation
Click Save
✅ Your list now includes two new structured fields!
✏ Adding Values to Existing Items
After creating columns, update current rows so they follow the new structure.
🧭 How to Update an Item
Select a row → Click Edit
For an independent shop:
Shop Type → Independent
Affiliation → NA
For an affiliated shop:
Shop Type → Affiliated
Affiliation → Mega Repairs (or real partner name)
Click Save
⚠ Problem: Even when Independent is selected, users can still type an affiliation. Let’s fix that with conditional logic!
🎯 Applying Conditional Visibility to Columns
We can make the form smarter:
👉 Show Affiliation field ONLY when Shop Type = Affiliated
🧭 Steps to Add a Condition
Click Add new item
In the form, open: Edit Form → Edit Columns
Find Affiliation column
Click ⋯ → Edit conditional formula
Enter a formula like:
=if([$ShopType] == "Affiliated", true, false)
Save all changes
🧪 Test the Behavior
Shop Type Selected
Affiliation Field
Independent
❌ Hidden
Affiliated
✅ Visible
🎉 Now your form stays clean and error-free!
🚀 Why This Matters
✔ Users see only relevant fields
✔ Data stays consistent
✔ Fewer mistakes during entry
✔ Professional, guided experience
🧠 Quick Recap
Add new columns to expand your list
Update existing rows with structured values
Use conditional formulas to show/hide fields
Keep forms simple and intuitive
✅ Ensuring Proper Form Validation in SharePoint Lists
When users enter data into a SharePoint list, there’s always a risk of missing or incorrect information. Without validation, important fields can be skipped—leading to incomplete records and messy data 😬.
Thankfully, SharePoint provides built-in validation tools that let you:
Enforce rules across multiple fields
Prevent saving invalid entries
Show friendly error messages to guide users
Let’s walk through a real-world example: 👉 If a repair shop is marked as “Affiliated,” the Affiliation name must be required.
Video Explanation
⚠ What Happens Without Validation?
Imagine your list has:
Shop Type → Independent / Affiliated
Affiliation → Name of parent company
By default, SharePoint allows this:
❌ User selects Affiliated ❌ Leaves Affiliation blank ✔ The form still saves!
This creates confusing, incomplete data—exactly what we want to avoid.
🛠 Adding Row Validation in SharePoint
Row validation lets you define rules that must be satisfied before an item can be saved.
🧭 Steps to Add Validation
Open your SharePoint list
Click the ⚙ Settings icon
Select List settings
Click Validation settings
You’ll see two fields:
Formula – where the rule logic goes
User Message – what users see if validation fails
✏ Example Validation Formula
Rule:
If Shop Type = “Affiliated”, then Affiliation must not be blank
❗ “Affiliation is required when Shop Type is set to Affiliated.”
This helps users understand exactly what to fix 👍.
🧪 Test the Validation
Try these scenarios:
Shop Type
Affiliation
Result
Affiliated
Blank
❌ Error – cannot save
Affiliated
“Mega Repairs”
✅ Saves
Independent
Blank
✅ Saves
🎯 Perfect! The rule only applies when needed.
🎯 Key Benefits of Validation
✔ Prevents incomplete records
✔ Improves data quality
✔ Guides users with clear messages
✔ Reduces admin cleanup work
🧠 Quick Recap
Use Validation Settings to enforce rules
Write formulas that depend on other fields
Show helpful error messages
Keep your lists structured and reliable
📅 Calendar View in a SharePoint List
SharePoint lists don’t have to stay as rows and columns! With Calendar View, you can transform date-based data into a visual calendar layout—making it easier to track events, deadlines, and milestones at a glance.
Instead of scrolling through long tables, you’ll see items displayed on days, weeks, or months—just like a real calendar 🗓️.
💡 Important: Calendar View only works if your list has at least one Date-type column. Without a date field, SharePoint won’t know what to plot on the calendar.
Video Explanation
🔑 Why Use Calendar View?
Calendar View is perfect when your list contains time-based information. It helps you:
👀 Visualize data instead of reading raw rows
⏱ Track deadlines, events, and schedules
📈 Spot busy days or trends quickly
🧭 Navigate items by month/week/day
Great for scenarios like:
Customer sign-up dates
Project deadlines
Training schedules
Employee leave tracking
Event management
🛠 How to Create a Calendar View
Follow these simple steps to turn your list into a calendar:
Open your SharePoint list Go to the list that contains a date column (e.g., Sign-up Date, Due Date, Event Date).
Add a New View At the top right—just above the column headings—click ➕ Add View.
Name the View In the pop-up window, give it a name like: 👉 Calendar View
Select a Date Column Choose which date field should drive the calendar. Examples:
✔ Sign-up Date
✔ Deadline
✔ Event Date
❌ Date of Birth (not ideal for real tracking)
Choose a Layout Set the default display:
Month – best for overall planning
Week – detailed short-term view
Day – focused daily schedule
Click Create 🎉 Your list now appears in a calendar format!
🖼 Practical Example
Imagine you have a Customer Sign-up Date column:
You can instantly see how many customers joined in a month
Identify peak sign-up days
Spot quiet periods for marketing focus
Much more intuitive than reading dates in a table!
🎯 Best Use Cases
Scenario
Why Calendar View Helps
Project deadlines
See upcoming tasks visually
Event planning
Avoid date clashes
Support tickets
Track SLA dates
Employee leave
View overlaps easily
✅ Key Takeaways
Calendar View = visual, time-based perspective
Requires at least one Date column
Great for planning and trend spotting
Switch anytime between table and calendar views
🔔 Working with Alerts in Microsoft SharePoint
SharePoint alerts help you stay updated without constantly checking your lists. Once configured, SharePoint automatically notifies you whenever important changes occur—whether to a single item or the entire list. This is perfect for tracking updates like status changes, new entries, or edits made by team members.
Video Explanation
📌 Create an Alert for a Specific List Item
Sometimes you only need to monitor one critical record instead of the whole list. SharePoint lets you set alerts at the item level, so you get notified only when that particular item changes.
How to create an alert:
Open your SharePoint list and locate the item.
Click the three dots (…) next to the item.
Select Alert me from the menu.
You can then configure:
Alert Title – a meaningful name
Send Alerts To – one or more email recipients
Trigger Conditions – e.g., Anything changes or Someone else changes the item
Notification Timing – immediately, daily summary, or weekly summary
Click OK to activate the alert.
✉ What Happens After an Update
Whenever that item is modified, SharePoint sends an email containing:
What was changed
Who made the change
The date and time of the update
This keeps everyone informed without manual follow-ups.
🧰 Manage or Remove Alerts
As your project grows, you may want to review or clean up alerts.
To manage alerts:
Open the list
Click Manage my alerts from the top menu
From here you can:
✏ Edit existing alerts
🗑 Delete outdated ones
➕ Create alerts for the entire list
💡 Tip: List-level alerts are great when you need to track new items or bulk changes instead of one record.
🎯 Why Use Alerts?
Saves time by automating notifications
Reduces missed updates
Improves collaboration and accountability
Works for both items and whole lists
✅ Quick Recap
Alerts notify you automatically via email
Can be set on individual items or entire lists
Fully customizable with conditions and schedules
Easy to edit or delete anytime
📤 Working with SharePoint Lists: Exporting and Deleting Data
Managing SharePoint lists isn’t just about adding data—you’ll often need to export information for reports or clean up outdated records. SharePoint makes both tasks simple with built-in tools, no extra software required.
In this section, we’ll cover:
Exporting list data to Excel, CSV, or Power BI
Deleting individual items (with restore options)
Removing an entire list safely
Video Explanation
📥 Export a SharePoint List
Need to analyze your data in Excel or build dashboards in Power BI? Exporting lets you take your SharePoint list outside the platform in seconds.
🚀 Why Export?
Create reports and summaries
Share data with external teams
Perform advanced analysis in Excel
Build visual dashboards in Power BI
✅ Export Formats Available
Excel (.xlsx) – best for analysis and formulas
CSV – perfect for importing into other systems
Power BI – ideal for interactive reports
🧭 Steps to Export
Open your SharePoint list
Click the Export dropdown at the top
Choose your preferred format
The file downloads instantly to your device
💡 Tip: Export to Excel keeps column structure intact, making it easy to continue working with the data offline.
🗑 Delete a SharePoint List Item (With Restore Option)
Cleaning up old or incorrect records keeps your list accurate and relevant. The good news? Deleted items aren’t gone forever—they go to the Recycle Bin first.
🧹 How to Delete an Item
Select the item from the list
Click Delete from the top menu
Confirm the action
The item disappears from the list—but stays recoverable.
♻ How to Restore a Deleted Item
Open the Recycle Bin (left navigation)
Find your deleted item
Click Restore
The item returns exactly to its original location 🎉
🛡 Safety Net: SharePoint’s recycle bin protects you from accidental deletions.
⚠ Delete an Entire SharePoint List
If a list is no longer needed, you can remove it completely.
Steps to Delete a List
Open the list
Click the Settings gear icon
Select List Settings
Choose Delete this list
Confirm the action
❗ Important: Deleting a list removes all items inside it—double-check before proceeding.
In SharePoint, pages are the foundation of how content is presented and shared across a site. They allow you to display documents, announcements, dashboards, and project information in a structured and visually organized way. Whether you’re building an internal knowledge base, a team portal, or a company intranet, pages determine how users experience and interact with your content.
SharePoint offers several types of pages, each designed for different scenarios and levels of customization.
Types of SharePoint Pages
Site Pages (Modern Pages)
These are the default and recommended page type in today’s SharePoint. Site pages are built using web parts, making it easy to add text, images, document libraries, news, and more without technical skills.
Best features:
Mobile-friendly and responsive
Simple drag-and-drop editing
Consistent design across the site
Works seamlessly with modern SharePoint features
Site pages are ideal for team homepages, announcements, dashboards, and general communication.
Wiki Pages (Classic)
Wiki pages provide more free-form editing, similar to a word processor. Users can add formatted text, tables, links, and images directly on the page without structured web parts.
Good for:
Informal documentation
Knowledge bases
Quick notes and internal guides
Although still supported, wiki pages belong to the classic SharePoint experience and are gradually being replaced by modern site pages.
Web Part Pages (Legacy)
Web part pages come from older versions of SharePoint and allow detailed layout control using zones and classic web parts. However, they are now considered outdated.
Limitations:
Not mobile responsive
Limited compatibility with modern tools
More complex to maintain
These pages should only be used when required for legacy systems or older integrations.
When to Use Each Page Type
Choose Site Pages when you want a modern, responsive design with easy editing and full integration with current SharePoint features.
Choose Wiki Pages if you need flexible, text-heavy layouts or are working within an older environment.
Avoid Web Part Pages unless you must support legacy content or applications.
Understanding the different SharePoint page types helps you design sites that are easy to navigate, visually appealing, and aligned with modern collaboration needs. By selecting the right page type for the right purpose, you create a better experience for everyone who uses your SharePoint site.
📄 How to Create a Wiki Page in SharePoint — Step-by-Step Guide
Wiki pages may be part of SharePoint’s classic experience, but they’re still useful when you need free-form editing similar to a Word document. They’re great for quick documentation, internal notes, or simple knowledge-base pages where structure matters less than flexibility.
Let’s walk through how to create, edit, and publish a wiki page in a clear and easy way.
Video Explanation
🛠 Step-by-Step: Creating Your Wiki Page
➤ 1. Go to the Pages Library
Open your SharePoint site.
In the left navigation, click Pages — this is where all site pages are stored.
➤ 2. Create a New Page
Click the New button at the top.
You’ll see several options:
Site Page
Wiki Page
Web Part Page
Link
Select Wiki Page.
💡 Tip: Site Pages are the modern default, but Wiki Pages are perfect when you want a simple, document-style layout.
➤ 3. Name Your Page
Enter a meaningful title, such as:
“Expense Page”
“Team Guidelines”
“Project Notes”
A good name helps users find the page easily later.
➤ 4. Add Your Content
You’ll now see an editor that feels a lot like Microsoft Word:
✏️ Use the Format Text tab to style headings, bold text, bullets, and colors.
📎 Use the Insert tab to add:
Images
Links to files
Tables
App parts
This flexibility is what makes wiki pages great for informal documentation.
➤ 5. Save & Publish
When your content is ready, click Save and Publish.
Your page is now live and visible to site users.
📂 How to Find Your Page Later
To reopen or edit the page:
Go back to Pages in the site menu.
Click the page name (for example, Expense Page).
Choose Edit if you need to make updates.
Easy and always accessible 👍
💬 When Should You Use a Wiki Page?
Scenario
Good Fit?
Quick internal documentation
✅ Yes
Knowledge base articles
✅ Yes
Modern dashboards
❌ Better with Site Pages
Mobile-friendly layouts
❌ Use Site Pages
📌 Remember: Wiki pages are classic technology. For modern, responsive designs, Site Pages are recommended—but wiki pages remain handy for simple, text-focused content.
🎯 Summary
Wiki pages offer Word-like editing inside SharePoint
Great for informal guides, notes, and documentation
Easy to create with no technical skills
Still useful even in modern SharePoint sites
📁 Embedding a Document Library into a SharePoint Page
One of the smartest ways to make SharePoint easier for users is to bring the tools to the page instead of sending users around the site. By embedding a document library directly into a page, you can combine instructions, context, and file management in a single, friendly interface.
This approach is perfect for scenarios like expense submissions, project file uploads, or team collaboration spaces.
Video Explanation
🎯 Why Embed a Document Library?
Adding a library to a page gives you several advantages:
✅ Creates a guided experience for users
📤 Allows file upload directly from the page
🧭 Reduces navigation confusion
📘 Keeps instructions and documents together
👩💻 Ideal for non-technical team members
Think of it like building a mini workspace inside a page instead of just a blank information screen.
🛠 Step-by-Step: Add a Library to a Page
1️⃣ Open the Page
Go to your SharePoint site
Click Pages in the left navigation
Open the page you want to enhance (for example, Expense Page)
2️⃣ Switch to Edit Mode
Click the Edit ✏️ icon at the top-right
The page will open in a Word-like editor
3️⃣ Choose a Layout
Click Text Layout at the top
Select Two Columns with Header
This gives you:
A header for the title
Left column → instructions
Right column → document library
4️⃣ Add Helpful Instructions
In the header and left column, add guidance such as:
💬 “Upload your expense reports using the panel on the right.” 💬 “Use this file naming format: Department_Date.pdf”
Clear instructions = fewer mistakes 👍
5️⃣ Insert the Document Library (App Part)
Now for the magic part ✨
Click inside the right column
Open the Insert tab
Select App Part
Choose your library (e.g., Expenses)
Click Add
Your live document library now appears inside the page!
6️⃣ Save & Publish
Click Save and Publish
The page is now ready for your team
🚀 What Users Can Do Now
From this single page, users can:
📂 Upload new files
📝 Create documents
👀 View recent uploads
📖 Follow on-page instructions
👉 No more jumping between Pages, Site Contents, and Libraries!
💡 Best Use Cases
Scenario
Perfect Fit?
Expense submissions
✅ Yes
Project file collection
✅ Yes
HR document uploads
✅ Yes
Simple read-only info
❌ Use normal page
🧠 Final Thought
Embedding a document library turns a simple SharePoint page into a functional workspace. It combines guidance + action in one place — exactly what end users need to stay productive without confusion.
Give it a try on your next SharePoint page and watch how much smoother your team workflows become 🚀
🔧 Customizing an Embedded Document Library (App Part) in SharePoint Pages
Embedding a document library inside a SharePoint page is powerful—but the real magic happens when you customize how that library appears and behaves. You can group files, hide unnecessary columns, or even turn the library into a read-only viewer so users can’t upload or modify content.
Let’s walk through how to fine-tune your embedded library for a cleaner and more user-friendly experience.
Video Explanation
🎯 What You Can Achieve
With App Part customization, you can:
📂 Group files by metadata (e.g., Department)
👁️ Show only the columns that matter
🚫 Disable upload/edit buttons
🧼 Create a simple, clutter-free interface
✅ Step 1: Create a Custom View in the Library
The embedded library will display whatever view you choose, so start by creating one tailored for your page.
➤ Create the View
Open your Expenses document library
Click the view dropdown (e.g., All Documents)
Select Create new view
Name it something clear like: 👉 Expense Page View
➤ Customize the View
After creating it:
Open the view dropdown again
Click Edit current view
Now configure:
❌ Uncheck columns you don’t need
Modified
Modified By
📁 Under Group By, choose:
Department
Click OK to save.
👀 This is exactly how the library will look when embedded in the page.
✅ Step 2: Apply That View to the Page
Now connect the page to this new view.
➤ Open the Page
Go to Pages from site navigation
Open your page (e.g., Expense Page)
Click Edit ✏️
➤ Configure the App Part
Click once on the embedded document library
A Web Part tab appears at the top
Select Web Part Properties
In the right panel:
Under List View, choose 👉 Expense Page View
Optional tweaks:
🖼️ Appearance – change title
🧱 Layout – adjust sizing
⚙️ Advanced – fine-tune behavior
Click Apply.
✅ Step 3: Make It Read-Only (Optional)
Want users to only view files — not upload or edit?
➤ Turn Off the Toolbar
In Web Part Properties:
Find Toolbar Type
Select 👉 No Toolbar
✨ Result:
Upload button gone
New document option removed
Library becomes a clean viewer
🧠 Final Result
Your page now:
✔ Shows only relevant columns
✔ Groups files logically
✔ Prevents unwanted changes
✔ Looks professional and focused
🚀 Why This Matters
This setup is perfect for:
Expense review dashboards
HR document viewers
Project file showcases
Read-only reference areas
You get the best of both worlds: 👉 Guided page experience + live library functionality
🎉 Summary
By customizing the embedded App Part, you transform a basic page into a purpose-built workspace that’s clear, controlled, and easy for users to navigate.
Ready to level up your SharePoint pages? This technique is a game changer 💪
📄 How to Add Images and Links in a SharePoint Wiki Page
Adding images and links to a SharePoint wiki page transforms plain text into a visual, easy-to-navigate workspace. A banner image can make your page look professional, while links guide users directly to the right documents or libraries.
Let’s walk through how to do both—step by step 👇
Video Explanation
🖼️ Insert an Image into a Wiki Page
1. Open the Page
Go to Pages from the left navigation
Open your wiki page (for example, Expense Page)
Click Edit ✏️ at the top-right
2. Add the Image
Place your cursor where the image should appear
Open the Insert tab
Click Picture → From Computer
Browse and select your image
Choose destination library (usually Site Assets)
Click OK
3. Adjust the Image
Click the image to open the Picture tab
Resize, align, or adjust layout as needed
💡 Tip: Use a wide, lightweight image for a clean banner look.
🔗 Add a Link to a Document Library
1. Insert the Link
In Edit mode, place the cursor where the link should go
Go to Insert → Link → From Address
Enter:
Link Text: e.g., Click here to access the Expenses Library
Address: paste the library URL
Click Insert
2. Open in a New Tab (Recommended)
Click the inserted link
Open the Link tab
Enable Open in a new tab
🧭 Update Site Navigation
Add the Page to Navigation
Go to the homepage
Click Edit at the bottom of the left menu
Click the + icon
Choose Link
Paste the wiki page URL and name it (e.g., Expenses Page)
Click Save
Optional Cleanup
Remove any old direct link to the document library
Keep navigation focused on the new page
🎯 Result
Your wiki page now includes:
✔ A visual image banner
✔ Clickable link to the document library
✔ Clean and simple navigation
✔ Improved user experience
This structure helps users understand the page quickly and reach the right content with minimal effort 🚀
🔄 Viewing Page History and Embedding Content in SharePoint Pages
SharePoint pages evolve over time, and it’s important to track what changes have been made and by whom. SharePoint provides a built-in Page History feature for this purpose. In addition, you can enrich your pages by embedding external content such as YouTube videos, dashboards, or other web resources using embed code.
Video Explanation
📖 Viewing Page History
Page History allows you to review previous versions of a page and compare edits.
Steps to view history:
Open the SharePoint page you want to review (for example, Expense Page).
Click Edit at the top-right corner.
From the Page tab, select Page History.
A panel will appear listing all saved versions of the page.
What you can do:
Select any version to view how the page looked at that time.
Use the compare option to see differences between versions.
Changes are color-coded:
🟢 Green – content that was added
🔴 Red – content that was removed
This feature is extremely useful for auditing edits or restoring previous content if needed.
🎥 Embedding a YouTube Video or Other Content
You can make your SharePoint pages more engaging by embedding content from external sources.
How to embed a video:
Open the YouTube video (or another service that provides embed code).
Click Share → Embed and copy the HTML code.
Return to your SharePoint page in Edit mode.
Place the cursor where you want the video to appear.
Go to the Insert tab and choose Embed Code.
Paste the copied code and click Insert.
Click Save and Publish to make the changes live.
The video will now appear directly on your page and can be played without leaving SharePoint.
✅ Benefits
Using these features together helps you:
Track and review page edits over time
Recover earlier versions when needed
Add rich media to make pages more interactive
Create more engaging and informative SharePoint sites
With Page History and embedding, SharePoint pages become powerful communication tools rather than simple static documents.
📄 How to Create a Modern Site Page in SharePoint
Modern Site Pages are the heart of today’s SharePoint experience. They let you create clean, visually appealing pages using drag-and-drop web parts—no technical skills required. Compared to older Wiki pages, Site Pages feel more like building a modern website: responsive, flexible, and easy for everyone to use.
In this section, you’ll learn how to create a Site Page from scratch and customize it to fit your team’s needs.
Video Explanation
🧭 Step-by-Step: Create Your First Site Page
Follow these simple steps to get started:
Open the Pages library
From your SharePoint site, click Pages in the left navigation.
Create a new page
Click New → Site Page at the top.
Add a page title
Click on the title area and type a meaningful name, such as “Cars Page” or “Team Resources.”
Customize the banner
Click the banner area to open its settings.
You can:
Change the banner image
Align the title (Left / Center / Right)
Add text above the title (e.g., “Welcome to our resources”)
Show or hide the published date
Add content sections
Click the ➕ plus icon below the banner to insert web parts like:
📝 Text
🖼️ Image
📁 Document Library
🎬 Video
🔗 Links and more
Publish the page
When ready, click Publish in the top-right corner.
🚀 After You Publish
SharePoint gives you helpful options right away:
➕ Add the page to site navigation so users can find it easily
📰 Post as News to announce it to your organization
🔗 Copy link to share in Teams or email
📧 Share via email with a single click
✨ Why Use Modern Site Pages?
Modern Site Pages are perfect for:
Creating internal dashboards
Building knowledge base pages
Displaying announcements and updates
Embedding document libraries and videos
Designing role-based landing pages
They combine professional design + easy editing + powerful integration with the rest of Microsoft 365.
🖌️ How to Enhance a SharePoint Site Page with Layout Edits & an Embedded Picture Library
Modern SharePoint Site Pages are designed to look clean, visual, and professional without any technical skills. With just a few clicks, you can transform a simple page into an engaging space that combines banners, structured layouts, and live image galleries.
In this section, you’ll learn how to upgrade an existing Site Page by customizing the banner, adjusting the layout, and embedding a picture library so users can view images directly from the page.
Video Explanation
✏️ Step 1 – Open the Page in Edit Mode
Go to the SharePoint page you created earlier
Click Edit in the top-right corner
The page switches to design mode where all elements become customizable
💡 Tip: Use the full-screen ↗ icon to hide navigation and focus only on the page while editing.
🖼️ Step 2 – Customize the Banner
The banner sets the mood of your page — make it informative and attractive.
Click anywhere on the banner area
Select Change Image to:
Pick a stock image
Upload your own photo
Use Set Focal Point to control which part of the image stays in focus
You can also:
Add small text above the title
Show or hide the publish date
Align the title left, center, or right
🎨 A well-designed banner gives instant context to your page visitors.
🧩 Step 3 – Add a Structured Section
To organize content neatly:
Scroll below the banner
Click the ➕ Add section icon
Choose a layout such as Two Columns
For better balance:
Open Section Properties
Change layout to One-third Right
Left side → wider for main content
Right side → perfect for images or libraries
📸 Step 4 – Embed the Picture Library
Now let’s bring images directly onto the page:
Inside the column, click ➕ Add web part
Select Document Library
Choose your Cars picture library
✨ Instantly, thumbnails from the library appear on the page — no manual uploads required!
This is ideal for:
Product galleries
Event photo collections
Team showcases
Visual knowledge bases
🚀 Step 5 – Publish the Page
When everything looks good:
Click Republish at the top right
The enhanced page becomes live for everyone 🎉
✅ What You Get
After these updates, your page now includes:
✔ A branded banner with focal control
✔ Clean multi-column layout
✔ Live picture gallery embedded
✔ Modern, professional design
This approach turns SharePoint pages into interactive visual hubs instead of plain text screens, making content easier and more enjoyable to explore.
🧑🤝🧑 How to Add People to a SharePoint Site Page
Adding people profiles to a SharePoint page is a great way to make your site feel more human and connected. Whether you’re building a team directory, highlighting project owners, or showing key contacts, the People web part lets you display names, photos, roles, and contact details in a professional layout.
In this section, you’ll learn how to insert and customize a People section so visitors can easily recognize and reach the right person.
Video Explanation
✅ Step-by-Step: Add the People Web Part
1️⃣ Open the Page in Edit Mode
Go to the SharePoint page you want to update
Click Edit in the top-right corner to start customizing
2️⃣ Choose Where to Place It
Hover over the column or section where you want the people list
Click the ➕ Add web part icon
3️⃣ Insert the People Web Part
In the toolbox, search for People
Click it to add the web part to your page
4️⃣ Add Team Members
Start typing a person’s name or email
Select them from the suggestions
Repeat to add multiple people
💡 SharePoint automatically pulls profile photos and contact info from Microsoft 365.
🎨 Customize the Look
Click on the People web part and open Properties ⚙️ to adjust:
Layout options:
🟦 Small – compact cards with name + photo
🟩 Medium – adds space for a short description
🟪 Large – more detailed, perfect for directories
Optional descriptions:
Add roles like Project Manager or HR Lead
Include department names or responsibilities
Provide quick contact notes
🚀 Publish the Changes
When everything looks good, click Republish
The updated page goes live instantly
👀 What Visitors Will See
Your page will now show:
✔ Profile photos or initials
✔ Names and job details
✔ Clickable cards that open email & contact info
This is perfect for:
Team introductions
Project contact lists
Department directories
Stakeholder pages
🌟 Why Use the People Web Part?
Makes pages more personal
Helps users find the right contact fast
No manual data entry — synced with Microsoft 365
Clean, professional presentation
🕒 How to Add a Countdown Timer to a SharePoint Site Page
A countdown timer is a simple but powerful way to grab attention on your SharePoint site. Whether you’re counting down to a product launch, company event, project deadline, or registration closing date, this web part creates urgency and keeps everyone focused on what matters next.
The best part? SharePoint includes a built-in Countdown Timer web part—no coding or third-party tools needed 👍.
In this section, you’ll learn how to add, customize, and publish a live countdown timer on any modern SharePoint page.
Video Explanation
🔧 Step-by-Step: Add the Countdown Timer
1️⃣ Open the Page in Edit Mode
Go to the SharePoint page where you want the timer
Click Edit in the top-right corner
2️⃣ Add a New Section
Hover between sections until you see the ➕ icon
Click it and choose a layout
👉 One Column works best for a full-width timer
3️⃣ Insert the Countdown Web Part
Inside the section, click the inner ➕ Add web part
Search for Countdown Timer
Select it to place it on the page
⚙️ Customize Your Timer
Click on the timer and open Properties ⚙️ on the right to configure:
🎯 Set the Basics
Add a title like:
“Event Starts In”
“Sale Ends In”
“Project Go-Live”
Choose the target date and time
⏱ Choose What to Display
Select which units to show:
Days
Hours
Minutes
Seconds
You can keep it simple (days + hours) or ultra-precise with seconds ticking away!
🔗 Add a Call to Action (Optional)
Want users to take action before time runs out?
Turn on Add a call to action
Set button text like:
“Register Now”
“Learn More”
“Submit Report”
Add a link to the relevant page or form
🖼 Make It Visually Engaging
Give your timer more impact with a background:
Upload your own image or choose a stock photo
Adjust overlay color (light/dark)
Use opacity slider for better readability
This helps the timer stand out instead of looking like plain text.
🚀 Publish the Page
When everything looks good, click Republish
The countdown goes live instantly and updates in real time
🎉 What You Get
Your SharePoint page will now feature:
✔ A live, ticking countdown
✔ Optional action button
✔ Branded background image
✔ A professional, event-focused look
💡 Great Use Cases
Company events & town halls
Training registration deadlines
Project go-live dates
Offer expirations
Sprint or milestone tracking
🧭 How to Add Navigation Elements to a SharePoint Page
Adding navigation elements like Call to Action (CTA) blocks and buttons makes your SharePoint pages easier to use and more interactive. Instead of forcing users to hunt through menus, you can guide them directly to key areas such as the Home page, Expense page, or any important resource.
These elements act like signposts on your site—helping visitors move smoothly from one section to another.
Video Explanation
🚀 Why Add Navigation Elements?
Using CTAs and buttons on your pages helps to:
✔ Guide users to important content quickly
✔ Reduce confusion for new visitors
✔ Highlight frequently used pages
✔ Improve overall user experience
🔧 Step-by-Step: Add Navigation Elements
1️⃣ Open the Page in Edit Mode
Navigate to the page you want to update
Click Edit in the top-right corner
2️⃣ Add a New Section
Hover below the banner until the ➕ icon appears
Select One Column Section to create space for your navigation
3️⃣ Insert a Call to Action (CTA)
Click the inner ➕ Add web part
Choose Call to Action
Then configure it in the properties panel:
Add a message such as: “Want to check the Expense page?”
Set button text like “Click Here”
Paste the link to the target page
Pick a background color to make it stand out
4️⃣ Add a Navigation Button
Hover above or below the CTA
Click ➕ Add web part → Button
Enter:
Label: Home
Link: your homepage URL
5️⃣ Publish and Test
Click Republish
Test each link to confirm correct navigation
💡 Tips for Better Navigation
Use clear action words like View Expenses or Go to Dashboard
Keep button labels short and simple
Avoid adding too many CTAs on one page
Match colors with your site theme for consistency
🎯 What You Achieve
With these additions your page will:
Feel more interactive and professional
Help users reach content faster
Reduce unnecessary clicks
Provide a smoother browsing experience
A few well-placed navigation elements can transform a basic SharePoint page into a user-friendly hub 👍.
🏠 How to Create and Customize a SharePoint Home Page
Your SharePoint Home Page is the front door to your site. It’s where users land first, so it should be informative, organized, and easy to navigate. With modern SharePoint, you can build a custom homepage using web parts like News, Calendar, Quick Links, and Activity — all without any coding.
In this section, you’ll learn how to design a professional homepage from scratch and set it as the default landing page for your site.
Video Explanation
✨ What Makes a Good SharePoint Home Page?
A well-designed homepage should:
✔ Highlight important updates and announcements
✔ Provide quick access to key pages and libraries
✔ Show recent activity to keep users engaged
✔ Be visually clean and easy to scan
Let’s build one step by step 👇
🛠 Step-by-Step: Build Your Custom Home Page
1️⃣ Create a New Site Page
Open Pages from the left navigation
Click New → Site Page
The modern page editor will open
2️⃣ Customize the Banner
Click on the top banner area
Open the Properties panel
Choose a layout such as Color Block, Image, or Title Only
Add a meaningful page title like “Welcome to Our Team Site”
🧩 Add Useful Web Parts
3️⃣ Add News & Calendar Section
Click the ➕ Add section button
Choose Two Column layout
In the left column:
Add the News web part to display announcements
In the right column:
Add the Group Calendar web part to show upcoming events
👉 This gives users a quick snapshot of what’s happening.
4️⃣ Add Quick Navigation Cards
Add another section with One Column layout and insert:
Call to Action web parts linking to:
Expense Page
Cars Picture Library
Any important department pages
For each CTA you can configure:
Title
Description
Button text
Link URL
Background image 🎨
These act like visual shortcuts across your site.
5️⃣ Add Site Activity Feed
At the bottom of the page:
Add a One Column section
Insert the Site Activity web part
This shows:
Recent file uploads
Page edits
User interactions
Great for keeping the homepage “alive” 🔄
🚀 Publish & Set as Home Page
When you’re happy with the design:
Click Publish
Go back to the Pages library
Find your new page
Click the three dots (…) → select Make homepage
✅ Now this page becomes the default landing page when users click the Home icon.
🎯 Final Result
Your custom homepage now includes:
📰 News updates
📅 Calendar events
🔗 Quick links to key pages
📊 Activity feed
🎨 Personalized banner and layout
This transforms SharePoint from just a file storage space into a real digital workplace hub.
🧰 Useful Menu Items on SharePoint Site Pages
SharePoint Site Pages include several built-in tools that help you understand page performance, promote content, and manage page details—all from the top menu. These features make it easy to turn a simple page into a well-managed, high-impact resource.
Let’s explore the three most useful options 👇
Video Explanation
📊 1. Page Analytics — Understand Your Audience
The Analytics option gives you valuable insights into how users interact with your page.
When you click Analytics, you can see:
👀 Page Views – how many times the page was opened
🧑 Unique Viewers – number of individual visitors
⏱ Average Time Spent – how long users stay on the page
📈 Traffic Trends – busy hours and popular days
💡 Great for: Checking whether important pages are actually being used and identifying the best time to post updates.
📣 2. Promote — Share Your Page with the Team
The Promote button helps you surface your page in different places without extra effort.
From the promote panel you can:
➕ Add to Navigation – make the page easy to find
📰 Post as News – feature it on the homepage news feed
🔗 Share Page – send directly to colleagues
📧 Copy Link / Email – quick distribution
🧩 Save as Template – reuse the design later
💡 Great for: Turning a normal page into a highlighted announcement or reusable template.
🗂 3. Page Details — Manage Metadata
The Page Details option opens a side panel with important information about the page.
Here you can:
✏ Edit title and description
🏷 Update custom metadata fields
🔍 Review page properties
📁 Keep content organized for search and filtering
💡 Great for: Keeping pages structured and searchable across your SharePoint site.
🎯 Why These Tools Matter
Using these menu features helps you:
Track engagement and improve content
Promote key information to the right audience
Keep pages organized and professional
Reuse good designs across the site
With just a few clicks, you can manage your SharePoint pages like a pro 👍.
Microsoft SharePoint provides a simple and powerful way to store, organize, and collaborate on files with your team. You can upload documents, create new ones directly in the site, edit files in your browser, and share them with others—all in one place.
In this section, we’ll look at how to navigate the Documents library and how to work with files effectively, including organizing and opening them.
Video Explanation
Site Navigation and Document Library
The Documents library is the main area where files are stored and managed in a SharePoint site. It’s designed to make adding and organizing files easy.
You can create new content or upload existing files from your computer.
👉 How to add documents:
Open your SharePoint site.
Select Documents from the left menu.
Click the New button at the top left.
Choose one of the following:
Folder to create a new folder
A file type (Word, Excel, PowerPoint) to create a new document
Upload to add files from your computer
When uploading, choose either:
Individual files
Entire folders
Once uploaded, your files appear in the document library and are ready to use.
✨ Example: You might upload a Word file, an Excel sheet, and a PowerPoint file to quickly build your document library.
Working with Files in SharePoint
After files are added, you can work with them directly online. This allows quick collaboration without needing to download files first.
👉 Common file actions:
Open and Edit Online
Click a file to open it in the browser.
Edit it much like a desktop app.
Use Download if offline editing is needed.
Share with Colleagues
Click the Share button next to a file.
Enter a colleague’s name.
Select them from suggestions and click Send.
View File Details
Click the three dots (…) next to a file.
Select Details.
A right-side panel shows:
Activity
Version history
Permissions
Quick Access from the Homepage
Many sites include a Documents web part on the homepage.
This provides fast access to recent or important files.
✨ This makes editing, sharing, and reviewing files smooth and collaborative.
Creating Files and Folders
You don’t always need to upload files—SharePoint lets you create them directly.
Create new files from the New menu
Create folders within the library
Drag and drop files into folders to move them
However, relying only on folders is considered an older method of organization in SharePoint.
Organizing with Metadata (Columns)
SharePoint offers metadata features to organize files more effectively than folders alone.
You can add columns to files
Columns store information like category, department, or status
This makes sorting and filtering much easier
Using metadata helps teams find files faster without deep folder structures.
Opening and Reading Files
SharePoint provides multiple ways to open and read files:
Open in App
Opens the desktop version for offline editing
Changes sync back to the cloud
Availability depends on your plan
Open in Browser
Edit and view directly online
No downloads required
Immersive Reader
Larger, easier-to-read text
Can read content aloud
Helpful for accessibility and focus
By using document libraries, online editing, sharing tools, and metadata, SharePoint makes file management organized and team-friendly.
Editing Files and Using Version History in SharePoint
Microsoft SharePoint makes file editing and collaboration simple by allowing you to work directly in your browser or in desktop apps. There’s no need to download and re-upload files after every change. Even better, SharePoint automatically saves your work and supports real-time collaboration, so teams can edit together without confusion.
Another key feature is Version History, which quietly tracks changes and lets you restore earlier versions if needed. Together, these tools make file management safer and more efficient.
Video Explanation
Editing Files in SharePoint
One of the biggest advantages of SharePoint is how easy it is to edit files. You can open a file and start working immediately, with changes saved automatically.
How editing works:
Files open directly in your browser
Changes are auto-saved
Multiple people can edit at the same time
You can switch between browser and desktop apps
👉 Steps to edit a file:
Go to your Documents Library.
Click the file name (for example, a Word or Excel file).
The file opens in a new browser tab.
Start typing or making changes — they save automatically.
More editing options:
Click the three dots (…) next to a file.
Select:
Open in Browser for quick online edits
Open in App to use a desktop Office app
When others are editing the same file, you’ll see their initials or cursors in real time. This makes teamwork smooth and avoids duplicate versions.
File Version History in SharePoint
Version History is a built-in safety feature. Every time a file is saved, SharePoint keeps a record of previous versions. This allows you to review or restore older copies if needed.
Why Version History matters:
Protects against accidental changes or deletions
Lets you track how a file evolved
Makes restoring older content easy
👉 Steps to access Version History:
In the Documents Library, find your file.
Click the three dots (…) next to it.
Select Version History.
A list of saved versions appears.
Options for each version:
View → Open and review that version
Restore → Revert the file to that version
Delete → Remove a version if unnecessary
If you restore a version, SharePoint rolls the file back while still keeping newer versions stored. This ensures you never permanently lose important work.
Versioning and Check-In/Check-Out in SharePoint
Versioning is one of the most valuable features in Microsoft SharePoint for managing files. It helps teams track edits, collaborate confidently, and restore earlier versions when needed. Instead of saving files as “v1,” “v2,” or “final-final,” SharePoint automatically keeps a history of changes for you.
In this section, we’ll look at how versioning works, how check-out/check-in supports controlled editing, and how versioning applies to non-Office files.
Video Explanation
Understanding Versioning
Versioning allows you to track and manage changes made to a file over time. Every time a file is edited and saved, SharePoint records a new version in the background.
Why versioning is useful:
Tracks who made changes and when
Allows teams to collaborate on the same file
Lets you restore earlier versions if mistakes happen
Removes the need for manual version names in file titles
SharePoint also supports simultaneous editing, meaning multiple users can work on the same file at the same time. You may see another user’s cursor or presence indicator while they are editing, which helps avoid conflicts.
If unwanted edits are made, you can simply restore a previous version from the version history.
Check-Out and Check-In
Sometimes, you may want to prevent others from editing a file while you work on it. That’s where check-out and check-in come in.
How it works:
Check-out locks the file so only you can edit it
Others can view but not modify the file
Check-in unlocks the file and saves your updates as a new version
When checking a file back in, you can add comments describing your changes. These comments appear in the version history and help track what was updated.
When to use check-out/check-in:
When working on sensitive documents
When making major revisions
When you want full control over edits
Versioning for Non-Office Files
Versioning also works for non-Office files such as videos, images, or PDFs. The main difference is that these files cannot be edited by multiple users at the same time in SharePoint.
How versioning works for non-Office files:
Download and edit the file offline
Upload it again using the same file name
Choose the option to replace the existing file
SharePoint recognizes this as a new version of the file.
You can then:
View version history
Track previous versions
Restore older copies if needed
This is especially helpful for files like videos or design assets that go through multiple revisions.
Using versioning together with check-in and check-out gives teams strong control over file edits while still supporting collaboration. It ensures that changes are tracked, recoverable, and organized without extra manual effort.
Accessing SharePoint Files Offline with OneDrive
Working offline doesn’t mean you have to stop using SharePoint. With OneDrive integration, you can sync your SharePoint document libraries to your computer and access them directly from File Explorer—even without a constant internet connection. Any changes you make offline will automatically sync once you’re back online.
In this section, you’ll learn how to add a SharePoint library shortcut to OneDrive and then access those files from your PC.
Video Explanation
Add a SharePoint Library Shortcut to OneDrive
Adding a shortcut connects your SharePoint document library to your OneDrive. This lets you view and manage the same folders from both SharePoint and OneDrive.
👉 Steps to add the shortcut:
Open your SharePoint document library.
At the top, click Add shortcut to OneDrive.
Wait for the confirmation notification.
👉 Verify in OneDrive:
Sign in to the Microsoft 365 portal.
Open OneDrive from the side navigation.
Click the folder icon in the OneDrive menu to view your files.
Look for a folder named after your SharePoint site followed by the library name.
Open it to confirm the folder structure matches SharePoint.
✅ Key Point: The folder structure you see in OneDrive mirrors your SharePoint library.
Access OneDrive from Your Windows PC
Once synced, you can access your SharePoint files directly from your PC using OneDrive.
👉 Steps to access files from a PC:
Log into a Windows PC using your organizational account.
Complete multi-factor authentication if prompted.
Open File Explorer.
Select OneDrive from the left sidebar.
Sign in if requested.
You’ll now see the same folders that appear in OneDrive on the web, including your SharePoint site folders.
Creating and Syncing Files Offline
You can create or edit files locally, and they will sync automatically.
👉 Example workflow:
Open a synced SharePoint folder (for example, a folder named Test).
Create a new file, such as a text file named File from PC.
Save it normally.
When you later open SharePoint in your browser and navigate to the same folder, you’ll see that file there.
✅ Key Point: Any changes made on your PC sync seamlessly to SharePoint, keeping files updated across devices.
Using OneDrive with SharePoint gives you the flexibility to work from your desktop while still benefiting from cloud storage and collaboration features provided by Microsoft 365.
Using Templates and Managing the New Menu in SharePoint
Templates and the New menu in Microsoft SharePoint are simple features that can make a big difference in daily work. They help teams create consistent documents, save time, and reduce repetitive formatting. Instead of starting from scratch each time, users can begin with a ready-made structure.
In this section, you’ll learn how to upload and use templates, and how to control what appears in the New menu so it fits your team’s needs.
Video Explanation
Why this matters:
Keeps documents consistent across the organization
Speeds up document creation
Reduces formatting errors
Makes the New menu cleaner and easier to use
Upload and Use a Template File
Templates are pre-formatted files that users can open, fill in, and save as new documents. They’re useful for quotes, forms, reports, or any document with a standard layout.
A template can be almost any file type, such as Word, Excel, or PowerPoint.
How templates help:
Include predefined fields (company name, address, etc.)
Ensure consistent structure
Save time for repeated document types
👉 Steps to upload a template:
Open any document library.
Click the New button at the top.
From the dropdown, select Add template (usually at the bottom).
Upload your desired file.
Once uploaded, your template appears as an option under the New button.
👉 How it’s used in practice:
A user clicks New and selects the template.
The file opens with prefilled structure.
The user fills in the needed details.
The file is saved with a new name (for example, Quote 1).
The same template can be reused for other clients or scenarios.
This keeps documents uniform and organized.
Edit the New Menu
The New menu appears in every document library and lets users quickly create files, folders, or template-based documents. If the menu shows options you don’t need, you can customize it.
Why edit the New menu:
Remove unused options
Hide outdated templates
Simplify choices for users
Match the menu to team workflows
👉 Steps to edit the New menu:
Open your document library.
Click the New button.
Select the Edit option in the menu.
A panel opens on the right with checkboxes.
Check or uncheck items to show or hide them.
Save your changes.
If a template is no longer needed, simply uncheck it so it doesn’t appear in the New menu.
Using templates together with a well-managed New menu helps teams work faster, stay consistent, and keep document creation simple.
Associating Metadata with Uploaded Files in SharePoint
Using metadata in SharePoint is a powerful way to organize files beyond simple folder structures. Instead of relying only on file names or deep folders, metadata lets you tag files with useful information like department, project, or document type. This makes searching, filtering, and managing documents much easier as your library grows.
In this section, you’ll learn how to upload files and assign metadata so your documents stay organized and easy to find.
Video Explanation
Why metadata is important:
Makes files easier to search and filter
Reduces dependence on complex folder structures
Keeps libraries organized as they grow
Helps teams quickly identify file context
Upload Files to a Document Library
Before adding metadata, you first need files in your library.
👉 Steps to upload files:
Open any document library.
(Optional) Open a folder if you want to upload there.
While folders can be used, SharePoint works best when organization relies on metadata.
Click Upload.
Choose Files or Folder from your computer.
Wait for the upload to complete.
Once uploaded, you’ll see files in the library with default columns such as:
Name
Modified
Modified By
At this point, filenames may be the only clue about content—but metadata will improve that.
Create a Metadata Column
Metadata is added through columns in the document library. Each column stores a specific type of information.
👉 Example: Create a “Department” column
In the document library, click Add column.
Choose a column type.
Select Choice when you want predefined options.
Click Next.
👉 Configure the column:
Column name: Department
Description: (optional)
Choices:
Accounting
Marketing
Sales
HR
Disable manual entry so users must pick from the list
Turn on Require this column if every file must have a value
Click Save.
Your new metadata column is now ready.
Assign Metadata to Files
After creating the column, you need to assign values to your files.
Method 1: File Details Panel (One-by-One)
Best for small updates.
Click the three dots (…) next to a file.
Select Details.
In the panel, choose the correct department.
Method 2: Edit in Grid View (Bulk Editing)
Best for multiple files.
Click Edit in Grid View from the top menu.
The library switches to an Excel-like view.
Click cells under the Department column.
Assign departments to multiple files quickly.
Exit grid view when finished.
This method is much faster when tagging many files.
Good Practice Tips
Use folders sparingly; rely more on metadata
Keep choice options limited and clear
Require important metadata fields
Use consistent naming for columns
Adding metadata transforms a simple document library into a smart, searchable system. With the right columns in place, teams can quickly filter, group, and find files without digging through folders.
Organize SharePoint Files Smarter with Metadata
In Microsoft SharePoint, organizing documents doesn’t have to rely on folders alone. Instead, you can use metadata—custom fields such as Department or Expense Type—to tag files with meaningful information. This approach is far more flexible than traditional folders and makes it easier to search, filter, group, and manage large volumes of documents.
Metadata helps you see your files from different perspectives without moving or duplicating them. The same document can belong to multiple logical views, something folders simply can’t handle well.
Video Explanation
Filtering Files Using Metadata
Once files are tagged with metadata, you can quickly narrow down what you see.
How filtering works:
Each metadata column has a dropdown menu.
You can filter files based on one or more values.
Only matching files are shown, while others are temporarily hidden.
Steps to filter files:
Go to the column header (for example, Department).
Click the dropdown arrow.
Select Filter.
In the right-hand pane, check the values you want to see (for example, Accounting).
Click Apply.
Now, only files tagged with that department are displayed.
To clear filters:
Open the filter pane again.
Click Clear all.
Select Apply to return to the full file list.
Grouping Files by Metadata
Grouping lets you visually organize files into expandable sections based on metadata values. This is especially useful when working with many related documents.
How grouping helps:
Files are grouped by category (such as departments or expense types).
Groups can be expanded or collapsed.
Makes bulk actions easier.
Steps to group files:
Click the dropdown on a metadata column (for example, Department).
Select Group by Department.
Files are now grouped under headers like Accounting, Sales, or HR. Each group has an arrow that lets you collapse or expand it.
You can also:
Select all files in a group at once
Perform bulk actions like delete, move, or download
Switching Between Different Metadata Views
You’re not limited to one way of grouping.
If you want to group by Expense Type instead of Department, repeat the same steps using that column.
Only one metadata field can be used for grouping at a time.
At the top of the file list, you’ll also find:
Expand all – Opens all groups
Collapse all – Closes all groups
These options help you quickly switch between a high-level overview and a detailed view.
By using metadata with filtering and grouping, SharePoint turns a simple document library into a powerful, flexible file management system—making it much easier to find, organize, and work with your files at scale.
Track and Analyze Expenses in SharePoint Using Currency Metadata
Microsoft SharePoint can do much more than store documents—it can also help you track and analyze financial data using metadata. Instead of organizing expense files with folders or relying on filenames, you can use structured metadata such as Department, Expense Type, and Currency (Amount) to gain clear, real-time insights directly within a document library.
This approach turns a standard SharePoint library into a lightweight financial tracking and reporting tool that’s easy for teams to use.
Video Explanation
Add a Currency Metadata Column
To begin tracking expenses, you first need a currency-based metadata column.
Steps to create a currency column:
Open your SharePoint document library.
Click Add column.
Select Currency as the column type and click Next.
Enter a column name such as Amount.
Choose the currency format (for example, USD or EUR).
Optionally set a default value or description.
Click Save.
The new Amount column will now appear alongside your files.
Enter Financial Values
Once the column exists, you can start adding values to your files.
Efficient data entry:
Click Edit in grid view to switch to an Excel-like layout.
Enter amounts such as 450, 1200, or 2500 for each file.
Exit grid view when finished—SharePoint saves changes automatically.
This method is ideal for entering or updating values across many files at once.
Sort, Filter, and Group Expense Data
With currency values in place, SharePoint’s built-in tools let you analyze the data quickly.
Using the Amount column, you can:
Sort expenses from lowest to highest (or vice versa).
Filter files to show only specific ranges (for example, expenses above $500).
Group files by other metadata such as Department or Expense Type.
Grouping makes it easy to compare expenses across teams or cost categories without exporting data.
Use Totals for Instant Insights
One of the most powerful features is Totals, which provides quick summaries directly in the library view.
How to enable totals:
Click the dropdown on the Amount column.
Select Totals.
Choose a calculation such as:
Sum – total expenses
Average
Minimum / Maximum
Count
Standard Deviation / Variance
When combined with grouping, totals become even more valuable. For example:
Group by Department and show the sum to see total spend per department.
Group by Expense Type to identify major cost areas.
Use Count to see how many expense files exist per category.
You can remove summaries at any time by setting totals back to None.
Why This Approach Works
Using currency metadata in SharePoint allows you to:
Avoid maintaining separate spreadsheets for tracking totals
Get instant financial overviews without exporting data
Enable non-technical users to analyze expenses visually
Combine document management with basic financial reporting
With metadata, filtering, grouping, and totals, SharePoint becomes a practical and flexible solution for managing and analyzing expense-related documents.
Visually Enhance SharePoint Lists with Conditional Formatting and Column Styling
Microsoft SharePoint makes it easy to store and manage data—but good visual design makes that data far easier to understand and act on. By using view formatting and column styling, you can highlight important information such as high expenses, specific categories, or outliers directly within a list or document library.
In this section, you’ll learn how to apply alternating row styles, conditional formatting, and column-level styling to make your SharePoint lists more readable, informative, and user-friendly.
Video Explanation
Open the Format Current View Panel
All list-level formatting starts from the same place.
Steps to open formatting options:
Go to your SharePoint list or document library.
In the top menu, click the All Documents (or current view) dropdown.
Select Format current view.
You’ll see two tabs:
Format view – styles entire rows
Format columns – styles individual columns
Apply Alternating Row Styles
Alternating row styles improve readability by visually separating rows.
How to apply:
In the Format view tab, choose Alternating row styles.
Select background colors for:
Even rows (for example, light gray)
Odd rows (for example, white or light blue)
Click Save to apply.
⚠️ This styling is purely visual and does not depend on data values.
Use Conditional Formatting (Row-Level)
Conditional formatting lets you style rows based on metadata values such as Expense Type or Department.
Steps to apply conditional formatting:
In Format view, select Conditional formatting.
Reset any default styling by choosing No style.
Click Add rule.
Choose a column (for example, Expense Type).
Set a condition (for example, equals Travel).
Choose a background color.
Save the rule.
Only rows matching the condition will be highlighted, making important entries stand out instantly.
Workaround: Enable Formatting for Currency Columns
By default, Currency columns cannot be used in view-level conditional formatting. A simple workaround solves this.
Steps to update the column:
Click the dropdown on the Amount column.
Select Column settings → Edit.
Change the column type from Currency to Number.
In More options, enable Require that this column contains information.
Choose a currency symbol if needed.
Click Save.
The column will now be available for conditional formatting rules.
Add Conditional Formatting Based on Amount
Now you can highlight high-value items automatically.
Example: highlight large expenses
Open Format current view → Conditional formatting.
Clear any default styles.
Click Add rule.
Choose the Amount column.
Set a condition (for example, Amount is greater than 3000).
Choose a strong color such as red.
Save.
Any row exceeding that amount will be visually emphasized—even when sorting or filtering the list.
Use Column Formatting for Individual Cells
If you prefer to highlight only one column instead of the entire row, use column formatting.
Steps:
Click the dropdown on the Amount column.
Select Column settings → Format this column.
You’ll see two powerful options:
Conditional formatting Apply color rules to individual cells based on values.
Data bars Display horizontal bars that visually represent numeric values.
Data bars are especially useful for financial data:
Higher values show longer bars
Lower values show shorter bars
Makes comparisons instant without charts or exports
Reset the View to Default
If you want to remove all formatting and return to the standard view:
Open Format current view.
Disable Conditional formatting.
Click Save.
Your list will return to the default white-background layout.
Why Formatting Matters
Using conditional formatting and column styling in SharePoint helps you:
Quickly spot high-value or critical items
Improve readability of large lists
Reduce the need for filtering or exporting data
Create a clean, modern, and insightful user experience
With the right formatting in place, SharePoint lists become easier to scan, analyze, and act on—right where your data lives.
Customizing Columns in a SharePoint Document Library
Microsoft SharePoint document libraries become far more useful when columns are arranged and displayed in a way that matches how people actually work. SharePoint provides simple, built-in options to move, hide, show, and pin columns—allowing users to personalize their views without writing code or changing advanced settings.
In this section, you’ll learn how to adjust column layouts to create a cleaner, more productive document library experience.
Video Explanation
Reorder Columns (Move Left or Right)
Reordering columns helps bring the most important information into focus.
Method 1: Use Column Settings
Click the dropdown arrow next to the column header.
Select Column settings.
Choose Move left or Move right.
Method 2: Drag and Drop
Click and hold the column header.
Drag it to the desired position.
Release to drop it in place.
Both methods instantly update the column order in the current view.
Hide and Show Columns
If certain columns are not relevant, hiding them reduces clutter and makes the list easier to read.
Hide a column:
Click the dropdown on the column header.
Select Column settings → Hide this column.
The column is removed from the view but not deleted.
Show hidden columns:
Click the dropdown on any visible column.
Go to Column settings → Show/Hide columns.
In the panel that appears, check the columns you want to display (for example, Modified or File size).
Click Apply.
This is a quick way to bring back hidden columns or add built-in ones.
Pin Columns to the Filter Pane
Pinning columns makes filtering faster and more intuitive for users.
How to pin a column:
Click the dropdown on the column header.
Select Column settings → Pin to filter pane.
Once pinned:
Open the Filter pane (top-right corner).
The pinned column appears prominently with a pin icon.
Users can quickly filter the library by that column’s values.
To unpin a column:
Open the filter pane.
Click Unpin next to the pinned column.
Why Column Customization Matters
Customizing columns in SharePoint helps you:
Focus on the most important metadata
Reduce visual clutter
Make filtering faster and easier
Create user-friendly views without technical effort
With just a few clicks, you can transform a crowded document library into a clean, organized, and highly usable workspace tailored to your team’s needs.
Creating and Managing Custom Views in SharePoint Document Libraries
Microsoft SharePoint document libraries can quickly become crowded as files and metadata grow. Views solve this by letting you present the same data in different ways—using filters, sorting, grouping, and totals—without changing the underlying files. Each view is simply a saved configuration, making it easy to tailor what different users see based on their needs.
Video Explanation
What Is a View in SharePoint?
A view is a customized way to display files in a list or document library. With views, you can:
Show only files that meet specific criteria (for example, Department = Sales)
Sort files by any column (such as Amount or Modified date)
Group files by categories (like Department or Expense Type)
Display totals (sum, count, average) for numeric columns
Views are especially useful for role-based work—finance, sales, or managers can all look at the same library through different lenses.
Create and Save a Filtered View
You can quickly turn a temporary filter into a reusable view.
Steps:
Open the document library.
Click the dropdown arrow on a column header (for example, Department).
Choose Filter by and select the value you want (for example, Sales).
Once the list updates, open the view selector at the top (usually labeled All Documents).
Select Save view as….
Enter a name (for example, Sales Files) and click Save.
The view is now saved and available in the view selector.
Create a New View from Scratch
For more control, you can build a view with detailed settings.
Steps:
Open the view selector and choose Create new view.
Enter a name and click Create.
Open the view selector again and choose Edit current view.
From the configuration page, you can customize:
Columns: Choose which metadata fields appear.
Sort: Set the order (for example, sort by Amount descending).
Filter: Include or exclude data (for example, Department is not HR).
Group By: Organize files into expandable sections (for example, by Department).
Totals: Show calculations like Sum for numeric columns.
Click OK to save the view.
Switching Between Views
All saved views appear in the view selector at the top of the library. You can switch between them at any time, and each view keeps its own layout, filters, grouping, and totals.
Best practice: Use views where files are consistently tagged with metadata. Views rely on metadata to work correctly and are most effective in well-organized libraries.
By using custom views strategically, you can transform a single SharePoint document library into multiple, purpose-built workspaces—each tailored to how different teams need to see and analyze the same information.
Document Library Top Menu: A Quick Guide
The top menu in a Microsoft SharePoint document library provides quick access to the most important file and metadata management actions. Understanding what each option does helps you work faster, keep files organized, and take full advantage of SharePoint’s document management capabilities.
In this section, we’ll walk through the key options you’ll find in the document library’s top menu and when to use them.
Video Explanation
New, Upload, and Edit in Grid View
These options focus on adding content and managing metadata.
New Create new folders or files (such as Word, Excel, or PowerPoint) directly in the document library.
Upload Upload existing files or entire folders from your computer into SharePoint.
Edit in Grid View Switches the library into a spreadsheet-style layout. This is especially useful for:
Bulk updating metadata
Quickly filling required columns
Editing multiple files at once
Share and Copy Link
These options help you share access without moving files.
Share Sends a link to the folder or file list to other users in your organization.
Copy Link Generates a direct URL to a specific file or folder. You can paste this link into emails, chats, or documents for quick access.
Sync and Add Shortcut to OneDrive
These options connect your document library to OneDrive and your local machine.
Sync Ensures your local OneDrive client is up to date with the latest library content.
Add shortcut to OneDrive Creates a shortcut to the SharePoint library inside your OneDrive. If OneDrive is synced on your Windows PC, the files also appear locally in File Explorer—making desktop access easy.
Download vs. Export to Excel
These options are often confused but serve different purposes.
Download Downloads only the files themselves. Metadata (such as Department or Amount) is not included.
Export to Excel Creates an Excel file containing:
File names
Metadata columns
File paths
This option is ideal for reporting, audits, or analysis where metadata matters.
View Options (List, Compact, Tiles)
You can change how files are visually displayed.
List view Default view that shows files in rows along with metadata columns.
Compact list Reduces spacing to fit more files on the screen—useful for large libraries.
Tiles view Displays large icons and file names only. Metadata is hidden, so this view is not recommended when working with structured data.
Files That Need Attention
Sometimes you may see a red dot next to the All Documents (view selector) dropdown.
This indicates that some files are missing required metadata.
Clicking it shows which files need attention.
This often happens when:
Metadata requirements differ across folders
Files were uploaded before required columns were enforced
Best practice: If different document types require different metadata, place them in separate document libraries (for example, one for expense files and another for contracts).
By using the document library top menu effectively, SharePoint becomes more than file storage—it becomes a structured, metadata-driven document management system that supports collaboration, reporting, and long-term organization.
Organize Your SharePoint Site with a New Document Library
When working with different types of files in Microsoft SharePoint, placing everything inside the default Documents library can quickly lead to clutter. Files with different purposes often require different metadata, views, and permissions. A much cleaner and more scalable approach is to create separate document libraries for distinct categories—such as one dedicated library for expense files.
Using multiple document libraries keeps content organized, simplifies metadata management, and makes the site easier to maintain over time.
Video Explanation
Why Create a New Document Library?
Creating a dedicated document library allows you to:
Keep unrelated files clearly separated
Apply purpose-specific metadata (for example, Expense Type, Department)
Improve navigation and performance
Manage permissions more cleanly
Avoid confusion caused by mixed file types in one library
For example, storing all expense-related documents in an Expenses library keeps them isolated from contracts, project files, or general documents.
Steps to Create a New Document Library
Follow these steps to create a new document library in your SharePoint site:
Go to Site Contents
From your SharePoint site, open the menu (gear icon or navigation)
Select Site Contents
This page shows all apps and libraries in the site
Click New → App
Although you may see Document Library as an option, selecting App gives access to all built-in apps
A document library is technically a SharePoint app
Switch to Classic Experience (if needed)
If built-in apps are not immediately visible
Click Classic experience to view the default SharePoint app list
Create views, formatting, and totals specific to that library
Apply permissions if access needs to be restricted
The new library will always be available under Site Contents, making it easy to return to and manage.
Best Practice for Long-Term Organization
Instead of using folders to separate file types, use multiple document libraries with clear purposes. This approach scales better, keeps metadata clean, and makes SharePoint easier for users to understand and use.
Creating dedicated document libraries is one of the most effective ways to keep a SharePoint site organized, structured, and ready for growth.
Create and Manage Site Navigation Links in SharePoint
Site navigation links in Microsoft SharePoint make it easy for users to move around a site and quickly access important resources such as document libraries, lists, pages, or even external websites. A well-organized navigation panel improves usability and helps users find what they need without searching.
In this section, you’ll learn how to add, edit, and remove links from the left-hand site navigation.
Video Explanation
Add a New Navigation Link
You can add links to both internal SharePoint content and external websites.
Steps to add a navigation link:
Open your SharePoint site.
Go to the left-hand navigation panel.
Scroll to the bottom and click Edit.
Hover between two existing links until a “+” (plus) icon appears.
Click the + icon and select Link.
Enter the link details:
Address – Paste the URL (for example, a document library, a page, or an external site).
Display name – Enter a friendly name (such as Expenses or Google).
Click OK.
When finished adding links, click Save at the bottom of the navigation panel.
The new link will now appear in the site navigation.
Remove a Navigation Link
If a link is no longer needed, you can remove it easily.
Steps to remove a link:
Click Edit at the bottom of the navigation panel.
Locate the link you want to remove.
Click the trash (delete) icon next to it.
Click Save to apply the change.
The link will be removed from the navigation.
Tip: Get the URL for a Document Library
To add a navigation link to a document library (for example, Expenses):
Go to Site Contents.
Click the document library you want to link to.
Copy the URL from the browser’s address bar
Copy it up to and including the library name (for example, /Expenses).
Use this URL when creating the navigation link.
Best Practices for Navigation Links
Use clear, meaningful display names
Link to frequently used libraries and pages
Remove unused or duplicate links
Keep navigation concise to avoid clutter
By customizing site navigation links, you create a cleaner, more intuitive SharePoint site that helps users access important content quickly and efficiently.
Create and Use a Picture Library in SharePoint
A Picture Library in Microsoft SharePoint is a specialized type of library designed specifically for storing and viewing images. Unlike a standard document library, it provides a more visual, gallery-style experience, making it ideal for photos, graphics, or any image-heavy content.
In this section, you’ll learn how to create a picture library, upload images, browse them easily, and optionally add the library to your site navigation for quick access.
Video Explanation
What Is a Picture Library?
A Picture Library is optimized for images and offers features such as:
Tile-based image display
Built-in image preview and slideshow navigation
Simple switching between different layout views
It’s best used when the primary purpose of the library is to view and browse images, not documents.
Steps to Create a Picture Library
Go to Site Contents
Open your SharePoint site.
Navigate to Site Contents using the left navigation or settings menu.
Create a New App
Click New at the top.
Select App (instead of Document Library).
Switch to Classic Experience
In the apps page, scroll down and click Classic experience.
This displays SharePoint’s built-in apps.
Select Picture Library
From the list, click Picture Library.
Name the Library
Enter a meaningful name, such as Cars (or any name related to the images you’ll store).
Click Create.
Your new picture library is now created and listed under Site Contents.
Upload and View Images
Open the picture library from Site Contents.
Click Upload and select image files from your computer.
After uploading, images appear as tiles by default.
Viewing images:
Click any image to open a preview.
Use the left and right arrows to move through images like a slideshow.
This gallery-style navigation is what makes picture libraries different from standard document libraries.
Change the Display Layout
You can change how images are displayed based on your preference:
Tile view – Best for visual browsing (default)
List view – Displays images in rows with details
Compact list – Shows more items on screen with minimal spacing
These options let you balance visual appeal with organization.
(Optional) Add the Picture Library to Site Navigation
To make the picture library easy to access from anywhere on the site:
Open the picture library and copy its URL (up to the library name, such as /Cars).
Go to the left navigation menu.
Click Edit at the bottom.
Click the + (plus) icon where you want the link.
Paste the URL and enter a display name (for example, Cars).
Click OK, then Save.
The picture library will now appear in the site navigation.
When to Use a Picture Library
A picture library is a great choice when:
Images are the main content
Visual browsing is more important than metadata
You want an easy gallery-style experience
By using a picture library, you give users a clean, visual way to manage and explore images directly within SharePoint.
A Quick Guide to SharePoint Library Settings
In Microsoft SharePoint, document and picture libraries are more than just places to store files. Each library comes with a comprehensive Library Settings area that allows you to control behavior, structure, permissions, and user experience. Understanding these settings helps you design libraries that are secure, well-organized, and easy to use.
This section provides a clear overview of how to access library settings and what each major area is used for.
Video Explanation
How to Access Library Settings
Library settings are only available inside a library—they won’t appear if you’re on the site homepage.
Steps to access:
Open the document or picture library you want to manage (for example, Documents, Expenses, or Pictures).
Click the Gear icon in the top-right corner.
Select Library settings.
On the settings page, click More library settings to open the full classic settings view.
This classic page is where most configuration options live.
General Settings
General settings control the basic identity and behavior of the library.
Common options include:
Name & Description Rename the library and add a helpful description.
Navigation Settings Decide whether the library appears in the site’s left-hand navigation.
Versioning Settings
Enable or disable version history
Choose major or minor versions
Set limits on the number of versions stored
Require content approval before publishing
Versioning is especially important for collaboration, auditing, and rollback.
Advanced Settings
Advanced settings define how the library behaves behind the scenes.
Key options include:
Content Types – Allow multiple content types in one library
Document Template – Set a default template for new files
Open Behavior – Choose whether files open in the browser or desktop app
Search Indexing – Include or exclude the library from search results
Offline Availability – Control OneDrive sync behavior
Reindex Library – Force search to re-crawl the library if results are outdated
Most advanced settings can remain at their defaults unless you have specific requirements.
Validation and Form Settings
These settings help control how users enter data.
Validation Settings Add rules or formulas to validate column values (for example, numeric ranges or required logic).
Form Settings
Use the default SharePoint forms
Or connect a custom form built with Power Apps for a richer experience
These options are useful when accuracy and consistency are critical.
Permissions and Management
This section controls access and lifecycle management.
Includes:
Permission Settings – Grant or restrict access at the library level
Delete This Document Library – Permanently remove the library (use with caution)
Manage Check-Out Files – See and manage files checked out by users
RSS Settings – Allow users to subscribe to library updates
Library-level permissions are helpful when access needs differ from the rest of the site.
Column and View Settings
This area controls how metadata and views work.
You can:
Create new columns or add from existing site columns
Change column order
Index frequently used columns to improve performance
Create and manage custom views with filters, sorting, grouping, and totals
This is where libraries become structured, searchable, and user-friendly.
Final Notes
Library settings give you full control over how files are stored, accessed, and managed. Whether you’re building an HR document library, a finance repository, or a team knowledge base, properly configuring these settings ensures a secure, organized, and efficient SharePoint environment.
Microsoft 365 includes powerful tools for collaboration, and SharePoint is one of the most useful among them. It allows teams to share documents, organize information, and create dedicated spaces for projects or departments.
In this section, you’ll learn how to log in to your Microsoft 365 portal and create a new SharePoint site. Even if you’re completely new, the process is simple and guided.
Video Explanation
Logging in to the Office Portal
Before using SharePoint, you first need to sign in to your Microsoft 365 account. Once logged in, you can access all available apps from one place.
Steps to log in:
Open your browser and go to office.microsoft.com.
Enter your work or school email and password.
After signing in, you may be redirected to a different Microsoft 365 URL — this is normal.
Use your organization account when prompted.
After login, you’ll see the Microsoft 365 app launcher with apps like Outlook, Word, Teams, and SharePoint.
Click SharePoint to open it.
✅ Key Point: SharePoint is included with Microsoft 365, so one login gives you access to all apps.
Creating a SharePoint Site
A SharePoint site acts as a central hub where your team can store files, share updates, and collaborate.
Steps to create a site:
On the SharePoint home page, click Create site (top-left corner).
Choose Team site when asked for the site type.
Select the default team template and click Use template.
Configure your site:
Site name → Example: Test Site
Site address → Auto-generated (editable)
Description → Optional but useful
Privacy settings:
Public → Anyone in your organization can view
Private → Only invited members can access
For most team or project work, choose Private
Click Create site.
You can skip adding members for now and add them later.
✅ Key Point: A Private site keeps access limited to invited members, which is ideal for most teams and projects.
Familiarizing Yourself with the SharePoint Site Interface
A SharePoint site in Microsoft 365 is designed to make navigation and collaboration simple. Once you understand the layout, it becomes much easier to find information, manage files, and move between different areas of your site.
In this section, we’ll walk through the main parts of a SharePoint site interface so you know what each area does and how it helps with daily work.
Top Bar and Global Navigation
At the very top of a SharePoint site, you’ll find tools that help you search and navigate across sites.
Key areas:
Search bar (top): Lets you search for files, pages, or content across SharePoint.
SharePoint toolbar (far left): This toolbar is consistent across SharePoint sites. It includes:
Home icon → Takes you to the SharePoint home page where you can see your sites.
Sites icon → Shows all sites available to you in your organization.
News icon → Displays news posts from different sites.
Files icon → Lists your files across the organization, including files connected to your work.
Site Home Page
The site home page is made up of web parts, which you can think of as widgets that display different types of content.
Common web parts include:
News – Displays announcements and updates
Quick Links – Provides shortcuts to important resources
Documents – Shows recent or pinned documents
Activity – Highlights recent actions on the site
The home page acts like a dashboard where important information is grouped in one place.
Site Apps and Left Navigation
A SharePoint site is essentially a collection of apps (also called site contents). Each app serves a specific purpose and has its own screen and menu.
The left-side navigation menu helps you move between these apps.
Common apps include:
Conversations Used to track communications related to the site (often connected to group discussions).
Documents A document library where site-related files are stored and managed.
Site Contents A central area where you can see everything in the site. This includes:
Document libraries
Page libraries
Lists and other content types
You can think of Site Contents like a “program files” directory on a computer—it shows all available components in one place.
To explore available content types, you can click New inside Site Contents and see what can be created.
How Apps Work
Each app in SharePoint has:
Its own menu
Its own display screen
For example, the Home page itself is an app with a layout and menu options.
Understanding that a SharePoint site is built from apps makes it easier to manage and customize your site as your needs grow.
Once you’re familiar with these areas, navigating SharePoint becomes much more intuitive, helping you find information faster and work more efficiently.