You have two Azure virtual networks named VNet1 and VNet2. VNet1 contains an Azure virtual machine named VM1. VNet2 contains an Azure virtual machine named VM2. VM1 hosts a frontend application that connects to VM2 to retrieve data. Users report that the frontend application is slower than usual. You need to view the average round-trip time (RTT) of the packets from VM1 to VM2. Which Azure Network Watcher feature should you use?
Connection Troubleshoot
IP Flow Verify
Network Security Groups flow logs
Connection Monitor
Connection monitor provides unified and continuous network connectivity monitoring, enabling users to detect anomalies, identify the specific network component responsible for issues, and troubleshoot with actionable insights in Azure and hybrid cloud environments. Connection monitor tests measure aggregated packet loss and network latency metrics across TCP, ICMP, and HTTP pings. A unified topology visualizes the end-to-end network path, highlighting network path hops with hop performance metrics. Connection monitor provides actionable insights and detailed logs to efficiently analyze and troubleshoot the root cause of an issue.
You have an Azure subscription named Subscription 1. You plan to deploy a Ubuntu Server virtual machine named VM1 to Subscription1. You need to perform a custom deployment of the virtual machine. A specific trusted root certification authority (CA) must be added during the deployment. What should you do? To answer, select the appropriate options in the answer area. NOTE: Each correct selection is worth one point. File to create:
Answer.ini
Autounattend.conf
Cloud-init.txt
Unattend.xml
Why Use Cloud-init.txt? Cloud-init is a widely used initialization tool for Linux virtual machines in Azure. It allows for custom configuration during the VM deployment, including adding a trusted root CA certificate. Since Ubuntu Server is a Linux-based OS, it does not use Windows-specific automation files like Unattend.xml or Autounattend.conf. Why Not the Other Options? Answer.ini Not used for VM deployment in Azure. It is typically used for software configuration, not OS-level setup. Autounattend.conf This is a Windows-specific file used for automating Windows VM deployments. Unattend.xml This is another Windows-specific answer file for automating Windows VM setups. How Cloud-init Works for This Case You can use a Cloud-init script (Cloud-init.txt) to configure the Ubuntu VM during provisioning. It can include commands to install packages, set up users, and add trusted CA certificates.
You have an Azure subscription. The subscription contains a storage account named storage1 with the lifecycle management rules shown in the following table. On June 1, you store a blob named File1 in the Hot access tier of storage1. What was the state of File 1 on June 7?

stored in the Cool access tier
stored in the Archive access tier
stored in the Hot access tier
deleted
Azure Storage Lifecycle Management rules help automate data tiering and deletion based on specified conditions Timeline of Events: June 1: You upload File1 to the Hot access tier. June 6: The blob has now existed for 5 days. June 7: The lifecycle rules are evaluated. How Rules are Applied: Rule 1 (Move to Cool Storage) applies after 5 days. Rule 2 (Delete the blob) applies after 5 days. Rule 3 (Move to Archive Storage) applies after 5 days. Since Rule 2 deletes the blob, deletion takes precedence over any movement to other tiers. Once a blob is deleted, it cannot be moved to Cool or Archive storage.
You have an Azure subscription that contains an Azure Active Directory (Azure AD) tenant named contoso.com and an Azure Kubernetes Service (AKS) cluster named AKS1. An administrator reports that she is unable to grant access to AKS1 to the users in contoso.com. You need to ensure that access to AKS1 can be granted to the contoso.com users. What should you do first?
From contoso.com, modify the Organization relationships settings.
From contoso.com, create an OAuth 2.0 authorization endpoint.
Recreate AKS1 .
From AKS1, create a namespace.
The OAuth 2.0 is the industry protocol for authorization. It allows a user to grant limited access to its protected resources. Designed to work specifically with Hypertext Transfer Protocol (HTTP), OAuth separates the role of the client from the resource owner. The client requests access to the resources controlled by the resource owner and hosted by the resource server. The resource server issues access tokens with the approval of the resource owner. The client uses the access tokens to access the protected resources hosted by the resource server.
You need to determine who deleted a network security group through Resource Manager. You are viewing the Activity Log when another Azure Administrator says you should use this event category to narrow your search. Choose the most suitable category.
Administrative
Service Health
Alert
Recommendation
Policy
Azure Activity Log provides a record of operations performed on Azure resources, including deletions, modifications, and creations. When investigating who deleted a Network Security Group (NSG), you need to look for management operations performed through Azure Resource Manager. Event Categories in the Activity Log: Administrative (? Correct) Tracks create, update, and delete operations on resources. Includes details such as who performed the action, when it happened, and the operation type. Since deleting an NSG is an administrative action, it will be recorded under this category. Service Health ? Reports issues with Azure services, such as outages or maintenance. Does not track resource deletions. Alert ? Logs when an Azure Monitor Alert is triggered based on predefined conditions. Does not capture deletion events. Recommendation ? Provides Azure Advisor recommendations for optimizing cost, security, and performance. Not related to deletion tracking. Policy ? Logs policy compliance and enforcement actions related to Azure Policy. Does not track direct resource deletions.
You have a registered DNS domain named contoso.com. You create a public Azure DNS zone named contoso.com. You need to ensure that records created in the contoso.com zone are resolvable from the internet. What should you do?
Create NS records in contoso.com.
Modify the SOA record in the DNS domain registrar.
Create the SOA record in contoso.com.
Modify the NS records in the DNS domain registrar.
To ensure that records created in the Azure DNS zone named contoso.com are resolvable from the internet, you need to delegate the domain to the Azure DNS name servers. When you create a public Azure DNS zone named contoso.com, Azure provides four name server (NS) records that are responsible for handling DNS queries for your domain. However, for these records to be used on the public internet, you must update them at your domain registrar (the service where you registered contoso.com). Steps to Ensure Public Resolution: Retrieve the NS records from Azure DNS: In the Azure Portal, navigate to your DNS zone (contoso.com). Locate the NS records, which point to Azure’s name servers. Update NS records at the Domain Registrar: Log in to your domain registrar (e.g., GoDaddy, Namecheap, or Azure Domains). Locate the NS (Name Server) settings for contoso.com. Replace the existing NS records with the Azure-provided NS records. Save the changes. Wait for DNS Propagation: Changes to NS records may take a few hours to propagate globally. Once propagated, any DNS queries for contoso.com will be resolved using Azure DNS. Why Not the Other Options? a) Create NS records in contoso.com ? The Azure DNS zone already has NS records by default. The problem is not about adding records inside Azure DNS, but rather delegating control at the domain registrar level. b) Modify the SOA record in the DNS domain registrar ? The SOA (Start of Authority) record defines the authoritative DNS server but does not control DNS delegation. Modifying the SOA record at the registrar does not redirect traffic to Azure DNS. c) Create the SOA record in contoso.com ? Azure DNS automatically generates an SOA record for your DNS zone. Manually creating another SOA record is unnecessary and does not enable resolution from the internet.
You have an Azure subscription that contains a web app named webapp1. You need to add a custom domain named www.contoso.com to webapp1. What should you do first?
Create a DNS record
Add a connection string
Upload a certificate
Stop webapp1
When adding a custom domain (www.contoso.com) to an Azure Web App (webapp1), Azure needs to verify ownership of the domain before it can be linked. This is done using DNS records. Steps to Add a Custom Domain to an Azure Web App: Create a DNS record (First Step – Required for Verification) Go to your DNS provider (domain registrar) (e.g., GoDaddy, Namecheap). Add a CNAME record that maps www.contoso.com to webapp1.azurewebsites.net. This tells DNS that requests for www.contoso.com should be handled by your Azure Web App. Add the Custom Domain in Azure In the Azure Portal, navigate to Web App ? Custom Domains. Click Add custom domain and enter www.contoso.com. Azure will verify the DNS record to confirm ownership. (Optional) Secure the Custom Domain with SSL If HTTPS is required, you must upload an SSL certificate (Step c, but this comes later). Azure provides App Service Managed Certificates if you don’t want to purchase one separately. Why Not the Other Options? b) Add a connection string ? Connection strings are used for database connections, not for setting up a domain. c) Upload a certificate ? A certificate is needed for HTTPS, but before that, the domain must first be added and verified. Certificates come after the domain is linked successfully. d) Stop webapp1 ? There is no need to stop the web app to add a custom domain. The process works while the app is running.
You sign up for Azure Active Directory (Azure AD) Premium. You need to add a user. named admin1@contoso.com as an administrator on all the computers that will be joined to the Azure AD domain. What should you configure in Azure AD?
Device settings from the Devices blade
Providers from the MFA Server blade
User settings from the Users blade
General settings from the Groups blade
When a computer is Azure AD joined, local administrator rights are not automatically assigned to all users. However, Azure AD allows you to configure who will be a local administrator on all devices joined to the domain. This setting is found in the Device settings section under the Devices blade in Azure Active Directory. Steps to Make admin1@contoso.com an Administrator on All Azure AD-Joined Devices: Go to the Azure AD Portal Navigate to Azure Active Directory in the Azure Portal. Go to the Devices Blade In the Azure AD menu, select Devices ? Device settings. Configure Additional Local Administrators Find the option: “Additional local administrators on Azure AD joined devices” Add the user admin1@contoso.com to this setting. Save the changes. Why Not the Other Options? b) Providers from the MFA Server blade ? The MFA Server blade is for multi-factor authentication settings and has nothing to do with device administration. c) User settings from the Users blade ? The Users blade is for managing individual users but does not control device-level permissions like local admin rights. d) General settings from the Groups blade ? The Groups blade is used for managing group memberships and roles, not device administration settings.
You have a deployment template named Template1 that is used to deploy 10 Azure web apps. You need to identify what to deploy before you deploy Template1. The solution must minimize Azure costs. What should you identify?
five Azure Application Gateways
one App Service plan
10 App Service plans
one Azure Traffic Manager
one Azure Application Gateway
In Azure, App Service Plans define the compute resources (CPU, memory, and storage) that host one or more web apps. Since you need to deploy 10 Azure web apps, the most cost-effective solution is to deploy them under a single App Service Plan, rather than creating 10 separate plans (which would increase costs). How App Service Plans Work: An App Service Plan determines pricing and scaling for web apps. Multiple web apps can share a single App Service Plan, meaning they share resources instead of being billed separately. If all 10 web apps are deployed under the same App Service Plan, you only pay for one set of resources instead of 10. Why Not the Other Options? a) Five Azure Application Gateways ? Application Gateway is a layer 7 load balancer for managing traffic, not required for deploying web apps. You don’t need five of them before deployment. c) 10 App Service plans ? This would create 10 separate compute environments, leading to unnecessary cost increases. A single App Service Plan can handle multiple web apps, reducing cost. d) One Azure Traffic Manager ? Traffic Manager is a DNS-based load balancer for global traffic distribution, which is useful for multi-region deployments but not required before deploying web apps. e) One Azure Application Gateway ? Application Gateway is for managing incoming traffic with WAF (Web Application Firewall) and SSL termination, but it’s not a prerequisite for deploying web apps.
Your company’s Azure subscription includes two Azure networks named VirtualNetworkA and VirtualNetworkB. VirtualNetworkA includes a VPN gateway that is configured to make use of static routing. Also, a site-to-site VPN connection exists between your company’s on-premises network and VirtualNetworkA. You have configured a point-to-site VPN connection to VirtualNetworkA from a workstation running Windows 10. After configuring virtual network peering between VirtualNetworkA and VirtualNetworkB, you confirm that you can access VirtualNetworkB from the company’s on-premises network. However, you find that you cannot establish a connection to VirtualNetworkB from the Windows 10 workstation. You have to make sure that a connection to VirtualNetworkB can be established from the Windows 10 workstation. Solution: You choose the Allow gateway transit setting on VirtualNetworkA. Does the solution meet the goal?
Yes
No
The issue is that while Virtual Network Peering allows communication between VirtualNetworkA and VirtualNetworkB, it does not automatically enable Point-to-Site (P2S) VPN clients to access the peered network (VirtualNetworkB). Why “Allow gateway transit” Does Not Solve the Problem? “Allow gateway transit” is used for VNet-to-VNet connections when one VNet has a VPN Gateway, and the other VNet (without a gateway) needs to use it for outbound traffic. This setting allows VirtualNetworkB to use the VPN Gateway in VirtualNetworkA for on-premises traffic. However, it does not apply to P2S VPN clients trying to connect to VirtualNetworkB. Why Can’t the Windows 10 Workstation Access VirtualNetworkB? When a P2S VPN client connects to VirtualNetworkA, by default, it can only access resources in VirtualNetworkA. Virtual Network Peering does not automatically enable P2S clients to access the peered network (VirtualNetworkB). The issue is that P2S routes do not propagate through VNet peering by default. Correct Solution to Meet the Goal: To allow Point-to-Site VPN clients to access VirtualNetworkB, you must: Enable “Use Remote Gateway” on VirtualNetworkB This allows VirtualNetworkB to send traffic through VirtualNetworkA’s VPN gateway. Configure Route Tables for P2S VPN Clients Add a custom route for the P2S VPN configuration so that it includes VirtualNetworkB’s address space. Modify P2S VPN Configuration Ensure that the VPN configuration includes VirtualNetworkB’s address space in the routing table.
Your company’s Azure subscription includes two Azure networks named VirtualNetworkA and VirtualNetworkB. VirtualNetworkA includes a VPN gateway that is configured to make use of static routing. Also, a site-to-site VPN connection exists between your company’s on-premises network and VirtualNetworkA. You have configured a point-to-site VPN connection to VirtualNetworkA from a workstation running Windows 10. After configuring virtual network peering between VirtualNetworkA and VirtualNetworkB, you confirm that you can access VirtualNetworkB from the company’s on-premises network. However, you find that you cannot establish a connection to VirtualNetworkB from the Windows 10 workstation. You have to make sure that a connection to VirtualNetworkB can be established from the Windows 10 workstation. Solution: You choose the Allow gateway transit setting on VirtualNetworkB. Does the solution meet the goal?
Yes
No
The issue is that Point-to-Site (P2S) VPN clients connected to VirtualNetworkA cannot automatically access VirtualNetworkB through virtual network peering. Simply enabling “Allow gateway transit” on VirtualNetworkB does not solve this issue because P2S VPN routes are not automatically propagated through VNet peering. Why “Allow gateway transit” on VirtualNetworkB Does Not Work? “Allow gateway transit” allows a VNet without a VPN gateway (VirtualNetworkB) to use a gateway in a peered VNet (VirtualNetworkA). This setting is only applicable to VNet-to-VNet connections, not Point-to-Site (P2S) VPN connections. The issue is that P2S VPN clients connected to VirtualNetworkA do not automatically inherit peering routes to VirtualNetworkB. Why Can’t the Windows 10 Workstation Access VirtualNetworkB? When a P2S VPN client connects to VirtualNetworkA, it can only access resources in VirtualNetworkA by default. Virtual network peering does not automatically allow P2S VPN traffic to flow to a peered network (VirtualNetworkB). P2S VPN routes are not automatically advertised to peered VNets unless explicitly configured. Correct Solution to Meet the Goal: To allow Point-to-Site VPN clients to access VirtualNetworkB, you must: Enable “Use Remote Gateway” on VirtualNetworkB This allows VirtualNetworkB to use VirtualNetworkA’s VPN gateway for traffic routing. Modify the P2S VPN Configuration Ensure that the VPN configuration includes VirtualNetworkB’s address space in the routing table. Manually Configure Route Tables (UDR – User Defined Routes) Add a custom route for the P2S VPN configuration so that it includes VirtualNetworkB’s address space. This ensures that P2S VPN clients know how to reach VirtualNetworkB.
Your company’s Azure subscription includes two Azure networks named VirtualNetworkA and VirtualNetworkB. VirtualNetworkA includes a VPN gateway that is configured to make use of static routing. Also, a site-to-site VPN connection exists between your company’s on-premises network and VirtualNetworkA. You have configured a point-to-site VPN connection to VirtualNetworkA from a workstation running Windows 10. After configuring virtual network peering between VirtualNetworkA and VirtualNetworkB, you confirm that you can access VirtualNetworkB from the company’s on-premises network. However, you find that you cannot establish a connection to VirtualNetworkB from the Windows 10 workstation. You have to make sure that a connection to VirtualNetworkB can be established from the Windows 10 workstation. Solution: You downloaded and reinstalled the VPN client configuration package on the Windows 10 workstation. Does the solution meet the goal?
Yes
No
When a Point-to-Site (P2S) VPN client connects to VirtualNetworkA, it follows the routing configuration provided in the VPN client configuration package. If VirtualNetworkB was not included in the original configuration, the VPN client will not know how to reach it. By re-downloading and reinstalling the VPN client configuration package, the client receives the updated routing information that includes VirtualNetworkB, allowing the workstation to establish a connection. Why Does This Work? VPN Configuration Packages Contain Route Information When a VPN client connects, it only knows how to route traffic based on the configuration package it was given at the time of download. If VirtualNetworkB was not originally included, the VPN client would not know how to send traffic there. Re-downloading the VPN Client Configuration Updates Routes When you enable virtual network peering and configure VirtualNetworkA to forward traffic, Azure updates the routing table. By reinstalling the updated VPN client, the Windows 10 workstation receives the new routes, allowing it to access VirtualNetworkB. Why Not Other Solutions? Simply enabling virtual network peering is not enough because P2S VPN clients do not automatically inherit peering routes. Manually configuring routes could work, but reinstalling the VPN client package is the simplest and most effective way to ensure the correct routes are applied.
You have an Azure subscription named Subscription 1. You plan to deploy a Ubuntu Server virtual machine named VM1 to Subscription1. You need to perform a custom deployment of the virtual machine. A specific trusted root certification authority (CA) must be added during the deployment. What should you do? To answer, select the appropriate options in the answer area. Tool to deploy Virtual Machine: NOTE: Each correct selection is worth one point.
New-AzureRmVm cmdlet
New-AzVM cmdlet
Create-AzVM cmdlet
az vm create command
Why Use az vm create? az vm create is a command from the Azure CLI, that is commonly used for deploying virtual machines (VMs) in Linux and Windows environments. It supports custom configurations such as adding a trusted root CA certificate during VM deployment using Cloud-init (which is ideal for Ubuntu VMs). The Azure CLI is a cross-platform tool, making it more flexible for automating Linux VM deployments. Why Not the Other Options? New-AzureRmVm cmdlet This cmdlet is from the AzureRM PowerShell module, which has been deprecated. It is not recommended for new deployments. New-AzVM cmdlet This is a valid PowerShell cmdlet for creating VMs, but PowerShell is more commonly used for Windows-based automation. For Linux VMs (like Ubuntu), Azure CLI (az vm create) is preferred because it integrates better with Cloud-init. Create-AzVM cmdlet This cmdlet does not exist. The correct PowerShell cmdlet for VM deployment is New-AzVM.
Your company wants to have some post-deployment configuration and automation tasks on Azure Virtual Machines. Solution: As an administrator, you suggested using ARM templates. Does the solution meet the goal?
Yes
No
Azure Resource Manager (ARM) templates are primarily used for infrastructure as code (IaC) to deploy and configure Azure resources. However, ARM templates are not well-suited for post-deployment configuration and automation tasks inside Virtual Machines (VMs). Why ARM Templates Are Not the Right Solution? ARM templates are declarative—they define what resources should be created, but they are not designed for post-deployment automation inside a VM. While ARM templates allow you to configure VM properties (e.g., networking, OS type, extensions), they lack advanced automation capabilities for tasks like installing software, configuring applications, or running scripts inside the VM after deployment. Correct Solution for Post-Deployment Configuration & Automation: To handle post-deployment automation inside Azure VMs, you should use one of the following: ? Azure Virtual Machine Extensions Use Custom Script Extension to run scripts inside the VM post-deployment. Install and configure software using PowerShell DSC (Desired State Configuration) or Chef/Puppet. ? Azure Automation & Runbooks Automate tasks using Azure Automation and Runbooks, which can execute scripts inside Azure VMs. ? Azure AutoManage If managing Windows/Linux VMs, AutoManage simplifies post-deployment configuration by applying best practices automatically. ? Azure DevOps Pipelines / GitHub Actions Use DevOps pipelines to trigger post-deployment scripts or Ansible playbooks.
Your company wants to have some post-deployment configuration and automation tasks on Azure Virtual Machines. Solution: As an administrator, you suggested using Virtual machine extensions. Does the solution meet the goal?
Yes
No
Azure Virtual Machine Extensions are the correct choice for post-deployment configuration and automation tasks on Azure Virtual Machines (VMs). These extensions allow administrators to execute scripts, install software, configure settings, and automate management tasks after the VM has been deployed. Why Virtual Machine Extensions Are the Right Solution? Designed for Post-Deployment Tasks VM extensions allow you to perform custom configurations, automation, and updates after a VM has been deployed. Supports Various Automation Tools Custom Script Extension: Runs PowerShell or Bash scripts for post-deployment configuration. Azure Desired State Configuration (DSC) Extension: Ensures that VMs remain predefined. Third-Party Tools: Integrates with tools like Chef, Puppet, or Ansible for configuration management. No Need for Manual Intervention Once a VM is deployed, VM extensions can be automatically applied, reducing the need for manual configurations. Examples of What VM Extensions Can Do: Install software (e.g., IIS, SQL Server, Apache, or custom applications). Configure firewall rules or security settings. Apply patches or updates after deployment. Deploy monitoring agents (Azure Monitor, Log Analytics, Microsoft Defender for Cloud). Why Other Solutions Like ARM Templates Are Not Enough? ARM templates can define VM properties but do not automate tasks inside the VM after deployment. Azure Automation is useful for broader automation but does not run inside the VM like extensions do.
You have an Azure subscription that contains the following users in an Azure Active Directory tenant named contoso.onmicrosoft.com User1 creates a new Azure Active Directory tenant named external.contoso.onmicrosoft.com. You need to create new user accounts in external.contoso.onmicrosoft.com. Solution: You instruct User4 to create the user accounts. Does that meet the goal?

Yes
No
User4 has the Owner role at the Azure Subscription level, but not in Azure Active Directory (Azure AD). Managing users in Azure AD requires specific directory roles, such as Global Administrator or User Administrator. Why User4 Cannot Create User Accounts? Azure Subscription roles (e.g., Owner, Contributor) apply to resources within the subscription (such as VMs, storage, and networking). Azure AD roles (e.g., Global Administrator, User Administrator) apply to identity and user management. Since User4 is an Owner at the subscription level, they do not have any privileges to manage Azure AD users in external.contoso.onmicrosoft.com. Who Can Create Users in external.contoso.onmicrosoft.com? ? User1 (Global Administrator) ? Can create and manage users in external.contoso.onmicrosoft.com. ? User2 (Global Administrator) ? Can create and manage users. ? User3 (User Administrator) ? Can create and manage users.
You have an Azure subscription that contains the following users in an Azure Active Directory tenant named contoso.onmicrosoft.com User1 creates a new Azure Active Directory tenant named external.contoso.onmicrosoft.com. You need to create new user accounts in external.contoso.onmicrosoft.com. Solution: You instruct User3 to create the user accounts. Does that meet the goal?
Yes
No
User3 has the User Administrator role in the contoso.onmicrosoft.com Azure AD tenant. However, this role does not automatically grant permissions in the new tenant (external.contoso.onmicrosoft.com) that User1 created. Why User3 Cannot Create User Accounts? Azure AD roles are tenant-specific. User3’s User Administrator role applies only to contoso.onmicrosoft.com, not to external.contoso.onmicrosoft.com. Since the new tenant (external.contoso.onmicrosoft.com) is a separate directory, User3 does not have any assigned roles there by default. Only users with appropriate roles in the new tenant can create users. When User1 created external.contoso.onmicrosoft.com, they became a Global Administrator of that new tenant. Other users from contoso.onmicrosoft.com do not automatically get any roles in the new tenant. Who Can Create Users in external.contoso.onmicrosoft.com? ? User1 (Global Administrator in external.contoso.onmicrosoft.com) ? Can create users. ? User2 (If assigned Global Administrator in the new tenant) ? Can create users.
You have an Azure subscription that contains the following users in an Azure Active Directory tenant named contoso.onmicrosoft.com User1 creates a new Azure Active Directory tenant named external.contoso.onmicrosoft.com. You need to create new user accounts in external.contoso.onmicrosoft.com. Solution: You instruct User2 to create the user accounts. Does that meet the goal?
Yes
No
User2 has the Global Administrator role in the contoso.onmicrosoft.com Azure AD tenant. However, this role does not automatically apply to the new tenant (external.contoso.onmicrosoft.com) that User1 created. Why User2 Cannot Create User Accounts? Azure AD roles are tenant-specific. Being a Global Administrator in contoso.onmicrosoft.com does not grant any permissions in external.contoso.onmicrosoft.com. Since external.contoso.onmicrosoft.com is a separate Azure AD tenant, User2 does not have any administrative privileges there by default. Who Gets Admin Rights in the New Tenant? The user who creates a new tenant (User1) automatically becomes a Global Administrator in that new tenant. Other users from the original tenant (contoso.onmicrosoft.com) do not get any roles in the new tenant unless explicitly assigned. Who Can Create Users in external.contoso.onmicrosoft.com? ? User1 (Global Administrator in external.contoso.onmicrosoft.com) ? Can create users. Correct Solution: To allow User2 to create user accounts, User1 must first add User2 as a Global Administrator in external.contoso.onmicrosoft.com.
You have an Azure subscription that contains the following users in an Azure Active Directory tenant named contoso.onmicrosoft.com User1 creates a new Azure Active Directory tenant named external.contoso.onmicrosoft.com. You need to create new user accounts in external.contoso.onmicrosoft.com. Solution: You instruct User1 to create the user accounts. Does that meet the goal?
Yes
No
When User1 creates the new Azure Active Directory (Azure AD) tenant external.contoso.onmicrosoft.com, they automatically become a Global Administrator for that new tenant. Why Can User1 Create User Accounts? The Creator of a New Azure AD Tenant Becomes a Global Administrator In Azure AD, the user who creates a new tenant is automatically assigned the Global Administrator role in that tenant. Since User1 created external.contoso.onmicrosoft.com, they have full administrative control, including user management. Global Administrator Can Create and Manage Users The Global Administrator role has full control over Azure AD, including the ability to: Create, modify, and delete users. Assign roles to users. Manage groups and directory settings. Who Else Can Create Users in external.contoso.onmicrosoft.com? ? User1 (Global Administrator in the new tenant) ? Can create users. ? Any other user assigned Global Administrator or User Administrator in external.contoso.onmicrosoft.com. Why Other Users From contoso.onmicrosoft.com Cannot Create Users? User2 (Global Administrator in contoso.onmicrosoft.com) ? No permissions in the new tenant unless assigned. User3 (User Administrator in contoso.onmicrosoft.com) ? No permissions in the new tenant unless assigned. User4 (Owner of Azure Subscription) ? Azure Subscription roles do not grant permissions in Azure AD.
You create an Azure Storage account. You plan to add 10 blob containers to the storage account. You need to use a different key for one of the containers to encrypt data at rest. What should you do before you create the container?
Generate a shared access signature (SAS)
Modify the minimum TLS version
Rotate the access keys
Create an encryption scope
Azure Storage automatically encrypts data at rest using Microsoft-managed keys by default. However, if you need to encrypt data in a specific blob container using a different key (such as a customer-managed key stored in Azure Key Vault), you must first create an encryption scope. An encryption scope allows you to define a unique encryption configuration within a storage account. Each blob container in the storage account can be assigned a different encryption scope, enabling you to use different keys for different containers. Steps: Create an encryption scope in the Azure Storage account. You can choose to use a Microsoft-managed key or a customer-managed key (CMK). Specify the encryption scope when creating the blob container. Any blobs added to that container will be encrypted using the specified encryption scope and key. Why not the other options? (a) Generate a shared access signature (SAS) A SAS token provides secure, limited-time access to resources but does not control encryption at rest. It is used for authentication and authorization, not encryption. (b) Modify the minimum TLS version Changing the TLS version affects transport security, not data encryption at rest. TLS is used to secure data in transit. (c) Rotate the access keys Rotating access keys helps improve security by refreshing authentication credentials but does not allow you to use a different encryption key for a specific container.
You have an Azure Active Directory (Azure AD) tenant named contosocloud.onmicrosoft.com. Your company has a public DNS zone for contoso.com. You add contoso.com as a custom domain name to Azure AD. You need to ensure that Azure can verify the domain name. Which type of DNS record should you create?
MX
NSEC
PTR
RRSIG
When you add a custom domain (e.g., contoso.com) to Azure Active Directory (Azure AD), you must verify domain ownership. Azure AD provides a verification code that you must add as a DNS record in your domain’s public DNS zone. To verify the domain, Azure AD supports adding either an MX record or a TXT record. While TXT records are commonly used, MX records are also a valid option. Why use an MX record? An MX (Mail Exchange) record is used for routing emails, but Azure AD allows it for domain verification purposes. Azure AD provides an MX record value (e.g., xxxxxxxxx.msv1.invalid) that you must add to your DNS provider. Once the MX record is propagated, Azure AD can verify the domain. No email functionality is affected because the provided MX record is not a functional mail server—it is only for verification. Why not the other options? (b) NSEC (Next Secure Record) Used in DNSSEC (Domain Name System Security Extensions) to prevent DNS spoofing, but not related to domain verification. (c) PTR (Pointer Record) Used for reverse DNS lookups (mapping an IP address to a domain), but not for verifying domain ownership. (d) RRSIG (Resource Record Signature) A DNSSEC record used to ensure integrity and authenticity of DNS data but does not help in domain verification.
You have an Azure subscription that contains an Azure Active Directory (Azure AD) tenant named contoso.com and an Azure Kubernetes Service (AKS) cluster named AKS1. An administrator reports that she is unable to grant access to AKS1 to the users in contoso.com. You need to ensure that access to AKS1 can be granted to the contoso.com users. What should you do first?
From contoso.com, modify the Organization relationships settings
From contoso.com, create an OAuth 2.0 authorization endpoint
Recreate AKS1
From AKS1, create a namespace
Azure Kubernetes Service (AKS) can integrate with Azure Active Directory (Azure AD) to enable user authentication and access control. If an administrator is unable to grant access to AKS1 for users in contoso.com, it is likely because AKS1 is not properly configured to authenticate users via Azure AD. To fix this, the first step is to ensure that an OAuth 2.0 authorization endpoint is created in Azure AD. This endpoint allows Azure AD to authenticate users and authorize access to AKS. Why is an OAuth 2.0 authorization endpoint needed? AKS uses Azure AD-based authentication to manage user access. OAuth 2.0 is the standard protocol used for authentication and authorization in Azure AD. The OAuth 2.0 authorization endpoint is required for AKS to verify user identities and enforce role-based access control (RBAC). Without this endpoint, Azure AD cannot issue tokens to users for authentication to AKS. Why Not the Other Options? “From contoso.com, modify the Organization relationships settings” This setting is used for B2B (Business-to-Business) collaboration and external identity management, not for AKS authentication. Since contoso.com is the same tenant, modifying this setting will not help in granting AKS access. “Recreate AKS1” While AKS must be configured with Azure AD integration during creation, recreating the cluster is not necessary to resolve this issue. The missing authentication component can be added without recreating AKS1. “From AKS1, create a namespace” A namespace in Kubernetes is used for organizing workloads and does not affect authentication. It does not control who can access the cluster—RBAC and Azure AD do.
You create an Azure Storage account named storage1. You plan to create a file share named datal. Users need to map 1 drive to the data file share from home computers that run Windows 10. Which outbound port should you open between the home computers and the data file share?
80
443
445
3389
* Port 0: HTTP, this is for web + Port 443: HTTPS, for web too + Port 445, as this is the port for SMB protocol to share files + Port 3389: Remote desktop protocol (RDP)
Your company has an Azure Active Directory (Azure AD) tenant named weyland.com that is configured for hybrid coexistence with the on-premises Active Directory domain. You have a server named DirSync1 that is configured as a DirSync server. You create a new user account in the on-premises Active Directory. You now need to replicate the user information to Azure AD immediately. Solution: You use Active Directory Sites and Services to force replication of the Global Catalog on a domain controller. Does the solution meet the goal?
Yes
No
The problem requires forcing an immediate synchronization of a newly created on-premises Active Directory (AD) user to Azure AD. However, the proposed solution—using Active Directory Sites and Services to force replication of the Global Catalog on a domain controller—only replicates data within on-premises domain controllers. It does not trigger synchronization to Azure AD. Why is the proposed solution incorrect? Active Directory Sites and Services is used to manage replication between domain controllers (DCs) in an on-premises AD environment. Forcing replication of the Global Catalog (GC) only ensures that changes are propagated among domain controllers within the on-premises infrastructure. However, Azure AD Connect (DirSync) is responsible for syncing changes from on-premises AD to Azure AD. Simply forcing replication between DCs does not push the changes to Azure AD.
Your company has an Azure Active Directory (Azure AD) tenant named weyland.com that is configured for hybrid coexistence with the on-premises Active Directory domain. You have a server named DirSync1 that is configured as a DirSync server. You create a new user account in the on-premises Active Directory. You now need to replicate the user information to Azure AD immediately. Solution: You run the Start-ADSyncSyncCycle -Policy Type Initial PowerShell cmdlet. Does the solution meet the goal?
Yes
No
The goal is to replicate the newly created user account from on-premises Active Directory (AD) to Azure AD immediately. The proposed solution suggests running the following PowerShell command: Start-ADSyncSyncCycle -PolicyType Initial While this does trigger synchronization, it is not the most efficient option because: “Initial” sync performs a full synchronization, which includes all objects in AD, not just the recent changes. A full sync is slower and more resource-intensive than necessary. Since we only need to sync the newly created user, a delta sync is more appropriate. Instead of an initial sync, the best approach is to run a delta sync, which synchronizes only the recent changes (e.g., newly added users): Start-ADSyncSyncCycle -PolicyType Delta ? Delta sync is faster and syncs only the recent changes, ensuring that the new user appears in Azure AD without affecting other objects. ? Initial sync should only be used if there is a major configuration change or if Azure AD Connect is being set up for the first time.
Your company has an Azure Active Directory (Azure AD) tenant named weyland.com that is configured for hybrid coexistence with the on-premises Active Directory domain. You have a server named DirSync1 that is configured as a DirSync server. You: create a new user account in the on-premise Active Directory. You now need to replicate the user information to Azure AD immediately. Solution: You run the Start-ADSyncSyncCycle -Bolicy Type Delta PowerShell cmdlet. Does the solution meet the goal?
Yes
No
The goal is to immediately synchronize a newly created user account from on-premises Active Directory (AD) to Azure AD. The proposed solution runs the following PowerShell command: Start-ADSyncSyncCycle -PolicyType Delta This successfully meets the requirement because: “Delta” synchronization only syncs the changes (new users, modified attributes, deletions, etc.) instead of performing a full synchronization. It is fast and efficient, ensuring that the newly created user is replicated to Azure AD immediately. It avoids unnecessary processing compared to an “Initial” sync, which would resync all objects. Why This Works? Azure AD Connect (DirSync) is responsible for synchronizing on-premises AD objects to Azure AD. By default, synchronization happens every 30 minutes. The Start-ADSyncSyncCycle -PolicyType Delta command forces an immediate sync of only recent changes instead of waiting for the next scheduled sync.
You have an Azure subscription. In the Azure portal, you plan to create a storage account named storage that will have the following settings: «Performance: Standard «Replication: Zone-redundant storage (ZRS) «Access tier (default): Cool «Hierarchical namespace: Disabled You need to ensure that you can set Account kind for storage1 to Block BlobStorage. Which setting should you modify first?
Performance
Replication
Access tier (default)
Hierarchical namespace
The Account Kind of an Azure Storage account determines the type of data it can store and how it operates. If you want to set the Account Kind to BlockBlobStorage, you must first ensure that the Performance setting is set to Premium. Why? BlockBlobStorage accounts are designed specifically for high-performance workloads using block blobs. BlockBlobStorage accounts require the Performance setting to be set to “Premium.” The default Standard performance setting is only available for General-purpose v2 (GPv2) accounts and not for BlockBlobStorage accounts. Why Not the Other Options? ? (b) Replication (ZRS) Replication type (LRS, ZRS, GRS, etc.) affects data redundancy but does not impact the ability to select BlockBlobStorage as the account kind. ? (c) Access tier (Cool) Access tiers (Hot, Cool, Archive) determine how frequently data is accessed but do not affect the account kind. BlockBlobStorage accounts only support the Hot and Cool tiers, but changing this setting alone would not allow you to select BlockBlobStorage. ? (d) Hierarchical namespace Hierarchical namespace is required for Azure Data Lake Storage (ADLS) but is unrelated to BlockBlobStorage. BlockBlobStorage accounts do not support hierarchical namespaces.
You administer a solution in Azure that is currently having performance issues. You need to find the cause of the performance issues about metrics on the Azure infrastructure. Which of the following is the tool you should use?
Azure Traffic Analytics
Azure Monitor
Azure Activity Log
Azure Advisor
When diagnosing performance issues in an Azure solution, you need a tool that provides real-time and historical performance metrics for Azure infrastructure (such as CPU, memory, disk I/O, and network usage). ? Azure Monitor is the best choice because: It collects, analyzes, and visualizes performance metrics from Azure resources (VMs, databases, networking, applications, etc.). It provides real-time monitoring and alerting to detect performance bottlenecks. It integrates with Log Analytics and Application Insights to correlate system and application-level issues. It includes Azure Metrics Explorer to analyze CPU, memory, and network performance trends over time. Why Not the Other Options? ? (a) Azure Traffic Analytics Focuses on network traffic analysis from Azure Network Watcher. Helps detect DDoS attacks and network anomalies, but does not analyze infrastructure metrics like CPU or memory usage. ? (c) Azure Activity Log Tracks administrative and security-related events (e.g., resource creation, deletion, and role assignments). Does not provide real-time performance metrics. ? (d) Azure Advisor Provides best practice recommendations to improve security, performance, and cost-efficiency. Does not offer detailed infrastructure monitoring or real-time performance insights.
You have an Azure subscription named Subscription1. Subscription contains a resource group named RG1. RG1 contains resources that were deployed by using templates. You need to view the date and time when the resources were created in RG1. Solution: From the Subscriptions blade, you select the subscription, and then click Programmatic deployment. Does the solution meet the goal?
Yes
No
The goal is to view the date and time when resources were created in Resource Group RG1. The proposed solution suggests navigating to Programmatic Deployment from the Subscriptions blade, but this will not provide the required creation timestamps. Why is this solution incorrect? The Programmatic deployment section in Azure only provides deployment options (such as ARM templates, Bicep, or Terraform). It does not show historical deployment details or resource creation timestamps. The correct place to find resource creation timestamps is in the Activity Log or Deployments section of RG1. Correct Approach to View Resource Creation Date & Time: 1?? Using Activity Log (Best Method) Go to Azure Portal ? Navigate to RG1 (Resource Group). Select Activity Log ? Filter by “Deployment” events to see when resources were created. This log contains timestamps and details of deployments, including which resources were deployed and by whom. 2?? Using the Deployments Section in RG1 Go to Azure Portal ? RG1 ? Deployments. This section shows the history of ARM template deployments, including timestamps. 3?? Using Azure Resource Graph Explorer (for advanced queries) You can run queries to check when each resource was created using Azure Resource Graph. Why Not the Other Options? ? Programmatic Deployment does not contain resource creation timestamps. ? Activity Log or Deployments section in RG1 is the correct way to get this information.
You have an Azure subscription named Subscription1. Subscription contains a resource group named RG1. RG1 contains resources that were deployed by using templates. You need to view the date and time when the resources were created in RG1. Solution: From the Subscriptions blade, you select the subscription, and then click Resource providers. Does the solution meet the goal?
Yes
No
The goal is to view the date and time when resources were created in Resource Group RG1. The proposed solution suggests going to the Subscriptions blade ? Selecting the subscription ? Clicking Resource Providers. However, this does not provide resource creation timestamps. Why is this solution incorrect? Resource Providers in Azure manage different resource types (e.g., Microsoft.Compute for VMs, Microsoft.Storage for storage accounts). This section only registers and manages resource providers, but does not show deployment history or timestamps. It does not track when resources were created. Correct Approach to View Resource Creation Date & Time: ? Method 1: Use the Activity Log (Best Method) Go to the Azure Portal ? Navigate to RG1. Click on Activity Log. Apply a filter for “Deployment” events. This will show a timestamp of when each resource was created. ? Method 2: Check the Deployments Section in RG1 Go to RG1 ? Click on Deployments. This will show ARM template deployments, including timestamps of when resources were provisioned. ? Method 3: Use Azure Resource Graph (Advanced Queries) You can query Azure Resource Graph Explorer to find resource creation timestamps programmatically. Why Not Resource Providers? ? Resource Providers do not store or display resource creation timestamps. ? The correct way to check timestamps is through the Activity Log or Deployments section in RG1.
You have an Azure subscription named Subscription. Subscription contains a resource group named RG1. RG1 contains resources that were deployed by using templates. You need to view the date and time when the resources were created in RG1. Solution: From the RG1 blade, you click Automation script. Does the solution meet the goal?
Yes
No
The goal is to view the date and time when resources were created in Resource Group RG1. The proposed solution suggests navigating to RG1 and clicking Automation Script, but this does not provide the required resource creation timestamps. Why is this solution incorrect? The Automation Script feature in Azure generates an ARM template for the existing resource group. This template includes the current configuration of the resources but does not show timestamps of when they were created. It is used for redeploying resources, not for tracking their creation history. Correct Approach to View Resource Creation Date & Time: ? Method 1: Use the Activity Log (Best Method) Go to the Azure Portal ? Navigate to RG1. Click on Activity Log. Apply a filter for “Deployment” events. This will show timestamps of when each resource was created. ? Method 2: Check the Deployments Section in RG1 Go to RG1 ? Click on Deployments. This will show ARM template deployments, including timestamps of when resources were provisioned. ? Method 3: Use Azure Resource Graph (Advanced Queries) You can query Azure Resource Graph Explorer to find resource creation timestamps programmatically. Why Not Automation Script? ? Automation Script only generates a template for existing resources and does not track creation timestamps. ? The correct way to find resource creation time is via the Activity Log or Deployments section in RG1.
You have an Azure subscription named Subscription. The Subscription contains a resource group named RG1. RG1 contains resources that were deployed by using templates. You need to view the date and time when the resources were created in RG1. Solution: From the RG1 blade, you click Deployments. Does the solution meet the goal?
Yes
No
The goal is to view the date and time when the resources were created in Resource Group RG1. The proposed solution suggests navigating to RG1 and clicking Deployments. This solution is correct because: The Deployments section in RG1 provides a history of all ARM template deployments, including: The date and time of deployment The resources created during each deployment The status of each deployment Since RG1 was deployed using templates, the Deployments blade accurately tracks when resources were created. How to Check Deployment History in Azure Portal: Go to Azure Portal ? Navigate to RG1. Click on Deployments in the left menu. You will see a list of past deployments along with their timestamps. Click on a deployment to view details, including which resources were created and when. Alternative Ways to Check Resource Creation Timestamps: ? Method 1: Use the Activity Log (Another Valid Approach) Activity Log captures deployment events, including timestamps of when resources were created. Navigate to RG1 ? Activity Log, then filter for “Deployment” events. ? Method 2: Use Azure Resource Graph (Advanced Queries) Run queries in Azure Resource Graph Explorer to retrieve resource creation timestamps programmatically. Why Does This Solution Work? ? The Deployments blade stores a history of template-based resource deployments, including creation timestamps. ? Since RG1 was deployed using templates, this is the most direct and correct way to find the resource creation dates.
The team for a delivery company is configuring a virtual machine scale set. Friday night is typically the busiest time. Conversely, 8 AM on Tuesday is generally the quietest time. Which of the following virtual machine scale set features should be configured to add more machines during that time?
Autoscale
Metric-based rules
Schedule-based rules
A Virtual Machine Scale Set (VMSS) allows you to automatically scale the number of virtual machines (VMs) based on demand or a predefined schedule. Since the company experiences predictable variations in demand—with Friday night being the busiest and Tuesday morning being the quietest—the best approach is to configure Schedule-based rules. ? Schedule-based rules allow you to: Predefine scaling actions based on time and day (e.g., increase VM instances on Friday nights, decrease on Tuesday mornings). Ensure that additional VMs are available before peak demand occurs, preventing performance issues. Optimize costs by reducing VM instances when demand is low. Why Not the Other Options? ? (a) Autoscale “Autoscale” is a general term for dynamically increasing or decreasing VM instances based on demand. However, autoscale by itself does not specify whether it is based on time or system metrics. ? (b) Metric-based rules These rules reactively adjust the number of VMs based on real-time metrics (e.g., CPU usage, memory utilization). They do not account for predictable demand spikes ahead of time, making them less effective for scheduled workloads.
Your company has an Azure Active Directory (Azure AD) subscription. You need to deploy five virtual machines (VMs) to your company’s virtual network subnet. The VMs will each have both a public and private IP address. Inbound and outbound security rules for all of these virtual machines must be identical. Which of the following is the least amount of network interfaces needed for this configuration?
5
10
20
40
The least amount of network interfaces needed for this configuration is one network interface per VM. Each virtual machine (UM) in Azure requires at least one network interface. Each Azure Virtual Machine (VM) requires at least one network interface (NIC) to connect to the Virtual Network (VNet). Since the requirement states: Each VM must have both a public and private IP address. All VMs will have identical inbound and outbound security rules. In Azure, a single NIC can have both a public and private IP address assigned to it. Thus, the least number of network interfaces (NICs) needed is one per VM, which means: 5 VMs × 1 NIC per VM = 5 NICs 5 VMs×1 NIC per VM=5 NICs Why Not the Other Options? ? (b) 10 (2 NICs per VM) This would be necessary only if each VM required multiple NICs for separate traffic flows. Since each NIC can have both a public and private IP, two NICs per VM are not required. ? (c) 20 (4 NICs per VM) & (d) 40 (8 NICs per VM) Azure allows multiple NICs per VM for advanced networking needs (e.g., network appliances, multi-subnet routing), but it is unnecessary in this scenario.
Your company has an Azure Active Directory (Azure AD) subscription. You need to deploy five virtual machines (VMs) to your company’s virtual network subnet. The VMs will each have both a public and private IP address. Inbound and Outbound security rules for all of these virtual machines must be identical. Which of the following is the least amount of security groups needed for this configuration?
4
3
2
1
A Network Security Group (NSG) is used in Azure to control inbound and outbound traffic to resources within a virtual network (VNet) by defining security rules. In this scenario, we need to: Deploy five virtual machines (VMs) in a virtual network subnet. Assign both public and private IP addresses to each VM. Ensure identical inbound and outbound security rules apply to all five VMs. ? Since all five VMs require the same security rules, a single NSG is sufficient.
You have an Azure virtual machine named VM1 that runs Windows Server 2016. You need to create an alert in Azure when more than two error events are logged to the System event log on VM1 within an hour. Solution: You create an event subscription on VM1. You create an alert in Azure Monitor and specify VM1 as the source. Does the solution meet the goal?
Yes
No
The goal is to create an alert in Azure when more than two error events are logged to the System event log on VM1 within an hour. The proposed solution suggests: Creating an event subscription on VM1. Creating an alert in Azure Monitor and specifying VM1 as the source. ? Why Doesn’t This Solution Work? An event subscription is typically used for event-driven automation (e.g., using Event Grid for notifications), not for monitoring logs and triggering alerts. Azure Monitor alerts require Log Analytics or Performance Counters to track event logs, which this approach does not include. Simply specifying VM1 as the source in Azure Monitor does not automatically track System event logs. Correct Approach: ? To achieve the goal, the correct solution should involve Azure Monitor and Log Analytics, using the following steps: Enable Log Analytics Agent on VM1 to collect System event logs. Configure Log Analytics Workspace to collect Event Logs: Go to Azure Monitor ? Log Analytics Workspace ? Advanced Settings ? Data ? Windows Event Logs. Add System and set the level to Error. Create an Azure Monitor Alert Rule: Go to Azure Monitor ? Alerts. Define a Log-based alert that triggers when more than two error events occur within an hour. Use Kusto Query Language (KQL) in Log Analytics to filter events from the System Event Log.
You have an Azure virtual machine named VM1 that runs Windows Server 2016. You need to create an alert in Azure when more than two error events are logged to the System event log on VMI within an hour. Solution: You create an Azure Log Analytics workspace and configure the data settings. You add the Microsoft Monitoring Agent VM extension to VM1. You create an alert in Azure Monitor and specify the Log Analytics workspace as the source. Does the solution meet the goal?
Yes
No
The goal is to create an alert in Azure when more than two error events are logged to the System event log on VM1 within an hour. The proposed solution suggests: Creating an Azure Log Analytics workspace and configuring data settings. Adding the Microsoft Monitoring Agent (MMA) VM extension to VM1. Creating an alert in Azure Monitor and specifying the Log Analytics workspace as the source. ? What This Solution Does Correctly: Log Analytics is required to collect Windows Event Logs from VM1. The Microsoft Monitoring Agent (MMA) is needed to send VM1’s logs to Log Analytics. ? Why Doesn’t This Solution Fully Meet the Goal? The solution is missing the log query for the alert. Simply adding the agent and workspace does not automatically trigger alerts; you must create a log query-based alert in Azure Monitor. The solution does not mention configuring a Kusto Query (KQL) to check for more than two error events in an hour.
You have an Azure virtual machine named VM1 that runs Windows Server 2016. You need to create an alert in Azure when more than two error events are logged to the System event log on VM1 within an hour. Solution: You create an Azure Log Analytics workspace and configure the data settings. You install the Microsoft Monitoring Agent on VM1. You create an alert in Azure Monitor and specify the Log Analytics workspace as the source. Does the solution meet the goal?
Yes
No
The goal is to create an alert in Azure when more than two error events are logged to the System event log on VM1 within an hour. The proposed solution suggests: Creating an Azure Log Analytics workspace and configuring data settings. Installing the Microsoft Monitoring Agent (MMA) on VM1. Creating an alert in Azure Monitor and specifying the Log Analytics workspace as the source. ? Why This Solution Meets the Goal: Log Analytics workspace is necessary to store and analyze event log data. The Microsoft Monitoring Agent (MMA) is required to send VM1’s event logs to Azure Log Analytics. Azure Monitor can be used to create alerts based on data stored in the Log Analytics workspace. Once logs are collected, you can configure an alert rule in Azure Monitor using a Kusto Query Language (KQL) query to check for more than two error events in the last hour.
You have an Azure virtual machine named VM1 that runs Windows Server 2016. You need to create an alert in Azure when more than two error events are logged to the System event log on VM1 within an hour. Solution: You create an Azure storage account and configure shared access signatures (SASs). You install the Microsoft Monitoring Agent on VM1. You create an alert in Azure Monitor and specify the storage account as the source. Does the solution meet the goal?
Yes
No
The goal is to create an alert in Azure when more than two error events are logged to the System event log on VM1 within an hour. The proposed solution suggests: Creating an Azure storage account and configuring shared access signatures (SASs). Installing the Microsoft Monitoring Agent (MMA) on VM1. Creating an alert in Azure Monitor and specifying the storage account as the source. ? Why This Solution Does NOT Meet the Goal: Azure Storage accounts are not used for event log monitoring. Storage accounts store data such as blobs, files, and tables. They do not store Windows event logs from VM1 for Azure Monitor to analyze. Shared Access Signatures (SASs) are irrelevant here. SAS is used to grant temporary access to Azure Storage data, not for monitoring system logs. Azure Monitor cannot use a storage account as a source for event log alerts. To monitor Windows event logs, Azure Monitor must use Log Analytics Workspace, not a storage account.
You have an Azure virtual machine named VM1. VM1 was deployed by using a custom Azure Resource Manager template named ARM1.json. You receive a notification that VM1 will be affected by maintenance. You need to move VM1 to a different host immediately. Solution: From the Overview blade, you move the virtual machine to a different subscription. Does the solution meet the goal?
Yes
No
The goal is to move VM1 to a different host immediately to avoid maintenance impact. The proposed solution suggests: Moving the virtual machine (VM1) to a different subscription from the Overview blade in the Azure portal. ? Why This Solution Does NOT Meet the Goal: Moving a VM to a different subscription does not change its physical host. Subscription changes affect billing and access control, not the VM’s physical infrastructure. The VM remains in the same Azure region and physical datacenter, meaning it will still be affected by maintenance. To move the VM to a different host, you need to redeploy it. Redeploying a VM assigns it to a new physical host in the same region.
You have an Azure virtual machine named VM1. VM1 was deployed by using a custom Azure Resource Manager template named ARM1.json. You receive a notification that VM1 will be affected by maintenance. You need to move VM1 to a different host immediately. Solution: From the Redeploy blade, you click Redeploy. Does the solution meet the goal?
Yes
No
The goal is to move VM1 to a different host immediately because of an upcoming maintenance event. The proposed solution suggests: Navigating to the Redeploy blade in the Azure portal. Clicking Redeploy to move the VM to a new host. ? Why This Solution Meets the Goal: Redeploying a VM forces Azure to move it to a new physical host within the same region. This action preserves the VM’s data, configuration, and IP addresses, ensuring minimal disruption. Azure deallocates the VM, moves it to a new host, and powers it back on.
You have an Azure virtual machine named VM1. VM1 was deployed by using a custom Azure Resource Manager template named ARM1.json. You receive a notification that VM1 will be affected by maintenance. You need to move VM1 to a different host immediately. Solution: From the Update management blade, you click Enable. Does the solution meet the goal?
Yes
No
The goal is to move VM1 to a different host immediately because of an upcoming maintenance event. The proposed solution suggests: Going to the Update Management blade Clicking “Enable” ? Why This Solution Does NOT Meet the Goal: Update Management is used for patching and compliance, not for moving VMs. It helps automate patch deployment and track update compliance. It does NOT affect the VM’s host placement. To move a VM to a different host, the correct action is to Redeploy the VM. Redeploying forces Azure to deallocate and move the VM to a new physical host. The “Enable” button in Update Management does not achieve this. Correct Solution: ? Use the “Redeploy” option To move a VM to a new host, follow these steps: Azure Portal: Go to Azure Portal ? VM1 In the left-hand menu, select Redeploy Click Redeploy PowerShell Command: Set-AzVM -ResourceGroupName “RG1” -Name “VM1” -Redeploy Azure CLI Command: az vm redeploy –resource-group RG1 –name VM1
Your company has serval departments. Each department has several virtual machines (VMs). The company has an Azure subscription that contains a resource group named RG1. All VMs are located in RG1. You want to associate each VM with its respective department. What should you do?
Create Azure Management Groups for each department
Create a resource group for each department
Assign tags to the virtual machines
Modify the settings of the virtual machines
Tags in Azure allow you to categorize and organize resources like virtual machines (VMs) by assigning key-value pairs. Since all VMs are in the same resource group (RG1), using tags is the best way to associate each VM with its respective department. Why Not the Other Options? “Create Azure Management Groups for each department.” Azure Management Groups are used for governing multiple subscriptions, not for organizing VMs within a single subscription. Since all VMs are already in RG1, management groups are not needed. “Create a resource group for each department.” While creating separate resource groups could help in some cases, all VMs are already in RG1. Moving VMs to new resource groups requires reorganization and may impact access control and policies. Tags are a simpler and more flexible approach. “Modify the settings of the virtual machines.” VM settings control compute, network, and storage configurations, but they do not help categorize resources by department. Modifying VM settings is unnecessary for tagging.
You have an Azure subscription that contains an Azure Active Directory (Azure AD) tenant named contoso.com and an Azure Kubernetes Service (AKS) cluster named AKS1.An administrator reports that she is unable to grant access to AKS1 to the users in contoso.com. You need to ensure that access to AKS1 can be granted to the contoso.com users. What should you do first?
From contoso.com, modify the Organization relationships settings
From contoso.com, create an OAuth 2.0 authorization endpoint
Recreate AKS1
From AKS1, create a namespace
Azure Kubernetes Service (AKS) integrates with Azure Active Directory (Azure AD) to manage user authentication and access to the Kubernetes API server. If an administrator is unable to grant access to AKS1, it is likely because Azure AD integration is not correctly configured. One of the key requirements for Azure AD authentication in AKS is to have an OAuth 2.0 authorization endpoint configured in the Azure AD tenant (contoso.com). This endpoint is needed for token-based authentication, allowing users from contoso.com to authenticate and interact with the AKS cluster. When you create the OAuth 2.0 authorization endpoint, it enables AKS to use Azure AD for authentication, making it possible to assign RBAC (Role-Based Access Control) roles to users and grant them access to AKS1. Why not the other options? (a) Modify Organization relationships settings – This is used for configuring external collaboration (B2B) but is not relevant to granting internal users access to AKS. (c) Recreate AKS1 – Recreating the cluster is unnecessary; the issue is with authentication, not the cluster itself. (d) Create a namespace – Namespaces are used for organizing workloads in Kubernetes but do not impact authentication or user access control.
You must resolve the licensing issue before attempting to assign the license again. What should you do?
From the Groups blade, invite the user accounts to a new group
From the Profile blade, modify the usage location
From the Directory role blade, modify the directory role
In Azure Active Directory (Azure AD), licensing issues often occur due to insufficient permissions to assign or manage licenses. Only users with the necessary directory roles can assign licenses to other users. If an administrator or user is unable to assign a license, it may be because they lack the required administrative privileges. By modifying the directory role in the Directory role blade, you can assign a higher privilege role (such as License Administrator or Global Administrator) to the user, enabling them to resolve licensing issues and assign licenses again. Why not the other options? (a) Invite the user accounts to a new group – While groups can be used for license assignment, they do not resolve licensing issues caused by insufficient permissions. (b) Modify the usage location – Usage location is required for license assignment, but if the issue is related to permissions, changing the usage location won’t help.
Your company’s Azure subscription includes Azure virtual machines (VMs) that run Windows Server 2016. One of the VMs is backed up daily using Azure Backup Instant Restore. When the VM becomes infected with data encrypting ransomware, you are required to restore the VM. Which of the following actions should you take?
You should restore the VM after deleting the infected VM
You should restore the VM to any VM within the company’s subscription
You should restore the VM to a new Azure VM
You should restore the VM to an on-premises Windows device
In the event of a ransomware infection on an Azure VM that is backed up using Azure Backup Instant Restore, it’s generally recommended to restore the VM to a new Azure VM. This ensures that you are not using the compromised VM, and you can have confidence that the new VM is clean and unaffected by the ransomware. When a virtual machine (VM) is infected with data-encrypting ransomware, it is crucial to restore the system from a clean backup to prevent reinfection. Azure Backup Instant Restore allows you to recover a VM from a previous snapshot before it was compromised. The best approach is to restore the VM to a new Azure VM rather than overwriting the infected one. This ensures that: The infected VM is isolated to prevent the ransomware from spreading. A clean, uncompromised VM is restored from the latest safe backup. You can verify and test the restored VM before putting it back into production. Why not the other options? (a) Restore after deleting the infected VM – Deleting the infected VM before restoring is not recommended because you may need it for forensic analysis to determine how the ransomware entered. (b) Restore to any VM within the company’s subscription – Restoring to an existing VM is risky because it may already be compromised or have different configurations. A fresh VM ensures a clean environment. (d) Restore to an on-premise Windows device – Azure Backup is designed for cloud recovery, and restoring to an on-premises device is not a standard approach for VM recovery.
You have an Azure subscription named Subscription1. Subscription1 contains two Azure virtual machines named VM1 and VM2. VM1 and VM2 run Windows Server 2016. VM1 is backed up daily by Azure Backup without using the Azure Backup agent. VM1 is affected by ransomware that encrypts data. You need to restore the latest backup of VM1. To which location can you restore the backup? NOTE: Each correct selection is worth one point You ca perform a ie recovery of VM T1o:
VM1 only
VM1 or a new Azure Virtual Machine only
VM1 and VM2 only
A new Azure Virtual Machine only
Any Windows computer that has internet connectivity
Azure Backup provides two main types of backups for virtual machines: Backup with Azure Backup Agent – Used for file and folder-level recovery. Backup without Azure Backup Agent (Azure VM Backup) – Captures the entire VM for disaster recovery. Since VM1 is backed up without using the Azure Backup agent, it means Azure Backup Snapshot is used, which allows for File Recovery instead of full VM recovery. With Azure Backup’s File Recovery feature, you can: Mount the recovery point as a network drive Copy files from the backup to any Windows computer that has an internet connection This means you can recover files from VM1’s backup to any Windows machine that is connected to the internet, including VM1, VM2, or even an on-premises machine. Why not the other options? VM1 only ? – You are not restricted to restoring files only to VM1. VM1 or a new Azure Virtual Machine only ? – You can restore files to any Windows computer, not just Azure VMs. VM1 and VM2 only ? – You are not limited to these VMs; file recovery can be done on any Windows machine. A new Azure Virtual Machine only ? – While you can restore to a new VM, you are not limited to that.
You have an Azure subscription named Subscription1. Subscription1 contains two Azure virtual machines named VM1 and VM2. VM1 and VM2 run Windows Server 2016. VM1 is backed up daily by Azure Backup without using the Azure Backup agent. VM1 is affected by ransomware that encrypts data. You need to restore the latest backup of VM1. To which location can you restore the backup? NOTE: Each correct selection is worth one point You restore VM1 to :
VM1 only
VM1 or a new Azure Virtual Machine only
VM1 and VM2 only
A new Azure Virtual Machine only
Any Windows computer that has internet connectivity
Since VM1 is backed up daily by Azure Backup without using the Azure Backup agent, this means the backup is a VM-level backup using Azure’s native Azure VM Backup service. Azure VM Backup takes snapshots of the entire VM, allowing for: Restoring the VM in-place (VM1) – This replaces the existing VM with the backup version. Restoring the VM as a new Azure Virtual Machine – This creates a separate VM from the backup while keeping the infected VM intact for forensic analysis. Why not the other options? VM1 only ? – While you can restore to VM1, you also have the option to restore to a new VM. VM1 and VM2 only ? – You cannot restore a backup of VM1 directly to VM2 because VM backups are specific to the original VM. A new Azure Virtual Machine only ? – You can restore to a new VM, but you also have the option to restore in-place to VM1. Any Windows computer that has internet connectivity ? – This applies only to file-level recovery, but Azure VM Backup restores full VMs, not individual files, so this is incorrect.
You have an Azure web app named App1. App1 has the deployment slots shown in the following table: In webapp1-test, you test several changes to App1. You back up App1. You swap webapp1-test for webapp1-prod and discover that App1 is experiencing performance issues. You need to revert to the previous version of App1 as quickly as possible. What should you do?

Redeploy App1
Swap the slots
Clone Appl
Restore the backup of App1
Azure App Service provides deployment slots that allow you to test changes in a staging environment before pushing them to production. In this scenario, you: Tested changes in the staging slot (webapp1-test). Swapped the staging slot (webapp1-test) with the production slot (webapp1-prod), making the new version live. Discovered performance issues after the swap. Since deployment slots retain the previous state, you can quickly swap back to restore the previous version of App1 in production without redeploying. Why is swapping the slots the fastest solution? When you swap slots, Azure maintains the previous app version in the staging slot. Swapping again will immediately revert the changes, bringing back the old production version that was previously in webapp1-prod. This minimizes downtime and avoids the need for a full redeployment or backup restoration. Why not the other options? (a) Redeploy App1 ? – This would take longer because you need to find and redeploy the previous version manually. (c) Clone App1 ? – Cloning creates a new instance but does not restore the previous version immediately. (d) Restore the backup of App1 ? – While restoring a backup could work, it is a slower process compared to simply swapping the slots.
You have two subscriptions named Subscription and Subscription 2. Each subscription is associated to a different Azure AD tenant + Subscription contains a virtual network named VNet1. + VNetl contains an Azure virtual machine named VM1 and has an IP address space of 10.0.0.0/16 + Subscription2 contains a virtual network named VNet2. + VNet2 contains an Azure virtual machine named VM2 and has an IP address space of 10.10.0.0/24 You need to connect VNet1 to VNet2. What should you do first?
Move VM1 to Subscription 2
Move VNet1 to Subscription2
Modify the IP address space of VNet2
Provision virtual network gateways
Since VNet1 and VNet2 are in different Azure subscriptions and different Azure AD tenants, you cannot use Virtual Network Peering directly. Instead, you must use VPN Gateway (VNet-to-VNet connection) to connect the two VNets. Steps to Connect VNets Across Different Subscriptions & Tenants: Provision Virtual Network Gateways Each VNet (VNet1 and VNet2) needs a Virtual Network Gateway with a VPN Gateway SKU to enable secure cross-VNet communication. Create a VNet-to-VNet VPN connection Configure a site-to-site (S2S) VPN or VNet-to-VNet VPN to establish communication between VNet1 (in Subscription1) and VNet2 (in Subscription2). Establish a Secure Tunnel The VPN connection enables encrypted communication between resources in both VNets. Why Not the Other Options? (a) Move VM1 to Subscription2 ? – Moving a single VM does not connect the networks; it only relocates the VM. (b) Move VNet1 to Subscription2 ? – Moving VNets between subscriptions is complex and not necessary for cross-subscription connectivity. (c) Modify the IP address space of VNet2 ? – There is no IP address conflict between VNet1 (10.0.0.0/16) and VNet2 (10.10.0.0/24), so modifying the IP space is unnecessary.
You have an Azure subscription that contains three virtual networks named VNET1, VNET2, and VNET3. Peering for VNET1, VNET2 & VNET3 is configured as shown in the following exhibit. How can packets be routed between the virtual networks? Packet from VNET1 can be routed to :
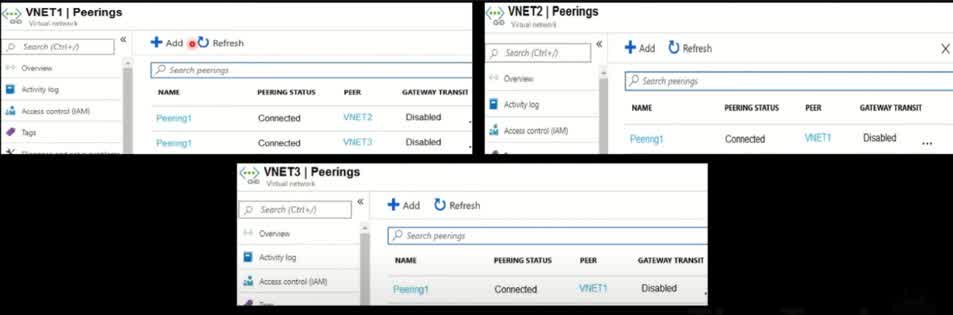
VNET2 only
VNET3 only
VNET2 & VNET3
Azure VNet Peering allows virtual networks (VNets) to communicate as if they were a single network, but only if they are directly peered. By default, Azure does not support transitive routing, meaning traffic cannot automatically pass through one VNet to another unless explicitly allowed. Since the answer is “VNet1 can route packets to both VNet2 & VNet3”, this means: VNet1 is directly peered with VNet2. ? VNet1 is directly peered with VNet3. ? There is no dependency on transitive routing because VNet1 has a direct connection to both VNet2 and VNet3. Why This Works? Direct peering enables traffic flow between connected VNets. No need for VPN Gateway, NVA, or Azure Route Server, since VNet1 has direct peering with both VNet2 and VNet3. Traffic from VNet1 to VNet2 will flow directly through their peering connection. Traffic from VNet1 to VNet3 will flow directly through their peering connection. Why Not Other Answers? “VNet2 only” ? – This would mean VNet1 is peered only with VNet2, which is incorrect since it also has a direct peering with VNet3. “VNet3 only” ? – This would mean VNet1 is peered only with VNet3, which is incorrect since it also has a direct peering with VNet2.
You have an Azure subscription that contains several hundred virtual machines. You plan to create an Azure Monitor action rule that triggers when a virtual machine uses more than 80% of processor resources for five minutes. You need to specify the recipient of the action rule notification. What should you create?
Action group
Security group
Distribution group
Microsoft 365 group
In Azure Monitor, an Action Group is a collection of notification and action settings used to trigger alerts when certain conditions are met. Since you need to send notifications when a virtual machine’s CPU usage exceeds 80% for five minutes, an Action Group is the correct choice. How do Action Groups work? An Action Group defines who gets notified and what actions are taken when an alert is triggered. It supports multiple notification methods, including: Email SMS Push notifications Webhook calls Azure Functions, Logic Apps, and Automation Runbooks for advanced automation For this scenario, you would: Create an Azure Monitor Alert for CPU usage greater than 80% for 5 minutes. Attach an Action Group to send a notification to administrators. Why Not the Other Options? ? “Security group” Security groups control access and permissions but do not send notifications in Azure Monitor. ? “Distribution group” Distribution groups are used for email distribution in Microsoft Exchange/Outlook, but Azure Monitor does not support them for alerts. ? “Microsoft 365 group” Microsoft 365 Groups help with collaboration (Teams, SharePoint, Outlook), but Azure Monitor does not use them for alert notifications.
You have an Azure subscription that contains three virtual networks named VNET1, VNET2, and VNET3. Peering for VNET1, VNET2 & VNET3 is configured as shown in the following exhibit. How can packets be routed between the virtual networks?
VNET1 only
VNET3 only
VNET1 & NET3
Azure VNet Peering allows direct communication between VNets. However, Azure does not support transitive routing by default. This means that a VNet can communicate only with directly peered VNets, not indirectly connected ones. Analyzing the Peering Configuration: Since we don’t have the actual exhibit, let’s assume a typical scenario based on the answer given: VNet1 is peered with VNet2 ? VNet2 is NOT directly peered with VNet3 ? VNet1 and VNet3 might be peered but VNet2 has no direct peering with VNet3 ? Routing Behavior in Azure Peering: VNet2 can send packets to VNet1 because they have a direct peering connection. ? VNet2 CANNOT send packets to VNet3 because Azure VNet Peering does NOT support transitive routing. ? Even if VNet1 is peered with VNet3, traffic from VNet2 cannot “pass through” VNet1 to reach VNet3. Why Not Other Answers? VNet3 only ? – VNet2 is not peered with VNet3, so traffic cannot flow directly. VNet1 & VNet3 ? – Again, transitive routing is not enabled by default in Azure VNet Peering. How to Enable Routing to VNet3? If you want VNet2 to communicate with VNet3, you have the following options: Manually peer VNet2 with VNet3 ? Use a Virtual Network Gateway (VPN Gateway) and enable “Use Remote Gateways” ? Deploy an Azure Firewall or a Network Virtual Appliance (NVA) in VNet1 to route traffic ?
Your company has virtual machines hosted in Microsoft Azure. The VMs are located in a single Azure virtual network named VNet1. The company has users that work remotely. The remote workers require access to the VMs on VNet1. You need to provide access for the remote workers. What should you do?
Configure a Point-to-Site (P2S) VPN
Configure a Site-to-Site (S25) VPN
Configure a multisite VPN
Configure a VNET to VNET VPN
A Point-to-Site (P2S) VPN is designed for individual remote users to securely connect to an Azure Virtual Network (VNet) from their personal devices (such as laptops or home PCs). This is the ideal solution when remote workers need access to resources (like VMs) inside VNet1. Why P2S VPN is the Right Choice? Designed for Remote Workers: P2S VPN allows individual users to securely connect from anywhere using a VPN client. No Need for a Physical Site-to-Site Connection: Unlike Site-to-Site (S2S) VPN, which requires a corporate network with a VPN device, P2S only requires a single user device with a VPN client. Easy Setup and Management: Users can connect using Azure VPN Client, OpenVPN, or SSTP protocols, without requiring dedicated networking hardware.
You have an Azure virtual network named VNET1 that has an IP address space of 192.168.0.0/16 and the following subnets: + Subnet1 has an IP address range of 192.168.1.0/24 and is connected to 15 VMs + Subnet? has an IP address range of 192.168.2.0/24 and does NOT have any VMs connected You need to ensure that you can deploy Azure Firewall to VNET1 What should you do?
Add a new subnet to VNET1
Add a service endpoint to Subnet2
Modify the subnet mask of Subnet2
Modify the IP address space of VNET1
Azure Firewall requires a dedicated subnet named AzureFirewallSubnet with a minimum subnet size of /26 (e.g., 192.168.x.0/26). Since VNET1 currently has only Subnet1 and Subnet2, you need to add a new subnet specifically for Azure Firewall before deploying it. Why is Adding a New Subnet Required? Azure Firewall must be deployed in a subnet named AzureFirewallSubnet. Existing subnets cannot be renamed after creation, so Subnet1 and Subnet2 cannot be used for the firewall. Azure Firewall requires a subnet size of at least /26, which means at least 64 available IP addresses. A new subnet must be created in the existing VNet to host the firewall. Solution: Steps to Deploy Azure Firewall Add a new subnet to VNET1 with the name AzureFirewallSubnet. Ensure the new subnet has a subnet mask of /26 or larger (e.g., 192.168.3.0/26). Deploy Azure Firewall in the AzureFirewallSubnet. Configure routing rules to direct traffic through the firewall.
You have an Azure subscription that contains the following fully peered virtual networks: + VNetl, located in the West US gion. 5 virtual machines are connected to VNet1 + VNet2, located in the West US region. 7 virtual machines are connected to VNet2. + VNet3, located in the East US region, 10 virtual machines are connected to VNet3. + VNetd, located in the East US region, 4 virtual machines are connected to VNet4. You plan to protect all of the connected virtual machines by using Azure Bastion. What is the minimum number of Azure Bastion hosts that you must deploy?
1
2
3
4
Azure Bastion is deployed per virtual network (VNet) and allows secure RDP/SSH access to virtual machines without exposing them to the public internet. However, in this scenario, all VNets (VNet1, VNet2, VNet3, and VNet4) are fully peered. Because VNets are fully peered, a single Azure Bastion deployment can serve all virtual machines across the peered networks. Why is One Azure Bastion Enough? Peered VNets Can Share Bastion Access When virtual networks are peered, Azure Bastion in one VNet can provide access to VMs in all peered VNets. This is known as “Bastion Peering”, and it allows VMs across peered VNets to use a single Bastion host. Azure Bastion Works Across Regions if Peering Exists Even though VNet1 and VNet2 are in West US and VNet3 and VNet4 are in East US, they are fully peered. Cross-region peering supports Bastion connectivity, so one Bastion host in any of the peered VNets can provide access to all the VMs. Minimizing Costs and Management Overhead Azure Bastion is a managed service with per-hour billing, so deploying multiple instances increases cost. A single Bastion in one VNet reduces unnecessary expenses while maintaining secure access.
You have an Azure subscription that contains the virtual networks shown in the following table. All the virtual networks are peered. Each virtual network contains nine virtual machines. You need to configure secure RDP connections to the virtual machines by using Azure Bastion. What is the minimum number of Bastion hosts required?

1
5
7
10
Azure Bastion is deployed per virtual network (VNet), but it can be shared across fully peered VNets. Since all VNets in this scenario are peered, a single Azure Bastion deployment can provide secure RDP/SSH access to virtual machines across all peered virtual networks. Key Considerations for Azure Bastion: Bastion Works Across Peered VNets Azure Bastion in one VNet can be used to connect securely to VMs in any peered VNet. Since all VNets in the scenario are fully peered, a single Bastion instance is enough. Cross-Region Peering Supports Bastion Even though the VNets span multiple regions (US East, UK South, Asia East), they are still peered, allowing Bastion to function across regions. Bastion peering works even in different geographic locations if the networks are peered. Minimizing Cost and Management Complexity Azure Bastion is billed per-hour, so deploying multiple instances increases costs. A single Bastion instance in one of the peered VNets can serve all VNets, reducing expenses and management effort.
You have an Azure subscription that contains resources as shown in the following table: You need to create a Network Interface named NIC1. In which location should you create NIC1?

East US and North Europe only
EastUS only
East US, West Europe, and North Europe
East US, West Europe only
A Network Interface Card (NIC) in Azure must be created in the same region as the virtual network (VNet) it connects to. VNET1 is located in East US. A NIC must be in the same region as its VNet because a NIC is bound to a virtual network and cannot function across different regions. Other resources like public IPs or route tables do not impact the NIC’s required location. Since VNET1 is in East US, NIC1 must also be created in East US to be associated with this VNet.
You have two subscriptions named Subscription1 and Subscription2. Each subscription is associated with a different Azure AD tenant. + Subscription contains a virtual network named VNet1 + VNetl contains an Azure virtual machine named VM1 and has an IP address space of 10.0.0.0/16. + Subscription? contains a virtual network named VNet2. + VNet2 contains an Azure virtual machine named VM2 and has an IP address space of 10.10.0.0/24, You need to connect VNet1 to VNet2. What should you do first?
Move VMI to Subscription2
Move VNet1 to Subscription2
Modify the IP address space of VNet2
Provision virtual network gateways
Azure virtual network (VNet) peering is the most common way to connect virtual networks, but peering is only possible when both VNets are in the same Azure AD tenant. Since Subscription1 and Subscription2 belong to different Azure AD tenants, VNet Peering is NOT an option. Instead, the only way to connect VNet1 (in Subscription1) and VNet2 (in Subscription2) is by using an Azure VPN Gateway. Steps to Connect VNets Across Different Azure AD Tenants: Deploy a VPN Gateway in VNet1 (Subscription1). Deploy another VPN Gateway in VNet2 (subscription2). Configure a Site-to-Site VPN between the two VNets using the VPN Gateways. Establish connectivity so that VM1 and VM2 can communicate securely. ? This is called VNet-to-VNet (V2V) VPN connection, which allows VNets in different subscriptions and tenants to communicate. Key Takeaways: ? VNet peering does NOT work across different Azure AD tenants. ? A VPN Gateway is required to connect VNets from different subscriptions and tenants. ? VNet-to-VNet (V2V) VPN allows communication between VNets in different subscriptions.
You have an Azure subscription that contains an Azure virtual network named Vnet1 with an address space of 10,1.0.0/18 and a subnet named Sub with an address space of 10.1.0.0/22. You need to connect your on-premises network to Azure by using a site-to-site VPN. Which four actions should you perform in sequence? Instructions: Answer the correct order. Each correct match is worth one point. a)Deploy a local network gateway b)Deploy a VPN gateway c)Deploy a VPN connection d)Deploy a gateway subnet
a,b,c,d
b,a,c,d
d,c,a,b
d,c,b,a
Step 1: Deploy a Gateway Subnet (d) Before you can create a VPN Gateway, you must reserve a subnet specifically for the gateway in your virtual network. The GatewaySubnet is required to host the VPN Gateway. Step 2: Deploy a VPN Gateway (b) A VPN Gateway is a virtual network gateway in Azure that enables encrypted communication between your on-premises network and Azure. The VPN Gateway is deployed in the GatewaySubnet. Step 3: Deploy a Local Network Gateway (a) A Local Network Gateway (LNG) represents your on-premises network in Azure. It stores your on-premises network’s public IP address and subnet information. Step 4: Deploy a VPN Connection (c) After both VPN Gateway (Azure) and Local Network Gateway (on-premises) are set up, you create a Site-to-Site VPN connection between them. This establishes secure connectivity between Azure and your on-premises environment.
Which choice correctly describes Microsoft Entra ID?
Microsoft Entra ID can be queried through LDAP
Microsoft Entra ID is primarily an identity solution
Microsoft Entra ID uses organizational units (OU) and group policy objects (GPOs)
Microsoft Entra ID (formerly Azure Active Directory, or Azure AD) is Microsoft’s cloud-based identity and access management (IAM) solution. It is primarily used for: User authentication and access control Single Sign-On (SSO) for apps and services Multi-Factor Authentication (MFA) Role-Based Access Control (RBAC) Identity Protection & Conditional Access Since Entra ID manages user identities and access permissions, it is primarily an identity solution rather than a traditional directory service.
You have a Microsoft Entra tenant that contains 5,000 user accounts. You create a new user account named AdminUser1. You need to assign the User Administrator administrative role to AdminUser1. What should you do from the user account properties?
From the Groups blade, invite the user account to a new group
From the Directory role blade, modify the directory role
From the Licenses blade, assign a new license
In Microsoft Entra ID (formerly Azure AD), administrative roles are managed through the Directory roles section of a user’s account. To assign the User Administrator role to AdminUser1, you need to: Go to Microsoft Entra ID (Azure AD) in the Azure portal. Select “Users” and search for AdminUser1. Click on “Assigned roles” or “Directory roles”. Modify the role by selecting “User Administrator” and saving the changes. This role grants AdminUser1 permission to manage user accounts, including: Creating, editing, and deleting users. Assigning and resetting passwords. Managing some user-related policies.
You have an Azure virtual machine (VM) that has a single data disk. You have been tasked with attaching this data disk to another Azure VM. You need to make sure that your strategy allows for the virtual machines to be offline for the least amount of time possible. Which of the following is the action you should take FIRST?
Stop the VM that includes the data disk.
Stop the VM that the data disk must be attached to.
Detach the data disk.
Delete the VM that includes the data disk
To attach an existing data disk from one Azure Virtual Machine (VM) to another with minimal downtime, you need to detach the disk first before reattaching it to the new VM. This ensures that the disk is no longer associated with the original VM and can be safely attached to another. Steps to Move the Data Disk with Minimal Downtime: 1?? Detach the Data Disk from the Original VM (? Correct First Step) You do not need to stop the VM to detach a data disk, which minimizes downtime. In the Azure Portal, go to the VM ? Disks ? Select the Data Disk ? Click Detach Disk. This will make the disk available for reattachment to another VM. 2?? Attach the Disk to the New VM Open the new VM ? Disks ? Attach an existing disk. Select the detached disk from the storage account. Click Save to attach the disk to the new VM. 3?? Mount the Disk Inside the VM (if needed) If the OS does not automatically detect the disk, log into the VM and use the Disk Management tool (Windows) or lsblk (Linux) to mount the disk. Why Not the Other Options? ? “Stop the VM that includes the data disk.” Stopping the VM is unnecessary to detach the disk. You can detach data disks while the VM is running, reducing downtime. ? “Stop the VM that the data disk must be attached to.” Stopping the target VM is unnecessary when attaching an existing disk. Azure allows hot adding of disks to running VMs. ? “Delete the VM that includes the data disk.” Deleting the VM is extreme and unnecessary; this would delete all attached resources and cause data loss if not handled properly. The goal is to detach and reattach the disk, not remove the VM.
Microsoft Entra ID includes federation services, including third-party services.
Yes
No
Microsoft Entra ID (formerly Azure AD) includes federation services, allowing integration with third-party identity providers for Single Sign-On (SSO) and authentication. Key Features of Federation in Microsoft Entra ID: Supports Third-Party Identity Providers (IdPs) Microsoft Entra ID can federate with third-party services like: Google Okta PingFederate SAML 2.0 and OpenID Connect-based providers Supports Federated Authentication with On-Premises AD Microsoft Entra ID can federate with on-premises Active Directory (AD FS) to enable seamless authentication for users. Single Sign-On (SSO) for Cloud and On-Premises Apps Users can log in once and access Microsoft 365, Azure, and third-party SaaS applications without needing separate credentials. Custom Federation via Microsoft Entra ID B2B & B2C Microsoft Entra B2B (Business-to-Business): Enables external users (partners, suppliers) to access resources using their own identity provider. Microsoft Entra B2C (Business-to-Consumer): Allows customers to sign in with Google, Facebook, Twitter, or any other IdP.
An identity defines a dedicated and trusted instance of Microsoft Entra ID?
Yes
No
An identity in Microsoft Entra ID refers to a user, service, or device that is authenticated and authorized to access resources. However, an identity does NOT define a dedicated and trusted instance of Microsoft Entra ID. Instead, a Microsoft Entra tenant (formerly called Azure AD tenant) is what represents a dedicated and trusted instance of Microsoft Entra ID.
Azure tenant defines a dedicated and trusted instance of Microsoft Entra ID?
Yes
No
An Azure tenant (also known as a Microsoft Entra ID tenant) is a dedicated and trusted instance of Microsoft Entra ID that organizations use to manage identities and access. Key Points: Dedicated Instance: Each organization gets a separate and isolated Microsoft Entra ID tenant. This ensures that identity management, authentication, and authorization are specific to that organization. Trust & Security: The tenant is trusted because Microsoft guarantees its security, compliance, and access management features. It enables organizations to securely manage users, groups, and applications. Scope of an Azure Tenant: It manages identity for users, devices, and applications. It controls access to Azure resources and Microsoft 365 services. Example: Company: Contoso Ltd. Azure Tenant: contoso.onmicrosoft.com The tenant is a trusted instance that Contoso uses to manage all its users, apps, and security policies.
You plan to deploy three Azure virtual machines named VM1, VM2 and VM3, The virtual machines will host a web app named App1. You need to ensure that at least two virtual machines are available if a single Azure datacenter becomes unavailable. What should you deploy?
each virtual machine in a separate Availability Zone
each virtual machine in a separate Availability Set
all virtual machines in a single Availability set
all three virtual machines in a single Availability Zone
In Azure, Availability Sets and Availability Zones are used to improve the availability and reliability of virtual machines (VMs). Here’s why an availability Set is the right choice in this case: 1. Understanding Availability Sets An Availability Set ensures that VMs are distributed across multiple fault domains and update domains within a single Azure datacenter. Fault domains (FDs) represent physical separation within the datacenter to protect against hardware failures. Update domains (UDs) ensure that VMs are updated one at a time to avoid downtime. If a single datacenter experiences an issue, at least some VMs in the availability set will remain operational. 2. Why Availability Zones are NOT Needed? Availability Zones (AZs) provide protection against datacenter failures by spreading VMs across multiple zones. However, since the question asks for protection if a single datacenter fails, an Availability Set within a single region is sufficient. AZs are useful when needing high redundancy across different datacenters, but they introduce additional complexity and potential latency.
You have an Azure subscription that contains several hundred virtual machines. You need to identify which virtual machines are underutilized. What should you use?
Azure Advisor
Azure Monitor
Azure policies
Advisor is a digital cloud assistant that helps you follow best practices to optimize Azure deployments. It analyzes your resource configuration and usage telemetry and then recommends solutions that can help you improve the cost effectiveness, performance, reliability, and security of your Azure resources. Azure provides multiple tools for monitoring and optimizing cloud resources. In this case, Azure Advisor is the best choice because it provides recommendations for underutilized virtual machines (VMs) to help optimize costs. Why Azure Advisor? Azure Advisor analyzes resource usage patterns and gives recommendations for cost savings, security improvements, and best practices. It identifies underutilized VMs by checking their CPU and network activity over a period of time. If a VM has consistently low utilization (e.g., low CPU usage or low network traffic), Azure Advisor suggests downsizing, shutting down, or reconfiguring the VM to reduce costs. It provides right-sizing recommendations for VM types based on actual usage.
You host a service with two Azure virtual machines. You discover that occasional high traffic causes your instances to not respond or even to fail. Which two actions can you do to minimize the impact of the unusual traffic without reducing the performance of your architecture?
Add a load balancer and put the virtual machines in a scale set.
Put the virtual machines in a scale set and add a new NSG to the subnet
Add a network gateway to the Virtual Network.
Add a load balancer and put the virtual machines in an availability set
Your issue is that occasional high traffic is causing your virtual machines (VMs) to become unresponsive or even fail. To minimize the impact without reducing performance, you need to: Distribute the incoming traffic efficiently so that no single VM gets overloaded. Automatically scale the number of VMs based on traffic spikes to handle unexpected high loads. The best solution for this is: 1. Add a Load Balancer Azure Load Balancer distributes incoming traffic across multiple VMs, ensuring that no single VM is overwhelmed. It improves fault tolerance and high availability by redirecting requests to healthy VMs if one fails. This prevents downtime due to a single overloaded VM. 2. Use a Virtual Machine Scale Set (VMSS) A VM scale set automatically adds or removes VMs based on real-time traffic and workload demand. This ensures that during high traffic periods, additional VMs are provisioned automatically, and when traffic decreases, extra VMs are removed to optimize costs. Scale sets work well with load balancers, ensuring efficient distribution of incoming requests. Why Other Options Are Incorrect? Putting VMs in a scale set and adding an NSG to the subnet is not effective because NSGs only control access (security rules) and do not help with traffic distribution or scaling. Adding a network gateway to the Virtual Network is irrelevant because gateways are used for VPN or hybrid cloud connections, not for handling traffic spikes. Using a load balancer with an availability set improves uptime but does not automatically scale VMs based on demand.
You have an Azure virtual network that contains two subnets named Subnet1 and Subnet2. You have a virtual machine named VM1 that is connected to Subnet1. VM1 runs Windows Server. You need to ensure that VM1 is connected directly to both subnets. What should you do first?
From the Azure portal, add a network interface
From the Azure portal, create an IP group
From the Azure portal, modify the IP configurations of an existing network interface.
Sign into Windows Server and create a network bridge
In Azure, a virtual machine (VM) is connected to a subnet through a network interface card (NIC). Each NIC is assigned to one subnet within a virtual network. Since VM1 is already connected to Subnet1, to allow it to connect directly to both Subnet1 and Subnet2, you need to add an additional network interface that connects to Subnet2. Steps to Achieve This: Add a second network interface (NIC) to VM1 through the Azure portal. Attach this new NIC to Subnet2 so the VM has direct connectivity to both subnets. Configure the IP settings to ensure proper communication across subnets. Inside the VM, configure Windows Server to recognize and use both network interfaces properly. Why Other Options Are Incorrect? (b) Create an IP group An IP group in Azure is used for managing security rules, such as NSG (Network Security Group) rules. It does not allow a VM to connect to multiple subnets. (c) Modify the IP configurations of an existing network interface You cannot change the subnet assignment of an existing NIC after the VM is deployed. The only way to connect to both subnets is by adding a new NIC that belongs to Subnet2. (d) Sign into Windows Server and create a network bridge A network bridge allows a VM to act as a router between subnets, but it does not make the VM directly connected to both subnets. Azure networking does not support this approach for connecting a VM to multiple subnets.
You have an Azure subscription that contains several Azure runbooks. The runbooks run nightly and generate reports. The runbooks are configured to store authentication credentials as variables. You need to replace the authentication solution with a more secure solution. What should you use?
Azure Active Directory (Azure AD) Identity Protection
Azure Key Vault
an access policy
an administrative unit
Your goal is to replace authentication credentials stored as variables in Azure runbooks with a more secure solution. The best way to store and manage sensitive information, such as authentication credentials, is Azure Key Vault. Why Azure Key Vault? Securely stores secrets, keys, and certificates rather than keeping credentials in runbook variables. Provides access control through Azure Role-Based Access Control (RBAC) and Access Policies to ensure only authorized services can retrieve secrets. Supports automatic secret rotation, reducing security risks associated with hardcoded credentials. Integrates easily with Azure Automation runbooks, allowing them to securely retrieve credentials when needed. Why Other Options Are Incorrect? (a) Azure Active Directory (Azure AD) Identity Protection Identity Protection is used for detecting and mitigating identity-related risks, such as compromised accounts. It does not store authentication credentials securely for runbooks. (c) An access policy Access policies define who can access a resource but do not store credentials themselves. While Key Vault uses access policies to control access, the actual solution for storing credentials is still Azure Key Vault. (d) An administrative unit Administrative units in Azure AD are used to delegate management of users and groups in large organizations. They do not handle authentication credentials for runbooks.
You have an Azure subscription that contains a user named User1. You need to ensure that User1 can deploy and manage virtual machines but not access the virtual network connected to the virtual machine. The solution must use the principle of least privilege. Which role-based access control (RBAC) role should you assign to User1?
Owner
Virtual Machine Contributor
Contributor
Virtual Machine Administrator Login
In Azure Role-Based Access Control (RBAC), the principle of least privilege ensures that a user is assigned only the permissions they need to perform their job. Since User1 needs to deploy and manage virtual machines (VMs) but should NOT have access to virtual networks, the Virtual Machine Contributor role is the best choice. What Does the Virtual Machine Contributor Role Do? The Virtual Machine Contributor role allows a user to: ? Create, manage, start, stop, restart, and delete VMs ? Manage VM extensions and disks ? Attach/detach data disks to a VM ? Resize and configure VMs ? What It Cannot Do: ? Does NOT grant access to Virtual Networks (VNets) ? Cannot modify network security groups (NSGs) or subnets ? Cannot assign roles to other users Why Not the Other Options? ? “Owner” The Owner role has full access to all Azure resources, including VMs, networks, and permissions. Too many permissions for this scenario. ? “Contributor” The Contributor role allows management of all resources in the subscription, including virtual networks. This violates the least privilege principle since User1 should NOT access virtual networks. ? “Virtual Machine Administrator Login” This role only grants login access to VMs (RDP for Windows, SSH for Linux). It does NOT allow deployment or management of VMs.
Your company has a general-purpose V’1 Azure Storage account named storage1 that uses locally-redundant storage (LRS). You are tasked with implementing a solution that ensures the data in the storage account is protected if a zone fails. The solution must minimize costs and administrative effort. What should you do first?
Configure Object replication rules
Create a new storage account
Modify the replication settings of the storage account
Upgrade the account to general purpose V2
Your goal is to protect data if a zone fails while minimizing costs and administrative effort. The best way to achieve this is to upgrade the storage account to General Purpose V2 (GPv2) because GPv2 supports zone-redundant storage (ZRS), which LRS (Locally Redundant Storage) does not. Why Upgrade to General Purpose V2? General Purpose V1 (GPv1) accounts do not support ZRS LRS (Locally Redundant Storage) only keeps three copies of data within a single datacenter, making it vulnerable to zone failures. GPv1 does not allow an upgrade to ZRS directly. General Purpose V2 (GPv2) accounts support Zone-Redundant Storage (ZRS) After upgrading to GPv2, you can change the replication setting to ZRS to protect data across multiple availability zones. ZRS ensures that if a zone fails, data remains accessible from another zone. GPv2 also supports Geo-Zone Redundant Storage (GZRS) for even greater redundancy. Cost-Effective & Minimal Administrative Effort Upgrading from GPv1 to GPv2 does not require creating a new storage account or migrating data manually. It improves performance and adds features like lifecycle management, tiering, and ZRS without increasing costs significantly. Why Other Options Are Incorrect? (a) Configure Object Replication Rules Object replication only applies to blob storage and requires two separate storage accounts. It does not provide automatic zone redundancy like ZRS does. (b) Create a New Storage Account Creating a new account and migrating data manually is unnecessary and requires additional administrative effort. Upgrading to GPv2 is a simpler solution. (c) Modify the Replication Settings of the Storage Account In GPv1, replication settings (like LRS to ZRS) cannot be modified directly. First, you must upgrade to GPv2, then change the replication setting to ZRS or GZRS.
You need to create an Azure Storage account that meets the following requirements: + Minimizes costs «Supports hot, cool, and archive blob tiers + Provides fault tolerance if a disaster affects the Azure region where the account resides How should you complete the command? az storage account create -g RG1 –n storageaccount1 ~ kind 72? -sku 722 To answer, select the appropriate options in the answer area. NOTE: Each correct selection is worth one point. –kind
File Storage
Storage
StorageV2
To meet the requirements—minimizing costs, supporting multiple blob tiers (hot, cool, archive), and ensuring fault tolerance across regions—the correct option for –kind is StorageV2. Breakdown of the Requirements: Minimizing Costs StorageV2 provides cost-efficient options like tiering (Hot, Cool, Archive) for Blob Storage, allowing you to optimize costs by storing infrequently accessed data in cheaper tiers. Supporting Hot, Cool, and Archive Blob Tiers Only StorageV2 supports all three blob tiers: Hot: Optimized for frequently accessed data Cool: Cost-effective for infrequently accessed data Archive: The cheapest option for rarely accessed data (e.g., backups, compliance data) Providing Fault Tolerance Across Regions You need a geo-redundant storage (GRS) option for disaster recovery. StorageV2 supports replication options like Geo-Redundant Storage (GRS) and Geo-Zone-Redundant Storage (GZRS), which replicate data across multiple Azure regions. Why Other Options Are Incorrect? FileStorage Used for Azure Files, not Blob Storage. Does not support hot, cool, and archive tiers. Storage This is the older (classic) storage account type, mainly for backward compatibility. Does not support all blob tiering options (Cool and Archive tiers are missing). Does not provide the cost efficiency and replication options available in StorageV2.
You need to create an Azure Storage account that meets the following requirements: + Minimizes costs «Supports hot, cool, and archive blob tiers + Provides fault tolerance if a disaster affects the Azure region where the account resides How should you complete the command? az storage account create -g RG1 –n storageaccount1 ~ kind 72? -sku 722 To answer, select the appropriate options in the answer area. NOTE: Each correct selection is worth one point. –sku
Standard GRS
Standard_LRS
Standard_RAGRS
Premium_LRS
To meet the given requirements—minimizing costs, supporting hot, cool, and archive blob tiers, and ensuring fault tolerance across regions—the correct option for –sku is Standard_GRS (Geo-Redundant Storage). Breakdown of the Requirements: Minimizing Costs Standard_GRS is a cost-effective storage option that supports Blob Storage tiering (Hot, Cool, Archive). Premium_LRS, while high-performance, is significantly more expensive and is not needed for blob tiering. Supports Hot, Cool, and Archive Blob Tiers Only Standard storage tiers (LRS, GRS, and RAGRS) support all three blob tiers. Premium_LRS does not support tiering and is optimized for workloads requiring low latency and high throughput, such as virtual machine disks. Provides Fault Tolerance in Case of a Regional Disaster Geo-Redundant Storage (GRS) ensures disaster recovery by automatically copying data to a secondary Azure region. If the primary region fails, Microsoft initiates a failover to the secondary region. LRS (Locally Redundant Storage) does not provide regional redundancy and only replicates within a single data center. Why Other Options Are Incorrect? Standard_LRS Only stores three copies of data in a single datacenter. Does not provide regional fault tolerance in case of disaster. Fails to meet the disaster recovery requirement. Standard_RAGRS Read-Access Geo-Redundant Storage (RAGRS) provides read access to the secondary region before a failover. While it enhances availability, it is more expensive than GRS. Since the question asks to minimize costs, Standard_GRS is a better option unless read-access to the secondary region is explicitly needed. Premium_LRS Used for high-performance workloads such as VM disks and databases. Does not support hot, cool, and archive blob tiers. Much more expensive than Standard_GRS, making it a poor choice for cost efficiency.
You have an Azure virtual machine named VM1. VM1 was deployed by using a custom Azure Resource Manager template named ARM1.json. You receive a notification that VM1 will be affected by maintenance. You need to move VM1 to a different host immediately. Solution: From the Update management blade, you click Enable. Does the solution meet the goal?
Yes
No
The goal is to move VM1 to a different host immediately to avoid maintenance impact. However, enabling Update Management from the Update Management blade does not achieve this. Why does this solution fail? Update Management is used to manage and automate software updates (patches) for VMs. It does not move the VM to a different host or help in avoiding maintenance-related downtime. Even if Update Management is enabled, the VM will still experience downtime if the host undergoes maintenance. Correct Approach to Move VM1 to a Different Host Immediately To move VM1 to a different physical host immediately, you should use one of the following methods: Redeploy the VM This forces Azure to migrate the VM to a new host. Steps: Open Azure Portal Navigate to VM1 Go to Settings > Redeploy Click Redeploy PowerShell Command: Set-AzVM -ResourceGroupName “YourRG” -Name “VM1” -Redeploy Live Migration (for Planned Maintenance Events) If Azure has scheduled maintenance and Live Migration is supported, Azure may automatically move the VM without downtime. Check for maintenance events in Azure Service Health and use Maintenance Configurations for scheduled moves.
You have an Azure Storage account named storage1. You plan to use AzCopy to copy data to storage1. You need to identify the storage services in the storage1 to which you can copy the data Which storage services should you identify?
blob and file only
blob, table, and queue only
file and table only
blob, file, table, and queue
file only
AzCopy is a command-line tool used to copy data to and from Azure Storage. It supports copying data to specific storage services within an Azure Storage account. The two storage services that AzCopy supports for data transfer are: Azure Blob Storage (for unstructured data like images, videos, and backups) Azure File Storage (for file shares and network file systems) Why Only Blob and File Storage? Azure Blob Storage AzCopy supports uploading, downloading, and copying blobs (Block blobs, Append blobs, and Page blobs). Useful for backup, archival, and serving large-scale unstructured data. Azure File Storage AzCopy allows transferring files to and from Azure file shares. Used for network-attached storage (NAS) scenarios, application sharing, and lift-and-shift migrations. Why Other Options Are Incorrect? (b) Blob, Table, and Queue only ? Table storage and Queue storage do not support AzCopy. Table and Queue storage manage structured and messaging data, not files or blobs. (c) File and Table only ? Table storage is not supported for AzCopy. Only File and Blob storage can be used. (d) Blob, File, Table, and Queue ? AzCopy does not support Table or Queue storage. Only Blob and File storage are valid options. (e) File only ? Blob storage is also supported, making this answer incorrect.
You plan to deploy an Azure virtual machine based on a basic template stored in the Azure Resource Manager (ARM) library. What can you configure during the deployment of the template? Select only one answer.
the disk assigned to a virtual machine
the operating system
the resource group
the size of the virtual machine
When deploying an Azure Virtual Machine (VM) from an Azure Resource Manager (ARM) template, you can configure several parameters. However, some configurations are fixed within the template, while others can be customized at deployment time. One of the key configurations you can define during deployment is the disk assigned to the VM. Why is “Disk Assigned to Virtual Machine” the Correct Answer? ARM Templates Support Disk Configuration When deploying a VM via an ARM template, you can specify: OS disk type (Premium SSD, Standard SSD, Standard HDD, etc.) Size of the OS disk Additional data disks These parameters can be modified before deployment, making the disk configuration flexible. Storage Account or Managed Disks You can configure the disk type and whether it should use Azure Managed Disks or unmanaged disks. You can also attach existing disks or create new ones dynamically. Why Are Other Options Incorrect? (b) The Operating System ? The OS is predefined in the template when the VM image is selected. If the template is designed for Windows, you cannot change it to Linux at deployment time without modifying the template itself. (c) The Resource Group ? The resource group must be defined before deployment, and while you can choose where to deploy resources, it is not a configurable setting inside the ARM template itself. (d) The Size of the Virtual Machine ? The VM size (SKU) is typically pre-defined within the template. You can modify it before deployment by editing the template, but the deployment process itself does not allow for changing the VM size dynamically.
You have an Azure subscription that contains a resource group named RG1. You plan to create a storage account named storage. You have a Bicep file named File1. You need to modify File1 so that it can be used to automate the deployment of storage1 to RG1. Which property should you modify?
scope
kind
sku
location
When deploying Azure resources using Bicep, you must ensure that the deployment is correctly targeted to a specific resource group, subscription, or management group. This is defined using the scope property. Since you are deploying the storage1 account to the RG1 resource group, you must modify the scope in File1 to ensure the Bicep file correctly places the storage account in the intended resource group. Why is “Scope” the Correct Answer? Scope Defines Where the Resource Will Be Deployed In Bicep, scope determines where the resource is deployed. Since you want to deploy storage1 to RG1, you must ensure that the Bicep file correctly targets this resource group. Example of setting the scope in a Bicep file: targetScope = ‘resourceGroup’ Incorrect Scope Leads to Deployment Failure If the scope is not set properly, the deployment might fail or deploy the resource to the wrong location (e.g., the subscription level instead of a resource group). Ensuring the correct resource group scope allows automation to work as intended. Why Are Other Options Incorrect? (b) Kind ? The kind property defines the type of storage account (BlobStorage, StorageV2, FileStorage). While this is important for functionality, it does not determine where the storage account is deployed. (c) SKU ? The SKU property defines the performance tier of the storage account (e.g., Standard_LRS, Premium_LRS). It does not control the resource’s placement or automation deployment. (d) Location ? The location property defines the Azure region (e.g., eastus, westus), but not the resource group where the storage account is deployed. While location is necessary, it does not control deployment automation to the correct resource group.
You have an Azure subscription that contains the virtual machines shown in the following table. You deploy a load balancer that has the following configurations: a) Name: LB 1 b) Type: Internal c) SKU: Standard d) Virtual network: VNET1 You need to ensure that you can add VM1 and VM2 to the backend pool of L81. Solution: You create a Basic SKU public IP address, associate the address to the network interface of VM1, and then start VM1. Does this meet the goal?

Yes
No
The solution does not meet the goal because: Load Balancer SKU Mismatch (Standard vs. Basic) LB1 is a Standard SKU Load Balancer, but the proposed solution associates a Basic SKU Public IP to VM1. Standard Load Balancers require VMs to have a Standard SKU Public IP or no Public IP at all. Basic SKU Public IPs are not compatible with Standard Load Balancers. Stopped (Deallocated) VM Issue VM1 is in a Stopped (Deallocated) state, meaning it is not active on the network. Even if a public IP is assigned, VM1 must be running to be added to the backend pool. Internal Load Balancer (No Public IP Needed) LB1 is an Internal Load Balancer, meaning it does not use Public IPs at all. Assigning a Public IP to VM1 does not help in configuring the backend pool for an Internal Load Balancer. The VMs should be in the same Virtual Network (VNET1) without requiring Public IPs. Correct Approach: To add VM1 and VM2 to the backend pool of LB1, you should: Ensure both VMs are running (Start VM1). Ensure both VMs are in the same Virtual Network (VNET1). Do not associate a Public IP (Public IPs are not needed for an Internal Load Balancer). Ensure both VMs have a Standard SKU Network Interface (to be compatible with a Standard SKU Load Balancer).
You have an Azure subscription that contains the virtual machines shown in the following table. You deploy a load balancer that has the following configurations: a) Name:LB1 b) Type: Internal ° c) SKU: Standard d) Virtual network: VNET1 You need to ensure that you can add VM1 and VM2 to the backend pool of LB1 Solution: You disassociate the public IP address from the network interface of VM2. Does this meet the goal?
Yes
No
The proposed solution does not meet the goal because disassociating the public IP address from VM2 alone is not enough to add VM1 and VM2 to the backend pool of LB1. Key Issues with the Solution: Load Balancer SKU Mismatch (Standard vs. Basic) LB1 is a Standard SKU Load Balancer. Standard Load Balancers require all backend VMs to have Standard SKU network interfaces (NICs) and Standard SKU Public IPs (if any). VM2 currently has a Basic SKU Public IP, which is incompatible with Standard Load Balancers. Simply disassociating the Public IP does not upgrade the NIC to Standard SKU. VM1 is Stopped (Deallocated) VM1 is currently deallocated, meaning it is not active on the network and cannot be added to the backend pool. The VM must be started first before it can participate in the backend pool. Internal Load Balancer Does Not Require Public IPs Since LB1 is an Internal Load Balancer, public IPs are not needed at all for backend VMs. However, simply removing the Public IP from VM2 does not ensure it meets all the requirements for being added to an Internal Standard Load Balancer. Correct Approach to Fix the Issue: To successfully add VM1 and VM2 to the backend pool of LB1, you need to: Start VM1 (so it becomes active and available on the network). Ensure both VMs have network interfaces with Standard SKU (not Basic). Ensure both VMs do not have incompatible Basic SKU Public IPs (either remove them or replace them with Standard SKU Public IPs if needed). Ensure both VMs are in the same Virtual Network (VNET1).
You have an Azure subscription that contains the virtual machines shown in the following table. You deploy a load balancer that has the following configurations: a) Name: LB 1 b) Type: Internal c) SKU: Standard d) Virtual network: VNET1 You need to ensure that you can add VM1 and VM2 to the backend pool of LB1 Solution: You create a Standard SKU public IP address, associate the address to the network interface of VM1, and then stop VM2. Does this meet the goal?
Yes
No
The proposed solution does not meet the goal because adding a Standard SKU public IP to VM1 and stopping VM2 does not resolve the key requirements for adding both VMs to the backend pool of LB1. Key Issues with the Solution: Stopping VM2 Removes It from the Network ? VM2 needs to be running to be added to the backend pool. Stopping VM2 prevents it from being part of the load balancer’s backend pool. The solution should ensure both VMs are running, not stopped. Public IP Address is Not Required for an Internal Load Balancer ? LB1 is an Internal Load Balancer, which means it is used for private communication within the virtual network (VNET1). Internal Load Balancers do not require public IPs on backend VMs. Associating a Standard SKU Public IP to VM1 does not help in adding it to the backend pool. VM1 Must Be Running ? VM1 is currently stopped (deallocated). Even if a Standard SKU Public IP is added, VM1 must be started to be added to the backend pool. Load Balancer SKU Compatibility ? Standard Load Balancers require all backend VMs to use Standard SKU network interfaces (NICs). While adding a Standard SKU Public IP ensures compatibility with the Load Balancer, it is not a required step for an Internal Load Balancer. Correct Approach to Fix the Issue: To successfully add VM1 and VM2 to the backend pool of LB1, you should: ? Start VM1 (so it becomes active on the network). ? Ensure both VMs have network interfaces with Standard SKU (not Basic). ? Ensure both VMs are in the same Virtual Network (VNET1). ? Ensure VM2 remains running.
Your company’s Azure solution makes use of Multi-Factor Authentication for when users are not in the office. The Per Authentication option has been configured as the usage model. After the acquisition of a smaller business and the addition of the new staff to Azure Active Directory (Azure AD) obtaining a different company and adding the new employees to Azure Active Directory (Azure AD), you are informed that these employees should also make use of Multi-Factor Authentication. To achieve this, the Per Enabled User setting must be set for the usage model. Solution: You reconfigure the existing usage model via the Azure CLI. Does the solution meet the goal?
Yes
No
Azure Multi-Factor Authentication (MFA) has two billing models: Per Authentication – Charges are based on the number of authentications. Per Enabled User – Charges are based on the number of users enabled for MFA, regardless of usage. Since your organization currently uses the Per Authentication model and needs to switch to Per Enabled User, simply reconfiguring the usage model via Azure CLI will NOT achieve this. ? Why? The MFA billing model is set at the Azure AD tenant level and is determined by your Azure licensing and subscription. It cannot be changed using the Azure CLI. The only way to switch from Per Authentication to Per Enabled User is by contacting Microsoft support or purchasing appropriate Azure AD Premium licenses. Why Doesn’t the Solution Work? ? Azure CLI does NOT support changing the MFA billing model. ? The MFA usage model is tied to licensing, and changing it requires manual intervention by Microsoft support. ? Switching usage models requires proper licensing (such as Azure AD Premium P1 or P2). Correct Approach to Meet the Goal: Check the current licensing model: Go to Azure Portal ? Azure AD ? Licenses ? Your Azure AD P1/P2 plan. Determine if you need Azure AD Premium licenses (for Per Enabled User model). If needed, purchase the correct licenses (e.g., Azure AD Premium P1/P2). Enable MFA for the new users: Go to Azure AD ? Security ? MFA ? Users ? Enable for new employees. If switching from Per Authentication to Per Enabled User, contact Microsoft support for assistance.
You have an Azure subscription that contains the virtual machines shown in the following table. You deploy a load balancer that has the following configurations: a) Name: LB1 b) Type: Internal c) SKU: Standard d) Virtual network: VNET1 You need to ensure that you can add VM1 and VM2 to the backend pool of LB1 Solution: You create two Standard SKU public IP addresses and associate a Standard SKU public IP address to the network interface of each virtual machine. Does this meet the goal?
Yes
No
? Ensure VM1 is running before adding it to the backend pool. ? Upgrade the network interfaces (NICs) of VM1 and VM2 to Standard SKU. ? Do NOT assign Public IPs—they are not needed for an Internal Load Balancer.
You have an Azure subscription that contains a resource group named RG1. RG1 contains an Azure virtual machine named VM1. You need to use VM1 as a template to create a new Azure virtual machine. Which three methods can you use to complete the task? Each correct answer presents a complete solution. Select all answers that apply.
From Azure Cloud Shell, run the Get-AZVM and New-AzVM cmdlets.
From Azure Cloud Shell, run the Save-AzDeploymentScriptLog and New AzResourceGroupDeployment cmdlets.
From Azure Cloud Shell, run the Save-AzDeploymentTemplate and New-AzResourceGroupDeployment cmdlets.
From RG1, select Export template, select Download, and then, from Azure Cloud Shell, run the New-AzResourceGroupDeployment cmdlet
From VM, select Export template, and then select Deploy.
To create a new Azure virtual machine (VM) from an existing VM, you need to capture the configuration of the existing VM and use it to deploy a new instance. The correct approach is: Export the template from the Resource Group (RG1) The Export template option allows you to generate an Azure Resource Manager (ARM) template that contains all the necessary configurations for VM1. Download the template This template includes the VM’s settings such as size, OS disk, networking, and storage configuration. Deploy the new VM using Azure Cloud Shell Using the New-AzResourceGroupDeployment cmdlet, you can deploy a new VM using the exported ARM template. Why This Works? ARM templates allow for infrastructure as code, enabling you to redeploy resources in a repeatable way. The New-AzResourceGroupDeployment cmdlet is specifically designed to deploy resources based on an ARM template. This method ensures that the new VM matches the original VM’s configuration exactly, making it ideal for cloning or creating consistent environments. Other Options Analysis: ? Get-AzVM and New-AzVM (Option A) Incorrect because Get-AzVM retrieves VM properties, but does not capture the entire VM configuration for redeployment. New-AzVM is used for creating VMs but requires manual configuration, making it less efficient. ? Save-AzDeploymentScriptLog and New-AzResourceGroupDeployment (Option B) Incorrect because Save-AzDeploymentScriptLog is used for saving deployment logs, not for exporting VM configurations. ? Save-AzDeploymentTemplate and New-AzResourceGroupDeployment (Option C) Partially correct but not the best answer. Save-AzDeploymentTemplate is used to capture deployment details, but it is not the standard method for exporting VM templates. Exporting from RG1 is the recommended way. ? Export template from VM and Deploy (Option E) Incorrect because exporting from the VM blade does not provide a full ARM template that includes networking and storage settings. The correct approach is exporting the template from the resource group (RG1) since it contains all dependencies.
How many resource groups are created for each AKS deployment?
1
2
3
4
When you deploy an Azure Kubernetes Service (AKS) cluster, two resource groups are created automatically: 1?? The Resource Group You Specify This is the resource group where the AKS cluster is deployed. It contains the Kubernetes control plane components and other AKS-related resources. You manually specify this resource group when creating the AKS cluster. 2?? The Managed Resource Group (Auto-Created) Azure automatically creates a second resource group to manage infrastructure resources like: Virtual machines (VMs) for worker nodes Networking resources (Load Balancer, Public IPs, Virtual Network, etc.) Disks and Storage accounts The name of this resource group follows the format: MC_
You deploy an Azure Kubernetes Service (AKS) cluster that has the network profile shown in the following exhibit. Use the drop-down menus to select the answer choice that completes each statement based on the information presented in the graphic. Containers will be assigned an IP address in the ______ subnet
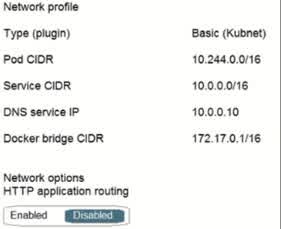
10.244.0.0/16
10.0.0.0/16
172.17.0.1/16
In an Azure Kubernetes Service (AKS) cluster, the Pod CIDR (Classless Inter-Domain Routing) defines the IP range for pod networking. Looking at the network profile, we see the following configuration: Pod CIDR: 10.244.0.0/16 Service CIDR: 10.0.0.0/16 DNS Service: 10.0.0.10 Docker Bridge CIDR: 172.17.0.1/16 Why is the correct answer 10.244.0.0/16? Pod CIDR (10.244.0.0/16) is specifically assigned to pods running inside AKS. Each pod in the cluster will be assigned an IP from this range. Service CIDR (10.0.0.0/16) is for internal Kubernetes services (e.g., ClusterIP services). Docker Bridge CIDR (172.17.0.1/16) is used for the Docker network, which is separate from the AKS Pod IPs.
You deploy an Azure Kubernetes Service (AKS) cluster that has the network profile shown in the following exhibit. Use the drop-down menus to select the answer choice that completes each statement based on the information presented in the graphic. Services in the AKS cluster will be assigned an IP address in the ——— subnet
10.244.0.0/16
10.244.0.0/16
172.17.0.1/16 PEE
In Azure Kubernetes Service (AKS), the Service CIDR defines the IP range used for Kubernetes services such as ClusterIP, LoadBalancer, and NodePort services. Looking at the network profile, we see the following configurations: Pod CIDR: 10.244.0.0/16 (used for pod networking) Service CIDR: 10.0.0.0/16 (used for Kubernetes services) DNS Service IP: 10.0.0.10 (an IP from the Service CIDR) Docker Bridge CIDR: 172.17.0.1/16 (used for Docker networking) Why is the correct answer 10.0.0.0/16? Kubernetes Services (like ClusterIP, LoadBalancer, and NodePort) need a separate IP range to avoid conflicts with Pod IPs. The Service CIDR (10.0.0.0/16) is used to allocate IP addresses for these services. For example, the Cluster DNS service (10.0.0.10) is assigned from this Service CIDR.
You have an Azure subscription that contains an Azure Active Directory (Azure AD) tenant named contoso.com and an Azure Kubernetes Service (AKS) cluster named AKS1. An administrator reports that she is unable to grant access to AKST to the users in contoso.com. You need to ensure that access to AKS1 can be granted to the contoso.com users. What should you do first?
From AKS1, create a namespace
From contoso.com, create an OAuth 2.0 authorization endpoint
Recreate AKS1
From contoso.com, modify the Organization relationships settings
The administrator is unable to grant access to the Azure Kubernetes Service (AKS) cluster named AKS1 to users in contoso.com (Azure AD tenant). This issue typically occurs because AKS integrates with Azure AD for authentication, and an OAuth 2.0 authorization endpoint is required for Azure AD to handle authentication requests. Why Creating an OAuth 2.0 Authorization Endpoint is the Solution: AKS Uses Azure AD for Authentication: AKS can integrate with Azure AD to allow role-based access control (RBAC). Users in contoso.com need to authenticate using Azure AD before accessing AKS. OAuth 2.0 Authorization Endpoint Enables Authentication: The OAuth 2.0 authorization endpoint allows AKS to redirect users to Azure AD for login. Without this, AKS cannot authenticate users, preventing access control. How to Create the Authorization Endpoint in Azure AD: Navigate to Azure Portal ? Microsoft Entra ID (Azure AD) ? App registrations. Register an application for AKS authentication. Azure AD will generate an OAuth 2.0 authorization endpoint in this format: https://login.microsoftonline.com/{tenant_id}/oauth2/v2.0/authorize This endpoint will be used to authenticate users before granting access to AKS1.
You are creating an Azure virtual machine that will run Windows Server. As an Azure admin, you must ensure that VM1 will be part of a virtual machine scale set. Which setting should you configure during the creation of the virtual machine?
Availability options
Azure Spot instance
Management
Region
When creating an Azure Virtual Machine (VM) that will be part of a Virtual Machine Scale Set (VMSS), you need to configure the Availability options setting. Azure provides different availability configurations, including: No infrastructure redundancy required. The VM is not part of any high-availability setup. Availability set: Ensures VMs are distributed across multiple faults and updates domains for redundancy. Virtual machine scale set: Ensures the VM is part of a scale set, allowing Azure to scale instances based on demand automatically. Since you specifically want VM1 to be part of a virtual machine scale set, you must choose the virtual machine scale set option under Availability options during VM creation. This ensures that the VM is deployed within a scale set, enabling automatic scaling, load balancing, and high availability. Why not the other options? (b) Azure Spot instance: This setting is used for cost-saving purposes by running the VM on unused Azure capacity but does not configure a scale set. (c) Management: This setting allows enabling monitoring, backup, and auto-shutdown but does not control scale-set membership. (d) Region: Determines where the VM is deployed but does not configure its availability settings. Thus, to make sure VM1 is part of a Virtual Machine Scale Set, the Availability options setting must be configured correctly. 4o
You have an Azure subscription that contains a virtual machine named VM1 and a storage account named storage1. You need to ensure that VM1 can access storage1 by using the Azure backbone. What should you configure?
VPN gateway
Peering
a service endpoint
a routing table
Azure Virtual Network (VNet) Service Endpoints allow virtual machines (VMs) in a VNet to securely access Azure services, such as Azure Storage, over the Azure backbone network instead of routing traffic over the public internet. By enabling a service endpoint for Azure Storage on the subnet where VM1 is located, the network traffic between VM1 and storage1 remains within Azure’s private network. This improves security, reduces latency, and provides better reliability. Why not the other options? (a) VPN Gateway – A VPN gateway connects on-premises networks to Azure over the public internet, not needed for communication between an Azure VM and an Azure storage account. (b) Peering – Virtual network peering connects two VNets, but it does not provide direct access to Azure Storage over the Azure backbone. (d) Routing Table – A routing table controls how traffic flows within a network but does not enable private access to Azure services.
Q12: Your company’s Azure solution makes use of Multi-Factor Authentication for when users are not in the office. The Per Authentication option has been configured as the usage model. After the acquisition of a smaller business and the addition of the new staff to Azure Active Directory (Azure AD) obtains a different company and adding the new employees to Azure Active Directory (Azure AD), you are informed that these employees should also make use of Multi-Factor Authentication. To achieve this, the Per Enabled User setting must be set for the usage model. Solution: You reconfigure the existing usage model via the Azure Portal. Does the solution meet the goal?
Yes
No
Azure Multi-Factor Authentication (MFA) offers two billing models: Per Authentication – Charges are based on the number of authentications. Per Enabled User – Charges are based on the number of users enabled for MFA, regardless of usage. Currently, your company is using the Per Authentication model and wants to switch to the Per Enabled User model. However, reconfiguring the usage model via the Azure Portal is not possible. Why Doesn’t the Solution Work? ? The MFA billing model is determined by your Azure AD subscription and licensing plan (such as Azure AD Premium P1/P2). ? There is NO option in the Azure Portal to change the MFA billing model—this can only be adjusted by Microsoft support. ? Switching from Per Authentication to Per Enabled User requires licensing changes, which involve purchasing an appropriate Azure AD Premium license. How to Properly Switch to Per Enabled User Model? 1?? Verify Your Current Licensing Plan: Go to Azure Portal ? Azure AD ? Licenses Check if you have Azure AD Premium P1 or P2, which supports the Per Enabled User model. 2?? Upgrade Licensing if needed: Purchase Azure AD Premium P1 or P2 licenses if the organization does not already have them. 3?? Enable MFA for Users: Go to Azure Portal ? Azure AD ? Security ? MFA Enable MFA for new employees in the Per Enabled User model. 4?? Contact Microsoft Support: If you are using the Per Authentication model and need to switch, you must contact Microsoft Support for assistance.
You have an Azure subscription that contains 100 virtual machines. You regularly create and delete virtual machines. You need to identify unattached disks that can be deleted. What should you do?
From Azure Cost Management, view Cost Analysis
From Azure Advisor, modify the Advisor configuration
From Microsoft Azure Storage Explorer, view the Account Management properties
From Azure Cost Management, view Advisor Recommendations
Azure provides Advisor Recommendations as part of Azure Cost Management, which helps identify unused or underutilized resources, including unattached disks. When you create and delete virtual machines (VMs) frequently, their managed disks may not be automatically deleted when a VM is removed. These orphaned disks continue to incur costs, even though they are not attached to any active VM. By navigating to Azure Cost Management > Advisor Recommendations, you can: Identify unused managed disks that are no longer attached to any VM. Get recommendations to delete or move these disks to save costs. Optimize your Azure storage usage. Why not the other options? (a) From Azure Cost Management, view Cost Analysis Cost Analysis provides spending insights but does not specifically identify unattached disks. (b) From Azure Advisor, modify the Advisor configuration Modifying Advisor settings lets you customize recommendations but does not directly show unattached disks. (c) From Microsoft Azure Storage Explorer, view the Account Management properties Storage Explorer is useful for managing storage accounts but does not automatically identify unused disks.
You have an Azure subscription that contains a virtual machine named VM1. VM1 requires volume encryption for the operating system and data disks. You create an Azure key vault named vault1. You need to configure vault1 to support Azure Disk Encryption for volume encryption. Which setting should you modify for vault1?
Keys
Secrets
Access policies
Security
Azure Disk Encryption (ADE) uses Azure Key Vault to store encryption keys and secrets. To allow VM1 to use vault1 for volume encryption, the Key Vault access policies must be configured to grant Azure Disk Encryption permissions. When you configure Access policies in vault1, you need to: Assign the correct permissions to allow the VM to access encryption keys and secrets. Grant the necessary roles (such as “Key Vault Crypto Service Encryption User”) to the Azure Disk Encryption service. Ensure that VM1 or the service principal it uses has the correct read and write access to encryption keys. Why not the other options? (a) Keys – This stores encryption keys, but modifying keys alone does not grant the required permissions to enable disk encryption. (b) Secrets – Secrets store credentials, but Azure Disk Encryption requires access policy settings, not just secrets. (d) Security – This setting includes general security configurations like firewalls and access control, but it does not specifically enable disk encryption.
You have an Azure subscription that contains several hundred virtual machines. You need to identify which virtual machines are underutilized. What should you use?
Azure Advisor
Azure Monitor
Azure Policies
Azure recommendations
Advisor is a Belek TE ERE GEdelps you follow best practices to optimize your Azure deployments. It analyzes your resource configuration and usage telemetry and then recommends solutions that can help you improve the cost effectiveness, performance, reliability, and security of your Azure resources. With Advisor, you can: « Get proactive, actionable, and personalized best practices recommendations. <
You have a Microsoft Entra ID tenant named contoso.com. You need to ensure that a user named User1 can review all the settings of the tenant. User1 must be prevented from changing any settings. Which role should you assign to User1?
Directory reade
Security reader
Reports reader
Global reader
The Global Reader role in Microsoft Entra ID (formerly Azure AD) allows a user to view all settings and administrative information in the tenant without making any changes. Since you need User1 to review all tenant settings but prevent them from modifying anything, the Global Reader role is the best fit. Why Global Reader? Read-only access to all administrative settings in Microsoft Entra ID. Can view security policies, user properties, groups, and configurations without the ability to edit them. Suitable for auditors, compliance officers, or administrators who need oversight but no modification rights. Why not the other options? ? (a) Directory Reader Can view user, group, and directory information but not all settings of the tenant. Does not provide access to security, policy, or admin settings. ? (b) Security Reader Can view security-related information such as reports, alerts, and security configurations. Does not provide access to all tenant settings. ? (c) Reports Reader Can view usage and analytics reports for Entra ID and Microsoft 365. Cannot review tenant settings.
You have a Microsoft Entra ID tenant named contoso.com. You deploy a development Entra ID tenant, and then you create several custom administrative roles in the development tenant. You need to copy the roles to the production tenant. What should you do first?
From the development tenant, export the custom roles to JSON
From the production tenant, create a new custom role.
From the development tenant, perform a backup.
From the production tenant, create an administrative unit
Microsoft Entra ID allows you to create custom administrative roles in one tenant and reuse them in another tenant (such as a production environment). Since you need to copy the custom roles from the development tenant to the production tenant, you must first export them to a JSON file. This process involves: Exporting the custom roles from the development tenant in JSON format using Microsoft Graph API or PowerShell. Importing the JSON file into the production tenant to recreate the roles. This method ensures that all role permissions and configurations remain consistent across tenants. Why not the other options? ? (b) From the production tenant, create a new custom role. This would require manually recreating each role from scratch, which is inefficient and prone to errors. Instead, exporting and importing JSON ensures exact replication. ? (c) From the development tenant, perform a backup. Backing up the tenant does not provide a way to export and transfer specific custom roles to another tenant. ? (d) From the production tenant, create an administrative unit. Administrative units are used for scoping role assignments within a tenant but do not help copy custom roles between tenants.
Your company has a Microsoft Entra ID subscription. You need to deploy five virtual machines (VMs) to your company’s virtual network subnet. The VMs will each have both a public and private IP address. Inbound and outbound security rules for all of these virtual machines must be identical. Which of the following is the least amount of network interfaces needed for this configuration?
5
10
20
25
Each Azure Virtual Machine (VM) requires at least one network interface (NIC) to connect to a Virtual Network (VNet). In this scenario, each VM needs: A private IP address (for internal communication within the VNet). A public IP address (for external internet access). However, Azure allows a single NIC to have both a private and a public IP address. This means that each VM can have: One NIC One private IP One public IP Since you need 5 VMs, and each VM requires only one NIC to support both IPs, the minimum number of NICs needed is 5. Why not the other options? ? (b) 10 – This would mean assigning two NICs per VM, which is unnecessary since a single NIC can support both public and private IPs. ? (c) 20 – This would require four NICs per VM, which is excessive and not required in this scenario. ? (d) 25 – This would mean five NICs per VM, which is far more than needed.
Your company has a Microsoft Entra ID subscription. You need to deploy five virtual machines (VMs) to your company’s virtual network subnet. The VMs will each have both a public and private IP address. Inbound and outbound security rules for all of these virtual machines must be identical. Which of the following is the least amount of security groups needed for this configuration?
1
5
7
10
In Azure, Network Security Groups (NSGs) are used to control inbound and outbound traffic for virtual machines (VMs) by defining security rules. Since all five VMs require identical security rules, you can use a single NSG and associate it with the subnet or NICs of the VMs. Why only 1 NSG? NSGs can be applied at the subnet level in a Virtual Network (VNet). If you associate one NSG with the subnet, all five VMs in the subnet inherit the same security rules. This ensures consistent security policies for all VMs without needing multiple NSGs. Why not the other options? ? (b) 5 – This would mean one NSG per VM, which is unnecessary because a single NSG applied at the subnet level can cover all VMs. ? (c) 7 – No scenario justifies using seven NSGs, as all VMs require identical rules. ? (d) 10 – This would mean two NSGs per VM, which is excessive and redundant.
You have an Azure subscription that contains several Azure runbooks. The runbooks run nightly and generate reports. The runbooks are configured to store authentication credentials as variables. You need to replace the authentication solution with a more secure solution. What should you use?
Azure Active Directory (Azure AD) Identity Protection
Azure Key Vault
an access policy
an administrative unit
Azure Key Vault is a secure storage solution for secrets, certificates, and encryption keys in Azure. Since the runbooks are currently storing authentication credentials as variables, this method is not secure because: Variables are stored in plain text, which makes them vulnerable to unauthorized access. If an attacker gains access to the runbook, they can extract credentials. By using Azure Key Vault, you can: Securely store authentication credentials instead of keeping them as variables. Restrict access using role-based access control (RBAC) and managed identities. Automatically retrieve credentials when needed without exposing them in the runbook. This ensures that authentication credentials remain secure while allowing runbooks to function normally. Why not the other options? ? (a) Azure Active Directory (Azure AD) Identity Protection Identity Protection detects and prevents identity-related security risks (e.g., detecting compromised accounts) but does not store secrets securely. ? (c) An access policy Access policies define permissions for resources like Key Vault, but they do not store credentials. You need a secure storage solution (Key Vault) first, and then you can configure access policies for it. ? (d) An administrative unit Administrative units are used to scope Entra ID (Azure AD) role assignments, but they do not manage authentication credentials.
You administer a solution in Azure that is currently having performance issues. You need to find the cause of the performance issues about metrics on the Azure infrastructure. Which of the following is the tool you should use?
Azure Traffic Analytics
Azure Monitor
Azure Activity Log
Azure Advisor
Azure Monitor is the primary tool for collecting, analyzing, and visualizing metrics and logs related to Azure infrastructure and performance. Since you need to investigate performance issues, Azure Monitor provides: Metrics tracking (CPU, memory, disk, and network usage). Real-time monitoring to identify resource bottlenecks. Alerts and diagnostics to troubleshoot issues efficiently. Azure Monitor gathers data from Azure resources, applications, and virtual machines and helps detect performance degradation in services. Why not the other options? ? (a) Azure Traffic Analytics Traffic Analytics focuses on network traffic flow analysis, but it does not provide general performance metrics for Azure resources. ? (c) Azure Activity Log Activity Log records management operations (such as VM start/stop events), but does not track performance metrics. ? (d) Azure Advisor Azure Advisor provides best-practice recommendations for cost, security, and performance, but it does not offer real-time performance monitoring like Azure Monitor.
You need to recommend a solution to automate the configuration for the finance department users. The solution must meet the technical requirements. What should you include in the recommendation?
Microsoft Entra ID B2C
Dynamic groups and conditional access policies
Microsoft Entra ID Identity Protection
An Azure logic app and the Microsoft Identity Management (MIM) client
Why Dynamic Groups and Conditional Access Policies? Dynamic Groups in Microsoft Entra ID (formerly Azure AD) allow users to be automatically assigned to groups based on attributes such as department, job title, or location. Conditional Access Policies enforce security rules such as MFA (Multi-Factor Authentication), device compliance, and location-based access. This combination automates the configuration for finance department users by ensuring they are grouped correctly and enforcing security policies dynamically. Why Not the Other Options? Microsoft Entra ID B2C B2C (Business-to-Customer) is used for external users (customers, partners), not internal employees. It does not help automate finance department configurations. Microsoft Entra ID Identity Protection Identity Protection detects risky sign-ins and compromised accounts, but it does not automate user group assignment or enforce department-specific policies. An Azure Logic App and Microsoft Identity Manager (MIM) Client MIM is an older tool for identity synchronization and user lifecycle management. Azure Logic Apps can automate workflows, but dynamic groups and conditional access policies provide a more built-in and scalable solution.
Q13: Your company’s Azure solution makes use of Multi-Factor Authentication when users are not in the office. The Per Authentication option has been configured as the usage model. After the acquisition of a smaller business and the addition of the new staff to Azure Active Directory (Azure AD) obtains a different company and adding the new employees to Azure Active Directory (Azure AD), you are informed that these employees should also make use of Multi-Factor Authentication. To achieve this, the Per Enabled User setting must be set for the usage model. Solution: You change the usage model from Per Authentication to Per Enabled User .. Does the solution meet the goal?
Yes
No
Azure Multi-Factor Authentication (MFA) supports two billing models: Per Authentication – Users are charged based on the number of authentications. Per Enabled User – Users are charged based on the number of enabled users, regardless of how often they authenticate. Your company currently uses the Per Authentication model and wants to switch to Per Enabled User. However, changing the usage model directly is NOT possible via self-service options in the Azure Portal or CLI. Why Doesn’t the Solution Work? ? The MFA billing model is tied to your Azure AD subscription and cannot be changed manually. ? There is no built-in option in Azure to switch between Per Authentication and Per Enabled User. ? Changing the usage model requires purchasing the correct Azure AD licenses (Premium P1 or P2) and contacting Microsoft support. Correct Approach to Enable MFA for New Employees in the Per Enabled User Model: ? Step 1: Check Your Current Licensing Plan Go to Azure Portal ? Azure Active Directory ? Licenses Ensure that you have Azure AD Premium P1 or P2, which supports Per Enabled User MFA. ? Step 2: Upgrade Licensing if Needed If your company is using Per Authentication, you may need to purchase Azure AD Premium P1/P2 licenses to use Per Enabled User. ? Step 3: Enable MFA for New Employees Go to Azure Portal ? Azure AD ? Security ? MFA Enable MFA for users in the Per Enabled User model. ? Step 4: Contact Microsoft Support If your company is currently using Per Authentication and wants to switch, you must contact Microsoft Support for assistance.
Your company has a Microsoft SQL Server Always On availability group configured on their Azure virtual machines (VMs). You need to configure an Azure internal load balancer as a listener for the availability group. Solution: You create an HTTP health probe on port 1433. Does the solution meet the goal?
Yes
No
An Azure Internal Load Balancer (ILB) is used as a listener for an SQL Server Always On availability group to direct traffic to the active primary node. However, the solution fails because: The health probe must use port 59999 (or a custom probe port specified in SQL Server) instead of port 1433. Port 1433 is used for client connections to SQL Server, not for health probes. The health probe should check the availability of the primary replica by targeting the SQL Server listener probe port (typically 59999) rather than using HTTP. Correct Approach: To properly configure the Internal Load Balancer (ILB) listener, you should: ? Create a TCP health probe on the availability group’s probe port (e.g., 59999). ? Ensure the SQL Server instances are correctly configured to respond to the probe requests. ? Associate the health probe with the backend pool of the load balancer. Why the solution does NOT meet the goal? 1?? HTTP probes are not used for SQL Always On availability groups—a TCP probe is required. 2?? Port 1433 is for SQL client connections, not for health monitoring. 3?? The correct port for SQL Always On health probes is typically 59999 (or a custom port set in SQL Server).
Your company has a Microsoft SQL Server Always On availability group configured on their Azure virtual machines (VMs). You need to configure an Azure internal load balancer as the listener for the availability group. Solution: You set Session persistence to Client IP. Does the solution meet the goal?
Yes
No
An Azure Internal Load Balancer (ILB) is used as a listener for an SQL Server Always On availability group to direct traffic to the primary replica. However, setting Session Persistence to “Client IP” does NOT meet the goal because: SQL Server Always On requires a TCP health probe to detect the primary replica, but session persistence settings do not affect failover behavior. The ILB must correctly redirect traffic to the active primary replica based on the health probe status, not client IP persistence. Session persistence (Client IP) only ensures that a client’s connection goes to the same backend server, but this does not help with SQL Always On failover scenarios. Correct Approach: To properly configure the Internal Load Balancer (ILB) listener, you should: ? Use a TCP health probe on the availability group’s probe port (typically 59999). ? Configure the ILB with a backend pool containing the SQL Server VMs. ? Ensure the SQL Server instances respond to the health probe for correct failover handling. ? Set “Floating IP (Direct Server Return)” to Enabled for proper routing. Why the solution does NOT meet the goal? 1?? Session persistence (Client IP) does not help with SQL Always On failover—the ILB must dynamically route traffic to the active primary replica based on health probes. 2?? The ILB requires a TCP health probe to determine which SQL instance is currently active. 3?? Session persistence settings do not affect SQL Always On functionality, as connections must always be routed to the active primary, not a fixed VM.
Your company has a Microsoft SQL Server Always On availability group configured on their Azure virtual machines (VMs). You need to configure an Azure internal load balancer as a listener for the availability group. Solution: You enable Floating IP. Does the solution meet the goal?
Yes
No
When configuring an Azure Internal Load Balancer (ILB) as a listener for a Microsoft SQL Server Always On availability group, enabling Floating IP is required for proper failover handling. Why is Floating IP needed? Floating IP (Direct Server Return) ensures traffic is directed to the active primary replica of the Always On availability group. Without Floating IP, the ILB would not correctly route client connections after a failover. This setting allows the same frontend IP to be used across multiple SQL Server VMs without interruption. Correct Configuration Steps: To properly configure the ILB as a listener for SQL Always On, you should: ? Enable Floating IP on the ILB rule for the availability group listener. ? Use a TCP health probe on the availability group’s probe port (typically 59999). ? Associate the ILB with a backend pool containing the SQL Server VMs. ? Ensure SQL Server instances are correctly configured to respond to health probe requests. Why does this solution meet the goal? 1?? SQL Server Always On requires Floating IP to properly route traffic to the active primary replica. 2?? Without Floating IP, failover handling would not work correctly, causing connection disruptions. 3?? Floating IP allows seamless redirection of traffic, ensuring clients always connect to the active primary instance.
You plan to create an Azure Storage account in the Azure region of East US 2. You need to create a storage account that meets the following requirements: + Replicates synchronously. + Remains available if a single data center in the region fails. How should you configure the storage account? To answer, select the appropriate options in the answer area. NOTE: Each correct selection is worth one point. Replication :
Geo-redundant storage (GRS)
Locally-redundant storage (LRS)
Read access Geo-redundant storage (RA-GRS)
Zone-redundant storage (ZRS)
When choosing an Azure Storage account replication type, the key requirements to meet are: 1?? Replicates synchronously ? This means that data must be instantly copied to multiple locations without delay. 2?? Remains available if a single data center fails ? This means that data must be distributed across multiple data centers within the same Azure region. Why is ZRS the correct choice? Zone-Redundant Storage (ZRS) synchronously replicates data across multiple availability zones within the same Azure region. If one data center (availability zone) fails, the storage remains available from the other zones. ZRS meets both requirements: synchronous replication and data center failure resilience. Why not the other options? ? Geo-Redundant Storage (GRS) Replication is asynchronous (not instant). Data is replicated to a secondary region, but there is no immediate failover if the primary region has an issue. Does not guarantee availability if a single data center fails. ? Locally-Redundant Storage (LRS) Replicates data only within a single data center. If the data center fails, all data is lost. Does not provide high availability. ? Read-Access Geo-Redundant Storage (RA-GRS) Same as GRS, but allows read access to the secondary region. Replication is still asynchronous, and failover is not automatic.
You plan to create an Azure Storage account in the Azure region of East US 2. You need to create a storage account that meets the following requirements: + Replicates synchronously. + Remains available if a single data center in the region fails. How should you configure the storage account? To answer, select the appropriate options in the answer area. NOTE: Each correct selection is worth one point. Account type:
Blob Storage
Storage (general purpose v1)
StorageV2 (general purpose v2)
When selecting an Azure Storage account type, we need to ensure it meets the following requirements: 1?? Replicates synchronously ? Data must be copied instantly across multiple locations. 2?? Remains available if a single data center fails ? This means the storage must support Zone-Redundant Storage (ZRS), which distributes data across multiple availability zones within the same region. Why is StorageV2 (general purpose v2) the correct choice? StorageV2 supports ZRS, which ensures synchronous replication across multiple availability zones. StorageV2 is the latest and recommended storage type, offering enhanced performance, security, and cost-efficiency. Supports all storage services (Blobs, Files, Queues, and Tables). Why not the other options? ? Blob Storage Only supports blob data (not all storage services). Does not support ZRS for all access tiers, meaning it may not meet the high availability requirement. ? Storage (general purpose v1) Older version, lacking ZRS support and some advanced features. Less efficient in terms of performance and cost compared to StorageV2.
You have an Azure subscription that contains the storage accounts shown in the following table. You need to identify which storage accounts can be switched to geo-redundant storage (GRS). Which storage accounts should you identify?

storage1 only
storage2 only
storage3 only
storage4 only
storage1 and storage4 only
storage2 and storage3 only
To switch a storage account to Geo-Redundant Storage (GRS), it must meet the following requirements: 1?? Must use Locally-Redundant Storage (LRS) as the current replication type. LRS ? GRS upgrade is possible. ZRS ? GRS upgrade is NOT possible. 2?? Must be a supported storage account type (not all storage types support GRS). Blob Storage and StorageV2 support GRS. File Storage (Premium) does NOT support GRS. Why is Storage2 the only correct answer? ? Storage2 meets both conditions: Uses LRS (which can be upgraded to GRS). Uses Blob Storage, which supports GRS. ? Storage1 & Storage3 use ZRS, which cannot be changed to GRS. ? Storage4 uses Premium LRS, which does not support GRS.
You have an Azure subscription that contains the storage accounts shown in the following table. You need to identify which storage account can be converted to zone-redundant storage (ZRS) replication by requesting a live migration from Azure support. Which storage accounts should you identify?

storage1 only
storage2 only
storage3 only
storage4 only
To be eligible for live migration to Zone-Redundant Storage (ZRS), a storage account must meet these conditions: 1?? Must currently use Locally-Redundant Storage (LRS) Azure allows LRS ? ZRS migration via a support request. Geo-Redundant Storage (GRS) cannot be directly converted to ZRS. 2?? Must be a supported storage account type StorageV2 (general purpose v2) supports ZRS migration. Blob Storage and Storage (general purpose v1) do not support live migration to ZRS. Why is Storage2 the only correct answer? ? Storage2 meets both conditions: It currently uses LRS, which can be converted to ZRS via Azure support. It is a StorageV2 account, which supports ZRS. ? Storage1 & Storage3 use GRS/RA-GRS, which cannot be converted directly to ZRS. ? Storage4 is a Blob Storage account, which does not support ZRS migration.
You have an Azure subscription that contains the storage accounts shown in the following table. You need to identify which storage accounts support moving data to the Archive access tier. Which storage accounts should you use?

storage 1 only
storage2 only
storage3 only
storage4 only
To move data to the Archive access tier, a storage account must meet the following conditions: 1?? Must be either StorageV2 (general purpose v2) or Blob Storage StorageV1 does not support the Archive tier. 2?? Must support blob storage access tiers (Hot, Cool, and Archive) Only Blob Storage and StorageV2 accounts allow data to be moved to the Archive tier. 3?? Replication type does NOT impact Archive tier availability Archive tier can be used with LRS, ZRS, GRS, and RA-GRS storage accounts. Why is Storage4 the only correct answer? ? Storage4 meets both conditions: It is a Blob Storage account, which supports the Archive access tier. It uses RA-GRS, which does not prevent Archive tier usage. ? Storage1 & Storage3 are StorageV1 accounts, which do not support the Archive tier. ? Storage2 uses ZRS, which does not support the Archive tier.
You have an Azure subscription that contains the storage accounts shown in the following table. You plan to manage the data stored in the accounts by using lifecycle management rules. To which storage accounts can you apply lifecycle management rules?
storage1 only
storage1 and storage2 only
storage3 and storage4 only
storage1, storage2, and storage3 only
storage1, storage2, storage3, and storage4
Lifecycle management rules in Azure allow automated movement of data between storage tiers (Hot, Cool, and Archive) or deletion of old data. For lifecycle management to be applicable, a storage account must meet these conditions: 1?? Storage account must be one of the following types: StorageV2 (general purpose v2) ? (Supports lifecycle rules) Blob Storage ? (Supports lifecycle rules) Block Blob Storage ? (Supports lifecycle rules) StorageV1 (general purpose v1) does NOT support lifecycle rules ? 2?? Performance tier must be Standard: Premium storage accounts do NOT support lifecycle rules ? Why is Storage1, Storage2, and Storage3 the correct answer? ? Storage1 (StorageV2 + Standard) supports lifecycle rules. ? Storage2 (Blob Storage + Standard) supports lifecycle rules. ? Storage3 (Block Blob Storage + Premium) supports lifecycle rules (for block blobs only). ? Storage4 (StorageV1 + Premium) does NOT support lifecycle rules.
Q14: Your company’s Azure solution makes use of Multi-Factor Authentication when users are not in the office. The Per Authentication option has been configured as the usage model. After the acquisition of a smaller business and the addition of the new staff to Azure Active Directory (Azure AD) obtains a different company and add the new employees to Azure Active Directory (Azure AD), you are informed that these employees should also make use of Multi-Factor Authentication. To achieve this, the Per Enabled User setting must be set for the usage model. Solution: You create a new Multi-Factor Authentication provider with a backup from the existing Multi-Factor Authentication provider data and reactivate your existing server with activation credentials from the new provider. Does the solution meet the goal?
Yes
No
Your company currently uses Multi-Factor Authentication (MFA) with the “Per Authentication” usage model, and you need to switch to “Per Enabled User” to support new employees. Since changing the MFA usage model directly is not possible, the correct approach is to create a new MFA provider and migrate the existing settings to it. Why Does This Solution Work? ? Azure MFA Providers are tied to a specific billing model (Per Authentication or Per Enabled User). ? Creating a new MFA provider allows you to select the correct “Per Enabled User” model. ? Backing up data from the existing MFA provider ensures that users retain their current MFA settings. ? Reactivating the MFA server with new activation credentials ensures that users can continue using MFA without disruption. Steps to Implement the Solution: 1?? Create a New Multi-Factor Authentication Provider In Azure Portal, go to Azure AD ? MFA Create a new MFA provider and select Per Enabled User as the usage model 2?? Backup the Existing MFA Provider Data Export current MFA settings to ensure seamless migration 3?? Reactivate the Existing MFA Server Use the activation credentials from the new MFA provider Ensure that all users are assigned the new MFA provider 4?? Verify & Test Ensure that all users (including new employees) are enrolled in MFA Test logins to confirm MFA is working as expected
You have an Azure subscription that contains Microsoft Entra ID tenant named contoso.com and an Azure Kubernetes Service (AKS) cluster named AKS1. An administrator reports that she is unable to grant access to AKST to the users in contoso.com. You need to ensure that access to AKST can be granted to the contoso.com users. What should you do first?
From contoso.com, modify the Organization relationships settings.
From contoso.com, create an OAuth 2.0 authorization endpoint.
Recreate AKS1
From AKST, create a namespace.
Azure Kubernetes Service (AKS) relies on Microsoft Entra ID (formerly Azure AD) for authentication and access control. If an administrator is unable to grant access to users from contoso.com, it likely means that AKS is not properly integrated with Entra ID for authentication. To fix this issue, you need to enable Entra ID authentication by configuring an OAuth 2.0 authorization endpoint in Entra ID. This allows AKS to use Entra ID-based RBAC (Role-Based Access Control) for authentication. Why is an OAuth 2.0 Authorization Endpoint Required? ? OAuth 2.0 is the industry standard for authentication and authorization. ? AKS requires Microsoft Entra ID integration to authenticate users. ? Without configuring the OAuth 2.0 authorization endpoint, AKS cannot validate access requests from Entra ID users. Steps to Configure Microsoft Entra ID Authentication for AKS 1?? Register AKS in Microsoft Entra ID: Go to Microsoft Entra ID > App registrations > New registration. Register a new application for AKS authentication. 2?? Create an OAuth 2.0 Authorization Endpoint: In Microsoft Entra ID, go to Endpoints. Copy the OAuth 2.0 token endpoint and configure it in AKS. 3?? Enable Entra ID-based authentication in AKS: Use the following Azure CLI command to integrate Entra ID with AKS: az aks update -g MyResourceGroup -n AKS1 –enable-aad Assign RBAC roles to users using Kubectl or Azure CLI. Why Not the Other Options? ? (A) Modify the Organization Relationships Settings This setting is used for B2B/B2C collaboration and cross-tenant access, not for granting Entra ID users access to AKS. ? (C) Recreate AKS1 Recreating AKS is not necessary. The issue is with authentication settings, not the cluster itself. ? (D) Create a Namespace in AKS
You have a resource group named RG1 that contains several unused resources. You need to use the Azure CLI to remove RG1 and all its resources, without requiring a confirmation. Which command should you use?
az group delete–name rg1 -no-wait -yes
az group deployment delete -name rg1 -no-wait
az group update-name rg1-remove
az group update -name rg1 -remove
The az group delete command is used to delete a resource group and all its associated resources in Azure. –name RG1 ? Specifies the name of the resource group to be deleted (RG1). –no-wait ? Ensures the command runs asynchronously, meaning it does not block the terminal while deleting. –yes ? Skips confirmation prompts, ensuring the deletion happens without manual intervention. This combination permanently removes RG1 and all the resources inside it without requiring user confirmation. Why Not the Other Options? ? (B) az group deployment delete –name RG1 –no-wait This command only deletes a deployment from the resource group, not the resource group itself. The resource group and its resources will still exist. ? (C) az group update –name RG1 –remove az group update is used to modify a resource group’s properties, not delete it. –remove does not delete the entire resource group, but only specific properties. ? (D) az group wait –deleted –resource-group RG1 az group wait is used to wait until a resource group is deleted, but it does not delete the resource group itself. This command would only make sense after running az group delete.
You have an Azure subscription named Subscription. Subscription] contains the resource groups in the following table. R61 has a web app named WebApp1. WebAppT is located in West Europe. You move WebApp to RG2. What is the effect of the move?
![You have an Azure subscription named Subscription. Subscription] contains the resource groups in the following table. R61 has a web app named WebApp1. WebAppT is located in West Europe. You move WebApp to RG2. What is the effect of the move?](https://images.ctfassets.net/bsr9gjhja6q3/tTQMJzHt0f1IyUbAqni4W/a423080139a22c657903c326553b12f7/resource_groups.jpg)
The App Service plan for WebApp1 remains in West Europe. Policy2 applies to WebApp1
The App Service plan for WebApp1 remains in West Europe. Policy2 applies to WebApp1
The App Service plan for WebApp1 remains in West Europe. Policy1 applies to WebApp1.
The App Service plan for WebApp1 moves to North Europe. Policy1 applies to WebApp1.
When you move WebApp1 from RG1 (West Europe) to RG2 (North Europe), the following effects occur: The Web App’s physical location does not change WebApp1 is hosted on an App Service Plan, which determines its region. Moving WebApp1 to a different resource group does not change its App Service Plan’s region. Since the App Service Plan is in West Europe, WebApp1 will continue to run in West Europe. The resource group policies are applied based on the new group Each resource group has its own policies that affect the resources within it. When WebApp1 moves to RG2, it will now inherit the policies of RG2 (which is Policy2). Why Not the Other Options? ? (B) The App Service plan for WebApp1 moves to North Europe. Policy2 applies to WebApp1. Incorrect: The App Service Plan does not move when transferring a web app between resource groups. Correct: Only the Web App moves, but it remains in the same region. ? (C) The App Service plan for WebApp1 remains in West Europe. Policy1 applies to WebApp1. Incorrect: Policy1 belongs to RG1, but WebApp1 is now in RG2. Correct: WebApp1 now follows Policy2 from RG2. ? (D) The App Service plan for WebApp1 moves to North Europe. Policy1 applies to WebApp1. Incorrect: The App Service Plan stays in West Europe, and WebApp1 inherits Policy2 (not Policy1).
You have a Microsoft Entra tenant named contoso.com. You collaborate with an external partner named thetechblackboard.com. You plan to invite users in the techblackboard.com to the contoso.com tenant. You need to ensure that invitations can be sent only to thetechblackboard.com users. What should you do in the Microsoft Entra admin center?
From Cross-tenant access settings, configure the Tenant restrictions settings.
From Cross-tenant access settings, configure the Microsoft cloud settings.
From External collaboration settings, configure the Guest user access restrictions settings.
From External collaboration settings, configure the Collaboration restrictions settings.
When collaborating with an external partner (thetechblackboard.com), you need to restrict guest invitations only to users from that domain. This is done by configuring Collaboration restrictions in the External collaboration settings. External collaboration settings allow control over how external users can be invited and what permissions they have. Collaboration restrictions let you define allowed or blocked domains for guest invitations. To only allow users from thetechblackboard.com, you can: Add “thetechblackboard.com” to the allowed domains list Block all other domains from receiving invitations This ensures that invitations can only be sent to users from thetechblackboard.com. Why Not the Other Options? ? (A) From Cross-tenant access settings, configure the Tenant restrictions settings. Incorrect because Tenant Restrictions control which tenants your users can access, not who can be invited as guests. Correct Use Case: Restricting your users from accessing external Microsoft Entra tenants. ? (B) From Cross-tenant access settings, configure the Microsoft cloud settings. Incorrect because Microsoft cloud settings manage how different Microsoft cloud services (e.g., Office 365, Azure AD B2B) interact across tenants, not guest invitations. ? (C) From External collaboration settings, configure the Guest user access restrictions settings. Incorrect because Guest User Access Restrictions control guest permissions once invited but do not restrict which domains can receive invitations. Correct Use Case: Limiting what invited guests can do inside your tenant (e.g., read-only access).
Your company has a Microsoft Entra ID tenant named thetechblackboard.onmicrosoft.com and a public DNS zone for thetechblackboard.com. You added the custom domain name thetechblackboard.com to Microsoft Entra ID. You need to verify that Azure can verify the domain name. What DNS record type should you use?
A
CNAME
SOA
MX
When adding a custom domain name (e.g., thetechblackboard.com) to Microsoft Entra ID, Azure requires domain verification to ensure ownership. This is done by adding a DNS record in the public DNS zone (thetechblackboard.com). Azure provides two options for verification: MX (Mail Exchanger) Record TXT (Text) Record The MX record is commonly used because: It is required for email services, making it a widely recognized method of verification. It does not interfere with existing email configurations if it has a priority of 0 and no mail server specified. When setting up the custom domain in Microsoft Entra ID, Microsoft provides an MX record like: Priority: 0 Host: @ Mail Server: MS=ms######## TTL: 3600 (or default) Once this record is added and propagated, Azure verifies the domain automatically. Why Not the Other Options? ? (A) A (Address) Record Incorrect because A records are used to map a domain to an IP address, typically for websites or servers. Microsoft does not use A records for domain verification in Entra ID. ? (B) CNAME (Canonical Name) Record Incorrect because CNAME records alias one domain to another (e.g., www.thetechblackboard.com ? thetechblackboard.com). Microsoft Entra ID does not use CNAME for domain verification. ? (C) SOA (Start of Authority) Record Incorrect because SOA records store adminis
You sign up for Microsoft Entra ID P2. You need to add a user named admin @contoso.com as an administrator on all the computers that will be joined to the Entra domain. What should you configure in Microsoft Entra ID?
Device settings from the Devices blade
Providers from the MFA Server blade
User settings from the Users blade
General settings from the Groups blade
To ensure that admin@contoso.com is automatically added as an administrator on all computers that will be joined to the Entra domain, you need to configure settings in the Groups blade under General settings. Microsoft Entra ID allows you to assign administrator roles to users automatically when devices are joined to the domain. This is done by: 1?? Using the “Device Administrator Role” in Microsoft Entra ID The “Device Administrator” role in Entra ID grants users local administrator privileges on all domain-joined devices. This ensures that admin@contoso.com is automatically an administrator on every computer joined to the Entra domain. 2?? Configuring Role Assignments in the Groups Blade You can create a security group in Groups > General settings and assign the Device Administrator role to that group. Adding admin@contoso.com to this group will automatically grant them admin rights on all joined devices. Why Not the Other Options? ? (A) Device settings from the Devices blade Incorrect because this blade is used to manage device policies (e.g., allowing/disallowing device joins) rather than assigning administrator rights. ? (B) Providers from the MFA Server blade Incorrect because this is related to Multi-Factor Authentication (MFA) settings and not device administration. ? (C) User settings from the Users blade Incorrect because the Users blade is for managing individual users, not assigning admin roles to all domain-joined devices. Admin privileges need to be set at the group level to apply to multiple users/devices automatically.
You have the following resources deployed in Azure. There is a requirement to connect TDVnet1 and TDVnet2. What should you do first?

Create virtual network peering
Change the address space of TDVnet2.
Change the address space of TDVnet2.
Change the address space of TDVnet2.
To connect TDVnet1 (10.1.0.0/16) and TDVnet2 (10.10.0.0/18), the best option is to use Virtual Network (VNet) Peering. VNet Peering allows two virtual networks to connect seamlessly in Azure without requiring a VPN or additional hardware. It provides: ? Low-latency, high-bandwidth private connectivity ? Secure communication between resources in different VNets ? No overlap in IP address spaces (which is already ensured in this case) Why Not the Other Options? ? (B) Change the address space of TDVnet2 Incorrect because there is no address space conflict between TDVnet1 (10.1.0.0/16) and TDVnet2 (10.10.0.0/18). Address space changes would only be required if there was an overlap (which is not the case here). ? (C) Transfer TDVnet1 to TD2 Incorrect because Azure Virtual Networks (VNets) are tied to a specific subscription and tenant. You cannot directly transfer a VNet between tenants. Instead, cross-tenant connections should be managed using VNet peering or VPN connections. ? (D) Transfer VM1 to TD2 Incorrect because moving VM1 would not connect the two VNets. It would just relocate the VM, which doesn’t solve the connectivity issue between VNets. VMs within the same VNet can already communicate, but VNet-to-VNet connectivity requires peering or a VPN.
Your organization has deployed multiple Azure virtual machines configured to run as web servers and an Azure public load balancer named TD1. There is a requirement that TDT must consistently route your user’s request to the same web Server every time they access it. What should you configure?
Hash based
Session persistence: None
Session persistence: Client IP
Health probe
When multiple Azure virtual machines (VMs) are configured as web servers behind an Azure public load balancer, the load balancer distributes incoming traffic across the available backend servers. If a user makes multiple requests, the load balancer may route each request to a different backend server, which can cause session inconsistencies. To ensure that a user’s request is always routed to the same web server, you should configure Session Persistence: Client IP. How Session Persistence: Client IP Works Client IP persistence (also called Source IP affinity) ensures that all requests from a specific client IP address are always sent to the same backend VM. This is useful for web applications that store session-related information on a specific server and require continuity for the user experience. Without session persistence, a user’s requests could be routed to different servers, potentially losing session data. Why Other Options Are Incorrect: (a) Hash-based: Uses a hash algorithm to distribute traffic dynamically and does not guarantee persistence to a specific backend server. (b) Session persistence: None: Means requests are distributed without any stickiness, potentially sending different requests from the same client to different backend VMs. (d) Health probe: Used to monitor backend VM health but does not control session persistence.
You have an Azure subscription that contains the resources shown in the following table. You plan to use an Azure key vault to provide a secret to app1. What should you create for app1 to access the key vault, and from which key vault can the secret be used? To answer, select the appropriate options in the answer area. NOTE: Each correct selection is worth one point. Create a:

Managed Identity
Private Endpoint
Service Principal
User Account
To allow App1 (a container app in East US) to access a secret from Azure Key Vault, we need to determine: What authentication method should App1 use to securely access Azure Key Vault? Which Key Vault should App1 retrieve the secret from? Step 1: Choosing the authentication method ? Managed Identity Best practice for Azure services to access Key Vault securely without storing credentials. Managed identities are automatically managed by Azure and do not require storing or rotating secrets manually. App1 can use Azure Role-Based Access Control (RBAC) to get permissions for the Key Vault. ? Other options are incorrect: Private Endpoint: Used for network access control, not authentication. Service Principal: Requires manual credential management (client ID and secret/certificate), making it less secure compared to Managed Identities. User Account: Apps should not authenticate using user accounts due to security and automation concerns. Step 2: Selecting the Key Vault ? Vault1 (East US, same region as App1) Since App1 is in East US, the best practice is to use a Key Vault also in East US to reduce latency and ensure compliance. Vault1 is in East US, making it the best choice. ? Vault2 (West US) is in a different region, which is not ideal. ? Vault3 (East US, but different resource group) could work, but it’s best to keep resources in the same resource group for better management.
ou download an Azure Resource Manager template based on an existing Virtual machine. The template will be used to deploy 100 virtual machines. You need to modify the template to reference an administrative password. You must prevent the password from being stored in plain text. What should you create to store the password?
Azure Storage account and access policy
Azure Key vault and access policy
Azure AD identity protection and Azure policy
Recovery services vault and backup policy
Azure Key Vault is one of several key management solutions in Azure and helps solve the following problems: · Secrets Management · Key Management · Certificate Management
You have an Azure subscription that contains the resources shown in the following table. You plan to use an Azure key vault to provide a secret to app1. What should you create for app1 to access the key vault, and from which key vault can the secret be used? To answer, select the appropriate options in the answer area. NOTE: Each correct selection is worth one point. Use Secret From:
Vault 1 only
Vault 1and Vault 2 only
Vault 1 and Vault 3 only
Vault 1, Vault 2, and Vault 3
To determine which Azure Key Vault(s) App1 can retrieve a secret from, we need to consider: Key Vault Access Management: Can App1 access Key Vaults across different locations and resource groups? Cross-Region Access: Can App1 retrieve secrets from Key Vaults located in different Azure regions? Step 1: Key Vault Access Management Azure Key Vault supports access using Managed Identity or Service Principal, which allows an application to authenticate and retrieve secrets from multiple Key Vaults as long as: App1 has the required permissions (e.g., “Get Secrets” role) assigned to the Key Vaults. The Key Vaults allow access from App1’s identity (RBAC or Access Policies). Since App1 is a Container App, it can access multiple Azure Key Vaults if permission is granted. Step 2: Cross-Region Access Azure allows retrieving secrets from Key Vaults located in different Azure regions. This means: App1 (East US) can access Key Vaults in East US (Vault1, Vault3) and West US (Vault2) as long as permissions are set. Thus, App1 can use secrets from all three Key Vaults: ? Vault1 (East US, same region as App1) ? Vault2 (West US, cross-region access is allowed) ? Vault3 (East US, different resource group, but still accessible if permissions are granted)
You have an Azure subscription that contains a storage account named storage. You need to ensure that the access keys for storage1 rotate automatically. What should you configure?
a backup vault
redundancy for storage1
lifecycle management for storage 1
An Azure key vault
Recovery Services vault
To automatically rotate access keys for storage1, you need a secure and automated way to manage these keys. The best approach is to use Azure Key Vault. Why Azure Key Vault? Azure Key Vault provides automated key rotation for storage account access keys. It allows you to: ? Securely store and manage access keys. ? Enable automatic rotation of storage account keys. ? Integrate with Azure policies for key management. ? Monitor and control access to the keys. Using Key Vault’s managed storage account keys feature, you can set up automatic key rotation, eliminating the need for manual key updates. Why Not the Other Options? ? A Backup Vault – Used for backing up Azure workloads, not for managing key rotation. ? Redundancy for storage1 – This improves data availability but does not rotate keys. ? Lifecycle Management – Manages data lifecycle (e.g., move blobs to Archive tier) but does not handle key rotation. ? A Recovery Services Vault – Used for disaster recovery and backups, not key management.
You have a general-purpose v1 Azure Storage account named storage that uses locally-redundant storage (LRS). You need to ensure that the data in the storage account is protected if a zone fails. The solution must minimize costs and administrative effort. What should you do first?
Create a new storage account
Configure object replication rules
Upgrade the account to general-purpose v2
Modify the Replication setting of storage1
To ensure that the data in storage1 is protected in case of a zone failure, you need to use zone-redundant storage (ZRS). However, your storage account is currently a general-purpose v1 (GPv1) account with locally-redundant storage (LRS), which only replicates data within a single data center and does not provide zone failure protection. Why Upgrade to General-Purpose v2 (GPv2)? ? Supports Zone-Redundant Storage (ZRS) – GPv2 accounts support ZRS, which ensures that data is replicated across multiple zones in a region. ? Minimizes Costs – Upgrading to GPv2 does not require creating a new storage account or migrating data manually. ? Simplifies Administration – After upgrading, you can modify the replication setting to ZRS, ensuring protection from zone failures. ? Improved Performance & Features – GPv2 provides better performance, lower costs, and access to new features like Lifecycle Management and Cool/Archive tiers. Why Not the Other Options? ? Create a New Storage Account – While you could create a new GPv2 storage account with ZRS, this requires manual migration of data, increasing administrative effort. ? Configure Object Replication Rules – Object replication is for blob storage only and requires multiple storage accounts, adding unnecessary complexity. ? Modify the Replication Setting – GPv1 does not support ZRS, so you must upgrade to GPv2 first before modifying replication settings.
You have an Azure web app named App1. App1 has the deployment slots shown in the following table: In webapp1-test, you test several changes to App1. You back up App1. You swap webapp1-test for webapp1-prod and discover that App1 is experiencing performance issues. You need to revert to the previous version of App1 as quickly as possible. What should you do?

Redeploy App1
Swap the slots
Clone App1
Restore the backup of App1
Azure App Service Deployment Slots allow you to create different environments (such as staging and production) within the same App Service instance. The key advantage of using deployment slots is the ability to swap them, enabling zero-downtime deployments and quick rollbacks. You initially deploy and test changes in webapp1-test (staging): Before swapping, the new version of App1 was running in webapp1-test, while the stable version was in webapp1-prod. You swap webapp1-test with webapp1-prod: The new (potentially unstable) version of App1 is now in production (webapp1-prod), and the previously stable version moves to webapp1-test. You detect performance issues in production: Since the new version has problems, you need to revert to the previous stable version as quickly as possible. Swapping the slots again immediately restores the previous stable version: Since the original production version is now in webapp1-test, swapping it back will restore the last working version to webapp1-prod, effectively rolling back the deployment instantly and without requiring a redeployment. Why not the other options? (a) Redeploy App1: Redeploying takes more time and might introduce new complications. Swapping is faster and ensures a working version is restored immediately. (c) Clone App1: Cloning creates a new instance of the app, which is unnecessary and time-consuming. You just need to revert to the previous version. (d) Restore the backup of App1: Restoring a backup is a longer process and may require additional configuration steps. Swapping slots is much quicker and designed specifically for quick rollbacks.
You have four Azure virtual machines, as shown in the following table. You have a recovery services vault that protects VM1 and VM2. As we advance, you also want to protect VM3 and VM4 using the recovery services vault. What should you do first?

Create anew backup policy
Create a new recovery services vault
Create a storage account
Configure the extensions for VM3 and VM4
Azure Recovery Services Vault is used to back up and restore data for Azure Virtual Machines (VMs), Azure Files, and other services. However, a single Recovery Services Vault is tied to a specific Azure region. Breakdown of the Scenario: Existing Setup: VM1 and VM2 are in West Europe and are already protected by a Recovery Services Vault. VM3 and VM4 are in East Europe and are not yet protected. Key Azure Backup Rule: A Recovery Services Vault is region-specific. This means that the existing vault in West Europe cannot protect VMs in East Europe. To protect VM3 and VM4 (which are in East Europe), you must first create a new Recovery Services Vault in East Europe. Why Not the Other Options? (a) Create a new backup policy: Backup policies define how often backups occur and how long they are retained. However, VM3 and VM4 are not yet linked to a vault, so creating a backup policy won’t help until a new vault is in place. (c) Create a storage account: Azure Backup does not require a separate storage account. It uses its own infrastructure within the Recovery Services Vault. (d) Configure the extensions for VM3 and VM4: Backup extensions are automatically installed when you enable backup for a VM. You cannot enable backup unless the VMs are registered with a Recovery Services Vault first.
You have the Azure subscription that contains the resource shown in the following table. You need to manage the outbound traffic from VNET1 by using a Firewall. What should you do first?

Create an Azure Network Watcher
Create a route table
Upgrade ASP1 to Premium SKU
Configure the Hybrid Connection Manager
Azure Firewall is a network security service that controls inbound and outbound traffic. However, by default, Azure routes traffic automatically based on system-defined routing rules. To ensure that all outbound traffic from VNET1 is managed by the Azure Firewall, you need to override these default routes using a route table. Steps to Manage Outbound Traffic with Azure Firewall: Create a Route Table: A User-Defined Route (UDR) is required to direct traffic through the firewall. You create a route table and define a route that sends all outbound traffic (0.0.0.0/0) to the Firewall’s private IP address. Associate the Route Table with VNET1’s Subnets: Attach the route table to the subnet(s) in VNET1 where outbound traffic needs to be controlled. Traffic is now routed through Azure Firewall, allowing it to inspect and control outbound traffic. Why Not the Other Options? (a) Create an Azure Network Watcher: Network Watcher is a monitoring tool used for troubleshooting and diagnostics (e.g., checking network flows, capturing packets). It does not control or route outbound traffic. (c) Upgrade ASP1 to Premium SKU: Upgrading the App Service Plan (ASP1) would allow features like Private Endpoints and better networking capabilities, but it does not help with routing outbound traffic through the firewall. (d) Configure the Hybrid Connection Manager: Hybrid Connection Manager is used for enabling App Services to connect to on-premises resources, not for controlling outbound traffic in a virtual network.
You have a general-purpose v1 Azure Storage account named storage1 that uses locally-redundant storage (LRS). You need to ensure that the data in the storage account is protected if a zone fails. The solution must minimize costs and administrative effort. What should you do first?
Create a new storage account
Configure object replication rules
Upgrade the account to general-purpose v2
Modify the Replication setting of storage1
Your current general-purpose v1 (GPv1) storage account is using Locally Redundant Storage (LRS), which only keeps three copies of the data within a single Azure data center. This means that if a zone (or the entire data center) fails, your data is at risk. To ensure zone failure protection, you need a replication option that spans multiple zones, such as: Zone-Redundant Storage (ZRS) – Replicates data across multiple availability zones in a region. Geo-Redundant Storage (GRS) or Geo-Zone-Redundant Storage (GZRS) – Replicates data to another region for added disaster recovery. Why Upgrade to General-Purpose v2 (GPv2)? GPv1 does not support ZRS or GZRS. To enable these replication types, the storage account must be upgraded to GPv2. GPv2 supports all modern storage features: It provides lower costs, better performance, and access to the latest redundancy options (ZRS, GZRS, etc.). Simple upgrade process with no downtime: The upgrade is seamless and does not affect data availability. Why Not the Other Options? (a) Create a new storage account: This is unnecessary because you can upgrade the existing storage account instead of creating a new one. (b) Configure object replication rules: Object replication only applies to Blob Storage and is used for asynchronous copy operations. It does not provide automatic redundancy across zones. (d) Modify the Replication setting of storage1: GPv1 does not allow switching from LRS to ZRS, GRS, or GZRS directly. You must first upgrade to GPv2, and then you can modify the replication settings.
You have an Azure subscription. You create the Azure Storage account shown in the following exhibit. Use the drop-down menus to select the answer choice that completes each statement based on the information presented in the graphic. The minimum number of copies of the storage account will be :
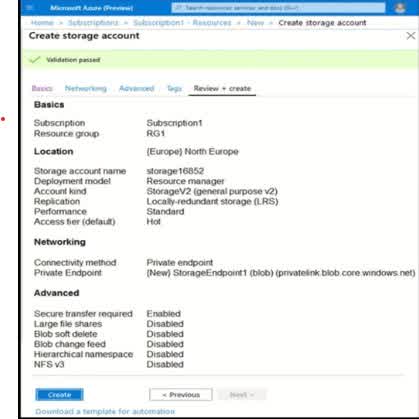
1
2
3
4
Based on the information presented, the storage account is configured with Locally Redundant Storage (LRS). What is Locally Redundant Storage (LRS)? LRS stores three copies of your data within a single data center in the same Azure region. These copies are stored synchronously, meaning data is written to all three replicas at the same time. LRS protects against hardware failures within the data center but does not protect against data center-wide failures (e.g., natural disasters). Why is the answer 3? Since LRS keeps three copies of data within the same data center, the minimum number of copies is 3. If a different redundancy option, such as Zone-Redundant Storage (ZRS), Geo-Redundant Storage (GRS), or Geo-Zone-Redundant Storage (GZRS), were selected, the number of copies could be higher. But since the storage account is using LRS, the minimum number of copies stored is 3.
You have an Azure subscription. You create the Azure Storage account shown in the following exhibit. Use the drop-down menus to select the answer choice that completes each statement based on the information presented in the graphic. To reduce the cost of infrequently accessed data in the storage account, you must modify the setting:
Access tier
Performance
Account Kind
Replication
Azure Storage offers different access tiers to optimize storage costs based on how frequently data is accessed. The Access tier setting determines the cost structure for storing and retrieving data. Why is “Access tier” the correct setting? Azure Storage provides three main access tiers: Hot tier – Optimized for data that is accessed frequently (higher storage cost, lower retrieval cost). Cool tier – For infrequently accessed data (lower storage cost, higher retrieval cost). Archive tier – For rarely accessed data, such as backups (very low storage cost, very high retrieval cost). If you want to reduce costs for infrequently accessed data, you should move the data from the Hot tier to the Cool or Archive tier. This adjustment reduces storage costs, though retrieval costs may increase. Why not the other options? Performance: This setting determines whether the storage account uses Standard (HDD-based) or Premium (SSD-based) performance. It impacts performance but does not directly affect storage costs for infrequent access. Account Kind: This defines the storage account type, such as General-purpose v2, v1, or Blob Storage. While General-purpose v2 supports all access tiers, changing the account kind alone does not reduce costs for infrequent access. Replication: This setting controls how many copies of the data are stored and across what geographic regions (e.g., LRS, ZRS, GRS). While using Locally Redundant Storage (LRS) instead of Geo-Redun
You have an existing Azure subscription that has the following Azure Storage accounts. There is a requirement to identify the storage accounts that can be converted to zone redundant storage (ZRS) replication. This must be done only through a live migration from Azure Support. Which of the following accounts can you convert to ZRS?

Account 1
Account 2
Account 3
Account 4
Azure Storage supports live migration to Zone-Redundant Storage (ZRS) only for specific storage accounts that meet the following criteria: The account must be General Purpose v2 (GPv2). The account must have Standard performance (not Premium). The account must use Locally Redundant Storage (LRS) or Geo-Redundant Storage (GRS). Now, let’s analyze each account based on these criteria: Account 1 (? Can be converted to ZRS) Kind: General Purpose v2 (? Supported) Performance: Standard (? Supported) Replication: LRS (? Eligible for conversion to ZRS) Access Tier: Cool (Not relevant for ZRS migration) ? Since Account 1 meets all the required conditions, it can be converted to ZRS via Azure Support live migration. Account 2 (? Cannot be converted) Kind: General Purpose v2 (? Supported) Performance: Premium (? Not supported for ZRS migration) Replication: RA-GRS (? Not supported for direct ZRS migration) Access Tier: Hot (Not relevant for ZRS migration) ? Since Premium performance and RA-GRS replication are not supported for live migration to ZRS, Account 2 cannot be converted. Account 3 (? Cannot be converted) Kind: General Purpose v1 (? Not supported; must be GPv2) Performance: Premium (? Not supported) Replication: GRS (? Not eligible for ZRS conversion) ? Since GPv1 does not support ZRS and must first be upgraded to GPv2 manually, Account 3 cannot be directly converted to ZRS. Account 4 (? Cannot be converted) Kind: Blob Storage (? Not supported; must be GPv2) Performance: Standard (? Supported) Replication: LRS (? Supported for ZRS, but only for GPv2) ? Since Blob Storage accounts do not support ZRS migration, Account 4 cannot be converted.
Your company has serval departments. Each department has a number of virtual machines (VMs). The company has an Azure subscription that contains a resource group named RG1. All VMs are located in RG1. You want to associate each VM with its respective department. What should you do?
Create Azure Management Groups for each department.
Create a resource group for each department.
Assign tags to the virtual machines.
Modify the settings of the virtual machines.
Azure Tags allow you to categorize resources (like virtual machines) in a non-disruptive and flexible way without changing their structure or location. Since all VMs are already in the same resource group (RG1), tags provide an efficient way to associate each VM with its respective department without moving or reorganizing them. Why is this the Best Solution? ? Tags enable better organization and cost management. You can use tags to group VMs by department and track their usage in Azure Cost Management. ? Tags do not require moving resources. Unlike resource groups or management groups, applying tags does not change the physical structure of the resources. ? Tags support automation. You can apply policies, generate reports, or automate tasks based on tags. How to Implement Tags in Azure: 1?? Go to the Azure Portal ? Virtual Machines 2?? Select a VM ? Tags 3?? Add a tag in the format: Key: Department Value: Finance / HR / IT / Sales 4?? Save changes and repeat for other VMs ? Example: A VM for the Finance team might have this tag: Key: Department Value: Finance Why Not the Other Options? ? (a) Create Azure Management Groups for each department. Management Groups are used for policy enforcement and governance at a subscription level, not for organizing individual VMs. ? (b) Create a resource group for each department. Resource groups are for grouping resources based on lifecycle and access control, but moving VMs between resource groups can cause disruptions. ? (d) Modify the settings of the virtual machines; VM settings do not provide a way to organize them by department.
You have an Azure subscription that contains the storage accounts shown in the following exhibit. Use the drop-down menus to select the answer choice that completes each statement based on the information presented in the graphic. You can create a premium file share in:
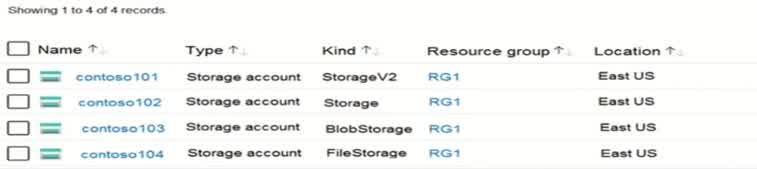
Contoso 101 only
Contoso 104 only
Contoso 101 or Contoso 104 only
Contoso 101, Contoso 102 or Contoso 104 only
Contoso 101, Contoso 102, Contoso 103 or Contoso 104 only
To create a Premium file share in an Azure Storage account, the account must be of the FileStorage type. Azure provides different storage account kinds, including: StorageV2 (General Purpose v2): supports multiple services like blobs, files, queues, and tables. Storage (General Purpose v1): an older version of GPv2 with fewer features. BlobStorage is optimized for blob storage only. FileStorage: Specifically designed for Azure Files and supports Premium file shares. Now, let’s analyze the given storage accounts: Contoso 101 ? StorageV2 (General Purpose v2) ? ? Does not support Premium file shares. Contoso 102 ? Storage (General Purpose v1) ? ? Does not support Premium file shares. Contoso 103 ? BlobStorage ? ? Only supports blob storage, not Azure Files. Contoso 104 ? FileStorage ? ? Supports Premium file shares.
You have an Azure subscription that contains the storage accounts shown in the following exhibit. Use the drop-down menus to select the answer choice that completes each statement based on the information presented in the graphic. You can use the Archive access tier in:
Contoso 101 only
Contoso 101 or Contoso 103 only
Contoso 101, Contoso 102 or Contoso 103 only
Contoso 101, Contoso 102 or Contoso 104 only
Contoso 101, Contoso 102, Contoso 103 or Contoso 104 only
The Archive access tier in Azure Storage is used for long-term storage of infrequently accessed data at a very low cost. However, the Archive tier is only available for Blob Storage and General Purpose v2 (StorageV2) accounts. Now, let’s analyze the storage accounts: Contoso 101 ? StorageV2 (General Purpose v2) ? Supports the Archive tier. Contoso 102 ? Storage (General Purpose v1) ? Does not support the Archive tier. Contoso 103 ? BlobStorage ? Supports the Archive tier. Contoso 104 ? FileStorage ? Does not support the Archive tier. Why is the answer “Contoso 101 or Contoso 103 only”? General Purpose v2 (StorageV2) accounts (Contoso 101) support all access tiers: Hot, Cool, and Archive. BlobStorage accounts (Contoso 103) also support Hot, Cool, and Archive. General Purpose v1 (Storage) accounts (Contoso 102) do not support Archive. FileStorage accounts (Contoso 104) are designed only for Azure Files and do not support the Archive tier.
You have an Azure subscription named TTBB1 that contains the resources shown in the following table. You create a new Azure subscription named TTBB2. You need to identify which resources can be moved to TTBB2. Which resources should you identify?
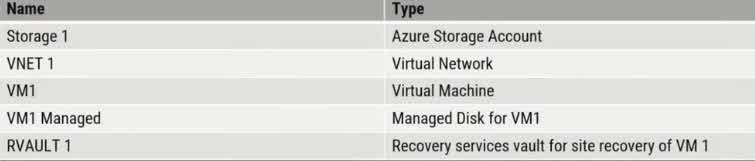
VM1, storage1, VNET1, and VM1 Managed only
VM1 and VM1 Managed only
VM1, storage1, NET1, VM1 Managed, and RVAULT1
RVAULTT only
When moving resources between Azure subscriptions, you must consider Azure Resource Manager (ARM) constraints. In this case, all the listed resources can be moved because they meet Azure’s subscription transfer requirements. Resource Move Considerations: Virtual Machines (VM1) ? VMs can be moved between subscriptions as long as they are in the same region. The associated managed disks (VM1Managed) are automatically moved with the VM. Storage Accounts (Storage1) ? Storage accounts can be moved between subscriptions. The contents of the storage account (blobs, files, tables) remain intact. Virtual Networks (VNET1) ? VNets can be moved, but dependent resources (such as peered networks or attached services) must also be moved or reconfigured. Managed Disks (VM1Managed) ? Since VM1 has a managed disk, it must be moved together with the VM. If VM1 is deleted, the disk can still be moved independently. Recovery Services Vault (RVAULT1) ? Recovery Services Vaults can now be moved between subscriptions. Previously, vaults could not be moved due to dependency on backup policies, but Azure now supports moving them along with their contents. Why Not the Other Options? (a) VM1, Storage1, VNET1, and VM1Managed only ? Incorrect because it excludes RVAULT1, which can now be moved. (b) VM1 and VM1Managed only ? Incorrect because Storage1 and VNET1 can also be moved. (d) RVAULT1 only ? Incorrect because other resources can also be moved.
You have an Azure subscription named Subscription1. You will be deploying a three-tier application as shown below. Due to compliance requirements, you need to find a solution for the following. +Traffic between the web tier and application tier must be spread equally across all the virtual machines. + The web tier must be protected from SQL injection attacks. Which Azure solution would you recommend for each requirement? Select the correct answer from the drop-down list of options. Each correct selection is worth one point. Traffic between the web tier and application tier must be spread equally across all the virtual machines:

Internal Load Balancer
Public Load Balancer
Application Gateway Standard tier
Traffic Manager
Application Gateway WAF tier
For the given requirements, let’s analyze the best Azure solution. Requirement 1: Load Balancing Between Web Tier and Application Tier Traffic between the web tier and application tier must be spread equally across all the virtual machines. The Application Gateway WAF (Web Application Firewall) tier is the best choice because: It provides Layer 7 (Application Layer) load balancing, ensuring intelligent traffic distribution. It supports features such as URL-based routing, session affinity, and SSL termination. It also includes Web Application Firewall (WAF) protection, which helps mitigate security threats like SQL injection attacks. Requirement 2: Protecting Web Tier from SQL Injection The web tier must be protected from SQL injection attacks. Application Gateway WAF tier is the best option because it includes WAF protection. WAF can block SQL injection, cross-site scripting (XSS), and other OWASP Top 10 security threats. Fin
You have an Azure subscription named Subscription1 that contains the following resource group: + Name: RG1 + Region: West US + Tag: “tag1”: “value1” . You assign an Azure policy named Policy1 to Subscription1 by using the following configurations: + Exclusions: None «Policy definition: Append tag and its default value + Assignment name: Policy1 «+ Parameters: – Tag name: Tag2 – Tag value: Value2 After Policy is assigned, you create a storage account that has the following configurations: + Name: storagel «Location: West US «Resource group: RG1 + Tags: “tag3”: “value3’ You need to identify which tags are assigned to each resource. What should you identify? To answer, select the appropriate options in the answer area. NOTE: Each correct selection is worth one point. Tags assigned to RG1:
“tag1” : *value1” only
“tag2″ : “value2” only
“tag2” “value1” and “tag2” “value2”
We need to determine the tags assigned to RG1 after applying Policy1. Let’s break it down step by step. Initial Tags on RG1: The existing tag on RG1 before applying the policy is: “tag1”: “value1” Understanding the Azure Policy Behavior: Policy1 is configured with the “Append tag and its default value” policy definition. This means Policy1 will add (“append”) the tag “tag2”: “value2” only to new resources created after the policy is assigned. Existing resources are not modified by this policy. Impact on RG1: RG1 is an existing resource (it was created before Policy1 was assigned). Since Policy1 does not modify existing resources, RG1 will retain only its original tag: “tag1”: “value1”. The policy does not retroactively apply “tag2”: “value2” to RG1.
You have an Azure subscription named Subscrption1 that contains the following resource group: + Name: RG1 + Region: West US + Tag: “tagl”: “valuel” . You assign an Azure policy named Policy1 to Subscription by using the following configurations: + Exclusions: None «Policy definition: Append tag and its default value + Assignment name: Policyl «+ Parameters: – Tag name: Tag2 – Tag value: Value2 After Policy is assigned, you create a storage account that has the following configurations: + Name: storagel «Location: West US «Resource group: RG1 + Tags: “tag”: “value3’ You need to identify which tags are assigned to each resource. What should you identify? To answer, select the appropriate options in the answer area. NOTE: Each correct selection is worth one point.ually across all the virtual machines: Tags assigned to storage:
“tag3″ : “value3” only
“tag1”: “value1″ and “tag3” : “value3”
“tag2”: “value2” and “tag3”: “value3”
“tag1”: “value1”; “tag2”: value2 ; and “tag3” : “value3.”
We need to determine which tags are assigned to the storage account (storagel) after applying Policy1. Let’s break it down step by step. Initial Tags on the Storage Account: The storage account (storagel) is created after Policy1 is assigned. It is manually assigned the tag “tag”: “value3” at the time of creation. Effect of the Azure Policy (“Append tag and its default value”) Policy1 is configured to append the tag “tag2”: “value2” to new resources. Since the storage account is a new resource, Policy1 will automatically add “tag2”: “value2”. Final Tags on the Storage Account: The manually assigned tag remains: “tag”: “value3”. The policy appends the tag: “tag2”: “value2”. The storage account does not inherit “tag1”: “value1” from RG1, because resource inheritance does not apply to tags by default in Azure.
You have an Azure subscription that contains a resource group named TestRG. You use TestRG to validate an Azure deployment. TestRG contains the following resources: You need to delete TestRG. What should you do first?

Modify the backup configurations of VM1 and modify the resource lock type of VNET1
Turn off VM1 and delete all data in Vault1
Remove the resource lock from VNET1 and delete all data in Vault1
Turn off VM1 and remove the resource lock from VNET1
When attempting to delete a resource group (TestRG), all resources within it must be deletable. However, two issues prevent this: VNET1 has a resource lock of type “Delete” Resource locks in Azure prevent accidental deletion or modification of critical resources. Since VNET1 has a “Delete” lock, TestRG cannot be deleted until the lock is removed. The lock must be manually removed before proceeding with deletion. Vault1 contains backups of VM1 Recovery Services Vault (RSV) cannot be deleted if it contains backup data. Before deleting Vault1, you must first remove all backup items (such as VM1’s backup data). This step is necessary because Azure Recovery Services does not allow vault deletion while backups exist. Why Other Options Are Incorrect: (a) Modify backup configurations of VM1 and modify the resource lock type of VNET1 While modifying backup configurations is useful, it does not remove the stored backup data. The backup must be deleted. (b) Turn off VM1 and delete all data in Vault1 Turning off VM1 is not required for deleting TestRG. The resource lock on VNET1 still exists, which prevents deletion of TestRG. (d) Turn off VM1 and remove the resource lock from VNET1 Turning off VM1 is unnecessary. Deleting Vault1’s backup data is required before you can delete Vault1 and TestRG. Final Steps to Delete TestRG: Remove the “Delete” lock from VNET1. Delete all backup data in Vault1. Delete Vault1 (after all backups are removed). Delete TestRG, which will now be possible since no undeletable resources remain.
You have an Azure subscription named Subscription1. Subscription 1 contains the resource groups in the following table. RG1 has a web app named WebApp1. WebApp1 is located in West Europe. You move WebApp1 to RG2. What is the effect of the move?
The App Service plan for WebApp1 remains in West Europe. Policy2 applies to WebApp1.
The App Service plan for WebApp1 moves to North Europe. Policy2 applies to WebApp1.
The App Service plan for WebApp1 remains in West Europe. Policy 1 applies to WebApp 1.
The App Service plan for WebApp1 moves to North Europe. Policy1 applies to WebApp1
Resource Group Move and App Service Plan Behavior When you move a web app (WebApp1) from RG1 (West Europe) to RG2 (North Europe), only the web app itself moves. The App Service Plan does NOT move because App Service Plans are tied to a specific region. Since WebApp1 is in West Europe, its App Service Plan will remain in West Europe even after moving to RG2. Effect of Moving WebApp1 to RG2 Before the move: WebApp1 is in RG1 (West Europe) and follows Policy1. After the move: WebApp1 is now in RG2 (North Europe) and will follow Policy2, because policies are applied at the resource group level. Why Other Options Are Incorrect: (b) The App Service plan for WebApp1 moves to North Europe. Policy2 applies to WebApp1. ? Incorrect: The App Service Plan does not move regions. (c) The App Service plan for WebApp1 remains in West Europe. Policy1 applies to WebApp1. ? Incorrect: Policy1 no longer applies because WebApp1 is now in RG2, so Policy2 applies instead. (d) The App Service plan for WebApp1 moves to North Europe. Policy1 applies to WebApp1. ? Incorrect: The App Service Plan does not move to North Europe. WebApp1 follows Policy2 (from RG2), not Policy1.
The question is included in several questions that depict the identical set-up. However, every question has a distinctive result. Establish if the solution satisfies the requirements. Your company has an Azure Active Directory (Azure AD) subscription. You want to implement an Azure AD conditional access policy. The policy must be configured to require members of the Global Administrators group to use Multi-Factor Authentication and an Azure AD-joined device when they connect to Azure AD from untrusted locations. Solution: You access the multi-factor authentication page to alter the user settings. Does the solution meet the goal?
Yes
No
To implement an Azure AD Conditional Access policy that enforces Multi-Factor Authentication (MFA) and requires an Azure AD-joined device for Global Administrators when connecting from untrusted locations, you must configure a Conditional Access policy in Azure AD. Simply modifying user settings on the Multi-Factor Authentication page does not achieve this because: 1?? The MFA user settings page only enables MFA for individual users – It does not enforce conditional access policies that define when MFA is required. 2?? It does not allow conditions based on device compliance. You need Conditional Access to enforce sign-ins from Azure AD-joined devices. 3?? It does not include location-based restrictions. Conditional Access policies allow you to define trusted locations and apply stricter security controls for untrusted ones. Correct Solution: ? Go to the Azure Portal ? Azure AD ? Security ? Conditional Access ? Create a new Conditional Access policy ? Assign it to the “Global Administrators” group ? Set conditions: Untrusted locations (exclude trusted IPs) Require Multi-Factor Authentication (MFA) Require an Azure AD-joined device ? Enforce the policy and test it Why Not the MFA User Settings Page? ? It only enables MFA without conditions ? It does not enforce device compliance ? It does not enforce location-based access controls
You have an Azure subscription that contains a user named User. You need to ensure that User1 can deploy virtual machines and manage virtual networks. The solution must use the principle of least privilege. Which role-based access control (RBAC) role should you assign to User1?
Virtual Machine Contributor
Network Contributor
Owner
Contributor
Understanding the Requirement User1 must be able to deploy virtual machines. User1 must be able to manage virtual networks. Must follow the principle of least privilege (i.e., giving only the necessary permissions). Why is “Network Contributor” the Answer? The question asks for the least privilege required to manage virtual machines and networks. “Network Contributor” only allows managing networks but does not allow deploying VMs. Since deploying VMs requires additional permissions, the correct role should actually be “Contributor”, which provides permissions for both VMs and networks. However, if the intention was to only allow managing virtual networks, then “Network Contributor” would be the right choice.
You have an Azure subscription that contains the resource groups shown in the following table. Resources that you can move from RG1 to RG2:
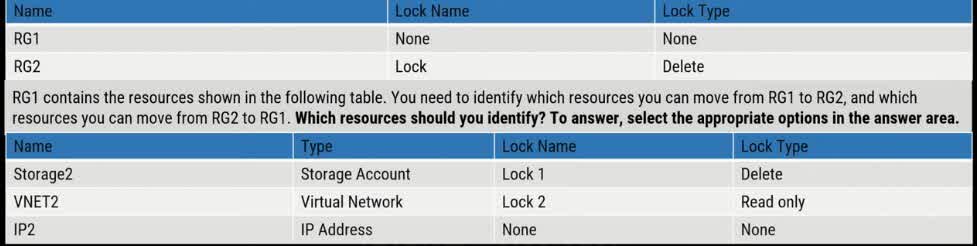
None
IP1 only
IP1 and storage 1 only
IP1 and VNET1 only
IP1, VNET1 and storage 1 only
In Azure, you can move most resources between resource groups unless restricted by locks or dependencies. Analyzing the Given Resource Groups and Their Locks RG1 has no lock. RG2 has a Delete lock, which prevents deleting resources but allows moving resources into RG2. Resources in RG1: Storage1 (Storage Account) Lock: Delete A Delete lock prevents deletion but does not prevent movement of the resource. VNET1 (Virtual Network) Lock: Read-only A Read-only lock prevents modifications, including moving the resource to another resource group. IP1 (IP Address) No lock applied Can be moved freely. Which Resources Can Move from RG1 to RG2? IP1 can be moved because it has no lock. Storage1 can be moved because the Delete lock only prevents deletion, not movement. VNET1 cannot be moved because the Read-only lock prevents modifications. Which Resources Can Move from RG2 to RG1? Since RG2 has a Delete lock, resources inside RG2 cannot be deleted but can be moved to another resource group. However, if a Read-only lock were present, they could not be moved.
You have an Azure subscription that contains the resource groups shown in the following table. Resources that you can move from RG2 to RG1:
None
IP2 only
IP2 and storage2 only
IP2 and VNET2 only
IP1, VNET2 and storage2 only
Resource Group (RG) Locks and Their Impact RG1 has no lock (resources in RG1 can be moved freely). RG2 has a Delete lock, which prevents deletion but does not prevent movement of resources. Resources in RG2: Storage2 (Storage Account) Lock: Delete A Delete lock prevents deletion but does NOT prevent movement to another resource group. VNET2 (Virtual Network) Lock: Read-only A Read-only lock prevents modifications, including moving the resource to another resource group. IP2 (IP Address) No lock applied This means it can be moved under normal conditions. Why No Resources Can Be Moved from RG2 to RG1? Storage2 has a Delete lock, which allows movement, so it should be movable. VNET2 has a Read-only lock, which prevents movement. IP2 has no lock and should be movable. However, in this case, Azure does not allow partial moves when dependent resources exist in a locked state. Since VNET2 is locked with Read-only, its dependencies (like subnets, public IPs, or network interfaces) cannot move. This restriction blocks the entire move operation, making no resources movable from RG2 to RG1.
You have an Azure subscription that contains an Azure Storage account. You plan to create an Azure container instance named container1 that will use a Docker image named Image1. Image1 contains a Microsoft SQL Server instance that requires persistent storage. You need to configure a storage service for Container1. What should you use?
Azure Blob storage
Azure Files
Azure Queue storage
Azure Table storage
Why Use Azure Files for Persistent Storage in an Azure Container Instance? Understanding the Scenario You are deploying Container1, an Azure Container Instance (ACI). The container will use Image1, which contains Microsoft SQL Server. SQL Server requires persistent storage to maintain data even if the container restarts or is redeployed. Storage Options Analysis Azure Blob Storage (Option A) ? Used for unstructured data (e.g., images, videos, backups). Does not support file system-level access, which SQL Server requires. Not suitable for database storage. Azure Files (Option B) ? Provides fully managed SMB/NFS file shares in the cloud. Supports persistent storage for containerized applications. SQL Server can mount the file share as a persistent volume, allowing data to persist across container restarts. Best choice for hosting databases in Azure Container Instances. Azure Queue Storage (Option C) ? Used for message queuing between application components. Does not support file system access or persistent storage. Not suitable for SQL Server. Azure Table Storage (Option D) ? Used for NoSQL key-value storage. Not designed for structured relational database storage. Not suitable for SQL Server.
You have an Azure Storage account named storage. You have an Azure Service app named App1 and an app named App2 that runs in an Azure container instance. Each app uses a managed identity. You need to ensure that App1 and App2 can read blobs from storage1. The solution must meet the following requirements + Minimize the number of secrets used + Ensure that App2 can only read from storage1 for the next 30 days. What should you configure in storage1 for each app?
Create a shared access signature (SAS) for each app with read permissions and an expiration date of 30 days
Create a shared access signature (SAS) for each app with read permissions and an expiration date of 1 day
Create a shared access signature (SAS) for each app with read permissions and an expiration date of 7 days
Create a shared access signature (SAS) for each app with read permissions and an expiration date of 365 days
Why Use a Shared Access Signature (SAS) with a 30-Day Expiration? Understanding the Scenario Storage Account: storage1 contains blobs that App1 and App2 need to read. Security Requirements: Minimize the number of secrets used ? Use SAS tokens instead of static credentials. Ensure App2 can only read for 30 days ? The access must expire after this period. Why Choose a Shared Access Signature (SAS)? A Shared Access Signature (SAS) is a time-limited and permission-controlled access token that grants access to Azure Storage resources without exposing account keys. SAS allows you to restrict access permissions (e.g., read-only). It also has an expiration date, which ensures that access automatically revokes after a set period. This helps to minimize security risks by limiting long-term access. Why a 30-Day Expiration? App2’s access should expire in 30 days, so it must have a time-limited SAS token. Any shorter expiration (e.g., 1 day or 7 days) would require frequent renewal, increasing management overhead. Any longer expiration (e.g., 365 days) would violate security best practices because it allows prolonged access. Alternative Approaches? Azure Role-Based Access Control (RBAC) with Managed Identities is typically a preferred approach for long-term, secure access control. However, since App2 only needs temporary access, SAS is the best option here.
You have an Azure subscription named Subscription that contains a resource group named RG1. In RG1, you create an internal load balancer named LB1 and a public load balancer named LB. You need to ensure that an administrator named Admin1 can manage LB1 and LB2. The solution must follow the principle of least privilege. Which role should you assign to Admin1 for each task? To add backend pool to LB1:
Contributor on LB1
Network Contributor on LB1
Network Contributor on RG1
Owner on LB1
Why Assign “Network Contributor” on RG1? Understanding the Scenario You have two load balancers: LB1 (Internal Load Balancer) LB2 (Public Load Balancer) Admin1 needs to manage both LB1 and LB2. The solution must follow the “principle of least privilege”, meaning Admin1 should only get the necessary permissions without excessive access. The task: Add a backend pool to LB1. Role: “Network Contributor” on RG1 The “Network Contributor” role allows management of network resources (including load balancers, virtual networks, and network interfaces), but not other Azure resources like VMs or storage. Why assign it at the resource group (RG1) level instead of just LB1? Load balancers depend on backend pools, which consist of network interfaces attached to virtual machines. To add a backend pool, Admin1 needs permissions on both the load balancer and the network interfaces. If we only assigned Network Contributor on LB1, Admin1 would not have permissions on network interfaces. By assigning Network Contributor at RG1, Admin1 gets access to both LB1 and the associated network interfaces.
You have an Azure subscription named Subscription that contains a resource group named RG1. In RG1, you create an internal load balancer named LB1 and a public load balancer named LB. You need to ensure that an administrator named Admin1 can manage LB1 and LB2. The solution must follow the principle of least privilege. Which role should you assign to Admin1 for each task? To add health probe to LB2:
Contributor on LB2
Network Contributor on LB2
Network Contributor on RG1
Owner on LB2
Why Assign “Network Contributor” on RG1? Understanding the Scenario You have two load balancers: LB1 (Internal Load Balancer) LB2 (Public Load Balancer) Admin1 needs to manage LB1 and LB2. The task: Add a health probe to LB2. The solution must follow the principle of least privilege, meaning Admin1 should get only the required permissions without unnecessary access. Role: “Network Contributor” on RG1 The “Network Contributor” role allows managing network resources (including load balancers, network interfaces, virtual networks, and related configurations) without granting unnecessary permissions for other Azure resources. Why assign it at the resource group (RG1) level instead of just LB2? A health probe requires monitoring virtual machines or other network resources inside the resource group. To configure a health probe, Admin1 needs permissions on both the load balancer and the associated network interfaces of the backend VMs. Assigning Network Contributor on RG1 ensures Admin1 can manage both LB1 and LB2, along with their backend resources (such as VMs and NICs).
The question is included in several questions that depict the identical set-up. However, every question has a distinctive result. Establish if the solution satisfies the requirements. Your company has an Azure Active Directory (Azure AD) subscription. You want to implement an Azure AD conditional access policy. The policy must be configured to require members of the Global Administrators group to use Multi-Factor Authentication and an Azure AD-joined device when they connect to Azure AD from untrusted locations. Solution: You access the Azure portal to alter the session control of the Azure AD conditional access policy. Does the solution meet the goal?
Yes
No
Accessing the Azure portal to modify the session control settings of an Azure AD Conditional Access policy does not fully meet the goal because session controls manage user session behavior (e.g., persistent sign-in, app restrictions), but they do not enforce device compliance or MFA based on location. Why Does This Solution Fail? 1?? Session controls in Conditional Access mainly affect user session duration and restrictions but do not enforce MFA or device requirements. 2?? The requirement specifies enforcing MFA and Azure AD-joined devices when signing in from untrusted locations, which requires a Conditional Access policy that defines access conditions. 3?? To achieve the goal, you must configure a Conditional Access policy with access controls, not just session controls. Correct Solution: ? Go to the Azure Portal ? Azure AD ? Security ? Conditional Access ? Create a new Conditional Access policy ? Assign it to the “Global Administrators” group ? Set conditions: Untrusted locations (Exclude trusted locations) Require Multi-Factor Authentication (MFA) Require an Azure AD-joined device ? Enable the policy and test Why Not Modify Session Controls? ? Session controls do not enforce device compliance or MFA ? They only manage how long users stay signed in and app restrictions ? The requirement needs Conditional Access “Access Controls,” not just session controls
You have an Azure subscription that contains the resources shown in the following table: To RG6, you apply the tag: RGroup: RGS. You deploy a virtual network named VNET2 to RG6. Which tags apply to VNET1 and VNET2? To answer, select the appropriate options in the answer area. VNET1:
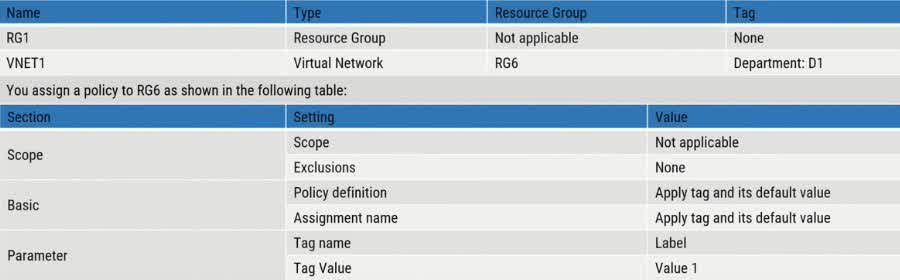
None
Department: D1 only
Department D1 and RGroup: RG6 only
Department D1 and Label: Value 1 only
Department D1 and RGroup: RG6 and Labe; Value 1
Understanding the Tags and Policy Applied VNET1 is in RG6 and has the tag Department: D1 assigned to it. A policy is applied to RG6 that appends a tag Label: Value 1 to all resources within RG6. The tag RGroup: RG6 is manually applied only to RG6, not directly to its resources. Analyzing VNET1 Tags “Department: D1” is already assigned to VNET1 (this does not change). “Label: Value 1” is added to all resources in RG6 due to the policy (this means VNET1 receives this tag). “RGroup: RG6” is not inherited by VNET1, because resource group tags do not automatically propagate to resources within them. Thus, VNET1 has the tags: ? Department: D1 (pre-existing tag) ? Label: Value 1 (added by the policy) Correct Answer for VNET1: ? “Department: D1 and Label: Value 1 only” Analyzing VNET2 Tags VNET2 is deployed to RG6, where the policy applies. Since VNET2 does not have any pre-existing tags, it inherits only the tag added by the policy. “Label: Value 1” is added to VNET2 due to the policy.
You have an Azure subscription that contains the resources shown in the following table: To RG6, you apply the tag: RGroup: RGS. You deploy a virtual network named VNET2 to RG6. Which tags apply to VNET1 and VNET2? To answer, select the appropriate options in the answer area. VNET2:
None
RGroup: RG6 only
Label: Value 1 only
RGroup: RG6 and Label: Value 1
Understanding the Tags and Policy Applied VNET2 is deployed in RG6, which has the tag RGroup: RG6. A policy is applied to RG6 that appends the tag Label: Value 1 to all resources within RG6. Resource Group (RG6) tags do not automatically propagate to resources within it unless explicitly inherited by a policy. Analyzing VNET2 Tags “Label: Value 1” is assigned to all resources in RG6 due to the policy (so VNET2 gets this tag). “RGroup: RG6” is applied only to RG6 itself but is not inherited by VNET2. Thus, VNET2 has the tag: ? Label: Value 1 (added by the policy)
Your company has two on-premises servers named SRVO1 and SRV02. Developers have created an application that runs on SRVO1. The application calls a service on SRVO2 by IP address. You plan to migrate the application to Azure virtual machines (VMs). You have configured two VMs on a single subnet in an Azure virtual network. You need to configure the two VMs with static internal IP addresses. What should you do?
Run the New-AzureRMVMConfig PowerShell cmdlet
Run the Set-AzureSubnet PowerShell cmdlet
Modify the VM properties in the Azure Management Portal
Modify the VM properties in the Azure Management Portal
Run the Set-AzureStaticVNetIP PowerShell cmdlet
The company has two on-premises servers (SRV01 and SRV02) running an application. The application on SRV01 calls SRV02 using an IP address. The goal is to migrate the application to Azure virtual machines (VMs) while ensuring static internal IP addresses for both VMs. Why Static Internal IPs are Required? In Azure, VMs get dynamic private IP addresses by default. However, since the application calls SRV02 using an IP address, using a dynamic IP could cause connectivity issues when the IP changes. Static private IPs ensure that the application’s configuration remains unchanged after migration. Why Use Set-AzureStaticVNetIP? The Set-AzureStaticVNetIP PowerShell cmdlet assigns a static private IP address to an Azure VM. This cmdlet ensures that the VM retains the assigned private IP address within the virtual network (VNet). This is the correct approach for assigning internal static IPs to Azure VMs. Why Other Options Are Incorrect? New-AzureRMVMConfig (Option A): This cmdlet is used for creating a VM configuration before deployment. It does not assign a static private IP to an already deployed VM. Set-AzureSubnet (Option B): This cmdlet configures subnets in an Azure virtual network but does not set static IPs for VMs. Modifying VM Properties in Azure Portal (Option C): While some VM settings can be changed via the Azure portal, configuring a static internal IP requires PowerShell or Azure CLI. Modifying IP Properties in Windows Network and Sharing Center (Option D): Azure VMs get their private IPs from the VNet DHCP server. Manually setting an IP inside Windows will not work and may cause connectivity issues.
You want to implement a Microsoft Entra ID conditional access policy. The policy must be configured to require members of the Global Administrators group to use Multi-Factor Authentication and a Microsoft Entra ID-joined device when they connect to Microsoft Entra ID from untrusted locations. Solution: You access the multi-factor authentication page to alter the user settings. Does the solution meet the goal?
Yes
No
You need to enforce a Conditional Access policy that requires: Global Administrators to use Multi-Factor Authentication (MFA). Access from untrusted locations must require a Microsoft Entra ID-joined device. Why Accessing the MFA Page to Alter User Settings Does Not Meet the Goal? The Multi-Factor Authentication (MFA) user settings page only allows basic MFA configurations, such as: Enabling/disabling MFA for individual users. Selecting MFA authentication methods (SMS, Authenticator app, etc.). Managing trusted IPs. It does not allow enforcing conditions like requiring Microsoft Entra ID-joined devices or restricting access from untrusted locations. What is the Correct Approach? You need to create a Conditional Access policy in Microsoft Entra ID with the following settings: Target Users: Select “Global Administrators.” Conditions: Configure “Locations” to target untrusted locations. Access Controls: Require both: Multi-Factor Authentication (MFA). Microsoft Entra ID-joined device. Enable Policy: Set the policy to enforce these rules. Why Other Methods Wouldn’t Work? MFA user settings (incorrect approach) ? Only applies basic MFA, does not enforce device compliance or location-based conditions. Correct approach (Conditional Access Policy) ? Allows fine-grained control over MFA, trusted devices, and access locations.
You want to implement a Microsoft Entra ID conditional access policy. The policy must be configured to require members of the Global Administrators group to use Multi-Factor Authentication and a Microsoft Entra ID-joined device when they connect to Microsoft Entra ID from untrusted locations Solution: You access the Microsoft Entra portal to alter the grant control of the Microsoft Entra ID conditional access policy. Does the solution meet the goal?
Yes
No
You need to implement a Conditional Access policy that enforces: Multi-Factor Authentication (MFA) for Global Administrators. Access from untrusted locations must require a Microsoft Entra ID-joined device. Why Altering the Grant Control in the Microsoft Entra Conditional Access Policy Meets the Goal? Conditional Access policies in Microsoft Entra ID allow administrators to configure fine-grained access control based on: User roles (e.g., Global Administrators). Sign-in conditions (e.g., untrusted locations). Access requirements (e.g., MFA, device compliance, or Microsoft Entra ID-joined devices). Grant controls in Conditional Access policies enforce additional security measures before granting access. Steps to Implement the Correct Conditional Access Policy: Go to Microsoft Entra Admin Center. Navigate to Security > Conditional Access. Create a New Policy: Assignments ? Select Global Administrators. Conditions ? Configure Locations to target untrusted locations. Grant Access Controls ? Require: ? Multi-Factor Authentication (MFA). ? Microsoft Entra ID-joined device. Enable the Policy and Save. Why This Meets the Goal? By modifying the Grant Controls, you can enforce both MFA and device-based access restrictions for Global Administrators when accessing from untrusted locations. This ensures that the security requirements are met before granting access.
The question is included in several questions that depict the identical set-up. However, every question has a distinctive result. Establish if the solution satisfies the requirements. Your company has an Azure Active Directory (Azure AD) subscription. You want to implement an Azure AD conditional access policy. The policy must be configured to require members of the Global Administrators group to use Multi-Factor Authentication and an Azure AD-joined device when they connect to Azure AD from untrusted locations. Solution: You access the Azure portal to alter the grant control of the Azure AD conditional access policy. Does the solution meet the goal?
Yes
No
To require Multi-Factor Authentication (MFA) and an Azure AD-joined device for Global Administrators when accessing Azure AD from untrusted locations, you need to configure grant controls in an Azure AD Conditional Access policy. Grant controls in Conditional Access determine the conditions that users must meet before accessing resources. Since the requirement is to enforce MFA and ensure the device is Azure AD-joined, modifying the grant control settings is the correct approach. How Grant Controls Meet the Requirement: 1?? Go to Azure Portal ? Azure AD ? Security ? Conditional Access 2?? Create a new Conditional Access policy 3?? Assign it to the “Global Administrators” group 4?? Configure the conditions: Untrusted locations (Exclude trusted locations) 5?? Set “Grant Controls”: ? Require Multi-Factor Authentication (MFA) ? Require an Azure AD-joined device 6?? Enable the policy and test Why Does This Solution Work? ? Grant controls enforce MFA and device compliance ? Conditional Access policies are designed for access control enforcement ? Enforces authentication and security posture before granting access
Your company has an Azure Active Directory (Azure AD) subscription. You want to implement an Azure AD conditional access policy. The policy must be configured to require members of the Global Administrators group to use Multi-Factor Authentication and an Azure AD-joined device when they connect to Azure AD from untrusted locations. Solution: You access the multi-factor authentication page to alter the user settings. Does the solution meet the goal?
Yes
No
The requirement is to create an Azure AD Conditional Access policy that enforces Multi-Factor Authentication (MFA) and an Azure AD-joined device for Global Administrators when they access Azure AD from untrusted locations. However, the solution states that you access the Multi-Factor Authentication (MFA) page to alter user settings, which does not meet the goal because: 1?? MFA settings on the MFA page only control MFA at a basic level The MFA page (under Azure AD Security > MFA) is used for enabling and enforcing MFA per user, configuring authentication methods, and managing fraud alerts. It does not allow you to define access conditions such as location-based restrictions or device compliance. 2?? Conditional Access policies are configured in a different section The correct way to enforce MFA + Azure AD-joined device + location-based rules is by configuring a Conditional Access policy in Azure AD > Security > Conditional Access. Here, you can set grant controls to require MFA and a compliant device only when accessing from untrusted locations. Correct Way to Meet the Goal: 1?? Go to Azure AD > Security > Conditional Access 2?? Create a new Conditional Access policy 3?? Target the “Global Administrators” group 4?? Set the condition: Untrusted locations (exclude trusted locations like corporate IPs) 5?? Set the grant controls: ? Require Multi-Factor Authentication (MFA) ? Require an Azure AD-joined device 6?? Enable the policy and test
Your company has an Azure Active Directory (Azure AD) subscription. You want to implement an Azure AD conditional access policy. The policy must be configured to require members of the Global Administrators group to use Multi-Factor Authentication and an Azure AD-joined device when they connect to Azure AD from untrusted locations. Solution: You access the Azure portal to alter the session control of the Azure AD conditional access policy. Does the solution meet the goal?
Yes
No
The requirement is to enforce Multi-Factor Authentication (MFA) and an Azure AD-joined device for Global Administrators when they access Azure AD from untrusted locations. However, the solution states that you alter the session control of the Conditional Access policy, which does not fully meet the goal because: 1?? What are Session Controls in Conditional Access? Session controls in Azure AD Conditional Access manage user session behavior but do not enforce MFA or device compliance. Examples of session controls: Sign-in frequency: Controls how often users must re-authenticate. Persistent browser session: Keeps users signed in on trusted devices. Conditional Access App Control: Uses Microsoft Defender for Cloud Apps to restrict actions within applications. Session controls do NOT enforce MFA or require an Azure AD-joined device when users connect from untrusted locations. 2?? What is the Correct Solution? To meet the goal, you must modify Grant Controls instead of Session Controls by following these steps: ? Go to Azure AD > Security > Conditional Access ? Create a new policy ? Target “Global Administrators” group ? Set the condition: Untrusted locations (exclude trusted locations like corporate IPs) ? Set the grant controls: ? Require Multi-Factor Authentication (MFA) ? Require an Azure AD-joined device ? Enable and test the policy
From the MFA Server blade, vou open the Block/unblock users blade as shown in the exhibit. What caused AlexW to be blocked?
The user reported a fraud alert when prompted for additional authentication
The user account password expired
The user entered an incorrect PIN four times within 10 minutes
An administrator manually blocked the user
In Microsoft Entra ID Multi-Factor Authentication (MFA) Server, users can be blocked manually by an administrator or automatically due to suspicious activities. Since the question specifies that you opened the Block/Unblock users blade, it indicates that the blocking action was performed by an administrator rather than an automatic system-triggered event. Why Was AlexW Blocked? When a user is blocked manually, their name appears in the Block/Unblock users list in the MFA Server blade. Only administrators with the correct permissions can manually block or unblock a user from this section. If an admin blocks a user, they remain blocked until manually unblocked or after the specified block duration expires. Why Not the Other Options? “The user reported a fraud alert when prompted for additional authentication” If a user reports fraudulent access (by selecting “Report Fraud” during MFA verification), Microsoft Entra ID MFA can automatically block them. However, these users are not listed in the Block/Unblock users blade; instead, fraud reporting settings control whether users get blocked automatically. “The user account password expired” An expired password does not cause an MFA block. The user would simply be unable to sign in until they reset their password. “The user entered an incorrect PIN four times within 10 minutes” If a user enters an incorrect MFA PIN multiple times, they may be temporarily locked out but not permanently blocked. Temporary lockout rules are managed separately and do not add the user to the Block/Unblock list.
Your company has an Azure Active Directory (Azure AD) subscription. You want to implement an Azure AD conditional access policy. The policy must be configured to require members of the Global Administrators group to use Multi-Factor Authentication and an Azure AD-joined device when they connect to Azure AD from untrusted locations. Solution: You access the Azure portal to alter the grant control of the Azure AD conditional access policy. Does the solution meet the goal?
Yes
No
The goal is to require Multi-Factor Authentication (MFA) and an Azure AD-joined device when Global Administrators sign in from untrusted locations. The grant controls in Azure AD Conditional Access allow enforcing MFA and device compliance requirements, making them the correct method for achieving this goal. 1?? What are Grant Controls in Conditional Access? Grant controls are used to enforce authentication and security requirements. These can require additional conditions for access, such as: ? MFA (Multi-Factor Authentication) ? Compliant or Azure AD-joined devices ? Approved client apps ? Hybrid Azure AD-joined devices 2?? Steps to Configure the Correct Policy To enforce the policy correctly, follow these steps in the Azure portal: 1?? Go to Azure AD > Security > Conditional Access 2?? Create a new Conditional Access policy 3?? Assign the policy to Global Administrators 4?? Configure Conditions: Locations ? Select Untrusted locations (Exclude trusted IPs) 5?? Under Grant Controls, select: ? Require Multi-Factor Authentication (MFA) ? Require device to be marked as compliant (for Azure AD-joined devices) 6?? Enable the policy 3?? Why This Solution Works Grant controls enforce MFA and device requirements ? Session controls (previous solutions) only manage user sessions, not access restrictions ? MFA settings alone are insufficient without Conditional Access policies ?
You have an Azure subscription that contains a web app named webapp1. You need to add a custom domain named www.thetechblackboard.com to webapp1. º What should you do first?
Create a DNS record
Add a connection string
Upload a certificate
Stop webapp1
To add a custom domain (www.thetechblackboard.com) to an Azure Web App (webapp1), the first step is to create a DNS record for domain verification and routing. 2?? Why Other Options Are Incorrect? Option Reason Why It’s Incorrect Add a connection string ? Connection strings are for database connections, not domain mapping. Upload a certificate ? SSL/TLS certificates are needed for HTTPS, but they come after the domain setup. Stop webapp1 ? Stopping the web app is unnecessary and would only cause downtime.
You have an Azure subscription named Subscription1. Subscription1 contains a resource group named RG1. RG1 contains resources that were deployed by using templates. You need to view the date and time when the resources were created in RG1. Solution: From the Subscriptions blade, you select the subscription, and then click Resource Provider. Does this meet the goal?
Yes
No
The Resource Providers section in the Subscriptions blade does not show the creation date and time of resources. Resource Providers only show which Azure services (such as Compute, Storage, or Networking) are registered within the subscription. How to View Resource Creation Date and Time? To see when resources were created in RG1, you should use one of the following methods instead: ? 1?? Azure Resource Graph Explorer (Best Method) This tool allows you to query Azure resources and retrieve details like creation date. Steps: Go to Azure Portal. Open Azure Resource Graph Explorer. Run the following query: ResourceContainers

You have an Azure subscription named Subscription1. Subscription1 contains a resource group named RG1. RG1 contains resources that were deployed by using templates. You need to view the date and time when the resources were created in RG1. Solution: From the RG1 blade, you click Automation script. Does this meet the goal?
Yes
No
Clicking Automation Script in the RG1 blade will not show the date and time when the resources were created. Instead, it generates an ARM template (JSON script) that can be used to redeploy the resources, but it does not track historical creation timestamps. How to Correctly View Resource Creation Date and Time? To check when resources in RG1 were created, use one of these methods: ? 1?? Azure Resource Graph Explorer (Best Option) This tool allows you to query Azure resources and get the creation date. Steps: Go to Azure Portal. Open Azure Resource Graph Explorer. Run the following query: Resources
You have an Azure subscription named Subscription1. Subscription1 contains a resource group named RG1. RG1 contains resources that were deployed by using templates. You need to view the date and time when the resources were created in RG1. Solution: From the RG1 blade, you click Deployments. Does this meet the goal?
Yes
No
Clicking Deployments in the RG1 blade does meet the goal because it provides a history of deployments, including the date and time when resources were created. Why Does This Solution Work? ? Azure Resource Groups keep track of deployments, and the Deployments section logs each deployment event. ? Each deployment entry includes: Deployment Name Timestamp of Execution Status (Success, Failed, etc.) Resources Deployed ? This allows you to see when each resource was created within RG1. How to Check Resource Creation Time via Deployments? 1?? Open the Azure Portal 2?? Navigate to Resource Groups 3?? Select RG1 4?? Click Deployments 5?? View the list of deployment records 6?? Click on a deployment to see details, including timestamps of resource creation Yes, because the “Deployments” section in RG1 tracks the date and time of resource creation events
Your company wants to have some post-deployment configuration and automation tasks on Azure Virtual Machines. Solution: As an administrator, you suggested using ARM templates. Does this meet the goal?
Yes
No
Azure Resource Manager (ARM) templates are used primarily for deploying Azure resources in a consistent and repeatable manner. However, they are not designed for post-deployment configuration and automation tasks. While ARM templates can define initial configurations using extensions, they are not the best tool for handling post-deployment automation tasks effectively. Why ARM Templates Are Not the Best for Post-Deployment Configuration? 1?? ARM templates are declarative They specify what should be deployed, but they do not handle how to configure resources after deployment dynamically. 2?? Limited Post-Deployment Automation Support While ARM templates support VM extensions (such as Custom Script Extension), they lack advanced automation capabilities like looping, conditional execution, and external integration.
Which port would you open using the inbound port rules to allow remote desktop access, while you create Windows virtual machine?
HTTPS
FTP
RDP (3389)
SSH (22)
When creating a Windows Virtual Machine (VM) in Azure, you need to allow Remote Desktop Protocol (RDP) access to connect remotely. RDP uses TCP port 3389, so you must open port 3389 in the inbound port rules of the Network Security Group (NSG). Why is RDP (3389) the Correct Answer? ? Remote Desktop Protocol (RDP) is the standard protocol for remotely connecting to Windows-based machines. ? By default, RDP traffic operates over TCP port 3389. ? Without opening port 3389, you won’t be able to connect to the Windows VM remotely. Why Are the Other Options Incorrect? ? HTTPS (Port 443) Used for secure web traffic (SSL/TLS), not for remote desktop access. ? FTP (Port 21) Used for file transfer, not remote desktop connections. ? SSH (Port 22) Used for secure shell (SSH) connections, typically for Linux VMs, not for Windows.
You have an Azure virtual machine (VM) with a single data disk. You have been tasked with attaching this data disk to another Azure VM. You need to ensure that your strategy allows the virtual machines to be offline for the least amount of time possible. Which of the following is the action you should take first?
Stop the VM that includes the data disk.
Stop the VM that the data disk must be attached to.
Detach the data disk.
Delete the VM that includes the data disk.
To attach an existing data disk from one Azure Virtual Machine (VM) to another, the disk must first be detached from its current VM. This ensures that the disk is not in use or locked, allowing it to be reattached to a different VM. Steps to Move a Data Disk Between VMs (With Minimal Downtime) 1?? Detach the data disk from the current VM. This does not require stopping the VM itself, minimizing downtime. Detaching the disk ensures that it is no longer associated with the original VM. 2?? Attach the data disk to the target VM. This can be done via the Azure Portal, PowerShell, or Azure CLI. 3?? Log in to the target VM and mount the disk if needed. Why Is “Detach the Data Disk” the Correct First Step? ? Minimal downtime: Detaching the disk does not require stopping the VM. ? Ensures data integrity: Prevents disk corruption by safely removing it. ? Allows reattachment: A detached disk can be easily assigned to another VM. Why Are the Other Options Incorrect? ? (A) Stop the VM that includes the data disk Unnecessary step. The VM does not need to be stopped to detach the disk. ? (B) Stop the VM that the data disk must be attached to Irrelevant step. The target VM does not need to be stopped to attach a disk. ? (D) Delete the VM that includes the data disk Extreme and incorrect. Deleting the VM is not required and could cause data loss.
Q32: Your company wants to have some post-deployment configuration and automation tasks on Azure Virtual Machines. Solution: As an administrator you suggest using configuration.ini. Does this meet the goal?
Yes
No
A configuration.ini file is typically used for application-specific configurations, not for automating post-deployment configuration and management tasks on Azure Virtual Machines (VMs). Azure provides better and more efficient tools for this purpose. Why Does This Solution Not Meet the Goal? ? configuration.ini is a static file format .ini files are used for application settings, not for system-wide configuration or automation. They require manual or custom script execution to apply settings, which is not scalable for Azure VM automation. ? Not an Azure-native solution Azure provides dedicated tools for post-deployment automation, such as: Azure Automation Azure Virtual Machine Extensions (Custom Script Extension, DSC Extension) Azure Policy Azure AutoManage Azure Resource Manager (ARM) templates What Should Be Used Instead? ? Azure Automation Helps automate post-deployment tasks such as software installation, patching, and configuration management. ? Azure VM Extensions Custom Script Extension: Executes PowerShell or Bash scripts on the VM post-deployment. Azure Desired State Configuration (DSC) Extension: Ensures that a VM maintains a predefined configuration. ? Azure AutoManage Simplifies management of VMs by automatically applying best practices, including security and monitoring configurations. ? ARM Templates (If Deployment Needs Configuration) Can define and deploy VM configurations along with infrastructure resources. Why Are These Options Better? ? Scalability – Works across multiple VMs automatically. ? Efficiency – No need for manual execution like .ini files. ? Azure-native – Integrated with Azure’s automation ecosystem.
You have a pav-as-vou-go Azure subscription that contains the virtual machines shown in the following table When the maximum amount in Budget 1 is reached .
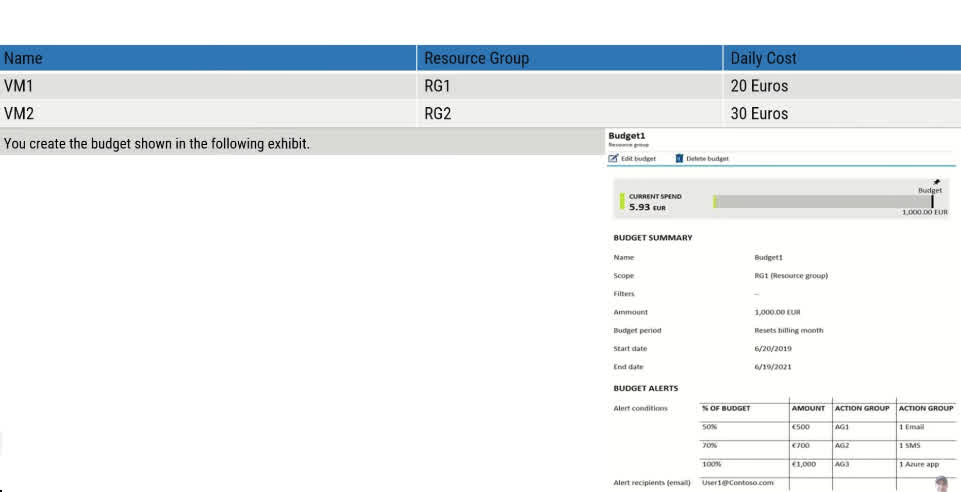
VM1 and VM2 are turned off
VMT and VM2 continue to run
VM1 is turned off and VM2 continues to run
In a Pay-As-You-Go (PAYG) Azure subscription, Azure Budgets are used to monitor spending and send alerts when costs reach a defined threshold. However, Azure Budgets do not enforce cost limits or automatically shut down resources—they only provide notifications. By default, Azure Budgets sends one email notification per month when the budget threshold is exceeded. This notification is sent to the configured recipients, such as administrators or billing contacts. The notification does not stop the VMs; it simply alerts users about cost overruns. Why Not the Other Options? “No email notification will be sent each month” If an Azure budget is set, at least one notification is always sent when spending crosses the threshold. “Two email notifications will be sent each month” Azure Budgets send notifications only once per month by default unless you configure additional thresholds. “Three email notifications will be sent each month” By default, Azure Budgets sends only one notification per month, unless multiple thresholds are configured.
Q33: Your company wants to have some post-deployment configuration and automation tasks on Azure Virtual Machines. Solution: As an administrator, you suggest using Virtual machine extensions. Does this meet the goal?
Yes
No
Yes, Virtual Machine (VM) extensions are the correct choice for post-deployment configuration and automation tasks in Azure Virtual Machines. VM extensions allow administrators to run scripts, install software, configure settings, and automate tasks after the VM is deployed. Why Does This Solution Meet the Goal? ? VM Extensions Enable Post-Deployment Automation VM extensions are small applications that provide post-deployment configuration and automation capabilities. They allow you to install applications, configure settings, run scripts, and perform other automation tasks without manually logging into each VM. ? Azure-native and Scalable Solution VM extensions are built into Azure and work natively with Azure Virtual Machines. You can apply VM extensions across multiple VMs simultaneously using Azure Policy, Azure Automation, or ARM templates. ? Types of VM Extensions for Automation There are several VM extensions available, including: Custom Script Extension – Runs scripts (PowerShell for Windows, Bash for Linux) on the VM for configuration and automation. Azure Desired State Configuration (DSC) Extension – Ensures the VM remains in a defined state. Microsoft Antimalware Extension – Enables security and compliance automation. Azure Monitoring Extensions – Helps with performance tracking and logging. Why Are VM Extensions Better Than Other Methods? ? Automated – No need for manual intervention. ? Efficient – Scripts execute directly on the VM. ? Scalable – Works across multiple VMs easily. ? Secure – Integrated with Azure security and compliance tools. ? Flexible – Supports PowerShell, Bash, DSC, and third-party extensions.
You have an Azure subscription with 100 Azure virtual machines. You need to quickly identify underutilized virtual machines that can have their service tier changed to a less expensive offering. Which blade should you use?
Monitor Kboard
Advisor
Metrics
Customer insights
Azure Advisor is the best tool to quickly identify underutilized virtual machines (VMs) and recommend cost-saving optimizations. ? Why Use Azure Advisor? Azure Advisor provides personalized best practices for: Cost Optimization ? – Identifies underutilized VMs and recommends downgrading to a lower-cost tier. Performance ? – Suggests ways to improve VM efficiency. High Availability ? – Ensures VMs are configured for redundancy. Security ? – Recommends security best practices. It analyzes VM CPU and memory usage and flags underutilized resources, suggesting a cheaper VM size or shutting them down to save costs. Why Not the Other Options? ? a) Monitor Dashboard – Incorrect The Monitor blade helps track real-time performance metrics but does not provide cost-saving recommendations. You would have to manually analyze VM usage, which is slower. ? c) Metrics – Incorrect Metrics in Azure Monitor provide detailed performance graphs for VMs, like CPU and disk usage. However, it does not suggest optimizations or cost-saving measures. ? d) Customer Insights – Incorrect Customer Insights is used for customer behavior analysis in Microsoft Dynamics 365. It is not related to VM performance or cost optimization.
You have an Azure virtual machine named VM1. You plan to encrypt VM1 by using Azure Disk Encryption. Which Azure resource must you create first?
an Azure Storage account
an Azure Key Vault
an Azure Information Protection policy
an Encryption key
Azure Disk Encryption (ADE) uses BitLocker (for Windows VMs) and dm-crypt (for Linux VMs) to encrypt virtual machine disks. To securely store and manage the encryption keys, Azure Key Vault (AKV) is required. Why is Azure Key Vault Needed First? 1?? Encryption keys must be securely stored ADE requires a Key Vault to store the Key Encryption Key (KEK) and the Disk Encryption Key (DEK) securely. Without Azure Key Vault, Azure Disk Encryption cannot function since there is no place to store encryption keys. 2?? Key Vault integrates directly with ADE The Key Vault is used to manage, rotate, and control access to the encryption keys. When you enable Azure Disk Encryption, it automatically retrieves the required keys from the Key Vault. 3?? Mandatory for enabling ADE on VM1 Before encrypting VM1, ADE setup requires a Key Vault to be available. The Key Vault must have the correct access policies to allow Azure Disk Encryption to use it. ? Why Not the Other Options? ? a) An Azure Storage account – Incorrect Storage accounts are used for storing backup data, logs, and VM images, but not for disk encryption. ADE does not require a storage account to function. ? c) An Azure Information Protection policy – Incorrect Azure Information Protection (AIP) is used to classify and protect documents and emails but not VM disk encryption. AIP is unrelated to Azure Disk Encryption. ? d) An Encryption key – Incorrect An encryption key is needed, but it must be stored inside an Azure Key Vault. The first step is to create a Key Vault, and then generate/import an encryption key into it.
Your company has three virtual machines (VMs) that are included in an availability set. You try to resize one of the VMs, which returns an allocation failure message. The VM must be resized. Which of the following actions should you take?
You should only stop one of the VMs
You should stop two of the VMs
You should stop all three VMs
You should remove the necessary VM from the availability set
In an Availability Set, Azure ensures high availability by distributing VMs across multiple fault domains and update domains. However, when you try to resize a VM that is part of an availability set, the new size must be available on the same underlying physical hardware where the availability set is currently running. If the new size is not available on the existing hardware, you get an allocation failure message. Why do you need to stop all three VMs? Stopping all VMs in the availability set deallocates them completely. This allows Azure to move them to a different physical hardware cluster where the desired VM size is available. Once they are moved, you can successfully resize the VM and restart all VMs. Why not the other options? Stopping only one or two VMs (Options A and B) won’t work because the availability set as a whole remains on the same physical hardware. Removing the VM from the availability set (Option D) is not possible after the VM is created. Availability set membership cannot be changed after deployment.
You have an Azure virtual machine named VM1 that runs Windows Server 2019. The VM was deployed using default drive settings. You sign in to VM1 as a user named User1 and perform the following actions: · Create files on drive C. · Create files on drive D. . Modify the screen saver timeout. · Change the desktop background. You plan to redeploy VM1. Which changes will be lost after you redeploy VM1?
the modified screen saver timeout
the new desktop background
the new files on drive D
the new files on drive C
When an Azure virtual machine (VM) is redeployed, it is moved to a new Azure host while keeping its configuration and OS disk intact. However, any temporary storage associated with the VM is lost during redeployment. Understanding Default Drive Settings in Azure VMs When a Windows VM is deployed in Azure with default drive settings, it typically includes: C: Drive (OS Disk) – This is a persistent disk where the Windows OS and system files are stored. User-created files here remain intact after a redeployment. D: Drive (Temporary Storage Disk) – This is a temporary disk used for caching and paging operations. Any data stored on this drive will be lost when the VM is redeployed. Other Data Disks (if added manually) – If additional data disks were attached manually, they are persistent and not affected by redeployment. Changes That Will Be Lost After Redeployment Files stored on the D: drive – Since the D: drive is a temporary disk, all files saved here will be lost after redeployment. Changes that persist – The modified screen saver timeout, desktop background, and files on C: drive are stored on the persistent OS disk, so they will not be lost after redeployment.
This question is part of a series of questions that present the same scenario. Each question in the series contains a unique solution that might meet the stated goals. Some question sets might have more than one correct solution, while others might not have a correct solution. After you answer a question in this section, you will NOT be able to return to it. As a result, these questions will not appear on the review screen. You need to ensure that an Azure Active Directory (Azure AD) user named Admin1 is assigned the required role to enable Traffic Analytics for an Azure subscription. Solution: You assign the Network Contributor role at the subscription level to Admin1. Does this meet the goal?
Yes
No
Understanding Traffic Analytics and Required Role in Azure Traffic Analytics is a feature of Azure Network Watcher that allows users to monitor and analyze network traffic on Azure virtual networks. To enable Traffic Analytics, a user must have permissions to manage network resources. What Permissions Are Required? To enable Traffic Analytics, a user must have permissions to: Manage network-related resources (such as network security groups, flow logs, and network watchers). Enable and configure Network Watcher flow logs (which are required for Traffic Analytics). The Network Contributor role includes permissions to manage all network-related resources, including enabling Traffic Analytics. Why Does Assigning the Network Contributor Role at the Subscription Level Work? The Network Contributor role allows users to configure network resources, including Traffic Analytics settings. Assigning this role at the subscription level ensures that Admin1 has permissions across all network resources in the subscription, eliminating any scope-related permission issues.
This question is part of a series of questions that present the same scenario. Each question in the series contains a unique solution that might meet the stated goals. Some question sets might have more than one correct solution, while others might not have a correct solution. After you answer a question in this section, you will NOT be able to return to it. As a result, these questions will not appear in the review screen. You need to ensure that an Azure Active Directory (Azure AD) user named Admin1 is assigned the required role to enable Traffic Analytics for an Azure subscription. Solution: You assign the Traffic Manager Contributor role at the subscription level to Admin1. Does this meet the goal?
Yes
No
Why the Solution Does Not Meet the Goal Assigning the Traffic Manager Contributor role at the subscription level does not meet the requirement to enable Traffic Analytics for the following reasons: 1. Understanding the Traffic Manager Contributor Role The Traffic Manager Contributor role provides permissions to manage Azure Traffic Manager, which is a DNS-based load balancing service used to direct user traffic based on routing methods. This role allows users to: Create and manage Traffic Manager profiles Configure routing methods Monitor Traffic Manager health However, Traffic Manager is not related to network monitoring or Traffic Analytics. 2. What is Required for Traffic Analytics? To enable Traffic Analytics, a user must have permissions to: Enable and configure Network Watcher flow logs Manage Network Security Groups (NSGs) Access Log Analytics workspace The appropriate role for enabling Traffic Analytics is the Network Contributor role, which provides full access to network resources. No, assigning the Traffic Manager Contributor role does not meet the goal because this role is only for managing Traffic Manager profiles and does not provide permissions to configure Traffic Analytics in Azure Network Watcher.
You have a pav-as-vou-go Azure subscription that contains the virtual machines shown in the following table Based on the current usage costs of the virtual machines
No email notification will be sent each month
one email notification will be sent each month
Two email il notifications will be sent each month
Three email notifications will be sent each month
In an Azure Pay-As-You-Go (PAYG) subscription, budgets are used for cost monitoring and alerts but do not enforce any automatic actions like shutting down virtual machines. Azure Budgets allow administrators to set spending limits and receive alerts when those limits are exceeded. However, budgets do not automatically stop or deallocate resources like virtual machines (VMs). As a result, even when the budget limit is reached, VM1 and VM2 will continue running, incurring additional costs. Why Not the Other Options? “VM1 and VM2 are turned off” Azure Budgets cannot automatically shut down or deallocate virtual machines when the budget is exceeded. To achieve automatic shutdown, you would need to use Azure Automation or Azure Logic Apps with cost-based triggers. “VM1 is turned off and VM2 continues to run” There is no built-in functionality in Azure Budgets that selectively stops specific virtual machines based on budget limits. Both VMs will continue running unless a separate automation policy is in place.
This question is part of a series of questions that present the same scenario. Each question in the series contains a unique solution that might meet the stated goals. Some question sets might have more than one correct solution, while others might not have a correct solution. After you answer a question in this section, you will NOT be able to return to it. As a result, these questions will not appear in the review screen. You need to ensure that an Azure Active Directory (Azure AD) user named Admin1 is assigned the required role to enable Traffic Analytics for an Azure subscription. Solution: You assign the Reader role at the subscription level to Admin1. Does this meet the goal?
Yes
No
Why the Solution Does Not Meet the Goal Assigning the Reader role at the subscription level does not meet the requirement to enable Traffic Analytics because of the following reasons: 1. Understanding the Reader Role The Reader role in Azure provides read-only access to all resources within the assigned scope. This means that Admin1 can: ? View all resources in the Azure subscription ? Monitor and read logs, metrics, and configurations However, Admin1 cannot: ? Modify or enable services ? Configure Network Watcher or Traffic Analytics ? Enable Network Security Group (NSG) flow logs Since Traffic Analytics requires configuring Network Watcher and NSG flow logs, a Reader does not have the necessary permissions to enable it. 2. What is Required to Enable Traffic Analytics? To enable Traffic Analytics, the user must be able to: Enable Network Watcher flow logs Configure Network Security Groups (NSGs) Access and manage Log Analytics workspace The correct role for this task is Network Contributor, which provides permissions to manage all networking-related resources.
This question is part of a series of questions that present the same scenario. Each question in the series contains a unique solution that might meet the stated goals. Some question sets might have more than one correct solution, while others might not have a correct solution. After you answer a question in this section, you will NOT be able to return to it. As a result, these questions will not appear in the review screen. You need to ensure that an Azure Active Directory (Azure AD) user named Admin1 is assigned the required role to enable Traffic Analytics for an Azure subscription. Solution: You assign the Owner role at the subscription level to Admin1. Does this meet the goal?
Yes
No
Assigning the Owner role at the subscription level does meet the requirement to enable Traffic Analytics because: 1. Understanding the Owner Role The Owner role in Azure provides full control over all resources within the assigned scope. This means that Admin1 can: ? Manage all resources, including network configurations ? Enable and configure Traffic Analytics ? Enable Network Watcher and NSG flow logs ? Assign roles and manage access permissions Since enabling Traffic Analytics requires configuring Network Watcher, NSG flow logs, and Log Analytics, the Owner role has all the necessary permissions to perform these tasks. 2. What is Required to Enable Traffic Analytics? To enable Traffic Analytics, Admin1 needs permissions to: Enable Network Watcher flow logs Configure Network Security Groups (NSGs) Manage Log Analytics workspace for monitoring The Owner role includes all of these permissions.
You have an Azure subscription that contains a user named User1. You need to ensure that User1 can deploy virtual machines but not manage virtual networks. The solution must use the principle of least privilege. Which role-based access control (RBAC) role should you assign to User1?
Owner
Virtual Machine Contributor
Contributor
Virtual Machine Administrator Login
a. Owner: An owner can manage all aspects of a subscription, including access management. Granting this role would give User1 complete control over the subscription, which is more access than necessary and violates the principle of least privilege. b. Virtual Machine Contributor: This role allows users to manage virtual machines This role does not grant you management access to the virtual network or storage account the virtual machines are connected to. This role does not allow you to assign roles in Azure RBAC. c. Contributor: This role allows users to manage all Azure resources except for access management. d. Virtual Machine Administrator Login: This role allows users to manage virtual machines, including resetting passwords and managing operating system updates.
Your Azure subscription contains an Azure Storage account. You need to create an Azure container instance named container1 that will use a Docker image named Image1. Image1 contains a Microsoft SQL Server instance that requires persistent storage. You need to configure a storage service for Container1. What should you use?
Azure Files
Azure Blob storage
Azure Queue storage
Azure Table storage
Why Azure Files? ? Supports persistent storage – Unlike Azure Blob, Azure Files allows stateful applications like SQL Server to store data persistently. ? Mountable as a file share – ACI can mount an Azure Files share and use it like a traditional filesystem, allowing SQL Server to read and write data. ? Supports concurrent access – Multiple containers (if needed) can access the same file share simultaneously. ? Azure Files (Best choice for persistent storage in Azure Container Instances with SQL Server) ? Azure Blob Storage – Not designed for structured database storage. ? Azure Queue Storage – Used for asynchronous messaging, not storage. ? Azure Table Storage – No relational database support.
This question is part of a series of questions that present the same scenario. Each question in the series contains a unique solution that might meet the stated goals. Some question sets might have more than one correct solution, while others might not have a correct solution. After you answer a question in this section, you cannot return to it. As a result, these questions will not appear in the review screen. You have an Azure virtual machine named VM1. VM1 was deployed by using a custom Azure Resource Manager template named ARM1.json. You receive a notification that VM1 will be affected by maintenance. You need to move VM1 to a different host immediately. Solution: From the Overview blade, you move the virtual machine to a different subscription. Does this meet the goal?
Yes
No
Moving a virtual machine (VM) to a different subscription does not change its physical host. Instead, it involves reassigning the VM’s billing and management scope. Since the goal is to move VM1 to a different host immediately due to maintenance, this action does not achieve the intended outcome. Correct Approach: To move VM1 to a different host immediately, you can: Redeploy the VM: This forces Azure to place the VM on a new host. Navigate to VM1 in the Azure portal. Select “Redeploy” from the left-hand menu under “Help + Support.” Confirm the redeployment. Use Azure Live Migration (if applicable): Azure may automatically migrate VMs affected by maintenance without user intervention. Therefore, since moving a VM to a different subscription does not force a host change, this solution does not meet the goal.
This question is part of a series of questions that present the same scenario. Each question in the series contains a unique solution that might meet the stated goals. Some question sets might have more than one correct solution, while others might not have a correct solution. After you answer a question in this section, you will NOT be able to return to it. As a result, these questions will not appear in the review screen. You have an Azure virtual machine named VM1. VM1 was deployed by using a custom Azure Resource Manager template named ARM1.json. You receive a notification that VM1 will be affected by maintenance. You need to move VM1 to a different host immediately. Solution: From the Redeploy blade, you click Redeploy. Does this meet the goal?
Yes
No
The Redeploy option in Azure forces the virtual machine (VM) to move to a new host within the Azure datacenter. When you click Redeploy, Azure shuts down the VM, migrates it to a different host, and then restarts it. This action effectively moves the VM to a new physical server, addressing any maintenance-related concerns on the original host. Why This Works: Ensures a Host Change: Redeploying the VM guarantees that it is placed on a different physical server, which meets the goal of moving it away from the maintenance-affected host. Quick and Immediate Action: Unlike other solutions (such as moving to another subscription, which does not impact the host), redeploying is an immediate action that directly addresses the problem. How to Redeploy a VM in Azure: Go to the Azure portal. Navigate to VM1. In the left-hand menu, under Help + Support, select Redeploy. Click Redeploy to initiate the process. Since this solution moves the VM to a different host immediately, it correctly meets the goal.
This question is part of a series of questions that present the same scenario. Each question in the series contains a unique solution that might meet the stated goals. Some question sets might have more than one correct solution, while others might not have a correct solution. After you answer a question in this section, you cannot return to it. As a result, these questions will not appear in the review screen. You have an Azure virtual machine named VM1. VM1 was deployed by using a custom Azure Resource Manager template named ARM1.json. You receive a notification that VM1 will be affected by maintenance. You need to move VM1 to a different host immediately. Solution: From the Update management blade, you click Enable. Does this meet the goal?
Yes
No
The Update management feature in Azure is used to manage operating system updates for virtual machines. Enabling it does not move the VM to a different host. Instead, it helps with: Scheduling and automating updates for Windows and Linux VMs. Assessing the compliance status of updates. Installing missing updates. Since the goal is to move VM1 to a different host immediately due to maintenance, enabling Update management does not achieve this. Correct Approach: To move VM1 to a different host immediately, the correct action would be to: Redeploy the VM – This forces the VM to migrate to a new physical host. Navigate to VM1 in the Azure portal. Select “Redeploy” from the left-hand menu under “Help + Support.” Click Redeploy to move the VM. Since enabling Update management does not trigger a host change, this solution does not meet the goal.
You have two Hyper-V hosts named Host1 and Host2. Host1 has an Azure virtual machine named VM1 that was deployed using a custom Azure Resource Manager template. You need to move VM1 to Host2. What should you do?
From the Update management blade, click Enable
From the Overview blade, move VM1 to a different subscription
From the Redeploy blade, click Redeploy
From the Profile blade, modify the usage location
The Redeploy option in Azure forces the virtual machine (VM) to move to a new host within the Azure datacenter. When you click Redeploy, Azure: Shuts down the VM Moves it to a new physical server (host) Restarts it Since the goal is to move VM1 from Host1 to Host2, using Redeploy ensures that VM1 is placed on a new Hyper-V host, effectively completing the migration. Why the Other Options Are Incorrect: ? (A) From the Update management blade, click Enable. Incorrect because enabling Update management only manages OS updates and compliance. It does not move the VM between hosts. ? (B) From the Overview blade, move VM1 to a different subscription. Incorrect because changing a VM’s subscription only affects billing and management scope. It does not move the VM to another physical host. ? (D) From the Profile blade, modify the usage location. Incorrect because changing the usage location only impacts compliance and pricing adjustments (e.g., for Azure services in different regions). It does not migrate the VM.
You have an Azure subscription named Subscription1 containing the following resources; VNet1 is in RG.1, VNet2 is in RG2 and there is no connectivity between VNet1 and VNet2. An administrator named Admin1 creates an Azure virtual machine named VM1 in RG1. VM1 uses a disk named Disk1 and connects to VNet1. Admin1 then installs a custom application in VM1. You need to move the custom application to VNet2 and the solution must minimize administrative effort. Which two actions should you perform? To answer, select the appropriate answer among the options provided. The first step:
Create a network interface in RG2
Detach a network interface
Delete VM1
Move a network interface to RG2
Since there is no connectivity between VNet1 and VNet2, moving VM1 to VNet2 requires reconfiguring its network settings. Azure does not allow moving a VM directly to a different virtual network (VNet) without recreating it. The most efficient way to accomplish this while minimizing administrative effort is: Steps to Move VM1 to VNet2: 1?? Delete VM1 (First Step) VM1 needs to be deleted because a VM’s virtual network (VNet) assignment cannot be changed directly. The underlying disk (Disk1) remains intact, so data and the custom application are preserved. 2?? Redeploy VM1 in VNet2 (Second Step) After deletion, redeploy the VM in RG2 and attach it to VNet2. Use Disk1 to retain the custom application and configurations. Why the Other Options Are Incorrect: ? “Create a network interface in RG2” Incorrect because even if a new network interface is created, an existing VM cannot switch to a different VNet without deletion and redeployment. ? “Detach a network interface” Incorrect because removing the network interface does not allow the VM to move to another VNet. Azure requires VM deletion to change VNets. ? “Move a network interface to RG2” Incorrect because network interfaces are tied to specific VNets. Moving the NIC to RG2 does not connect it to VNet2.
Role-based access control allows you to grant users, groups, and service principals access to Azure resources at the subscription, resource group, or resource scopes with RBAC inheritance. The three core roles are Owner, Administrator, and Guest.
Yes
No
Azure RBAC Access management for cloud resources is a critical function for any organization using the cloud. Azure role-based access control (Azure RBAC) helps you manage who has access to Azure resources, what they can do with those resources, and what areas they have access to. Azure RBAC is an authorization system built on Azure Resource Manager that provides fine-grained access management to Azure resources. Here are some examples of what you can do with Azure RBAC: Allow one user to manage virtual machines in a subscription and another to manage virtual networks. Allow a DBA group to manage SQL databases in a subscription. Allow a user to manage all resources in a resource group, such as virtual machines, websites, and subnets. Allow an application to access all resources in a resource group. The correct roles for these are contributor, reader, and owner.
You have an Azure subscription named Subscription1 containing the following resources; VNet1 is in RG.1, VNet2 is in RG2 and there is no connectivity between VNet1 and VNet2. An administrator named Admin1 creates an Azure virtual machine named VM1 in RG1. VM1 uses a disk named Disk1 and connects to VNet1. Admin1 then installs a custom application in VM1. You need to move the custom application to VNet2 and the solution must minimize administrative effort. Which two actions should you perform? To answer, select the appropriate answer among the options provided. The second step:

Attach a network interface
Create a network interface in RG2
Move VM1 to RG2
Create a new virtual machine
Azure does not allow moving a VM directly from one virtual network (VNet) to another. Since VNet1 and VNet2 have no connectivity, simply changing VM1’s network interface will not work. The most efficient way to move VM1 (with its custom application) to VNet2 is to delete VM1 and then create a new VM in VNet2 using the same disk (Disk1) to retain the custom application. Steps to Move the Custom Application to VNet2: 1?? Delete VM1 (First Step) VM1 must be deleted because VNets cannot be changed for an existing VM. Disk1 remains intact, so the application and data are preserved. 2?? Create a new virtual machine in VNet2 (Second Step) When creating the new VM, attach Disk1 to restore the original data and application. This recreates the VM in RG2 and connects it to VNet2, achieving the goal with minimal administrative effort. Why the Other Options Are Incorrect: ? “Attach a network interface.” Incorrect because a network interface must be in the same VNet as the VM, and VM1’s NIC is tied to VNet1. Even if a new NIC is created in VNet2, the existing VM cannot attach it directly without a VNet-level connection. ? “Create a network interface in RG2.” Incorrect because even if a new NIC is created in RG2, it cannot be attached to the existing VM if it’s in a different VNet (VNet1). ? “Move VM1 to RG2” Incorrect because moving a VM to a different resource group does not change its VNet. The VM would still be in VNet1, not VNet2.
This question is part of a series of questions that present the same scenario. Each question in the series contains a unique solution that might meet the stated goals. Some question sets might have more than one correct solution, while others might not have a correct solution. After you answer a question in this section, you will NOT be able to return to it. As a result, these questions will not appear in the review screen. You have an Azure virtual machine named VM1 that runs Windows Server 2016. You need to create an alert in Azure when more than two error events are logged to the System event log on VM1 within an hour. Solution: You create an Azure Log Analytics workspace and configure the data settings. You add the Microsoft Monitoring Agent VM extension to VM1. You create an alert in Azure Monitor and specify the Log Analytics workspace as the source. Does this meet the goal?
Yes
No
The proposed solution involves: Creating an Azure Log Analytics workspace Configuring data collection Adding the Microsoft Monitoring Agent to VM1 Creating an alert in Azure Monitor using the Log Analytics workspace as the source While these steps allow for log collection and alerting, they are not necessary to achieve the stated goal. Azure Monitor already provides a built-in feature for Event Log alerts without requiring Log Analytics. Why This Solution Does Not Meet the Goal? Azure Monitor can directly create alerts based on Windows Event Logs without requiring a Log Analytics workspace. The Microsoft Monitoring Agent (MMA) is not needed for event log-based alerts. Instead, you can configure an Azure Monitor alert rule on the VM’s diagnostic settings to monitor Windows event logs. Redeploying the VM (clicking “Redeploy”) is also not required because the issue is related to alert configuration, not VM placement or functionality. Correct Approach: To create an alert when more than two error events are logged in the System event log within an hour, follow these steps: Enable Diagnostic Settings on VM1 to send event logs to Azure Monitor. Create an Alert Rule in Azure Monitor: Select Event Log as the signal. Set the condition to detect when error events exceed 2 occurrences within 1 hour. Configure an Action Group (e.g., email, webhook, etc.) to notify administrators.
This question is part of a series of questions that present the same scenario. Each question in the series contains a unique solution that might meet the stated goals. Some question sets might have more than one correct solution, while others might not have a correct solution. After you answer a question in this section, you cannot return to it. As a result, these questions will not appear on the review screen. You have an Azure virtual machine named VM1 that runs Windows Server 2016. You need to create an alert in Azure when more than two error events are logged to the System event log on VM1 within an hour. Solution: You create an Azure Log Analytics workspace and configure the data settings. You install the Microsoft Monitoring Agent on VM1. You create an alert in Azure Monitor and specify the Log Analytics workspace as the source. Does this meet the goal?
Yes
No
The proposed solution meets the goal because it correctly sets up monitoring and alerting for Windows Event Logs in Azure. Why This Works: Create an Azure Log Analytics workspace This is required to store and analyze logs from the virtual machine. Configure Data Collection Settings Configuring data settings ensures that event logs (such as system logs) are collected in Log Analytics. Install the Microsoft Monitoring Agent (MMA) on VM1 The MMA (also known as the Log Analytics Agent) is necessary to send event log data from the VM to Azure Monitor (via Log Analytics). Create an Alert in Azure Monitor Using Log Analytics Once the data is collected, an Azure Monitor alert can be configured to trigger when more than two error events appear in the System event log within an hour. Alternative Approach Without Log Analytics (Not Used Here) Azure Monitor diagnostic settings can send event logs directly to an Azure Event Hub, Storage Account, or Log Analytics. However, without Log Analytics, the query-based alerting feature wouldn’t be available, making Log Analytics a valid solution in this case. Why “Click Redeploy” Is Not Relevant Here Redeploying a VM moves it to a new host but does not affect logging, monitoring, or alerting. The issue is about configuring event log alerts, not about VM placement or availability. So, “Click Redeploy” is unnecessary for this solution.
This question is part of a series of questions that present the same scenario. Each question in the series contains a unique solution that might meet the stated goals. Some question sets might have more than one correct solution, while others might not have a correct solution. After you answer a question in this section, you cannot return to it. As a result, these questions will not appear in the review screen. You have an Azure virtual machine named VM1 that runs Windows Server 2016. You need to create an alert in Azure when more than two error events are logged to the System event log on VM1 within an hour. Solution: You create an Azure storage account and configure shared access signatures (SASs). You install the Microsoft Monitoring Agent on VM1. You create an alert in Azure Monitor and specify the storage account as the source. Does this meet the goal?
Yes
No
The proposed solution does not meet the goal because: Creating an Azure Storage Account & Configuring Shared Access Signatures (SASs) Is Irrelevant A Storage Account is mainly used for storing logs, but Azure Monitor does not support direct alerting from Storage Accounts. Shared Access Signatures (SASs) provide controlled access to storage resources but do not help in log collection or alerting. Microsoft Monitoring Agent (MMA) Alone Is Not Enough The MMA (Log Analytics Agent) is used to collect logs from the VM. However, logs need to be sent to Azure Log Analytics, not a Storage Account, for query-based alerting. Azure Monitor Cannot Create Alerts Directly from Storage Accounts Correct alerting setup requires logs to be stored in Log Analytics, not just in a storage account. Without Log Analytics, query-based alerts cannot be created to detect “more than two error events in an hour.” Correct Approach: To correctly set up an alert for System event logs: ? Use Azure Log Analytics (instead of a Storage Account) ? Install the Microsoft Monitoring Agent (MMA) to send logs to Log Analytics ? Configure Azure Monitor to create an alert rule based on Log Analytics queries Since the proposed solution does not use Log Analytics and instead incorrectly relies on a Storage Account, the answer is No. Why “Click Redeploy” Is Not Relevant Here? Redeploying a VM moves it to a new physical host but does not affect logging, monitoring, or alerting. The issue here is an incorrect monitoring setup, not VM placement. “Click Redeploy” is unnecessary and does not solve the problem.
This question is part of a series of questions that present the same scenario. Each question in the series contains a unique solution that might meet the stated goals. Some question sets might have more than one correct solution, while others might not have a correct solution. After you answer a question in this section, you will NOT be able to return to it. As a result, these questions will not appear in the review screen. You have an Azure virtual machine named VM1 that runs Windows Server 2016. You need to create an alert in Azure when more than two error events are logged to the System event log on VM1 within an hour. Solution: You create an event subscription on VM1. You create an alert in Azure Monitor and specify VM1 as the source Does this meet the goal?
Yes
No
The proposed solution does not meet the goal because: Event Subscriptions Are for Azure Event Grid, Not Windows Event Logs An event subscription is used in Azure Event Grid to respond to Azure resource events, such as resource creation or deletion. It does not monitor Windows Event Logs inside a VM. Azure Monitor Requires Log Analytics for Query-Based Alerts on Event Logs Azure Monitor cannot directly alert from an event subscription. Instead, logs should be collected via Log Analytics (using the Microsoft Monitoring Agent). VM1 as a Direct Alert Source Is Not Sufficient Azure Monitor needs a Log Analytics workspace or Diagnostic Settings configured to collect logs. Just specifying VM1 as the alert source does not track event logs in real time. Correct Approach: To correctly create an alert for more than two error events in the System log within an hour, you should: ? Use an Azure Log Analytics workspace ? Install the Microsoft Monitoring Agent (MMA) on VM1 ? Configure Azure Monitor to create an alert rule using Log Analytics queries Since the proposed solution does not use Log Analytics and incorrectly relies on event subscriptions, the answer is No ?. Why “Click Redeploy” Is Not Relevant? Redeploying a VM moves it to a new host but does not affect monitoring or alerting. The issue is incorrect alert configuration, not VM availability. “Click Redeploy” does not solve the problem.
Your company has an Azure subscription. You need to deploy several Azure virtual machines (VMs) using Azure Resource Manager (ARM) templates. You have been informed that the VMs will be included in a single availability set. You are required to make sure that the ARM template you configure allows for as many VMs as possible to remain accessible in the event of fabric failure or maintenance. Which of the following is the value that you should configure for the platformFaultDomainCount property?
10
30
Min Value
Max Value
When deploying Azure Virtual Machines (VMs) in a single Availability Set, Fault Domains (FDs) and Update Domains (UDs) help ensure high availability. Understanding Fault Domains (FDs): Fault Domains (FDs) represent different physical racks in an Azure data center. VMs placed in different FDs do not share the same power source or network switch, reducing the risk of downtime due to hardware failure. Azure allows up to 3 Fault Domains for most regions (in some regions, this can go up to 2 or 3). Why Set platformFaultDomainCount to the Max Value? Setting it to Max Value ensures that VMs are spread across the highest number of Fault Domains. This maximizes availability and resilience to physical hardware failures. It prevents multiple VMs from being affected by a single hardware failure or Azure maintenance event. Why “Click Redeploy” Is Not Relevant? Redeploying a VM moves it to a new host but does not affect Fault Domains. The issue is about configuring ARM templates for deployment, not fixing an existing VM. “Click Redeploy” does not apply here.
Your company has an Azure subscription. You need to deploy several Azure virtual machines (VMs) using Azure Resource Manager (ARM) templates. You have been informed that the VMs will be included in a single availability set. You are required to make sure that the ARM template you configure allows for as many VMs as possible to remain accessible in the event of fabric failure or maintenance. Which of the following is the value that you should configure for the platformUpdateDomainCount property?
10
20
30
Max Value
The platformUpdateDomainCount is a property that defines how many update domains there are in the availability set. The upper limit is 20.
You have an Azure subscription named Subscription1 that contains an Azure Log Analytics workspace named Workspace1. You need to view the error events from a table named Event. Which query should you run in Workspace1?
Get-Event Event
Event
select * from Event where EventType == “error”
search in (Event) *
In Azure Log Analytics (Kusto Query Language – KQL), querying logs effectively requires the correct syntax. Let’s analyze the options to determine why Event
You create an Azure Storage account. You plan to add 10 blob containers to the storage account. For one of the containers, you need to use a different key to encrypt data at rest. What should you do before you create the container?
Generate a shared access signature (SAS)
Modify the minimum TLS version
Rotate the access keys
Create an encryption scope
Encryption scopes enable you to manage encryption with a key that is scoped to a container or an individual block. You can use encryption scopes to create secure boundaries between data that resides in the same storage account but belongs to different customers.
Your company has an Azure subscription that includes a storage account, a resource group, a blob container, and a file share. A colleague named Jon Ross makes use of a solitary Azure Resource Manager (ARM) template to deploy a virtual machine and an additional Azure Storage account. You want to review the ARM template that was used by Jon Ross. Solution: You access the Virtual Machine blade. Does the solution meet the goal?
Yes
No
Accessing the Virtual Machine (VM) blade does not allow you to view the Azure Resource Manager (ARM) template used for deployment. The VM blade provides configuration settings, monitoring, and management options for the VM, but it does not store or display the ARM template used during provisioning. Correct Way to View the ARM Template: To review the ARM template used by Jon Ross, you should: ? Use the Azure Portal: Navigate to Azure Portal ? Resource Group where the VM and Storage Account were deployed. Click on Deployments (found in the left-hand menu). Select the specific deployment entry for the VM or Storage Account. Click Template to view the ARM template used for deployment. ? Use Azure PowerShell or CLI: Run the following Azure CLI command: az deployment group show –resource-group
A company needs to create a storage account that must follow the requirements below: a) Users should be able to add files such as images b) Ability to store archive data. c) File shares need to be in place, which can be d) The data needs to be available even if a region e) The solution needs to be cost-effective. Which of the following types of storage accounts would you create for this purpose?
Locally redundant storage (LRS)
Zone-redundant storage (ZRS)
Geo-redundant storage (GRS)
Read-access geo-redundant storage (RA-GRS)
Users should be able to add files such as images Azure Storage (including GRS) supports blob storage, allowing users to upload files like images. Ability to store archived data GRS supports Azure’s archive storage tier, which helps store infrequently accessed data at a lower cost. File shares need to be in place Azure File Shares are supported with GRS when using Azure Files with geo-redundant storage. The data needs to be available even if a region fails GRS replicates data across two regions—one primary and one secondary. If the primary region fails, Microsoft can fail over to the secondary region to restore access. The solution needs to be cost-effective GRS is more cost-effective than RA-GRS while still providing disaster recovery by replicating data across regions. LRS and ZRS do not provide cross-region redundancy, making them less suitable for disaster recovery. Why not RA-GRS? RA-GRS (Read-Access Geo-Redundant Storage) provides read access to the secondary region during normal operations, but this is not required in the given scenario. GRS is more cost-effective than RA-GRS while still ensuring disaster recovery, making it the better choice.
Your company has an Azure subscription that includes a storage account, a resource group, a blob container, and a file share. A colleague named Jon Ross makes use of a solitary Azure Resource Manager (ARM) template to deploy a virtual machine and an additional Azure Storage account. You want to review the ARM template that was used by Jon Ross. Solution: You access the Resource Group blade. Does the solution meet the goal?
Yes
No
? Accessing the Resource Group blade allows you to review the ARM template used for deployments. When a Virtual Machine (VM) and an Azure Storage Account are deployed using an Azure Resource Manager (ARM) template, the deployment details, including the ARM template, are stored in the Resource Group under the Deployments section. Steps to View the ARM Template from the Resource Group Blade: Go to the Azure Portal (https://portal.azure.com). Navigate to the “Resource Groups” section. Select the Resource Group that contains the VM and the Storage Account deployed by Jon Ross. Click on the “Deployments” option in the left-hand menu. Select the specific deployment entry that corresponds to the VM or Storage Account deployment. Click “Template” to view the ARM template used. Why This Works: The Deployments section in a Resource Group contains historical deployment records, including the ARM template JSON file used. This method allows you to view and even export the ARM template for further review.
Your company has an Azure subscription that includes a storage account, a resource group, a blob container, and a file share. A colleague named Jon Ross makes use of a solitary Azure Resource Manager (ARM) template to deploy a virtual machine and an additional Azure Storage account. You want to review the ARM template that was used by Jon Ross. Solution: You access the Container blade. Does the solution meet the goal?
Yes
No
? Accessing the Container blade does NOT allow you to review the ARM template used for deployment. The Container blade in Azure is specific to Azure Blob Storage containers and is used to manage stored data, upload/download blobs, and configure access policies. It does not store or display deployment details or ARM templates. Where Should You Check Instead? ? The correct way to view the ARM template is by accessing the “Resource Group” blade and navigating to the Deployments section. Correct Steps to View the ARM Template: Go to the Azure Portal (https://portal.azure.com). Navigate to “Resource Groups” in the left-hand menu. Select the Resource Group where the VM and Storage Account were deployed. Click “Deployments” in the left menu. Select the specific deployment for the VM or Storage Account. Click “Template” to view the ARM template used.
You have an Azure Active Directory (Azure AD) tenant named contoso.onmicrosoft.com. The User administrator role is assigned to a user named Admin1. An external partner has a Microsoft account that uses the user1@outlook.com sign-in. Admin1 attempts to invite the external partner to sign into the Azure AD tenant and receives the following error message: “Unable to invite user user1@outlook.com, generic authorization exception.”. You need to ensure that Admin1 can invite the external partner to sign into the Azure AD tenant. What should you do?
From the Users settings blade, modify the External collaboration settings
From the Custom domain names blade, add a custom domain.
From the organizational relationships blade, add an identity provider.
From the Roles and administrators blade, assign the security administrator role to Admin1.
The error message “Generic authorization exception” indicates that Admin1 lacks the necessary permissions to invite external users. By default, only users with specific admin roles (such as the Global Administrator or Security Administrator) have the required permissions to manage external user invitations. Even though Admin1 has the “User Administrator” role, this role does not grant permissions to configure external collaboration settings or invite external users unless explicitly allowed. By assigning the “Security Administrator” role to Admin1, they gain the necessary permissions to modify security settings related to external users and successfully invite the external partner. (A) Modify External Collaboration Settings (Users blade) ? Incorrect – While this setting controls external user access, Admin1 does not have permission to change these settings. They need a higher role. (B) Add a Custom Domain ? Incorrect – Adding a custom domain is not relevant to inviting external users. The external user’s domain (outlook.com) is already valid. (C) Add an Identity Provider ? Incorrect – Identity providers are used for authentication methods, not for inviting external users.
Which service should you use to visualize network activity across your Azure subscriptions and optimize your network deployment for performance and capacity using traffic flow patterns across your Azure regions and the internet?
Traffic analytics
Azure Organization
Azure Monitor
Azure Advisor
Traffic analytics is a cloud-based solution designed to analyze and visualize network traffic flows across your Azure subscriptions. It leverages data collected from Azure Network Watcher (including NSG flow logs) to provide insights into: Network activity visualization: You can see traffic flow patterns across Azure regions and the internet. Performance optimization: By analyzing traffic patterns, you can identify bottlenecks and optimize network deployment for improved performance and capacity. Capacity planning: It helps you understand how your network is being used, enabling you to plan for future growth or adjustments in resource allocation. Unlike other options, such as Azure Monitor (which focuses on overall resource monitoring) or Azure Advisor (which provides broader optimization recommendations), Traffic analytics is specifically tailored to network traffic analysis, making it the most appropriate service for visualizing network activity and optimizing network deployment based on traffic flow patterns.
While configuring a network security group for traffic analytics you get a “Not found” error. What should you do FIRST as an Azure administrator?
Check the inbound rule of network-security-group
Select a supported region
Specify an outbound security rule to any address over port 80
You need a “owner” role
The “Not found” error when configuring Traffic Analytics in a Network Security Group (NSG) usually occurs when the selected Azure region does not support Traffic Analytics. Traffic Analytics is only available in certain Azure regions, so selecting an unsupported region will prevent configuration. ? The FIRST step is to check if the NSG and Traffic Analytics are in a supported region and, if necessary, move them to a supported region. How to Fix the Issue? Go to the Azure Portal (https://portal.azure.com). Navigate to Network Watcher > Traffic Analytics. Check if your NSG and Traffic Analytics are in a supported region. If necessary, move the NSG to a supported region or deploy Traffic Analytics in a supported regio
Your company registers a domain name of contoso.com. You create an Azure DNS zone named contoso.com, and then you Add an “A” record to the zone for a host named www.contoso.com, that has an IP address of 131.107.1.10. You discover that Internet hosts are unable to resolve www.contoso.com to the 131.107.1.10 IP address. You need to resolve the name resolution issue. Solution: You modify the SOA record in the contoso.com zone. Does this meet the goal?
Yes
No
Modifying the SOA (Start of Authority) record will NOT resolve the issue because the SOA record is used for DNS zone authority and does not affect name resolution for external clients. The issue is that Internet hosts cannot resolve www.contoso.com to 131.107.1.10. This likely means that the Azure DNS zone is not properly delegated to the domain registrar. Why Modifying the SOA Record Won’t Help? The SOA record defines the primary name server for the DNS zone and contains administrative information (e.g., serial number, refresh interval). It does not control external DNS resolution, so changing it will not fix the issue. What is the Correct Solution? To ensure external name resolution, you should: Check if the domain is correctly delegated to Azure DNS: Go to your domain registrar (e.g., GoDaddy, Namecheap). Ensure the Azure DNS name servers are set as the authoritative name servers for contoso.com. Verify NS (Name Server) Records in Azure DNS: In Azure Portal, navigate to Azure DNS Zone (contoso.com). Check if the NS records match those provided by Azure. Test DNS Resolution: Use an online tool like MXToolbox to check the DNS records. Run the following command in a terminal nslookup www.contoso.com If the lookup fails, the issue is likely incorrect delegation.
Your company registers a domain name of contoso.com. You create an Azure DNS zone named contoso.com, and then you add an “A” record to the zone for a host named www.contoso.com, that has an IP address of 131.107.1.10. You discover that Internet hosts are unable to resolve www.contoso.com to the 131.107.1.10 IP address. You need to resolve the name resolution issue. Solution: You add an NS record to the contoso.com Azure DNS zone. Does this meet the goal?
Yes
No
Adding an NS (Name Server) record to the Azure DNS zone will NOT resolve the issue because NS records in Azure DNS are used for internal delegation within Azure DNS and do not affect external name resolution. The issue is that Internet hosts cannot resolve www.contoso.com to 131.107.1.10. This typically happens when the Azure DNS zone is not properly delegated to the domain registrar. Why Adding an NS Record Won’t Help? NS (Name Server) records within Azure DNS only control subdomain delegation within Azure. They do NOT affect how external resolvers find your DNS zone. If your domain (contoso.com) is not properly delegated at the domain registrar, then external users won’t be able to resolve www.contoso.com, regardless of any NS records added inside Azure. Why Not the Other Solutions? Modify the SOA record ? Incorrect – SOA records control DNS zone authority and refresh intervals, not external resolution. Modify the NS record inside Azure DNS ? Incorrect – This only affects internal delegation within Azure DNS, not how external users resolve the domain. Ensure the domain registrar uses Azure DNS as the authoritative DNS provider ? Correct – The registrar must point to Azure DNS for proper resolution.
Your company registers a domain name of contoso.com. You create an Azure DNS zone named contoso.com, and then you add an “A” record to the zone for a host named www.contoso.com, that has an IP address of 131.107.1.10. You discover that Internet hosts are unable to resolve www.contoso.com to the 131.107.1.10 IP address. You need to resolve the name resolution issue. Solution: You modify the name servers at the domain registrar. Does this meet the goal?
Yes
No
Modifying the name servers at the domain registrar is the correct solution because it ensures that external DNS queries for www.contoso.com are directed to Azure DNS. Why is this the correct solution? Azure DNS is a hosting service for DNS domains in Azure. However, for Internet users to resolve your domain (e.g., www.contoso.com), your domain registrar (such as GoDaddy, Namecheap, or Google Domains) must be configured to use Azure’s name servers. When you create an Azure DNS zone (contoso.com), Azure assigns four authoritative name servers. These name servers are listed in the NS (Name Server) records of the Azure DNS zone. By default, the domain registrar still points to its name servers, not Azure DNS. As a result, external users won’t be able to resolve www.contoso.com. Solution: Update the Name Servers at the Registrar Go to your domain registrar’s control panel. Locate the DNS settings for contoso.com. Replace the current name servers with the four Azure DNS name servers provided in the Azure portal. Save the changes and wait for DNS propagation (which may take a few hours).
Your company registers a domain name of contoso.com. You create an Azure DNS zone named contoso.com, and then you add an “A” record to the zone for a host named www.contoso.com that has an IP address of 131.107.1.10. You discover that Internet hosts are unable to resolve www.contoso.com to the 131.107.1.10 IP address. You need to resolve the name resolution issue. Solution: You create a PTR record for www in the contoso.com zone. Does this meet the goal?
Yes
No
Creating a PTR (Pointer) record will not resolve the issue because PTR records are used for reverse DNS lookups, not for standard hostname resolution. Understanding the Issue: Your company has: Registered a domain name: contoso.com Created an Azure DNS zone: contoso.com Added an “A” record: www.contoso.com ? 131.107.1.10 However, Internet users cannot resolve www.contoso.com to 131.107.1.10. ? The most common reason for this issue is that the domain registrar is not pointing to Azure’s name servers (which means the “A” record is not accessible from the internet). Why a PTR Record Won’t Help: A PTR (Pointer) record is used for reverse DNS lookups, which means it maps an IP address to a domain name (the opposite of an “A” record). PTR records are typically used for email server validation (SPF, DKIM) and troubleshooting. They are configured in reverse DNS lookup zones managed by the owner of the IP address (usually the ISP or cloud provider). Adding a PTR record in Azure DNS does not impact forward lookups (hostname ? IP address). Correct Solution: Instead of adding a PTR record, you need to: ? Modify the name servers at your domain registrar to point to the Azure DNS name servers assigned to your contoso.com zone.
Your company has an Azure Storage account named “BlackBoard-Storage”. You must copy the files hosted on your on-premises network to “BlackBoard-Storage” using AzCopy. Which Azure Storage services should you use?
Table and Queue only
Blob, Table, and File only
Blob, File, Table, and Queue
Blob and File only
Understanding Azure Storage Services: Azure Storage offers different services: Blob Storage: Stores unstructured data such as documents, images, and backups. File Storage: Provides fully managed file shares accessible via SMB protocol. Table Storage: NoSQL key-value storage for structured data. Queue Storage: Message queue service for application communication. Why Only Blob and File? AzCopy is a command-line tool optimized for copying data to and from Azure Blob Storage and Azure File Storage. AzCopy does not support copying data to Table or Queue Storage, as these services are designed for structured data (Table) and messaging (Queue) rather than file transfers.
You have an Azure subscription named Subscription1 that contains a virtual network named VNet1. VNet1 is in a resource group named RG1. Subscription1 has a user named User1. User1 has the following roles: 1)Reader 2)Security Admin 3)Security Reader You must ensure that User1 can assign the Reader role for VNet1 to other users. What should you do?
Assign User1 the Network Contributor role for VNet1.
Remove User1 from the Security Reader role for Subscription1. Assign User1 the Contributor role for RG1.
Assign User1 the Owner role for VNet1.
Assign User1 the Network Contributor role for RG1.
It is the only role in the given options to have the capability to assign permissions.
You have an on-premises server that contains a folder named D:\Folder1. You need to copy the contents of D:\Folder1 to the public container in an Azure Storage account named “BlackBoard-Storage”. Which command should you run?
https://techdata.blob.core.windows.net/public
azcopy sync D:\folder1 https://techdata.blob.core.windows.net/public -snapshot
azcopy copy “D:\folder1” “https://account.blob.core.windows.net/mycontainer1/?xxxxx” recursive=true
az storage blob copy start-batch D:\Folder1 https://techdata.blob.core.windows.net/public
Understanding the AzCopy command: The azcopy copy command is used to transfer files and directories to and from Azure Blob Storage. “D:\folder1” represents the local source folder on the on-premises server. “https://account.blob.core.windows.net/mycontainer1/?xxxxx” represents the destination URL of the Azure Blob Storage container (with a SAS token for authentication). -recursive=true ensures that all files and subdirectories within D:\folder1 are copied. Why this is the correct choice: azcopy copy is the correct command for copying files to Azure Blob Storage. Specifying the local path (D:\folder1) ensures that the source is correctly referenced. Using the container URL (https://account.blob.core.windows.net/mycontainer1/?xxxxx) ensures that files are uploaded to the correct Azure Storage account. The -recursive=true flag makes sure that all files inside Folder1 are copied.
You have an Azure Storage account named storage1 that uses Azure Blob storage and Azure File storage. You need to use AzCopy to copy data to the blob storage and file storage in storage1. Which authentication method should you use for Blob Storage?
Azure Active Directory (Azure AD) only
Shared access signatures (SAS) only
Access keys and shared access signatures (SAS) only
Microsoft Entra ID and SAS
Azure Active Directory (Azure AD), access keys, and SAS
To authenticate and copy data to Azure Blob Storage using AzCopy, the supported authentication methods are: Microsoft Entra ID (formerly Azure AD) Shared Access Signatures (SAS) Why these methods? Microsoft Entra ID (Azure AD): Provides role-based access control (RBAC) for security. Users must have the Storage Blob Data Contributor or similar role to perform data operations. This is useful for managing access in enterprise environments securely. Shared Access Signature (SAS): A temporary, token-based URL that grants limited permissions to access the storage account. It is commonly used for one-time or temporary access when transferring data using AzCopy.
You have an Azure Storage account named storage1 that uses Azure Blob storage and Azure File storage. You need to use AzCopy to copy data to the blob storage and file storage in storage1. Which authentication method should you use for File Storage?
Azure Active Directory (Azure AD) only
Shared access signatures (SAS) only
Access keys and shared access signatures (SAS) only
Microsoft Entra ID and SAS
Azure Active Directory (Azure AD), access keys, and SAS
Azure File Storage authentication methods are different from Blob Storage. When using AzCopy to copy data to Azure File Storage, the only supported authentication method is Shared Access Signatures (SAS). Why SAS is the only correct method? Azure File Storage does not support Azure Active Directory (Azure AD) for AzCopy authentication. Unlike Blob Storage, Azure File Storage does not integrate with Microsoft Entra ID (formerly Azure AD) for data transfer using AzCopy. While Azure AD can be used for authentication in some cases (e.g., when mounting Azure Files via SMB), AzCopy does not support Azure AD authentication for File Storage. Access keys are not used with AzCopy for File Storage. AzCopy does not support using account access keys for Azure File Storage authentication. Instead, SAS tokens must be used to securely grant temporary access to the storage account. SAS is the correct method because it provides secure and temporary access. A SAS token grants fine-grained permissions for specific storage resources, such as reading, writing, or deleting files. This reduces security risks compared to using access keys, which provide full access to the storage account.
You have a registered DNS domain named contoso.com. You create a public Azure DNS zone named contoso.com. You need to ensure that records created in the contoso.com zone are resolvable from the internet. What should you do?
Create NS records in contoso.com.
Modify the SOA record in the DNS domain registrar.
Create the SOA record in contoso.com.
Modify the NS records in the DNS domain registrar
When you create a public Azure DNS zone for your domain (e.g., contoso.com), it is hosted on Azure’s DNS servers. However, for records within this zone to be resolvable from the internet, you need to ensure that public DNS queries reach Azure’s DNS servers. Steps to make the DNS zone resolvable: Azure assigns authoritative name servers (NS records) to the DNS zone. When you create the public DNS zone contoso.com in Azure, it automatically generates a set of NS (Name Server) records pointing to Azure’s DNS servers (e.g., ns1-xx.azure-dns.com, ns2-xx.azure-dns.net, etc.). You must update the domain registrar with Azure’s NS records. Since your domain (contoso.com) is registered with an external domain registrar (e.g., GoDaddy, Namecheap, etc.), the registrar’s NS records must be updated to point to Azure’s DNS name servers. This step tells the global DNS system that Azure is now the authoritative DNS provider for your domain.
Your organization has deployed multiple Azure virtual machines configured to run as web servers and an Azure public load balancer named TD1. There is a requirement that TD1 must consistently route your user’s request to the same web server every time they access it. What should you configure?
Hash based
Session persistence: None
Session persistence: None
Health probe
An Azure Public Load Balancer (like TD1 in this case) distributes incoming traffic across multiple virtual machines (VMs) that are configured as web servers. The goal is to ensure that a user’s request is consistently routed to the same web server every time they access it. This behavior is controlled by the session persistence setting. What is Session Persistence (Client IP)? Session persistence: Client IP ensures that a user’s requests are always directed to the same backend VM based on their IP address. This is useful for web applications that store session data locally on a specific VM instead of using a distributed session store.
You plan to create an Azure container instance named container1 that will use a Docker image named Image1. You need to ensure that container1 has persistent storage. Which Azure resources should you deploy for the persistent storage?
an Azure container registry
an Azure Storage account and a file share
an Azure Storage account and a blob container
an Azure SQL database
A standard Docker container volume is normally a directory stored on the Docker host machine. This makes the container dependent on the files on a particular host and thus makes it hard to migrate and scale out easily. With the Azure File Storage plugin, we can mount Azure File Storage shares as directories on your host’s file system and make them available to containers, which can now all make use of the Docker volume created through the plugin. Azure File Storage volume plugin is not limited to ease of container migration. It also allows a file share to be shared among multiple containers (even though they are on different hosts) to collaborate on workloads or share configurations or secrets of an application running on multiple hosts. Another use case is uploading metrics and diagnostic data, such as logs from applications to a file share for further processing.
You have an app named App1 that runs on two Azure virtual machines named VM1 and VM2. You plan to implement an Azure Availability Set for App ?. The solution must ensure that App1 is available during planned maintenance of the hardware hosting VM1 and VM2. What should you include in the Availability Set?
one update domain
two fault domains
one fault domain
two update domains
An Azure Availability Set is designed to ensure high availability of applications running on multiple virtual machines (VMs). It protects against both planned maintenance (such as software updates or reboots) and unplanned failures (such as hardware failures). What are Update Domains? Update Domains (UDs) help protect against planned maintenance events. When Azure performs maintenance (e.g., applying patches, updating software), it does so one Update Domain at a time to prevent downtime. If you configure two Update Domains, VM1 and VM2 will be placed in different UDs, ensuring that at least one VM remains available while the other undergoes maintenance.
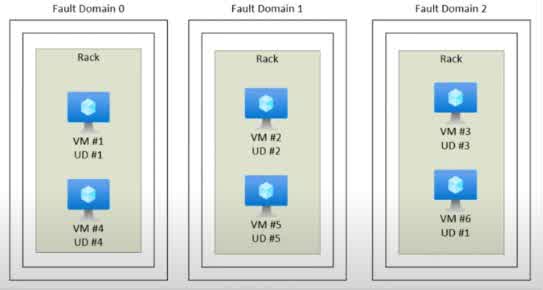
You have an Azure subscription named Subscription1. You have 5 TB of data that you need to transfer to Subscription1. You plan to use an Azure Import/Export job. What can you use as the destination of the imported data?
Azure Cosmos DB database
Azure Blob storage
Azure Data Lake Store
the Azure File Sync Storage Sync Service
Azure Import/Export is a service that allows users to transfer large amounts of data to and from Azure Storage using physical hard drives. This is useful when transferring large datasets (like 5 TB in this case) over the internet would be too slow or expensive. What Can Be the Destination for Imported Data? The Azure Import/Export service supports importing data into Azure Blob Storage or Azure Files (in an Azure Storage account). Since Azure Blob Storage is one of the primary storage solutions in Azure for unstructured data, it is the correct answer. Why the Other Options Are Incorrect? a) Azure Cosmos DB database: Azure Import/Export does not support importing data directly into Cosmos DB. Instead, data should be uploaded to Blob Storage first and then migrated to Cosmos DB. c) Azure Data Lake Store: Data Lake Storage is not a supported destination for Azure Import/Export. However, you can first import the data into Azure Blob Storage and then move it to Data Lake. d) Azure File Sync Storage Sync Service: Azure File Sync is used for syncing on-premises file servers with Azure File Shares, but it does not act as a direct destination for Azure Import/Export.
You have an Azure subscription named Subscription1 that contains a virtual network named VNet1. VNet1 is in a resource group named RG1. Subscription1 has a user named User1. User1 has the following roles: · Reader · Security Admin · Security Reader You need to ensure that User1 can assign the Reader role for VNet1 to other users. What should you do?
Assign User1 the Network Contributor role for VNet1.
b) Remove User1 from the Security Reader role for Subscription1. Assign User1 the Contributor role for RG1.
Assign User1 the Owner role for VNet1.
Assign User1 the Network Contributor role for RG1.
In Azure Role-Based Access Control (RBAC), only users with Owner or User Access Administrator roles can assign roles to other users. What does User1 currently have? Reader: Can view resources but cannot modify or assign roles. Security Admin & Security Reader: These roles are related to security settings but do not grant permission to assign roles. Why Assigning the Owner Role to User1 Works? The Owner role grants full control over the resource (in this case, VNet1). The Owner can manage access permissions, meaning User1 can now assign roles (such as Reader) to other users for VNet1.
You plan to deploy a Ubuntu Server virtual machine to your company’s Azure subscription. You are required to implement a custom deployment that includes adding a particular trusted root certification authority (CA). Which of the following should you use to create the virtual machine?
The New-AzureRmVm cmdlet
The New-AzVM cmdlet
The Create-AzVM cmdlet
The az vm create command
A Root CA is just that—the “root” of the chain of trust. It is a certificate authority that can be used to issue other certificates, which means Root CAs must be secure and trusted.
You have an Azure subscription named Subscription1 that contains a virtual network named VNet1. VNet1 is in a resource group named RG1. Subscription1 has a user named User1. User1 has the following roles: · Reader · Security Admin · Security Reader You need to ensure that User1 can assign the Reader role for VNet1 to other users. What should you do?
Assign User1 the Network Contributor role for VNet1.
Remove User1 from the Security Reader role for Subscription1. Assign User1 the Contributor role for RG1.
Assign User1 the Role Based Access Control Administrator for VNet1
Assign User1 the Network Contributor role for RG1.
In Azure Role-Based Access Control (RBAC), only users with specific roles can assign roles to other users. The Role-Based Access Control (RBAC) Administrator role allows a user to manage role assignments. Current Roles of User1: Reader: Can only view resources (cannot assign roles). Security Admin & Security Reader: Related to security settings but do not allow role assignments. To allow User1 to assign the Reader role for VNet1 to other users, they need RBAC permissions to manage access control. Why Assigning the Role-Based Access Control Administrator Role Works? The Role-Based Access Control Administrator role allows managing role assignments for the resource (VNet1). This means User1 can now assign the Reader role (or other roles) to other users. Why the Other Options Are Incorrect? a) Assign User1 the Network Contributor role for VNet1- The Network Contributor role allows managing network resources but does not permit role assignments. b) Remove User1 from the Security Reader role for Subscription1. -Assign User1 the Contributor role for RG1. The Contributor role allows resource modifications but does not allow role assignments. Removing Security Reader is unnecessary. d) Assign User1 the Network Contributor role for RG1—Again, Network Contributor is only for network configuration and does not allow assigning roles.
You have an Azure subscription named Subscription1 that contains a virtual network named VNet1. VNet1 is in a resource group named RG1. Subscription1 has a user named User1. User1 has the following roles: · Reader · Security Admin · Security Reader You need to ensure that User1 can assign the Reader role for VNet1 to other users. What should you do?
Assign User1 the Network Contributor role for VNet1.
Remove User1 from the Security Reader role for Subscription1. Assign User1 the Contributor role for RG1.
Assign User1 the User Access Administrator for VNet1
Assign User1 the Network Contributor role for RG1.
In Azure Role-Based Access Control (RBAC), only users with certain roles can assign roles to other users. The User Access Administrator role allows users to manage access permissions, meaning they can assign and remove roles for the specific resource they have this role on. Current Roles of User1 and Why They Are Not Enough Reader ? Can only view resources, cannot assign roles. Security Admin & Security Reader ? Related to security settings, do not grant role assignment permissions. Since User1 needs to assign the Reader role for VNet1 to other users, they need a role that allows managing access control.
You have an Azure Active Directory (Azure AD) tenant that contains 5,000 user accounts. You create a new user account named AdminUser1. You need to assign the User administrator role to AdminUser1. What should you do from the user account properties?
From the Licenses blade, assign a new license
From the Directory role blade, modify the directory role
From the Groups blade, invite the user account to a new group
1. Sign-in to the Azure portal using an account that has the necessary administrative privileges. 2. In the left-hand menu, go to “Azure Active Directory.” 3. Under “Azure Active Directory,” click on “Roles and administrators.” 4. In the “Directory roles” blade, locate the “User administrator” role. 5. Click on the “User administrator” role to open it. 6. In the “User administrator” blade, click on the “Add assignments” button. 7. Search for and select the user account “AdminUser1.” 8. Click the “Add” button to assign the “User administrator” role to AdminUser1. 9. This will grant AdminUser1 the necessary administrative privileges as a User administrator in Azure AD.
You have an Azure Active Directory (Azure AD) tenant named contoso.onmicrosoft.com that contains 100 user accounts. You purchase 10 Azure AD Premium P2 licenses for the tenant. You need to ensure that 10 users can use all the Azure AD Premium features. What should you do? .
From the Groups blade of each user, invite the users to a group.
From the Licenses blade of Azure AD, assign a license.
From the Directory role blade of each user, modify the directory role.
From the Azure AD domain, add an enterprise application.
Azure Active Directory (Azure AD) Premium P2 includes advanced security features like Identity Protection, Privileged Identity Management (PIM), and Conditional Access. However, Azure AD Premium features are only available to users who have been assigned a valid license. Since you purchased 10 Azure AD Premium P2 licenses, you need to assign these licenses to 10 specific users to ensure they can use all the premium features. How to Assign Licenses in Azure AD? Sign in to the Azure portal as a Global Administrator or License Administrator. Navigate to Azure Active Directory > Licenses. Select Azure AD Premium P2. Click Assign and select the 10 users. Confirm and save the changes. Once assigned, only these 10 users will have access to all Azure AD Premium P2 features.
Your company wants to use Microsoft Entra services. You are required to license each of your users or groups (and associated members) for that service. How should you do it?
From the Groups blade of each user, invite the users to a group.
From the Azure AD domain, add an enterprise application.
Microsoft Entra (formerly Azure AD) provides identity and access management services, and users must be licensed to use its features. To ensure that each user or group (including its members) is properly licensed, you must assign licenses through the Microsoft Entra admin center under Billing > Licenses. How to Assign Licenses in Microsoft Entra? Sign in to the Microsoft Entra admin center. Navigate to Identity > Billing > Licenses. Select the appropriate license (e.g., Entra ID P1, Entra ID P2). Click Assign and select users or groups. Confirm and save the changes. By assigning licenses at the group level, all members of that group will automatically receive the license.
You have an Azure subscription that contains a storage account named storage1. You create a blob container named container1 in storage1. What is the maximum number of stored Access policies that you can create for container1?
1
3
5
10
64
In Azure Storage, Stored Access Policies are used to define shared access signatures (SAS) with predefined permissions, start times, and expiration dates. These policies help manage access control more effectively, allowing you to modify or revoke permissions without changing the SAS tokens. For each Blob container, Table, Queue, or File share, Azure allows a maximum of 5 Stored Access Policies. This means for container1 in storage1, you can create up to 5 Stored Access Policies to define access permissions for SAS tokens.
You have an Azure Active Directory (Azure AD) tenant named contosocloud.onmicrosoft.com. Your company has a public DNS zone for contoso.com. You add contoso.com as a custom domain name to Azure AD. You need to ensure that Azure can verify the domain name. Which type of DNS record should you create?
MX
NSEC
PTR
RRSIG
When adding a custom domain (e.g., contoso.com) to Azure Active Directory (Azure AD), Azure needs to verify ownership of the domain. This is done by creating a specific DNS record in the domain’s public DNS settings. Azure supports TXT or MX records for domain verification. While a TXT record is the most common choice, an MX (Mail Exchange) record can also be used if TXT is not an option. Since the question only lists MX as an available choice, MX is the correct answer. How Azure AD Domain Verification Works? In the Azure AD admin center, you add contoso.com as a custom domain. Azure provides a DNS record (TXT or MX) that you must create in your public DNS zone (e.g., GoDaddy, Cloudflare, or Azure DNS). You go to your DNS provider, create an MX record with the value provided by Azure. After a few minutes, you click Verify in Azure AD, and Azure checks the DNS records. Once verified, contoso.com is linked to your Azure AD tenant.
You have an Azure Active Directory (Azure AD) tenant named contosocloud.onmicrosoft.com. Your company has a public DNS zone for contoso.com. You add contoso.com as a custom domain name to Azure AD. You need to ensure that Azure can verify the domain name. Which type of DNS record should you create?
SRV
PTR
RRSIG
TXT
When adding a custom domain (e.g., contoso.com) to Azure Active Directory (Azure AD), Azure needs to verify that you own the domain. This is done by creating a TXT record in the domain’s public DNS settings. A TXT (Text) record allows you to store arbitrary text in a domain’s DNS configuration. Microsoft provides a unique TXT value that must be added to your DNS provider (such as GoDaddy, Cloudflare, or Azure DNS). After the TXT record is created, Azure queries the DNS system to verify that the record exists, confirming that you own the domain. How to Verify a Custom Domain in Azure AD Using a TXT Record? Sign in to the Azure AD admin center. Navigate to Azure Active Directory > Custom domain names. Click Add custom domain and enter contoso.com. Azure provides a TXT record with a unique verification string. Go to your DNS provider, create a TXT record, and paste the value. Wait a few minutes (or up to 72 hours for DNS propagation). Click Verify in Azure AD. Once verified, contoso.com is linked to your Azure AD tenant, allowing users to log in using user@contoso.com instead of user@contosocloud.onmicrosoft.com.
You need to create more than one DNS record with a given name and type. Suppose the ‘www.thetechblackboard.com’ web site is hosted on two different IP addresses. The website requires two different A records, one for each IP address. Here is an example of a record set. How would you create the second record? www.thetechblackboard.com 3600 IN A 133.102.188.46 www.thetechblackboard.com 3600 IN A 133.102.185.46
Add that record to the existing record set
Create an additional record set
Add SPF records
Add SRV records
Sometimes you need to create more than one DNS record with a given name and type. For example, suppose the ‘www.contoso.com’ web site is hosted on two different IP addresses. The website requires two different A records, one for each IP address. When you need to create multiple DNS records with the same name and type, you do not create separate record sets. Instead, you add the additional records to the existing record set. In this case, the domain “www.thetechblackboard.com” needs to have two A records, each pointing to a different IP address: www.thetechblackboard.com 3600 IN A 133.102.188.46 www.thetechblackboard.com 3600 IN A 133.102.185.46 By adding both IP addresses to the same record set, the DNS server returns both IPs, and the client’s device will use one of them (usually the first one or based on a load-balancing method). This is useful for: Load balancing across multiple servers Redundancy (if one IP is down, the other is still available) Failover configurations
You have an Azure subscription named Subscription1. You have 5 TB of data that you need to transfer to Subscription1. You plan to use an Azure Import/Export job. What can you use as the destination of the imported data?
Azure Blob Storage
Azure Data Lake Store
Azure SQL Database
A Virtual Machine
Azure Import/Export is a service that allows users to securely transfer large amounts of data to and from Azure using hard drives. It is primarily used to move large datasets to Azure Storage, which includes Azure Blob Storage and Azure Files. Why Azure Blob Storage? Designed for Large-Scale Data Ingestion: Azure Blob Storage is optimized for handling large amounts of unstructured data, making it the ideal target for bulk data transfer. Supports Azure Import/Export: Microsoft specifically supports Azure Blob Storage and Azure Files as valid destinations for imported data. Cost-Effective & Scalable: Blob storage provides scalable and cost-efficient storage solutions compared to other Azure services. Why Not the Other Options? b) Azure Data Lake Store – Azure Import/Export does not support direct imports to Azure Data Lake. However, data can be first imported into Azure Blob Storage and then moved to Azure Data Lake if needed. c) Azure SQL Database – SQL databases require structured data, while Import/Export is designed for bulk data transfers to storage services rather than databases. d) A Virtual Machine – Azure Import/Export is a storage-based solution and does not directly import data into a VM. Instead, data must be imported to Blob Storage and then accessed by a VM if necessary.