What are the TWO examples of physical security methods?
Firewalls
Keys
Multifactor authentication
Biometric locks
These are physical security methods because they are tangible tools used to restrict physical access to systems or locations: Keys: Traditional physical devices used to lock and unlock doors or cabinets, controlling access to physical spaces. Biometric locks: Use physical traits (like fingerprints or retina scans) to allow access, making them a physical access control mechanism. Why the others are incorrect: Firewalls: These are logical security measures that control network traffic—not physical. Multifactor authentication: A logical security method that verifies identity using a combination of factors, often software-based. So, Keys and Biometric locks are the correct physical security examples.
A user has a program that defaults to saving files in a folder in his C: drive, so he wants to have Full Control over this drive and all of its contents. What are the TWO reasons why you won’t grant him this access?
It is a security risk.
It violates the Windows EULA.
It violates the principle of least privilege.
Only administrators can have access to the C: drive.
Granting a regular user Full Control over the entire C: drive is a bad security practice for two main reasons: It is a security risk: Full Control gives the user the ability to modify, delete, or overwrite critical system files, potentially leading to system instability, malware infection, or accidental damage. It violates the principle of least privilege: This principle states that users should be given the minimum level of access required to perform their tasks. Giving Full Control over the entire drive far exceeds what’s necessary just to save files. Why the other options are incorrect: It violates the Windows EULA: The Windows End User License Agreement doesn’t restrict file permissions at this level. Only administrators can have access to the C: drive: Not entirely true — users can access portions of the C: drive (like their own folders) without being administrators. Full access is restricted, not general access. Therefore, the correct answers are security risk and least privilege violation.
On their network, your client has a computer that they have set up as a secure web server. How should their router be configured to make sure that traffic intended for the server is directed there?
Forward outgoing requests for port 443 to the web server’s IP address.
Set the router to use UPnP.
Forward incoming requests for port 443 to the web server’s IP address.
Create a screened subnet for the web server.
Forward incoming requests for port 443 to the web server’s IP address: Port 443 is used for HTTPS traffic, which is typically the standard for secure web servers. To ensure that incoming HTTPS requests (traffic) intended for the web server are correctly routed, you need to configure the router to forward incoming traffic on port 443 (the default port for HTTPS) to the internal IP address of the web server. This process is known as port forwarding and ensures that external users’ requests for your web server are directed to the correct machine within your network. Create a screened subnet for the web server: A screened subnet (or DMZ) adds a layer of security by placing the web server in a separate network segment from the internal network. The web server is accessible from the internet but is isolated from the internal network, which helps protect sensitive internal systems. This segmentation limits the exposure of the internal network to potential attacks on the web server. Although it’s not strictly necessary to forward traffic to the server, using a screened subnet provides additional protection, especially for a public-facing service like a web server. Why the other options are incorrect: Forward outgoing requests for port 443 to the web server’s IP address: Port forwarding is typically used for incoming requests, not outgoing. The server will automatically send responses to outgoing requests without needing additional configuration. Set the router to use UPnP (Universal Plug and Play): UPnP allows devices to dynamically open ports without manual configuration, but it’s generally less secure for a secure web server setup. It’s better to manually configure port forwarding to ensure only specific ports (like port 443) are forwarded to the server. By forwarding the correct ports and using a screened subnet, you can make sure the web server is securely accessible while protecting your internal network.
You have a Microsoft 365 tenant and an Azure Active Directory (Azure AD) tenant named contoso.com. You plan to grant three users named User1, User2, and User3 access to a temporary Microsoft SharePoint document library named Library1. You need to create groups for the users. The solution must ensure that the groups are deleted automatically after 180 days. Which two groups should you create? Each correct answer presents a complete solution. NOTE: Each correct selection is worth one point.
a Microsoft 365 group that uses the Assigned membership type
a Security group that uses the Assigned membership type
a Microsoft 365 group that uses the Dynamic User membership type
a Security group that uses the Dynamic User membership type
a Security group that uses the Dynamic Device membership type
To meet the requirement of automatically deleting groups after 180 days, we must use Microsoft 365 groups because they support expiration policies in Azure Active Directory (Azure AD). Security groups do not support expiration policies. Why is (a) Correct? ? Microsoft 365 Group (Assigned Membership) Supports expiration policies, so it can be automatically deleted after 180 days. Assigned membership allows an admin to manually add User1, User2, and User3 to the group. Best when users need to be manually managed. Why is (c) Correct? ? Microsoft 365 Group (Dynamic User Membership) Supports expiration policies, ensuring automatic deletion after 180 days. Dynamic User membership automatically adds/removes users based on Azure AD rules (e.g., if their department is “Finance” or job title is “Analyst”). Best when access needs to be automated based on attributes. Why Are the Other Options Incorrect? ? (b) A Security group that uses the Assigned membership type Security groups do NOT support expiration policies, meaning they won’t be deleted automatically after 180 days. ? (d) A Security group that uses the Dynamic User membership type Security groups do NOT support expiration policies, even if they use dynamic user membership. ? (e) A Security group that uses the Dynamic Device membership type Device-based membership is irrelevant since we are managing users, not devices. Security groups do NOT support expiration policies.
You have an Azure subscription. Users access the resources in the subscription from either home or from customer sites. From home, users must establish a point-to-site VPN to access the Azure resources. The users on the customer sites access the Azure resources by using site-to-site VPNs. You have a line-of-business app named App1 that runs on several Azure virtual machines. The virtual machines run Windows Server 2016. You need to ensure that the connections to App1 are spread across all the virtual machines. What are two possible Azure services that you can use? Each correct answer presents a complete solution. NOTE: Each correct selection is worth one point.
an internal load balancer
a public load balancer
an Azure Content Delivery Network (CDN)
Traffic Manager
an Azure Application Gateway
Your goal is to distribute incoming traffic for App1, which is running on multiple Azure virtual machines (VMs). Since users connect via VPN (Point-to-Site and Site-to-Site), the traffic remains within the Azure private network, meaning public-facing solutions (like a public load balancer or CDN) are not needed. The two best options for load balancing private network traffic are: 1?? Internal Load Balancer (ILB) Why? An Internal Load Balancer (ILB) is designed for private network traffic within Azure. It distributes traffic only inside a Virtual Network (VNet) without exposing resources to the internet. Since users connect over a VPN (which extends their network to Azure), ILB ensures that their requests are properly balanced across all VMs running App1. 2?? Azure Application Gateway Why? Application Gateway is a layer 7 (HTTP/HTTPS) load balancer that distributes web traffic across VMs. It provides features like SSL termination, cookie-based session affinity, and Web Application Firewall (WAF). If App1 is a web application, this is a great choice as it optimizes and secures HTTP/S traffic. Why Not the Other Options? ? (b) A Public Load Balancer A public load balancer distributes traffic from the internet to Azure resources. Since users connect via VPN, the traffic is private, so a public load balancer is not needed. ? (c) Azure Content Delivery Network (CDN) CDN is used for caching static content (e.g., images, videos, scripts) and delivering it to users with lower latency. It does not distribute requests to VMs running App1. ? (d) Traffic Manager Traffic Manager is a DNS-based global traffic routing service. It is used to route traffic across multiple Azure regions but does not distribute traffic among VMs within a VNet.
What should you change immediately when configuring a new wireless router for a home office?
The router’s default administrator username and password.
The guest account password.
The default SSID.
The radio power level.
When setting up a new wireless router, two of the most important changes you should make immediately are: Changing the default administrator username and password: Routers come with default credentials that are widely known and published online. If not changed, anyone who accesses your network could log into the router and modify settings or disable security. Changing the default SSID (network name): Default SSIDs often indicate the make/model of the router, which could help attackers identify vulnerabilities. A unique SSID also helps you distinguish your network from nearby ones. Why the others are less critical at setup: Guest account password: Important if guest access is enabled, but guest access should be disabled by default unless needed. Radio power level: This can help control signal range and reduce interference, but it’s a fine-tuning step, not a top immediate security priority.
Your company has an Azure subscription that includes a Recovery Services vault. You want to use Azure Backup to schedule a backup of your company’s virtual machines (VMs) to the Recovery Services vault. Which of the following VMs can you back up? (Choose all that apply)
VMs that run Windows 10
VMs that run Windows Server 2012 or higher
VMs that have NOT been shut down
VMs that run Debian 8.2+
VMs that have been shut down
Azure Backup, through the Recovery Services vault, allows backing up virtual machines regardless of their OS version, power state, or type (Windows or Linux). Let’s analyze each option: ? (a) VMs that run Windows 10 Supported: Yes, Azure Backup supports Windows 10 (Enterprise, Pro, and Education editions). Limitation: Windows 10 Home edition is not supported in Azure VM scenarios. ? (b) VMs that run Windows Server 2012 or higher Supported: Yes, Windows Server 2012, 2016, 2019, and 2022 are all supported for Azure Backup. Why? Azure Backup fully integrates with Windows Server operating systems for backups at the VM level and file/folder level. ? (c) VMs that have NOT been shut down Supported: Yes, running VMs can be backed up without downtime. How? Azure Backup takes snapshots while the VM is running, ensuring minimal disruption. ? (d) VMs that run Debian 8.2+ Supported: Yes, Azure Backup supports many Linux distributions, including: Debian 8.2 and higher Ubuntu CentOS Red Hat Enterprise Linux (RHEL) SUSE Linux Enterprise Server (SLES) Oracle Linux Why? Azure Backup uses the Linux VM agent to take snapshots and perform backups. ? (e) VMs that have been shut down Supported: Yes, even stopped (deallocated) VMs can be backed up. How? Azure Backup captures snapshots of the disks, meaning the VM does not have to be running. Benefit? This helps save costs, as deallocated VMs do not incur compute charges but can still be backed up.
You have an Azure subscription that contains the following virtual networks: + VNet1 has an IP address range of 196.162.0.0/24. + VNet2 has an IP address range of 10.10.0.0/24. + VNet3 has an IP address range of 196.162.0.0/16. You need to configure virtual network peering. Which two peering can you create? Each correct answer presents a complete solution
VNET1 can be peered with VNET2
VNET1 can be peered with VNET3
VNET2 can be peered with VNET3
VNET3 can be peered with VNET1
Azure Virtual Network Peering allows virtual networks (VNets) to connect and communicate as if they were a single network. However, there is a key requirement: VNets cannot be peered if they have overlapping IP address ranges. Step-by-Step Peering Analysis: VNet1 (196.162.0.0/24) and VNet2 (10.10.0.0/24) ? ? Peering Allowed These two VNets have different, non-overlapping IP address ranges, so they can be peered. VNet1 (196.162.0.0/24) and VNet3 (196.162.0.0/16) ? ? Peering NOT Allowed VNet3’s IP range (196.162.0.0/16) overlaps with VNet1’s IP range (196.162.0.0/24). Because of this overlap, Azure does not allow peering between these two VNets. VNet2 (10.10.0.0/24) and VNet3 (196.162.0.0/16) ? ? Peering Allowed These two VNets have different, non-overlapping IP address ranges, so they can be peered. VNet3 (196.162.0.0/16) and VNet1 (196.162.0.0/24) ? ? Peering NOT Allowed This is the same as scenario #2. IP range overlap prevents peering.
You are evaluating the connectivity between the virtual machines after the planned implementation of the Azure networking infrastructure. For each of the following statements, select the correct.
The virtual machines on Subnet1 will be able to connect to the virtual machines on Subnet3
The virtual machines on ClientSubnet will be able to connect to the internet.
The virtual machines on Subnet3 and Subnet4 will be able to connect to the internet
In an Azure networking infrastructure, connectivity between virtual machines (VMs) depends on various factors such as Virtual Network (VNet) configurations, Network Security Groups (NSGs), Route Tables, and whether a NAT Gateway or Public IP is assigned. Here’s why all the given statements are correct: The virtual machines on Subnet1 will be able to connect to the virtual machines on Subnet3 – YES By default, all subnets within the same Virtual Network (VNet) in Azure can communicate with each other unless explicitly restricted by NSGs or custom route tables. If Subnet1 and Subnet3 are part of the same VNet and there are no NSG rules blocking traffic, the VMs will be able to communicate. The virtual machines on ClientSubnet will be able to connect to the internet – YES Azure provides internet access by default to all VMs that have a valid outbound internet connection via a default route (0.0.0.0/0) and no blocking NSG rules. If ClientSubnet has no NSG rules denying outbound traffic and no custom route table redirecting internet-bound traffic elsewhere, then the VMs can connect to the internet. The virtual machines on Subnet3 and Subnet4 will be able to connect to the internet – YES Similar to ClientSubnet, if Subnet3 and Subnet4 do not have NSG rules blocking outbound traffic and they follow the default Azure internet connectivity setup, they will have internet access. Azure’s default route (0.0.0.0/0) allows outbound internet traffic unless modified by a custom route table or NSG.
You host a service with two Azure virtual machines. You discover that occasional outages cause your service to fail. What two actions can you do to minimize the impact of the outages? Select two options
Add a load balancer
Put the virtual machines in a scale set
Put the virtual machines in an availability set
Add a network gate
Add a third instance of the virtual machine
Since your service is experiencing occasional outages, the goal is to improve availability and fault tolerance. The best way to achieve this is by ensuring redundancy and load distribution across multiple VMs. 1. Add a Load Balancer An Azure Load Balancer helps by distributing traffic between VMs. If one VM goes down due to an outage, the load balancer will redirect traffic to the other available VM. This ensures that the service remains accessible even if a single VM fails. 2. Put the Virtual Machines in an Availability Set An Availability Set protects against hardware failures within a single datacenter by distributing VMs across multiple Fault Domains (FDs) and Update Domains (UDs). Fault Domains ensure that VMs are placed in different physical racks to prevent failure from a single hardware issue. Update Domains ensure that VMs are updated one at a time to prevent downtime during maintenance. If one physical server fails, the other VM in the availability set remains operational, reducing the impact of outages. Why Other Options Are Incorrect? (b) Put the virtual machines in a scale set A scale set is mainly for handling traffic spikes by automatically adding/removing VMs. It does not directly protect against outages due to hardware failures, making an availability set a better choice for high availability. (d) Add a network gateway A network gateway is used for VPN connections and hybrid cloud setups. It does not help with improving availability or preventing service failure. (e) Add a third instance of the virtual machine While adding another VM increases redundancy, it does not prevent outages unless they are placed in an Availability Set. Without a load balancer, traffic cannot be efficiently distributed between the instances.
Your company has a Microsoft 365 tenant and an Azure Active Directory (Azure AD) tenant named contoso.com. The company uses several Azure Files shares. Each share is assigned to a different department at the company. The department attribute in Azure AD is populated for all users. You need to ensure that the users can access the departmental file shares: Which two types of groups should you use?
a security group that uses the dynamic membership type
a Microsoft 365 group that uses the dynamic membership type
a distribution group that uses the dynamic membership type
a security group that uses the assigned membership type
a Microsoft 365 group that uses the assigned membership type
Your goal is to ensure that users can access departmental Azure Files shares based on their department attribute in Azure AD. To achieve this, you need groups that support access control via Azure Role-Based Access Control (RBAC) and Azure AD authentication. Why These Two Options Are Correct? 1. Microsoft 365 Group (Assigned Membership Type) (Option E) Microsoft 365 groups allow manual assignment of users. Admins can manually assign members to their respective departmental file shares. This is useful when users need specific access that doesn’t change dynamically. Microsoft 365 groups also integrate well with OneDrive, SharePoint, and Teams, providing easy access to departmental file shares. 2. Security Group (Dynamic Membership Type) (Option A) A security group with dynamic membership automatically assigns users based on their Azure AD attributes (like “department”). Since all users have the department attribute populated, this ensures that users automatically get assigned to their respective departmental file shares. Dynamic security groups help reduce manual effort and ensure real-time access control as users change departments.
You have a Microsoft 365 tenant and an Azure Active Directory (Azure AD) tenant named contoso.com. You plan to grant three users named User1, User2, and User3 access to a temporary Microsoft SharePoint document library named Library. You need to create groups for the users. The solution must ensure that the groups are deleted automatically after 180 days. Which two groups should you create? Each correct answer presents a complete solution
a Microsoft 365 group that uses the Assigned membership type
A security group that uses the Assigned membership type
a Microsoft 365 group that uses the Dynamic User membership type
A security group that uses the Dynamic User membership type
A security group that uses the Dynamic Device membership type
You need to grant temporary access to a SharePoint document library and ensure that the groups automatically delete after 180 days. The best way to do this is by using groups with dynamic membership and Azure AD access reviews & expiration policies. Why these groups? Microsoft 365 group (Dynamic User membership) Microsoft 365 groups support SharePoint access natively, making them a great choice for managing access to document libraries. Dynamic membership ensures that users are automatically added or removed based on defined rules. Microsoft 365 groups support expiration policies, meaning they can be automatically deleted after 180 days if configured in Azure AD. Security group (Dynamic User membership) Security groups are also a good option for managing access and permissions at a granular level. Dynamic membership ensures only the correct users are part of the group. Security groups can also be set up with expiration policies in Azure AD. Why not the other options? ? (A) Microsoft 365 group with Assigned membership – Requires manual user management and does not automatically remove users. ? (E) Security group with Dynamic Device membership – Manages devices, not users, so it’s irrelevant for SharePoint access.
Your company has a Microsoft 365 tenant and a Microsoft Entra ID tenant named contoso.com. The company uses several Azure Files shares. Each share is assigned to a different department at the company. The department attribute in Microsoft Entra ID is populated for all users. You need to ensure that the users can access the departmental file shares. Which two types of groups should you use? Each correct presentation presents a complete solution.
a security group that uses the dynamic membership ty
a distribution group that uses the dynamic membership type
a Microsoft 365 group that uses the dynamic membership type
a security group that uses the assigned membership type
a Microsoft 365 group that uses the assigned membership type
You need to ensure that users can access Azure File Shares based on their department. The best way to manage this is by using groups with dynamic membership in Microsoft Entra ID (formerly Azure AD). Dynamic groups automatically update their membership based on user attributes (e.g., department), making them ideal for this scenario. Why these two options? ? (a) A security group that uses the dynamic membership type Security groups are used to manage access to Azure resources, including Azure File Shares. A dynamic security group can automatically include users based on the department attribute in Microsoft Entra ID. This ensures users are automatically granted access to the correct file share without manual intervention. ? (c) A Microsoft 365 group that uses the dynamic membership type Microsoft 365 groups provide collaboration features such as Teams, SharePoint, and email, but they can also be used for access management. A dynamic Microsoft 365 group automatically includes users based on the department attribute, ensuring they are assigned to the correct departmental file shares. Why not the other options? ? (b) A distribution group that uses the dynamic membership type Distribution groups are only used for email distribution lists. They cannot be used for granting access to Azure File Shares. ? (d) A security group that uses the assigned membership type Assigned security groups require manual management of group members. Since you need to automatically assign users based on the department attribute, dynamic membership is required. ? (e) A Microsoft 365 group that uses the assigned membership type Just like option (d), assigned groups require manual management instead of dynamic updates based on attributes.
Your wireless network appears to be experiencing a great deal of interference. You conclude that the network in the office next door is to blame. What are the three things that you should do to maintain a safe and reliable network?
Try moving the router or using a different band.
Turn your signal power down to decrease interference.
Change the channel your router uses.
Turn your Wi-Fi signal power to maximum power to drown out theirs.
When dealing with interference from a nearby wireless network, there are several adjustments you can make to improve your network’s reliability and security: Try moving the router or using a different band: Relocating the router may reduce the amount of interference from neighboring networks by physically distancing your access point from the source of the interference. Using a different band (for example, switching from the crowded 2.4 GHz band to the 5 GHz band) can help avoid interference if the neighbor’s network is operating on a frequency that overlaps with yours. Turn your signal power down to decrease interference: Reducing your transmit power can decrease the area where your signal overlaps with interfering signals. While it might seem counterintuitive, lowering the power can make your network less susceptible to distant interference and also reduce your network’s interference footprint on nearby networks. Change the channel your router uses: Selecting a less congested channel is a standard troubleshooting step. Many routers automatically select a default channel, which might be crowded if neighboring networks are using the same one. Switching to a channel with lower interference can significantly improve performance. Why the last option is not chosen: Turn your Wi-Fi signal power to maximum power to drown out theirs: Increasing your transmit power to maximum does not resolve interference issues; it can even worsen the problem by causing more overlapping interference with neighboring networks. It doesn’t eliminate the external interference and could compromise performance and security. By moving your router or switching bands, lowering your signal power, and changing the channel, you optimize the network environment to reduce external interference and achieve a safer, more reliable wireless connection.
Your company has 10 different departments. You have an Azure subscription that contains several hundred virtual machines. The users of each department use only their department’s virtual machines. You plan to apply resource tags for each department to the virtual machines. Which two solutions should you use? Each correct presentation presents a complete solution.
PowerShell
Azure Resource Manager (ARM) templates
App registrations
Azure Advisor
Applying resource tags to virtual machines (VMs) in Azure helps in organizing, managing, and controlling cost allocation for different departments. Since there are several hundred VMs, an automated approach is required. The two best solutions for applying tags efficiently are: 1?? PowerShell PowerShell can be used to automate the tagging process for multiple VMs at scale. It allows: ? Bulk updates – Apply tags to multiple VMs at once. ? Script execution – You can write a script to assign department-specific tags dynamically. ? Automation – Can be integrated into CI/CD pipelines for automatic tagging. ? Example PowerShell command to add a tag to a VM: $vm = Get-AzVM -ResourceGroupName “RG-Sales” -Name “VM-Sales-01” $vm.Tags.Add(“Department”, “Sales”) Set-AzResource -ResourceId $vm.Id -Tag $vm.Tags -Force 2?? Azure Resource Manager (ARM) Templates ARM templates define resources in JSON format and support tagging resources during deployment. This ensures that tags are applied consistently to new virtual machines. ? Declarative Approach – Tags are assigned at deployment time. ? Consistency – Every VM deployed using this template will have the correct department tag. ? Automation – Can be used in CI/CD pipelines. ? Example ARM template snippet for tagging a VM: { “type”: “Microsoft.Compute/virtualMachines”, “name”: “[parameters(‘vmName’)]”, “apiVersion”: “2021-03-01”, “location”: “[parameters(‘location’)]”, “tags”: { “Department”: “[parameters(‘departmentName’)]” } } Why Not the Other Options? ? App Registrations (Option C) App registrations in Microsoft Entra ID (formerly Azure AD) are used for app authentication and API access, not for tagging resources. ? Azure Advisor (Option D) Azure Advisor provides recommendations on best practices for cost, security, performance, and reliability. It does not apply tags to resources.
You have a Microsoft Entra tenant. You plan to perform a bulk import of users. You need to ensure that imported user objects are added automatically as the members of a specific group based on each user’s department. The solution must minimize administrative effort. Which two actions should you perform? Each correct answer presents part of the solution. NOTE: Each correct selection is worth one point.
Create groups that use the Assigned membership type.
Create an Azure Resource Manager (ARM) template.
Create groups that use the Dynamic User membership type.
Write a PowerShell script that parses an import file.
Create an XML file that contains user information and the appropriate attributes.
Create a CSV file that contains user information and the appropriate attributes.
When performing a bulk import of users into Microsoft Entra ID, you want to automatically assign them to specific groups based on their department attribute. The best way to achieve this with minimal administrative effort is by using: 1?? Dynamic User Membership Type for Groups Microsoft Entra dynamic groups allow automatic membership based on user attributes (e.g., department, job title, location). When a user is created with a specific department in their profile, they will be automatically added to the correct group. This eliminates the need for manual group assignments. Example Dynamic Membership Rule for a group: plaintext Copy Edit (user.department -eq “Sales”) This rule ensures that any user whose department is “Sales” will be automatically assigned to the group. 2?? CSV File for Bulk Import Microsoft Entra ID supports bulk user import using a CSV file. The CSV file contains user details, including attributes like department, which is used for dynamic group membership assignment. Example CSV Format: UserPrincipalName, DisplayName, GivenName, Surname, Mail, Department user1@contoso.com, User One, User, One, user1@contoso.com, Sales user2@contoso.com, User Two, User, Two, user2@contoso.com, HR Once users are imported, they will automatically join the correct dynamic groups based on the department field. Why Not the Other Options? ? (A) Create groups that use the Assigned membership type. Incorrect because assigned groups require manual user assignment and do not dynamically update based on attributes. ? (B) Create an Azure Resource Manager (ARM) template. Incorrect because ARM templates are used for deploying Azure resources (e.g., VMs, storage) but not for bulk user imports. ? (D) Write a PowerShell script that parses an import file. Incorrect because PowerShell scripts would require manual execution each time users are imported, which increases administrative effort. Dynamic user groups automate this process, making PowerShell unnecessary for this scenario. ? (E) Create an XML file that contains user information and the appropriate attributes. Incorrect because Microsoft Entra ID does not support XML for bulk user import. CSV files are the required format.
The company that you are working for is trying to go green. Instead of destroying or recycling old PCs, they want to repurpose them by donating them to a charitable organization. Before giving them away, what are the TWO things that you should do?
Wipe all drives.
Delete users and all their files and leave a generic administrator account active.
Create a new user for the charity and delete your user.
Restore the computer to its factory default condition.
Wipe all drives: Before donating or repurposing any PC, you should wipe all drives to ensure that no sensitive or personal data remains on the system. Simply deleting files or formatting the drive isn’t sufficient because the data can often be recovered with specialized tools. A secure drive wipe utility ensures that all data is permanently erased, making it inaccessible to anyone who might try to recover it. Restore the computer to its factory default condition: Restoring the computer to its factory default settings is a clean slate approach. It removes all installed software, settings, and configurations, and returns the device to the state it was in when first purchased. This process ensures that there are no remnants of the previous user’s settings or files, providing a fresh start for the new recipient. Why the others are incorrect: Delete users and all their files and leave a generic administrator account active: This option might remove personal files, but it doesn’t fully wipe the drive, and leaving a generic account active could pose a security risk. The new owner could still access data left on the drive or use the system with potentially risky admin privileges. Create a new user for the charity and delete your user: While creating a new user is a step toward cleaning the system, it doesn’t ensure that the entire drive is wiped and doesn’t guarantee that all previous data has been completely removed. A wipe and factory reset are more thorough actions.
You have an Azure subscription that contains a storage account named account1. You plan to upload the disk files of a virtual machine to account1 from your on-premises network. The on-premises network uses a public IP address space of 131.107.1.0/24. You plan to use the disk files to provision an Azure virtual machine named VMI. VM1 will be attached to a virtual network named VNet1. VNet1 uses an IP address space of 192.168.0.0/24. You need to configure account1 to meet the following requirements: Ensure that you can upload the disk files to account1 Ensure that you can attach the disks to VM1 Prevent all other access to account1 Which two actions should you perform?
From the firewalls and virtual networks blade of account 1, select Selected networks.
From the Firewalls and virtual networks blade of account1, select Allow trusted Microsoft services to access this storage account.
From the firewalls and virtual networks blade of the account1, add the 131.107.1.0/24 IP address range.
From the Firewalls and virtual networks blade of the account1, add VNet1
From the Service endpoints blade of VNet1, add a service endpoint
You need to configure account1 (an Azure Storage account) to meet the following requirements: Allow uploading of VM disk files from your on-premises network (131.107.1.0/24). Ensure VM1 can access the disks stored in account1. Block all other unauthorized access. Step 1: Restrict Access to Specific Networks By default, storage accounts allow access from all networks. To restrict access: (a) Select “Selected networks” under the “Firewalls and virtual networks” blade of account1. This ensures that only explicitly defined networks can access the storage account. Step 2: Allow Access from On-Premises (Upload Disk Files) Since your on-premises network has the public IP range 131.107.1.0/24, you must: (c) Add the IP range 131.107.1.0/24 under the “Firewalls and virtual networks” settings of account1. This allows your on-premises network to upload disk files while blocking all other public traffic. Why Not the Other Options? (b) Allow trusted Microsoft services to access this storage account ? This option is used for services like Azure Backup, Azure Site Recovery, and Azure SQL. It does not control general network access or allow your on-premises network to upload disk files. (d) Add VNet1 to the firewall settings ? Adding VNet1 would allow Azure Virtual Machines inside that VNet to access account1 directly. However, this is not required for VM1 to attach the disk, because attaching a managed disk does not require direct storage access. (e) Add a service endpoint in VNet1 ? Service endpoints allow private access to the storage account from within Azure VNets. However, your requirement is to upload disk files from an on-premises network, not from an Azure VNet.
You have an Azure subscription that contains the resources in the following table. Store1 contains a file share named data. Data contains 5,000 files. You need to synchronize the file in the file share named data to an on-premises server named Server1. Which three actions should you perform? Each correct answer presents part of the solution. NOTE: Each correct selection is worth one point

Create a container instance
Register Server1
Install the Azure File Sync agent on Server1
Download an automation script
Create a sync group
Azure File Sync allows you to synchronize Azure file shares with Windows servers, enabling seamless hybrid cloud storage solutions. To synchronize the file share “data” on Store1 with Server1, follow these steps: Step 1: Install the Azure File Sync agent on Server1 The Azure File Sync agent is required on any on-premises Windows Server that will sync with an Azure file share. It enables communication between the local server and Azure File Sync. Step 2: Register Server1 with Azure File Sync After installing the agent, Server1 must be registered with Azure File Sync to be linked with the Azure Storage Account (Store1). This step ensures that the on-prem server is recognized and managed by Azure. Step 3: Create a Sync Group A Sync Group is used to establish the synchronization relationship between the Azure file share (Data on Store1) and the on-premises server (Server1). The cloud endpoint (Azure file share) and the server endpoint (a folder on Server1) are defined in this Sync Group. Why Other Options Are Incorrect: (a) Create a container instance ? Incorrect: Azure Container Instances (ACI) are used for running containers, not for file synchronization. (d) Download an automation script ? Incorrect: Automation scripts are not needed for setting up Azure File Sync. The process is done through the Azure Portal or PowerShell.
You want to recycle some old hard drives that your company no longer needs. Which TWO methods allow you to make sure that no one else can access the data on them?
Formatting the drive.
Using an overwrite utility.
Using a drive wipe utility.
Using electromagnetic fields.
Using an overwrite utility: This method involves using software to overwrite the existing data on the hard drive multiple times with random data or patterns. By doing so, it removes any traces of the original data and makes it nearly impossible for someone to recover the information, even with advanced data recovery tools. Overwrite utilities like DBAN (Darik’s Boot and Nuke) or Eraser are commonly used for this purpose. Using a drive wipe utility: A drive wipe utility is a software tool designed to completely erase all data from a drive by overwriting it with random patterns or zeros. Tools like DBAN and Eraser also fit this description. These utilities ensure that data is permanently wiped from the drive, making it irrecoverable. Why the others are incorrect: Formatting the drive: Formatting does not truly erase the data. It just removes the pointers to the data on the drive, meaning the data still exists until it’s overwritten. Formatting can be reversed with the right tools, so it is not secure for data disposal. Using electromagnetic fields (degaussing): While degaussing is effective for magnetic drives (HDDs), it is a physical process, not a software solution. While it destroys the magnetic properties of the data, making it unreadable, it is a more expensive and specialized method compared to software-based wiping.
You have the Azure management groups shown in the following table: For each of the following statements, select the correct answers:
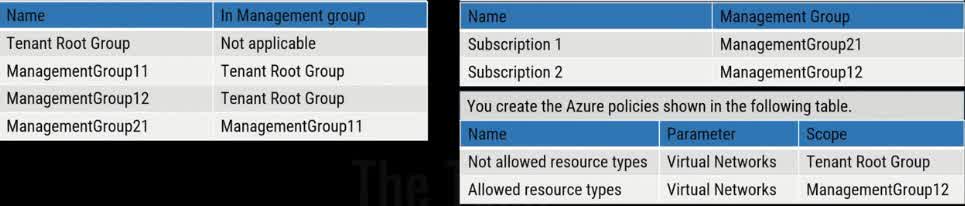
You can create a virtual network in subscription 1
You can create a virtual network in subscription 2
You can add subscription 1 to ManagementGroup11
Understanding the Management Group Hierarchy Tenant Root Group ManagementGroup11 ManagementGroup21 Subscription1 ManagementGroup12 Subscription2 Evaluating the Statements You can create a virtual network in Subscription1 False ? Since Subscription1 is under ManagementGroup21, which falls under ManagementGroup11, the “Not Allowed Resource Types: Virtual Networks” policy from the Tenant Root Group prevents virtual network creation. There is no exception policy allowing virtual networks in Subscription1. You can create a virtual network in Subscription2 True ? Even though the Tenant Root Group restricts virtual networks, ManagementGroup12 has an “Allowed Resource Types: Virtual Networks” policy that overrides the root policy for subscriptions under it. Since Subscription2 is under ManagementGroup12, virtual networks can be created. You can add Subscription1 to ManagementGroup11 True ? Subscription1 is already part of ManagementGroup21, which is under ManagementGroup11. There are no policy restrictions preventing Subscription1 from being moved directly under ManagementGroup11.
You have an Azure subscription that contains two virtual machines named VM1 and VM2. You create an Azure load balancer. You plan to create a load balancing rule that will load balance HTTPS traffic between VM1 and VM2. Which two additional load balancer resources should you create before you can create the load balancing rule?
a frontend IP address
a health probe
an inbound NAT rule
a virtual network
backend pool
Why “Health Probe” and “Backend Pool” Are Required Understanding the Scenario You have two virtual machines (VM1 and VM2). You created an Azure Load Balancer. You want to load balance HTTPS traffic (port 443) between VM1 and VM2. Before creating the load balancing rule, you must configure essential components. Required Components for a Load Balancing Rule To create a load balancing rule, you need two additional resources: Backend Pool ? A backend pool contains the virtual machines (VM1 and VM2) that will receive traffic from the load balancer. Without a backend pool, the load balancer won’t know which VMs to forward traffic to. Health Probe ? A health probe continuously checks the status of VM1 and VM2. If one of the VMs is down (e.g., unresponsive to HTTPS requests), the load balancer stops sending traffic to that VM. This ensures that users are only routed to healthy virtual machines.
You plan to use the Azure Import/Export service to copy files to a storage account. Which two files should you create before you prepare the drives for the import job?
an XML manifest file
a dataset CSV file
a JSON configuration file
a PowerShell PST file
a driveset CSV file
Why “Dataset CSV File” and “Driveset CSV File” Are Required The Azure Import/Export service allows you to securely transfer large amounts of data to an Azure Storage account by shipping physical hard drives to a Microsoft data center. Before preparing the drives for an import job, you need to create two important files: 1. Dataset CSV File ? The dataset CSV file specifies which files and folders should be copied from the drive to the Azure Storage account. It acts as a blueprint for the import job, ensuring that the correct files are uploaded. The file includes details like: Source path of the files Destination in Azure Storage File sizes Metadata (e.g., timestamps, permissions, etc.) 2. Driveset CSV File ? The driveset CSV file contains details about the physical drives being used for the import job. It ensures that Microsoft can properly process the incoming drives and match them to the correct import job. The file includes: Drive Serial Numbers BitLocker Encryption Keys (if applicable) Job Name and Storage Account Details Why Not the Other Options? XML Manifest File is not used in Azure Import/Export jobs. JSON Configuration File is not a required format for configuring these jobs. PowerShell PST File is not relevant to the Import/Export process.
You’ve been unlocking your phone with a drawn pattern for a while, but now it just won’t work. What are the two quickest steps that you should take to fix the problem?
Clean the screen.
Use your Google credentials to gain access.
Wipe the phone and do a factory reset.
Restart the phone.
Clean the screen: The pattern recognition might fail if the screen has smudges, dirt, or oils from your fingers. Cleaning the screen can help the phone better recognize the drawn pattern. Restart the phone: Sometimes, restarting the device can resolve issues with software glitches or temporary system errors that may be affecting the pattern recognition. Why the other options are not ideal for quick fixes: Use your Google credentials to gain access: While this is a valid option for unlocking your device, it’s not the quickest solution if cleaning the screen and restarting the phone can resolve the issue first. Wipe the phone and do a factory reset: This is a more drastic measure and would erase all data, so it’s generally not necessary unless the other steps fail. These two actions are quick and should address common issues with the pattern lock not working.
For security purposes, your mobile device locks after a brief idleness period. What are the TWO common biometric devices for unlocking a locked screen of a mobile device?
Fingerprint readers
Facial recognition
Swipe to unlock
PIN codes
The two common biometric devices for unlocking a locked screen on a mobile device are: Fingerprint readers: This biometric method uses the unique features of your fingerprint to authenticate and unlock the device. It’s widely used because of its convenience and security. Facial recognition: This method uses the device’s camera to scan and recognize your face, providing a secure and fast way to unlock your phone. Why the other options are incorrect: Swipe to unlock: This is not biometric authentication. It’s simply a gesture without any security verification. PIN codes: While commonly used, PIN codes are not biometric. They are numeric passwords that require manual input.
What are the two fast and secure methods for accessing your mobile device?
PIN code
Swipe
Fingerprint scanner
Facial recognition
Both fingerprint scanning and facial recognition are fast biometric authentication methods that offer a strong balance between security and convenience for mobile device access. Why they are secure and fast: Fingerprint scanner: Uses a unique fingerprint to unlock the device. It’s widely adopted, quick, and difficult to forge. Facial recognition: Uses the unique features of your face to verify identity. On modern devices, it’s fast and secure (especially on devices with infrared or 3D face mapping like Apple Face ID). Why the others are less secure: PIN code: While more secure than a swipe, it can still be guessed or observed (shoulder surfing). Swipe: Offers no real security—it’s simply a gesture to unlock the screen. Key takeaway: Biometric methods like fingerprint and facial recognition provide strong, user-specific protection and are much harder to bypass than traditional PINs or swipe patterns.
Employees at your company have been told to lock their computers whenever they leave them. However, as you walk around the office, you see unlocked computers with no one using them. What are the TWO steps that you should take to mitigate this problem?
Fire people who won’t lock their computer.
Set the PC to shut down after 2 minutes of inactivity.
Train users on the importance of locking their PC.
Enforce screen saver locks after a short time of inactivity.
Train users on the importance of locking their PC: Training is essential to ensure that employees understand the security risks of leaving their computers unlocked. By emphasizing the importance of locking their computers when they leave their desks, you can encourage better habits and raise awareness about the potential for unauthorized access or data theft. Enforce screen saver locks after a short time of inactivity: Enforcing an automatic lock after a period of inactivity, such as 5 or 10 minutes, is an effective way to ensure security even if users forget to lock their computers themselves. This automates the process and reduces the risk of unauthorized access. It’s a proactive measure to safeguard sensitive information when employees forget or neglect to manually lock their screens. Why the other options are less effective: Fire people who won’t lock their computer: Firing employees for not locking their computers is an extreme response and unlikely to foster a positive or cooperative workplace culture. Instead, education and policy enforcement are more effective and appropriate methods to address this issue. Set the PC to shut down after 2 minutes of inactivity: Shutting down the PC after 2 minutes of inactivity could be disruptive to employees’ workflows and may lead to frustration, especially if they are in the middle of tasks that require longer periods of inactivity. It’s better to have a screen saver lock or an automatic password prompt, which secures the system without disrupting work. Key Takeaway: To mitigate the problem of unlocked computers, ensure that employees are trained on the importance of locking their computers and implement automatic screen saver locks to safeguard against unauthorized access.
Which TWO locations should new employees keep their passwords?
Tape the password to the monitor so they can see it.
They need to memorize their password and not write it down.
Passwords will be saved in password manager software, and multifactor authentication is used for network access.
Write the password on a sticky note attached to the bottom of their keyboard.
Passwords will be saved in password manager software, and multifactor authentication is used for network access: Password manager software is a secure way to store and manage passwords. It allows employees to store strong, unique passwords for each account without the need to memorize them. Using a password manager reduces the risk of weak or reused passwords and allows employees to store passwords safely. Additionally, multifactor authentication (MFA) adds an extra layer of security, ensuring that even if a password is compromised, an attacker cannot easily gain access to the network. They need to memorize their password and not write it down: The best practice is for employees to memorize their passwords to avoid physical risks, such as losing sticky notes or notes being found by others. Memorizing passwords ensures they are not written down in unsafe locations, reducing the chance of an attacker discovering the password. However, this only works if the password is strong enough and employees follow proper password hygiene. Why the other options are not ideal: Tape the password to the monitor so they can see it: Writing passwords on sticky notes or taping them to monitors is an extremely risky practice. It exposes passwords to anyone who may have physical access to the workstation. This compromises the security of the system and is generally considered an unsafe practice. Write the password on a sticky note attached to the bottom of their keyboard: Similarly, writing passwords on sticky notes and attaching them to keyboards is highly insecure. If someone finds the note, they can easily access sensitive systems. This method also defeats the purpose of protecting login credentials. Key Takeaway: The best practices for managing passwords include using a password manager for secure storage and memorizing passwords rather than writing them down. Additionally, multifactor authentication (MFA) should be implemented for better security.
You want to adhere to password best practices as you adopt new password policies for your network. What are the two things that you should do to improve the security of your network?
Require passwords to be a minimum of 8 characters.
Require passwords to have a special character.
Require passwords to expire every 180 days.
Require passwords to be no more than 10 characters long.
Require passwords to be a minimum of 8 characters: Password length is a crucial factor in password security. A minimum of 8 characters is generally considered a strong standard because it increases the number of possible combinations, making it harder for attackers to crack the password through brute force. Shorter passwords are easier to guess or crack using automated tools. Require passwords to have a special character: Password complexity is important in making passwords harder to guess or crack. By requiring the inclusion of special characters (such as !, @, #, etc.), you increase the difficulty of password guessing attacks. This is because it broadens the character set, making the password significantly harder to guess or brute-force. Why the other options are less effective: Require passwords to expire every 180 days: While password expiration can improve security, it’s not as impactful as requiring a minimum length and complexity. Frequent password changes can lead to weaker passwords if users choose simpler, easier-to-remember passwords. Modern security practices often focus on encouraging longer and more complex passwords over frequent changes. Require passwords to be no more than 10 characters long: Limiting password length to no more than 10 characters decreases security. Longer passwords are generally better, as they provide more combinations and are harder to crack. Password length should not be restricted to fewer than 12 characters for better security. Key Takeaway: To improve password security, requiring a minimum length of 8 characters and enforcing the inclusion of special characters will significantly enhance the strength of passwords, making them more resistant to attacks.
What are the TWO BEST practices for managing user accounts?
Enable the Guest account.
Give all users administrative access.
Restrict user permissions.
Restrict login times.
Restrict user permissions: Principle of Least Privilege is a best practice for security. Users should only be given the minimum level of access they need to perform their jobs. This reduces the risk of accidental or malicious actions that could harm the system or compromise sensitive data. For example, regular users shouldn’t have administrative privileges unless absolutely necessary, as this limits the potential impact of any security breaches. Restrict login times: Limiting when users can log in can improve security by restricting access to critical systems during non-business hours or times when users don’t need access. This reduces the attack window, especially for users with access to sensitive or critical resources. Why the other options are less effective or not recommended: Enable the Guest account: The Guest account is typically disabled for security reasons. Enabling it can allow unauthorized access, especially if not properly managed, increasing the attack surface. It’s best to avoid using this account unless there is a specific need, and even then, it should have limited access. Give all users administrative access: Granting administrative access to all users is a significant security risk. Users with administrative privileges have the ability to modify system settings, install software, and access sensitive files, making the system more vulnerable to attacks, either accidental or malicious. Administrative access should be restricted to only those who need it for specific tasks. Key Takeaway: To secure your system and data, the best practices for managing user accounts are to restrict user permissions (limit access to only what is necessary) and restrict login times (limit when users can access the system). Both of these practices help reduce the attack surface and improve overall security.
What are the two best practices for passwords?
Passwords expire after 45 days.
Passwords expire after 180 days.
Enforce password complexity.
Passwords should be easy to guess in case you forget, like your dog’s name.
Passwords expire after 180 days: A password expiration policy is essential for maintaining security. Having passwords expire periodically (often every 90 to 180 days) reduces the risk of an account being compromised. 180 days is a common standard as it balances security and user convenience. Enforce password complexity: Enforcing password complexity ensures that passwords are harder to guess or crack. This typically includes requirements like using a mix of upper and lower case letters, numbers, and special characters. It makes it more difficult for attackers to guess passwords through methods like brute force or dictionary attacks. Why the other options are incorrect: Passwords expire after 45 days: While having an expiration policy is important, 45 days might be too short, potentially causing unnecessary disruption for users. A standard range is 90 to 180 days, as it offers a good balance between security and user convenience. Passwords should be easy to guess in case you forget, like your dog’s name: This is not a best practice. While it might seem convenient, easy-to-guess passwords (like a pet’s name) significantly reduce security. Passwords should be strong and unique to protect against attacks. If a user forgets their password, other secure recovery methods should be available, such as password resets or multi-factor authentication. Key Takeaways: Enforcing password complexity and ensuring that passwords expire after a reasonable period (e.g., 180 days) are best practices for improving security. Avoid making passwords easy to guess, as it compromises security.
What are the TWO options to configure encryption for the data-at-rest on a new Windows Pro workstation?
Kerberos
EFS
BitLocker
RADIUS
For data-at-rest encryption on a Windows Pro workstation, the two main options are: EFS (Encrypting File System): EFS is a file-level encryption feature that allows individual files or folders to be encrypted. Users can encrypt files, and only those with the correct credentials (like the user’s account) will be able to access the encrypted data. EFS is useful for securing sensitive files on a single device, without the need to encrypt the entire disk. BitLocker: BitLocker is a full-disk encryption solution that encrypts the entire hard drive, including the operating system and all data. It ensures that all data-at-rest is encrypted, protecting it from unauthorized access if the device is lost or stolen. BitLocker is ideal for securing data on laptops and workstations where physical security may be a concern. Why the other options are incorrect: Kerberos: This is an authentication protocol, not an encryption method. It is used for secure communication in network environments, typically in Active Directory domains. RADIUS: RADIUS is a network authentication protocol used for centralized authentication, authorization, and accounting, not for encryption of data-at-rest.
You are configuring authentication for new users of Windows 10 and Windows 11 computers. What are the TWO login methods that require specific hardware?
PIN
Facial recognition
Username and password
Fingerprint
For both facial recognition and fingerprint authentication, specific hardware is required to support these forms of biometric authentication. Facial recognition: To use facial recognition for login, specialized hardware such as a camera with infrared capability (like Windows Hello) is needed to capture and verify the user’s face accurately. This hardware helps ensure the security and accuracy of the facial recognition process. Fingerprint: Fingerprint authentication requires a fingerprint scanner or reader to capture the user’s fingerprint. This scanner must be installed on the device for the authentication process to work. Why the other options are incorrect: PIN: A PIN can be used on any device and does not require specific hardware. It’s a numeric code set by the user, and the device only needs a keyboard or touchscreen for input. Username and password: This traditional method also does not require any specialized hardware. It relies on input from a keyboard or touchscreen to enter credentials.
What are the two benefits that NTFS permissions have over share permissions?
NTFS permissions can be set at the file level, but share permissions cannot.
NTFS permissions are more restrictive in their access levels than share permissions.
NTFS permissions affect users at the local computer, but share permissions do not.
NTFS permissions will override share permissions if there is a conflict.
NTFS permissions can be set at the file level, but share permissions cannot: NTFS permissions allow you to assign access down to individual files, not just folders. Share permissions only apply to entire shared folders, not the files inside them. This gives NTFS more granular control, making it more flexible and precise. 2. NTFS permissions will override share permissions if there is a conflict: When both NTFS and share permissions are applied (i.e., someone accesses a shared folder over the network), the most restrictive effective permission wins. Technically, neither “overrides” the other outright, but NTFS is evaluated alongside share permissions. In practice, NTFS often ends up being the deciding factor, especially since it can apply to both network and local access. So this phrasing is commonly accepted to mean: NTFS permissions ultimately control file-level access when both are present.
You discover that your router only supports WPA2 and not WPA3 while checking the settings. You have both older and newer devices, all of which have been compatible with WPA2. What are the TWO things that you should do next?
Chose WPA2 Personal (AES)
Choose WPA3 Personal
Choose WPA2/WPA3 Transitional
Update the router’s firmware
Choose WPA2 Personal (AES): Since your router only supports WPA2 and not WPA3, the most appropriate option is to choose WPA2 Personal with AES encryption. AES (Advanced Encryption Standard) is the most secure encryption method available in WPA2, and it provides the strongest protection for your wireless network. WPA2 Personal (AES) ensures that both older and newer devices will remain compatible, as WPA2 is widely supported across many devices, and AES encryption provides a good level of security. Update the router’s firmware: Firmware updates can potentially add new features or enhance the capabilities of your router, including support for WPA3. It is worth checking if there is a firmware update available for your router that could enable WPA3 or improve its overall performance and security. By updating the firmware, you may be able to gain support for WPA3 in the future without needing to replace the router. Why the other options are incorrect: Choose WPA3 Personal: If your router does not support WPA3, you cannot select WPA3 Personal. This option would not work unless your router receives a firmware update or you replace it with one that supports WPA3. Choose WPA2/WPA3 Transitional: This option allows for compatibility between WPA2 and WPA3, but it requires the router to support WPA3. Since your router does not currently support WPA3, this option is not viable. Therefore, the best course of action is to select WPA2 Personal (AES) and check for firmware updates to potentially gain WPA3 support or improve security.